For the Best Results, Use the Latest Version.
-
Preparations for Mac
-
Account (Mac)
-
Get Started & Basic Settings (Mac)
- Release notes for Mac
- Latest Versions and Features for Mac
- Get Started on Mac - Full Guide
- Download/register/uninstall on Mac
- Panel Layout on Mac
- Keyboard shortcuts on Mac
- Touchbar on Mac
- Change playback quality on Mac
- Render preview files on Mac
- Manage timeline on Mac
- Media for use on Mac
- Logo Reveal For Mac
- Marked Favorites for Mac
-
Compatibility & Tech Specs (Mac)
-
Performance Settings (Mac)
-
-
Creating Projects - Mac
-
Creating New Projects (Mac)
-
-
Importing & Recording - Mac
-
Importing (Mac)
-
Recording (Mac)
-
-
Video Editing for Mac
-
Basic Video Editing for Mac
- Edit Live Photos on Mac
- Enable/Disable Clip for Mac
- Magnetic Timeline For Mac
- Select All Clips on Timeline for Mac
- Auto Ripple for Mac
- Split & cut videos on Mac
- Compositing on Mac
- Crop and zoom on Mac
- Playback Zoom Level for Mac
- Change speed on Mac
- Play video in reverse on Mac
- Mark In and Mark Out for Mac
- Markers for Mac
- Group clips on Mac
- Customized Backgrounds for Videos and Images in Mac
- Video snapshot on Mac
- Freeze frame on Mac
- Auto enhance on Mac
- Applying Drop Shadow for Mac
- Adjustment Layer for Mac
- Mark clip on Mac
- Video Editing Ruler – Mac
- Apply Transforming for Mac
-
Advanced Video Editing for Mac
-
AI-Powered Video Editing for Mac
- Smart Scene Cut for Mac
- Smart Short Clips for Mac
- Image to Video for Mac
- AI Idea to Video for Mac
- AI Text-to-Video for Mac
- Instant Cutter Tool on Mac
- AI Face Mosaic for Mac
- Keyframe Path Curve for Mac
- Planar Tracking for Mac
- AI Extend For Mac
- AI Script-to-Video for Mac
- AI Text-Based Editing in Mac
- Create With Instant Mode on Mac
- ChatGPT Plugin - AI Copywriting on Mac
- AI Smart Cutout for Mac
- Auto reframe on Mac
- Lens correction on Mac
- AI Portrait Cutout on Mac
- Scene detection on Mac
- AI Smart Masking for Mac
- AI Mate Editing for Mac
- Motion Tracking on Mac
- Stabilize video on Mac
- AI Object Remover For Mac
- AI Smart Search for Mac
- AI Skin Tone Protection for Mac
- Green screen on Mac
- Super Slow Motion with Optical Flow for Mac
- AI stylizer on Mac
- Video Denoise for Mac
-
-
Audio Editing for Mac
-
Basic Audio Editing for Mac
-
Advanced Audio Editing for Mac
-
AI-Powered Audio Editing for Mac
- Audio To Video for Mac
- AI Sound Effect for Mac
- Smart BGM Generation for Mac
- AI Voice Enhancer for Mac
- Audio Stretch for Mac
- AI Audio Denoise for Mac
- Auto synchronization for Mac
- AI Vocal Remover for Mac
- Auto Beat Sync on Mac
- AI Music Generator for Mac
- How to Perform AI Voice Cloning in Wondershare Filmora?
- Silence detection on Mac
-
-
Text Editing for Mac
-
Basic Text Editing for Mac
-
Advanced Text Editing for Mac
-
AI-Powered Text Editing for Mac
-
-
Video Customizations for Mac
-
Video Effects (Mac)
-
Audio Effects (Mac)
-
Transitions (Mac)
-
Stickers (Mac)
-
Filters (Mac)
-
Color Editing (Mac)
-
Animations (Mac)
-
Templates (Mac)
-
Asset Center (Mac)
-
-
Exporting & Share & Cloud Backup - Mac
Logo Reveal For Mac
Wondershare Filmora has put much of its attention into helping creators build a perfect brand identity. This has been made possible by including different features that influence easy and professional editing. Extending this purpose, Filmora has recently introduced a feature that transforms your simple logo into an animated showpiece, which helps reveal your brand to the market in a better way.
If you are a Mac user and looking for a proper technique to create a logo reveal animation, look ahead to the steps for a clear overview:
Index
Step 1. Access Influence Kit Section on Filmora
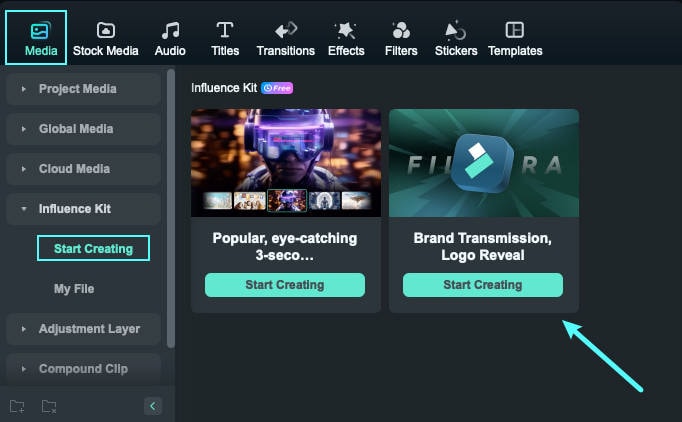
You need to start by launching Wondershare Filmora on your Mac and continue by tapping "New Project". As this opens an editing window, continue to look for the "Influence Kit" section present in the "Media" tab from the top.

Step 2. Select Logo Reveal Animation Option
Step 2. Select Logo Reveal Animation Option
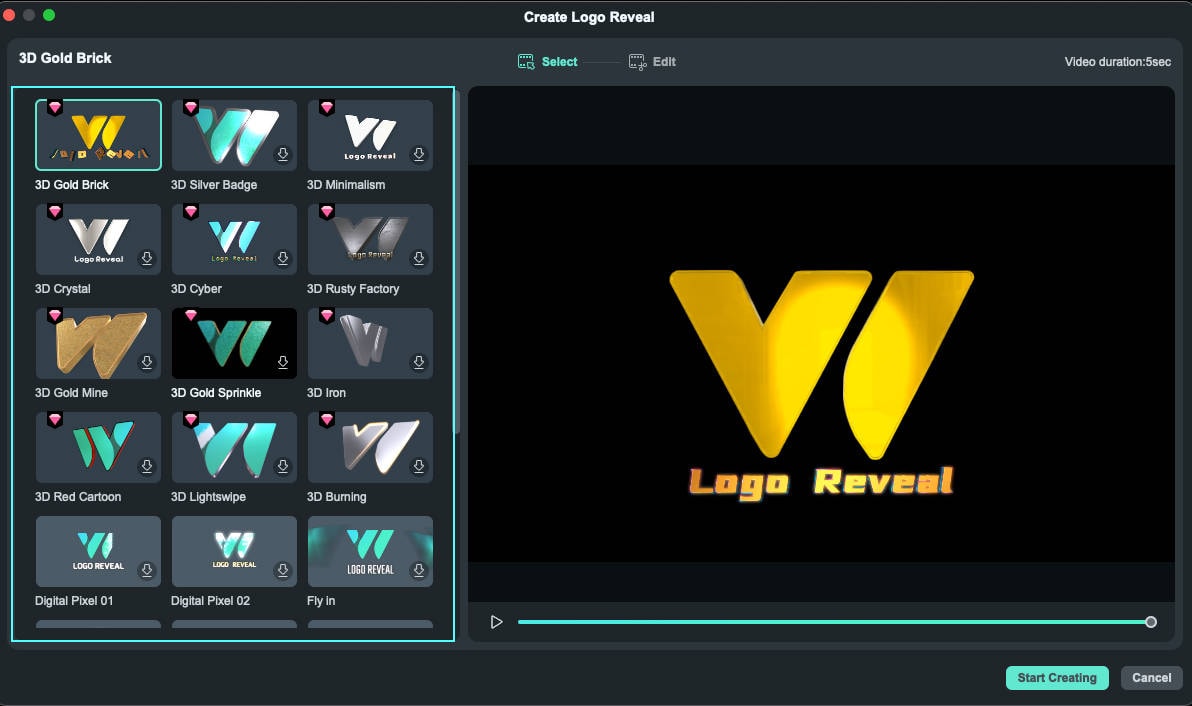
Select the "Start Creating" button under the “Brand Transmission, Logo Reveal” option. Consequently, this will direct you to a new window where you should select the effect that suits your requirements.

Step 3. Set Effect and Add Logo For Creating
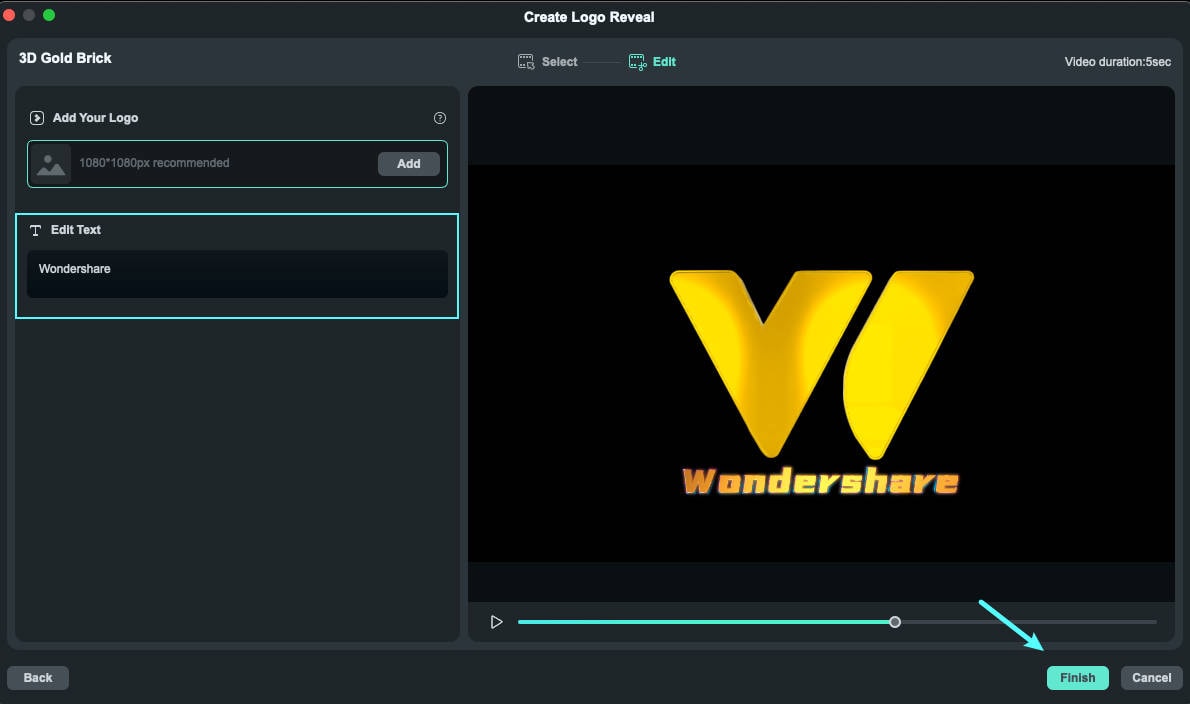
As you've selected the effect, click "Start Creating", which leads you to the next window. Add in your logo within the provided requirements, and change the display text in the "Edit Text" section. Once you are done, click "Finish" to automate the creation process and add this across your timeline for further editing.

Related Posts
Featured Articles
Black Friday Checklist: 11 Proven Tips for Businesses & Consumers
From business prep to scoring deals, learn how to prepare for Black Friday with our easy guide. Get the best tips to make the most of every sale and discount!
Halloween Video Ideas That Will Entertain and Creep Your Viewers
Ready to make an epic Halloween video? Check out these spooky ideas and learn how to create them with Wondershare Filmora for YouTube success.
The Best Video Editor for Beginners: Final Cut vs. Filmora
Are you a beginner who wants to start editing your videos in high-quality? Read this guide where we discuss Final Cut vs. Filmora and refine your clips.
Recommended User Guide
Keyboard shortcuts on Mac
Get to know about the keyboard shortcut list for Filmora for Mac.
Marked Favorites for Mac
Wondershare Filmora has made adding effects or filters easy for users through its Marked Favorites feature.
Latest Versions and Features for Mac
Find out the new features of Filmora Version 15 for Mac.
