For the Best Results, Use the Latest Version.
-
Preparations for Mac
-
Account (Mac)
-
Get Started & Basic Settings (Mac)
- Release notes for Mac
- Latest Versions and Features for Mac
- Get Started on Mac - Full Guide
- Download/register/uninstall on Mac
- Panel Layout on Mac
- Keyboard shortcuts on Mac
- Touchbar on Mac
- Change playback quality on Mac
- Render preview files on Mac
- Manage timeline on Mac
- Media for use on Mac
- Logo Reveal For Mac
- Marked Favorites for Mac
-
Compatibility & Tech Specs (Mac)
-
Performance Settings (Mac)
-
-
Creating Projects - Mac
-
Creating New Projects (Mac)
-
-
Importing & Recording - Mac
-
Importing (Mac)
-
Recording (Mac)
-
-
Video Editing for Mac
-
Basic Video Editing for Mac
- Edit Live Photos on Mac
- Enable/Disable Clip for Mac
- Magnetic Timeline For Mac
- Select All Clips on Timeline for Mac
- Auto Ripple for Mac
- Split & cut videos on Mac
- Compositing on Mac
- Crop and zoom on Mac
- Playback Zoom Level for Mac
- Change speed on Mac
- Play video in reverse on Mac
- Mark In and Mark Out for Mac
- Markers for Mac
- Group clips on Mac
- Customized Backgrounds for Videos and Images in Mac
- Video snapshot on Mac
- Freeze frame on Mac
- Auto enhance on Mac
- Applying Drop Shadow for Mac
- Adjustment Layer for Mac
- Mark clip on Mac
- Video Editing Ruler – Mac
- Apply Transforming for Mac
-
Advanced Video Editing for Mac
-
AI-Powered Video Editing for Mac
- Smart Scene Cut for Mac
- Smart Short Clips for Mac
- Image to Video for Mac
- AI Idea to Video for Mac
- AI Text-to-Video for Mac
- Instant Cutter Tool on Mac
- AI Face Mosaic for Mac
- Keyframe Path Curve for Mac
- Planar Tracking for Mac
- AI Extend For Mac
- AI Script-to-Video for Mac
- AI Text-Based Editing in Mac
- Create With Instant Mode on Mac
- ChatGPT Plugin - AI Copywriting on Mac
- AI Smart Cutout for Mac
- Auto reframe on Mac
- Lens correction on Mac
- AI Portrait Cutout on Mac
- Scene detection on Mac
- AI Smart Masking for Mac
- AI Mate Editing for Mac
- Motion Tracking on Mac
- Stabilize video on Mac
- AI Object Remover For Mac
- AI Smart Search for Mac
- AI Skin Tone Protection for Mac
- Green screen on Mac
- Super Slow Motion with Optical Flow for Mac
- AI stylizer on Mac
- Video Denoise for Mac
-
-
Audio Editing for Mac
-
Basic Audio Editing for Mac
-
Advanced Audio Editing for Mac
-
AI-Powered Audio Editing for Mac
- Audio To Video for Mac
- AI Sound Effect for Mac
- Smart BGM Generation for Mac
- AI Voice Enhancer for Mac
- Audio Stretch for Mac
- AI Audio Denoise for Mac
- Auto synchronization for Mac
- AI Vocal Remover for Mac
- Auto Beat Sync on Mac
- AI Music Generator for Mac
- How to Perform AI Voice Cloning in Wondershare Filmora?
- Silence detection on Mac
-
-
Text Editing for Mac
-
Basic Text Editing for Mac
-
Advanced Text Editing for Mac
-
AI-Powered Text Editing for Mac
-
-
Video Customizations for Mac
-
Video Effects (Mac)
-
Audio Effects (Mac)
-
Transitions (Mac)
-
Stickers (Mac)
-
Filters (Mac)
-
Color Editing (Mac)
-
Animations (Mac)
-
Templates (Mac)
-
Asset Center (Mac)
-
-
Exporting & Share & Cloud Backup - Mac
Audio Mixer
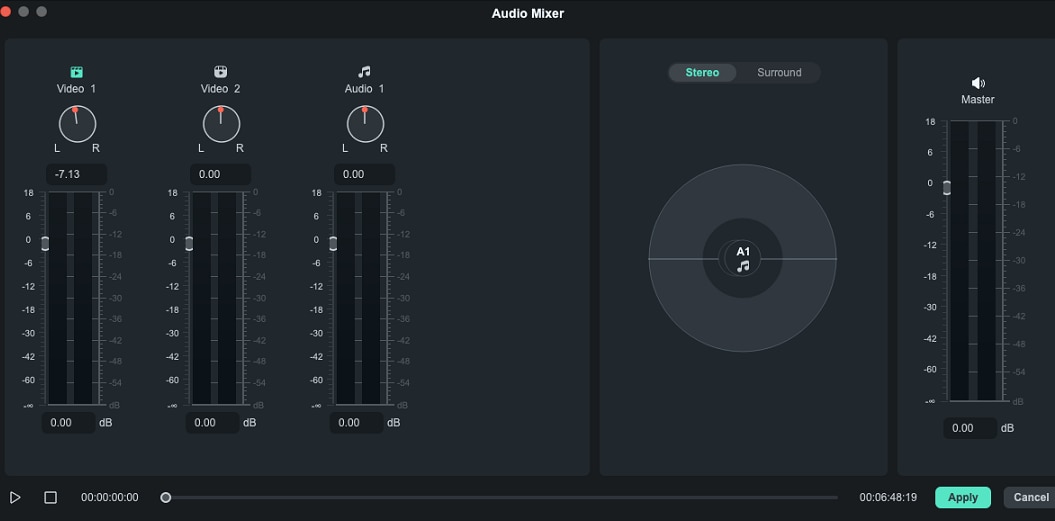
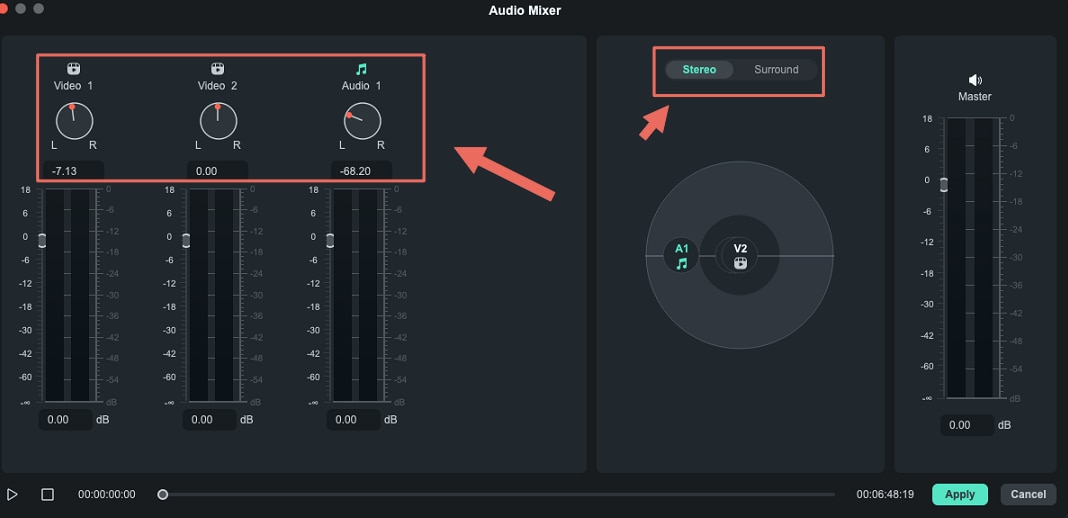
The Audio Mixer lets you adjust the dB levels of all your tracks that contain audio and set whether they're set more to the right or the left.
To use the Audio Mixer, follow these instructions:
- Drag and drop all your audio files (including video files from which you will be using the audio) into the timeline.
- Click the “Audio Mixer” icon in the toolbar.
- Drag the small ball along the circle (the Pan/Balance knob) for each track to switch the sound between the left and right channels. You can also move the circles on the gauges upwards or downwards to adjust the gain.

- You can choose between “Surround” and “Stereo” on the right side of the window. You can also drag the corresponding tracks to where you need them, along with the Pan.

Note:
If you select Surround, you'll be able to pan from left to right and from back to front, while in the Stereo mode, you can only pan from left to right.- Click "OK" to apply your changes to your video.
The Audio Mixer also lets you control the Master volume by dragging the sliders up or down so you can choose how loud a video clip should be. Click on the “Play” button to hear the results, and click “OK” to apply your adjustments.
Related Posts
Featured Articles
Xiaohongshu/REDnote Login: From Registration to Posting
Xiaohongshu or REDnote is now a trending app from China, and there're so many TikTok refugees now. This guide will teach you how to login Xiaohongshu /REDnote in 3 steps, and provide you with tips on creating new content.
How to Make a Slideshow on Mac - Ultimate Guide
If you’re having difficulty creating MacBook photos slideshows, then you’re in luck! In this comprehensive guide, you will discover five ways to make a slideshow on Mac, as well as tips to make the process seamless.
8 Strategies for Eliminating Filler Words in Your Speech
Discover the meaning of filler words and identify the ones you commonly use. Then follow the step-by-step methods provided to reduce filler words.
Recommended User Guide
Detect beat on Mac
Creating markers with Beat Detection.
Equalizer on Mac
How to adjust equalizer to improve the audio effects in your video? Follow this guide to see how to make it.
Audio ducking on Mac
Discover the art of audio ducking on your Mac with our comprehensive guide. This official guide provides step-by-step instructions on how to effectively lower background music levels while keeping vocal clarity at the forefront.
