For the Best Results, Use the Latest Version.
-
Preparations
-
Account
-
Get Started & Basic Settings
-
Compatibility & Tech Specs
-
Performance Settings
-
-
Creating Projects
-
Creating New Projects
-
-
Importing & Recording
-
Video Editing for Windows
-
Basic Video Editing
- Enable/Disable Clip in Windows
- Magnetic Timeline for Windows
- Drawing Tools fo Windows
- Dual Monitor Setup for Video Editing on Windows
- Select All Clips on Timeline for Windows
- Dual Monitor Setup for Video Editing on Mac
- Manage Timeline and Tracks
- Auto Ripple for Windows
- Split & trim video
- Crop & Pan & Zoom Video
- Compositing
- Change video playback speed
- Playing videos in reverse
- Mark In and Mark Out for Windows
- Markers for Windows
- Group editing
- Customizable Backgrounds for Videos and Images in Windows
- Video snapshot
- Using freeze frame
- Logo Reveal For Windows
- Apply auto enhance
- Applying drop shadow
- Adjustment layer for Windows
- Transforming
- Video Editing Ruler – Windows
-
Advanced Video Editing
-
AI-Powered Video Editing
- Smart Scene Cut for Windows
- Smart Short Clips for Windows
- AI Face Mosaic for Windows
- AI Video Enhancer
- AI Text-to-Video for Windows
- Planar Tracking
- AI Idea to Video for Windows
- Image to Video for Windows
- Instant Cutter Tool for Windows
- AI Extend
- AI Script to Video Guide for Windows
- AI Text-Based Editing for Windows
- AI Mate Editing for Windows
- Create with instant mode
- ChatGPT Plugin - AI Copywriting
- AI Smart Cutout
- Lens correction
- Auto reframe video
- AI Portrait Cutout
- Scene detection feature
- AI Smart Masking for Windows
- Make motion tracking
- Stabilization
- AI Video/Photo Object Remover for Windows
- AI Smart Search for Windows
- AI Skin Tone Protection for Windows
- AI Image for Windows
- Chroma key (green screen)
- Super Slow Motion with Optical Flow for Windows
- Video Denoise for Windows
-
-
Audio Editing for Windows
-
Basic Audio Editing
-
Advanced Audio Editing
-
AI-Powered Audio Editing
-
-
Text Editing for Windows
-
Basic Text Editing
-
Advanced Text Editing
-
AI-Powered Text Editing
-
-
Video Customizations
-
Video Effects
-
Audio Effects
-
Transitions
-
Stickers
-
Filters
-
Color Editing
-
Animations
-
Templates
-
Asset Center
-
-
Exporting & Share & Cloud Backup
Pitch
Changing pitch in audio will make the voice be higher when sped up or lower when slowed down.
Index
Change Audio Pitch
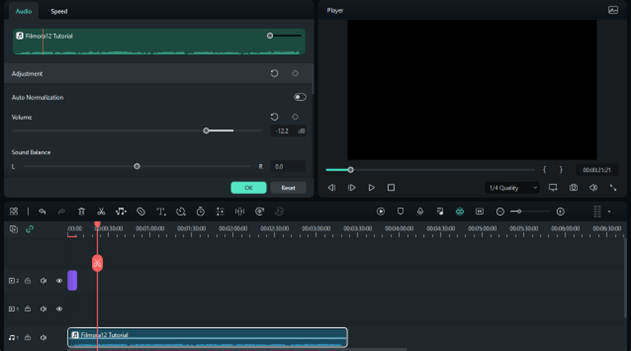
1. Double click the audio file in the timeline. In the popping-up window and under Volume, drag the pitch slider right to set the pitch up, and drag the slider left to set the pitch down.
2. Click the Play button in the Preview window to check what the audio sounds like. Click the Reset icon to restore the pitch settings.
3. Click OK to save the pitch changes in audio.

Note:
Adding a semitone is equivalent to changing the overall pitch by one note in a 12-tone scale. For example, C to C# (Sharp). The same to removing a semitone.Note:
Modifying audio speed by adjusting the pitch will not change the audio length.Related Posts
Featured Articles
The Best 5 Chrome Extensions to Download Facebook Videos
Struggling to download a video from Facebook? Read this article and learn about the top Facebook video downloaders for Chrome for easy downloads.
The Best AI Cartoon Generator to Transform Photos into Cartoons
Transform photos into cartoons with the best AI cartoon generator.
A Simple Guide To Converting Mono to Stereo in Premiere Pro in 2025
Many resources are available to turn mono into stereo Premiere to enhance the sound quality. Let us explore how to use them for the audio channel conversion.
Recommended User Guide
Adjust audio
This is a guide on adjusting audio in Filmora.
Audio fade in and fade out
Learn how to make Audio Fade In or Fade Out in Filmora
