For the Best Results, Use the Latest Version.
-
Preparations
-
Account
-
Get Started & Basic Settings
-
Compatibility & Tech Specs
-
Performance Settings
-
-
Creating Projects
-
Creating New Projects
-
-
Importing & Recording
-
Video Editing for Windows
-
Basic Video Editing
- Enable/Disable Clip in Windows
- Magnetic Timeline for Windows
- Drawing Tools fo Windows
- Dual Monitor Setup for Video Editing on Windows
- Select All Clips on Timeline for Windows
- Dual Monitor Setup for Video Editing on Mac
- Manage Timeline and Tracks
- Auto Ripple for Windows
- Split & trim video
- Crop & Pan & Zoom Video
- Compositing
- Change video playback speed
- Playing videos in reverse
- Mark In and Mark Out for Windows
- Markers for Windows
- Group editing
- Customizable Backgrounds for Videos and Images in Windows
- Video snapshot
- Using freeze frame
- Logo Reveal For Windows
- Apply auto enhance
- Applying drop shadow
- Adjustment layer for Windows
- Transforming
- Video Editing Ruler – Windows
-
Advanced Video Editing
-
AI-Powered Video Editing
- Smart Scene Cut for Windows
- Smart Short Clips for Windows
- AI Face Mosaic for Windows
- AI Video Enhancer
- AI Text-to-Video for Windows
- Planar Tracking
- AI Idea to Video for Windows
- Image to Video for Windows
- Instant Cutter Tool for Windows
- AI Extend
- AI Script to Video Guide for Windows
- AI Text-Based Editing for Windows
- AI Mate Editing for Windows
- Create with instant mode
- ChatGPT Plugin - AI Copywriting
- AI Smart Cutout
- Lens correction
- Auto reframe video
- AI Portrait Cutout
- Scene detection feature
- AI Smart Masking for Windows
- Make motion tracking
- Stabilization
- AI Video/Photo Object Remover for Windows
- AI Smart Search for Windows
- AI Skin Tone Protection for Windows
- AI Image for Windows
- Chroma key (green screen)
- Super Slow Motion with Optical Flow for Windows
- Video Denoise for Windows
-
-
Audio Editing for Windows
-
Basic Audio Editing
-
Advanced Audio Editing
-
AI-Powered Audio Editing
-
-
Text Editing for Windows
-
Basic Text Editing
-
Advanced Text Editing
-
AI-Powered Text Editing
-
-
Video Customizations
-
Video Effects
-
Audio Effects
-
Transitions
-
Stickers
-
Filters
-
Color Editing
-
Animations
-
Templates
-
Asset Center
-
-
Exporting & Share & Cloud Backup
Instant Cutter Tool for Windows
Filmora's Instant Cutter tool is designed for situations when immediate video trimming is necessary. It supports HEVC (H.265) videos and offers lossless editing, allowing you to cut and trim your videos without losing quality. We have outlined the step-by-step procedure for accessing this tool:
Index
Importing Media with Instant Cutter Tool
In this section, you will learn about accessing and employing Filmora's Instant Cutter Tool in three different methods. This exists as an independent feature; however, users can also access it indirectly using the methods discussed below:
Method 1: Using the Instant Cutter Tab in the Main Menu
Step 1: Launch Filmora and Access the Tool
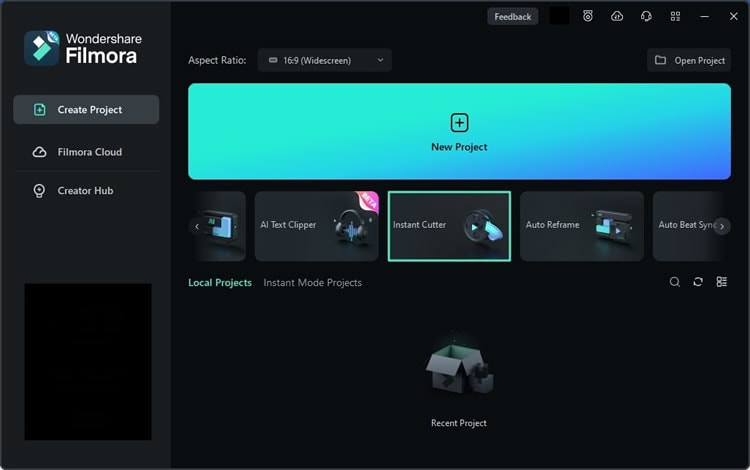
After performing the compulsory task of installing Filmora, launch it on your PC. Upon accessing its main display, navigate towards the tabs featured there and click the "┇ " symbol until you find the "Instant Cutter" tab and select it.
Step 2: Import Media in the Instant Cutter Window
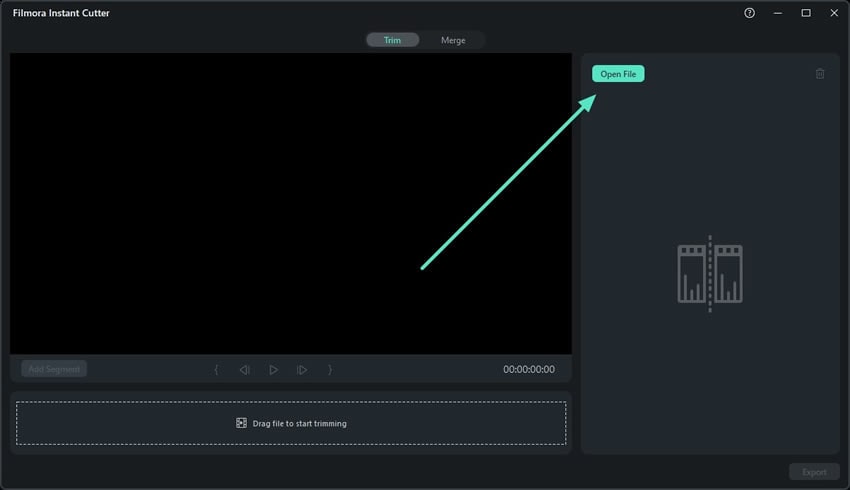
Filmora's Instant Cutter window will appear once you employ this action. Under the "Trim" tab, click the "Open File" button to import a clip from your device.
Step 3: Trim the Media Clip and Export It
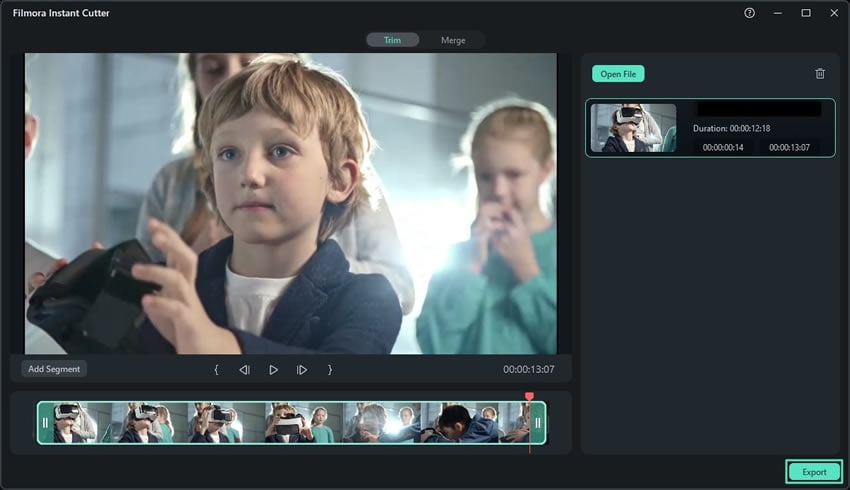
Once the clip has been imported into this window, change the slider's position to set your clip's starting and ending points. Once you have cut your clip, click the "Play" button to check if the duration is correct and hit the "Export" button.
Step 4: Adjust Export Settings
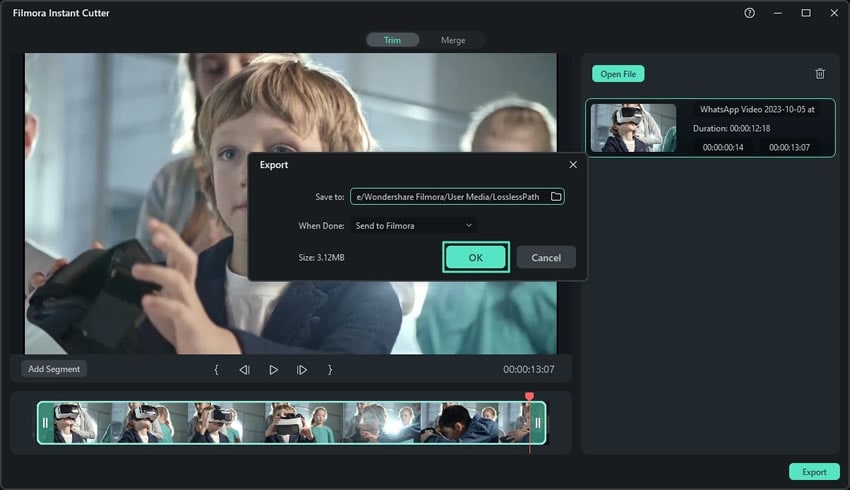
Upon clicking the "Export" button, a small pop-up will appear. You can customize the export setting from there, like the file's location. After adjusting the desired settings, click "OK", and the export progress will appear. Once the export procedure completes, you can access your file from the folder you saved it in.
Method 2: Using the Top Toolbar
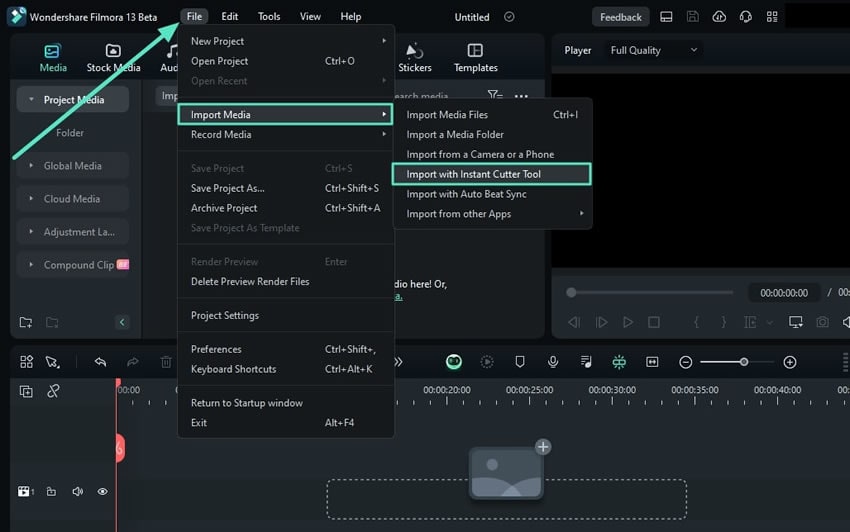
Create a new project in Filmora to access its main interface after launching it. Head in the direction of the top toolbar using your cursor and click the "File" tab. Expand the "Import Media" option from the dropdown menu and choose "Import with Instant Cutter Tool".
Method 3: Using the Project Media Section
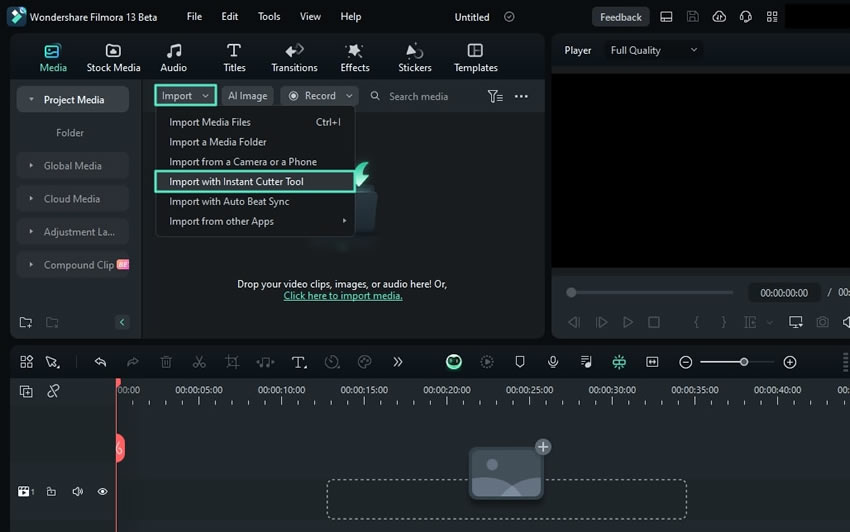
Upon reaching Filmora's editing interface after creating a new project, proceed toward the "Project Media" section and find the "Import" button. Click on it, and select the "Import with Instant Cutter Tool" option from the expansion menu.
Related Posts
Featured Articles
How to Sharpen Photos in Photoshop and Bonus Tips
Are you looking for how to fix blurry pictures in Photoshop? Here is a guide on how to make a blurry picture clear in Photoshop.
How To Add Subtitles in VLC: For Mobile Users [Android/iOS]
Are you trying to make your mobile videos accessible with captions? Read the following guide and learn how to add subtitles in VLC iPhone and Android.
6 Best Audio Recording and Editing Software
This article covers the best audio recording and editing software to elevate your audio projects. From voice recorders to editing suites, explore top tools for flawless audio capture.
Recommended User Guide
AI Skin Tone Protection for Windows
Flawless skin has become the ultimate symbol of perfection, and hence, keeping that in mind, Wondershare Filmora has come up with the perfect feature.
AI Smart Search for Windows
Use powerful AI technology to easily search objects, people, texts, dialogues, and other visual elements from your videos.
AI Face Mosaic for Windows
The AI Face Mosaic feature is an advanced tool designed to automatically recognize and protect faces in videos or images. Utilizing intelligent mosaic to track and cover faces in real-time, ensuring that privacy is safeguarded regardless of face movement within the frame.
