For the Best Results, Use the Latest Version.
-
Preparations
-
Account
-
Get Started & Basic Settings
-
Compatibility & Tech Specs
-
Performance Settings
-
-
Creating Projects
-
Creating New Projects
-
-
Importing & Recording
-
Video Editing for Windows
-
Basic Video Editing
- Enable/Disable Clip in Windows
- Magnetic Timeline for Windows
- Dual Monitor Setup for Video Editing on Windows
- Select All Clips on Timeline for Windows
- Manage Timeline and Tracks on Windows
- Auto Ripple for Windows
- Split & trim video
- Crop & Pan & Zoom Video
- Compositing
- Change Video Speed on Windows
- Playing videos in reverse
- Mark In and Mark Out for Windows
- Markers for Windows
- Group editing
- Customizable Backgrounds for Videos and Images in Windows
- Video snapshot
- Using freeze frame
- Logo Reveal For Windows
- Apply auto enhance
- Applying drop shadow
- Adjustment layer for Windows
- Transforming
- Video Editing Ruler – Windows
-
Advanced Video Editing
- Drawing Tools for Windows | Filmora Guide
- Create Multi-Camera Clip
- Compound Clip for Windows
- Multi-Clip Editing for Windows
- Filmora Motion Blur | Windows
- Filmora Flicker Removal Guide | Windows
- Apply mask to video
- Creating a PIP effect
- Keyframe Graph Editor for Windows
- Add animation keyframing for Windows
- Keyframe Path Curve for Windows
-
AI-Powered Video Editing
- Smart Scene Cut for Windows
- Smart Short Clips for Windows
- AI Face Mosaic for Windows
- Filmora AI Eye Contact- Windows
- AI Video Enhancer for Windows
- AI Text-to-Video for Windows
- Planar Tracking for Windows
- AI Idea to Video for Windows
- Filmora Image to Video for Windows
- Filmora Image to Prompt for Windows
- Instant Cutter Tool for Windows
- AI Extend
- Filmora AI Relight - Windows
- Filmora AI Image Enhancer Guide - Windows
- AI Script to Video Guide for Windows
- AI Text-Based Editing for Windows
- AI Mate Editing for Windows
- Create with instant mode
- ChatGPT Plugin - AI Copywriting
- AI Smart Cutout
- Lens correction on Windows
- Auto reframe video
- AI Portrait Cutout
- Scene detection feature
- AI Smart Masking for Windows
- Make motion tracking
- Video Stabilization for Windows
- AI Video/Photo Object Remover for Windows
- AI Smart Search for Windows
- AI Skin Tone Protection for Windows
- AI Image for Windows
- Chroma key (green screen)
- Super Slow Motion with Optical Flow for Windows
- Video Denoise for Windows
-
-
Audio Editing for Windows
-
Basic Audio Editing
-
Advanced Audio Editing
-
AI-Powered Audio Editing
-
-
Text Editing for Windows
-
Basic Text Editing
-
Advanced Text Editing
-
AI-Powered Text Editing
-
-
Video Customizations
-
Video Effects
-
Audio Effects
-
Transitions
-
Stickers
-
Filters
-
Color Editing
-
Animations
-
Templates
-
Asset Center
-
-
Exporting & Share & Cloud Backup
AI Idea to Video for Windows
Do you often have great video creation ideas in your mind? Filmora's AI Idea to Video feature allows you to maximize the value of your inspiration, helping you turn your video ideas into short story clips. If you're not satisfied, you can keep generating until you are happy with the result. If you're interested, please check out the upcoming tutorial!
How to Use Filmora's AI Idea to Video Feature?
To get a better understanding of how to utilize the AI Idea to Video feature, follow the simple guide below:
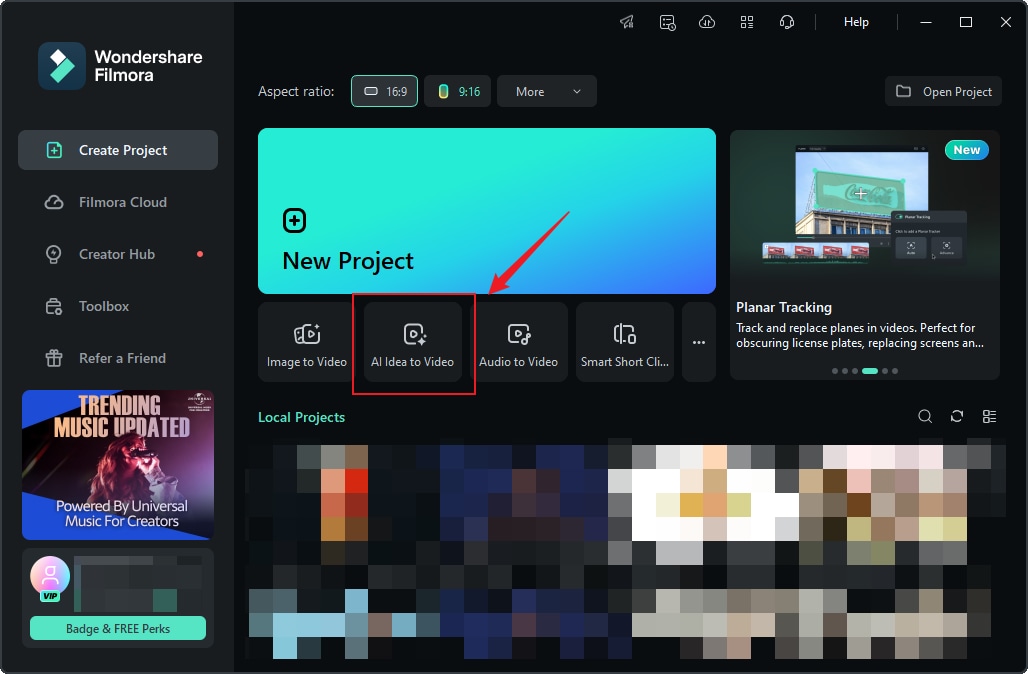
Step 1: Enter the "AI Idea to Video" Interface from the Startup Page.
On the startup page, find the "AI Idea to Video" feature box and click to enter.
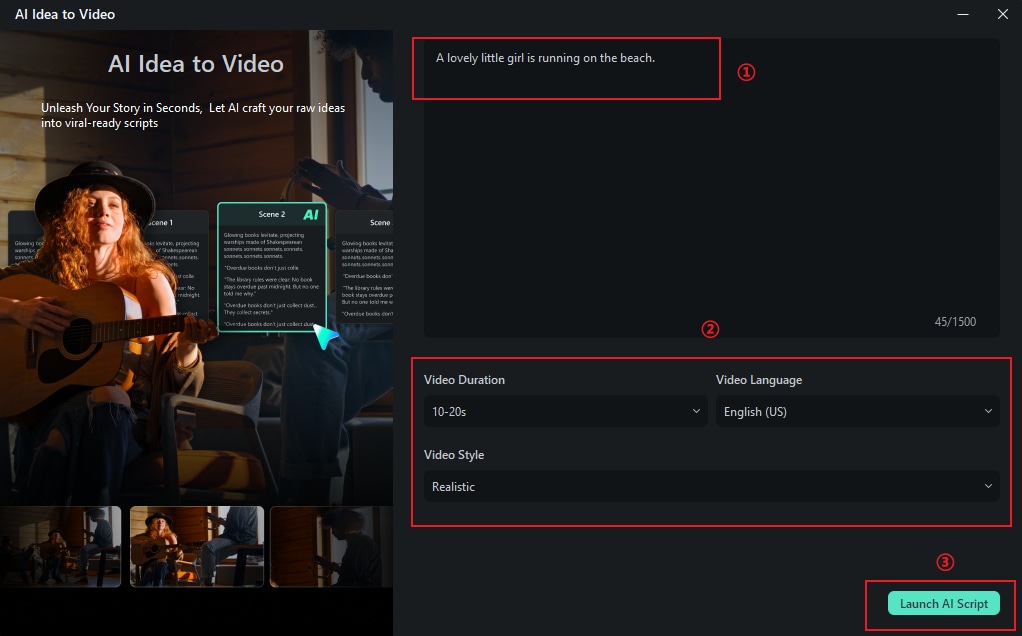
Step 2: Enter Your Story Script.
After entering the "AI Idea to Video" feature interface, you can input your story idea and customize the video length, language, and style. Once the settings are complete, click "Launch AI Script."
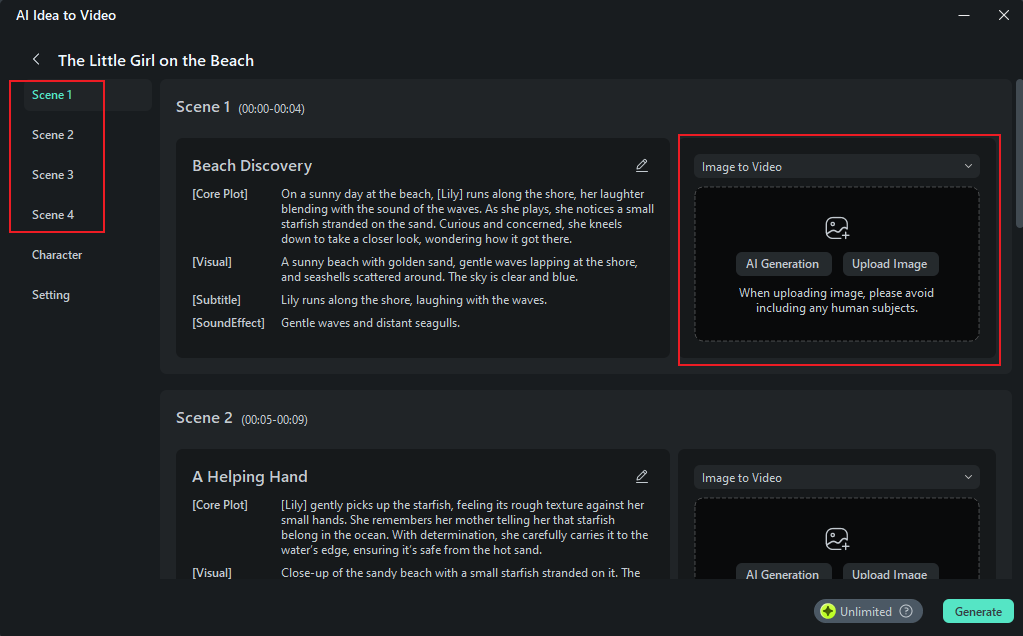
Step 3: Customize the Generated Scene Content.
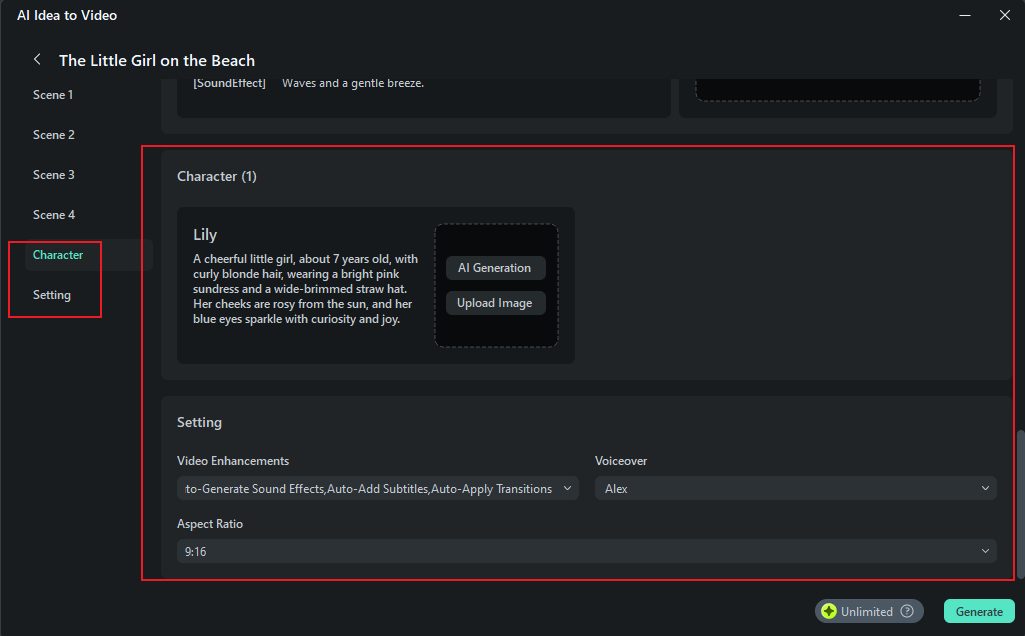
Filmora will generate several scene descriptions based on your input script, and display task settings and video scene configurations. You can manually edit the content to let Filmora regenerate it. Additionally, for each scene, you can upload images to generate videos from images. Once you confirm that the scene descriptions and related settings are satisfactory, click "Generate" to create the short video.
Step 4: Wait for the Video to Generate.
It will take a few minutes to generate the short video. You can click "Hide" to conceal the process.
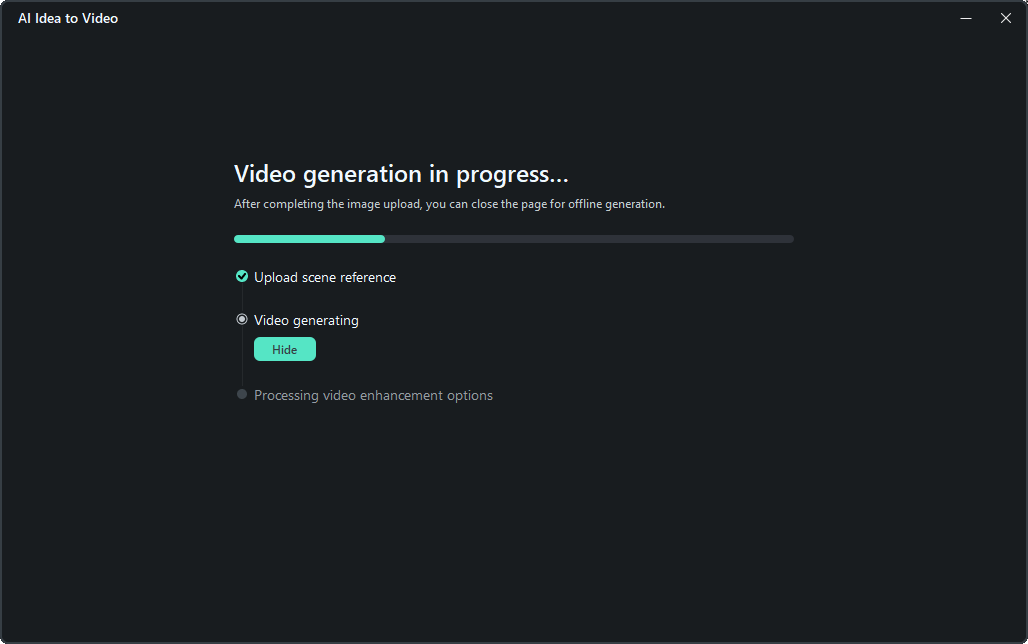
You don't need to worry about where to check the progress. By clicking the launch page or the project progress button at the top of the interface, you can view the video generation progress.
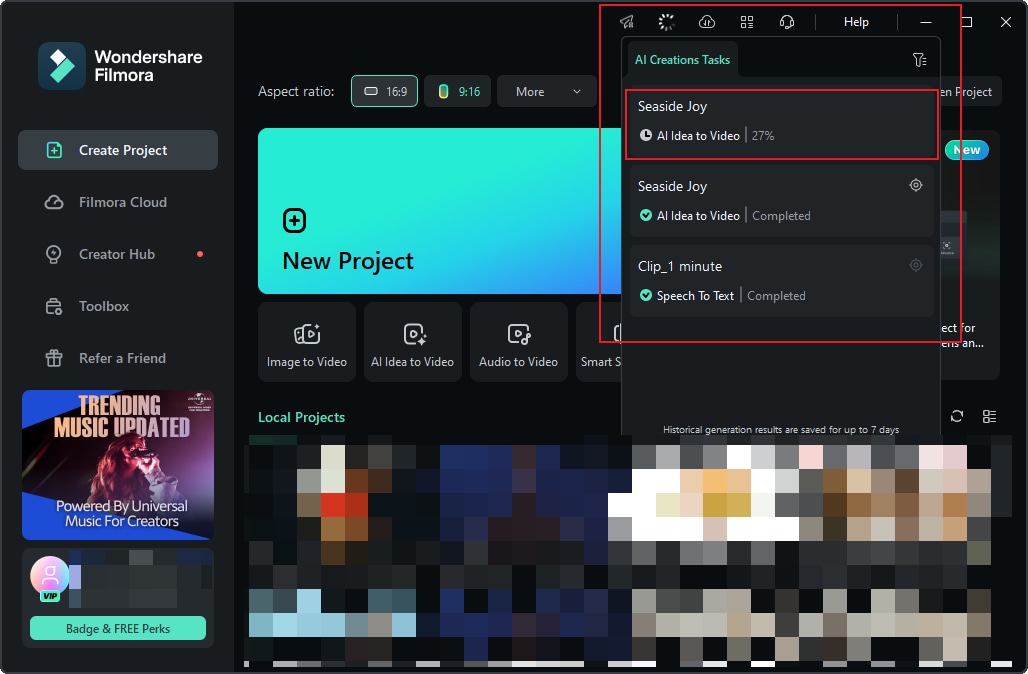
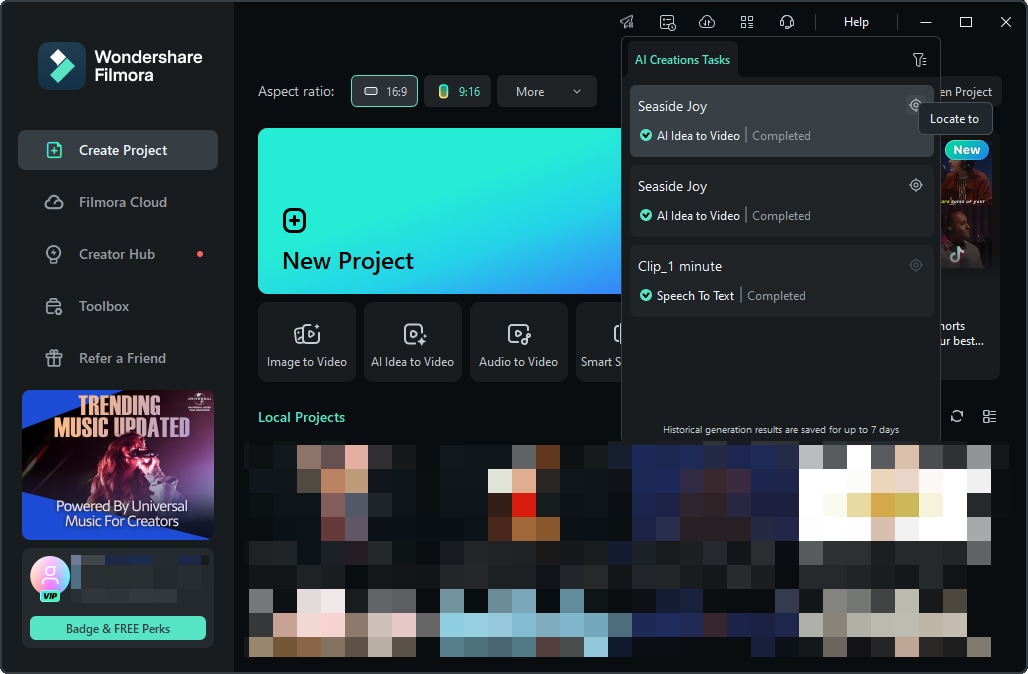
Once the video has been generated, you can click the "Locate" button next to the video process flow in the task list to enter the video panel page.
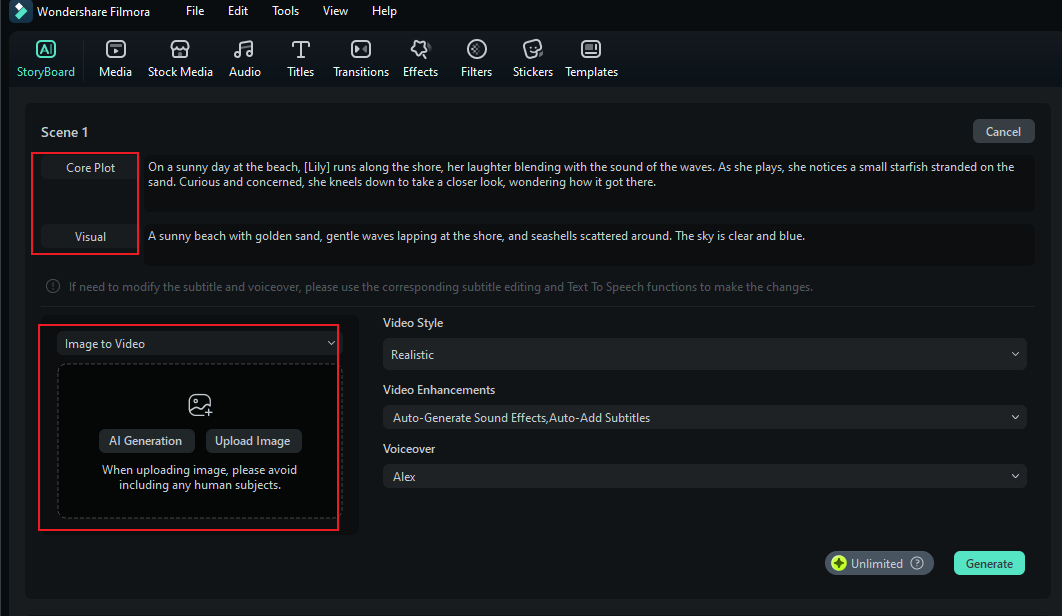
Step 5: Enter the Storyboard Page to Edit the Video.
After entering the Storyboard page, you can view the generated results for each scene. If you added subtitles or transition effects during the initial setup process, they will appear on the timeline. You can also use the features in the Filmora toolbar to edit the video, such as changing fonts, adding audio, adjusting transitions and filters, and more.

Step 6: Edit the Generated Results.
If you're not satisfied with the generated scene results, you can modify the scenes, tasks, or other settings and regenerate them.
That's how you can easily turn your ideas into short videos using Filmora's AI Idea to Video feature on Windows. Whether you're creating content for social media, storytelling, or just for fun, this feature helps you get started quickly and customize every step of the process. Try it now and bring your imagination to life!
Related Posts
Featured Articles
How to Create a Double Exposure Effect?
The double exposure effect is one of the most unique and interesting effects in the photo editing sphere. Learn all about it and how to create one.
5 Best Free Apps to Create Movie Trailers on Android & iPhone [2026]
Looking for a movie trailer apps creator tool to make your videos look like Hollywood? Read this guide, where we discuss how to create eye-catching videos.
How To Create Professional Car Highlights with Filmora's AI Video Maker
Discover how to create car highlight videos for free with Filmora. Learn step-by-step instructions and explore additional features with AI highlight video makers.
Recommended User Guide
AI Smart Masking for Windows
Editing video elements independently is an important part of video creation, and Filmora's masking provides multiple options.
Planar Tracking for Windows
This guide explains how to use Planar Tracking in your videos on Windows
Filmora Image to Prompt for Windows
Here is the guide on how to use the Image to Prompt in Filmora on Windows.
