
 100% Security Verified | No Subscription Required | No Malware

Are you curious about what is a timeline in video editing? It's a crucial tool in a video editor for organizing clips, audio, and effects. It's like a visual roadmap that helps you perfectly align and manage all your elements.
Whether you're just beginning or have some editing experience, understanding a timeline in video editing is crucial for producing polished videos.
This guide discusses the essentials and demonstrates how to use Wondershare Filmora to improve your projects. Mastering the timeline streamlines your editing workflow, from incorporating seamless transitions to syncing audio.
Ready to improve your video editing skills? Let's get started.
In this article
Part 1. Basic Understanding of Video Editing Timeline
To understand the video editing timeline, we divided different terms. These include the video timeline, timeline bar, and timeline panel. Each term helps explain a part of the editing process.
What is a Video Timeline?
A video timeline is a key tool in video editing. It helps arrange and order video clips, audio tracks, effects, and transitions. This tool shows the order of these elements, making it easier to see how the final video will look and sound. Each layer on the timeline represents a different part of the video. This allows editors to adjust and synchronize these parts.

Example:
For posting a YouTube video, you may need to use a timeline to create a story. It appears at the bottom of your screen. You can add photos, video clips, stickers, and text. Small thumbnails show the order of each element.

You can rearrange, trim, or add effects to these elements. The timeline helps visualize the sequence and make quick adjustments. A video timeline is essential for organizing and editing video content. It ensures a smooth and cohesive final product.
What is a Video Timeline Bar?
A video timeline bar is a tool in video editing. It shows the order and length of video clips, audio tracks, and effects. Each piece is shown as a bar or segment. You can move, trim, and edit these bars.
This helps you see how your video will look and sound. The timeline bar helps keep everything organized. It’s key for making adjustments and creating a smooth final video. Editors use it to control the flow and structure of their projects.

What is the Timeline Panel in Video Editing?
The timeline panel in video editing is a key tool. It shows the order of video clips, audio tracks, and effects. Each item is displayed as a bar. You can move, cut, and edit these bars. This helps you see the sequence of your video.
The timeline panel keeps your project organized. It allows for easy adjustments. Editors use it to control how the video flows. This tool is essential for creating smooth and professional videos.

What is the Timeline Panel Used for?
The timeline panel arranges video clips, audio, and effects in order. It helps you see how your final video will look. You can add, cut, and move items around. This tool also helps you sync audio with video.
It also allows you add transitions and effects at the right points. The timeline panel makes editing easier and more precise. It’s crucial for creating a polished and professional video.
Now that you know the basics of timeline in video editing. Let’s understand it further by discussing its different parts.
Part 2. What Are the Parts of a Video Timeline?
There are different components of a video editing timeline. Have a look at them.

A. Timeline
It's called a timeline because video pieces are lined up horizontally. Footage on the left plays before footage on the right. Time code markers show the location of each frame.
B. Tracks
Tracks are usually stacked vertically. This allows multiple pieces of media, both audio and visual, to be added. Visual items on higher tracks appear on top. This is called the z-order.
C. Media
Media sits on the timeline and includes video, audio, text, and images. These elements make up your video.
D. Playhead
The playhead shows where you are in the video. It helps ensure you are editing the correct part.
So far, we have discussed the essential components of a timeline in video editing. Ready to dive deeper? Let's move on to the next part!
Part 3. How To Create a Timeline In Video Editing?
Are you new to video editing and wondering how to create a timeline on Windows, Mac and Mobile? A timeline arranges your video clips, audio, and effects in sequence. It helps you see your final video.
Wondershare Filmora makes this easy. Its drag-and-drop interface is perfect for beginners. Arrange and trim your clips to remove unwanted parts. Add transitions for a smooth flow.
Expand your creativity with a fully-equipped video editing suite powered by AI.

Sync audio with video for a polished look. Insert text overlays and effects with Filmora's simple tools. Preview your video and adjust as needed.
With practice and tools like Wondershare Filmora, you'll edit like a pro in no time!
The Basic Functions of the Filmora Timeline
- Media Assembly: The Filmora timeline is where you assemble all media files (videos, images, audio) and effects for your video project.
- Drag and Drop: You can easily drag media from your computer or the internet onto the timeline.
- Ripple Edit: This feature, when enabled, automatically closes gaps when you delete or move clips, keeping everything in sync.
- Timeline Snapping: This function helps align clips precisely, making it easier to place media elements accurately.
- Track Management: Filmora has a track manager that allows you to organize and manipulate multiple tracks.
- Visual Representation: The timeline provides a visual layout of your project, showing the sequence and duration of all elements.
- Scrolling and Zooming: You can scroll horizontally through your project and zoom in/out timeline for more detailed work.
How Do You Use Filmora to Manage Timelines in Video Editing?
Follow the steps below to manage timelines in video editing using Filmora.
Step 1. First of all, download Filmora by clicking the button below. Then,launch Filmora and start a new project.


Step 2. Now, add your video, audio, and other media files to the project.

Step 3. The Playhead shows your current position on the timeline and lets you move through media files. The frame at the Playhead's position appears in the Preview window.

Step 4. Now, hover over the timeline's time area to zoom in or out by holding the left click and moving the mouse. Use the Zoom to Fit icon or the zoom slider to adjust the view of all media on the timeline.

Step 5. To add a new track in Filmora, drag and drop an audio or video file to the timeline. Wondershare Filmora will automatically create a new track for it.

That’s how you use Filmora to manage a timeline in video editing. What if you need to manage multiple timelines? We will also discuss this in the next section.
How to Manage Multiple Timelines in Video Editing Using Filmora?
Filmora V15 introduces powerful dual-timeline editing, allowing you to manage complex video projects more efficiently using Compound Clips as nested timelines. Here's how to leverage Filmora's dual-timeline editing feature to manage multiple timelines:
Step 1. Understanding Compound Clips and Timeline Tabs
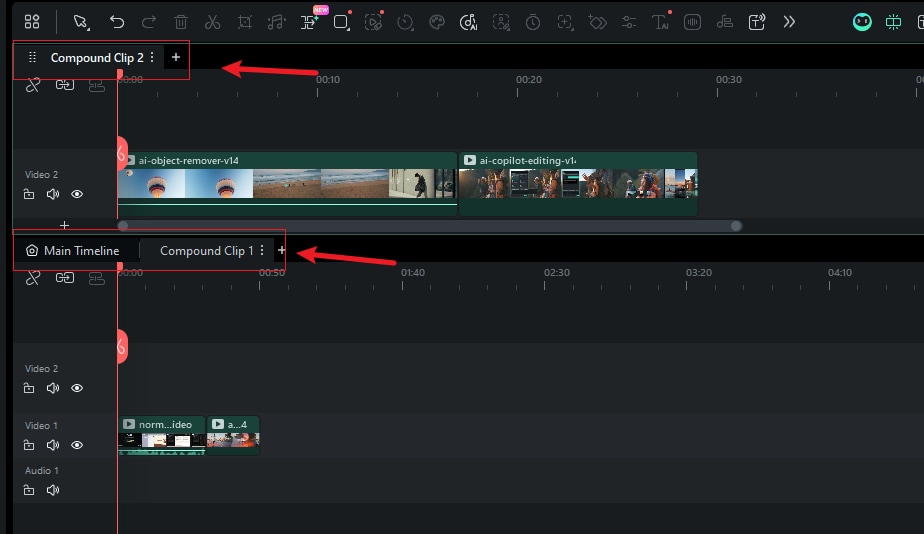
Each Compound Clip you create now functions as its own independent timeline, accessible via a tab system located directly above the main timeline. This helps you organize complex sequences, effects, or segments of your project into self-contained, editable clips.
- Creating Tabs: When you create a new Compound Clip, it will appear in your project media. Double-clicking the Compound Clip in the media library will open it as a new tab in the timeline area.
- Switching Timelines: Simply click on a tab (e.g., "Main Timeline," "Compound Clip 1") to switch between your main project and any nested sequence for focused editing.

Step 2. Activating the Dual Timeline View
Unleash the full power of multi-timeline editing by opening two timelines simultaneously. This dual-view setup is perfect for seamlessly moving assets between sequences or comparing different edits.
- How to Activate: Click and hold a Compound Clip tab, then drag it down into the timeline panel. A new timeline view will appear, creating a primary (bottom) and secondary (top) timeline workspace.
- Limitation: You can have a maximum of two timelines open at once.
Step 3. Interacting with Dual Timelines
With the dual timeline view active, editing becomes more fluid and intuitive.
- Drag and Drop Clips: Freely drag video or audio clips from the primary timeline to the secondary one, and vice versa. This makes reusing or rearranging assets across different parts of your project incredibly fast.
- Focus Indicator: The currently active timeline (the one that will respond to keyboard shortcuts and playback commands) is highlighted with a focus frame. The Preview window will always display the content of the active timeline.
Step 4. Exporting a Specific Timeline
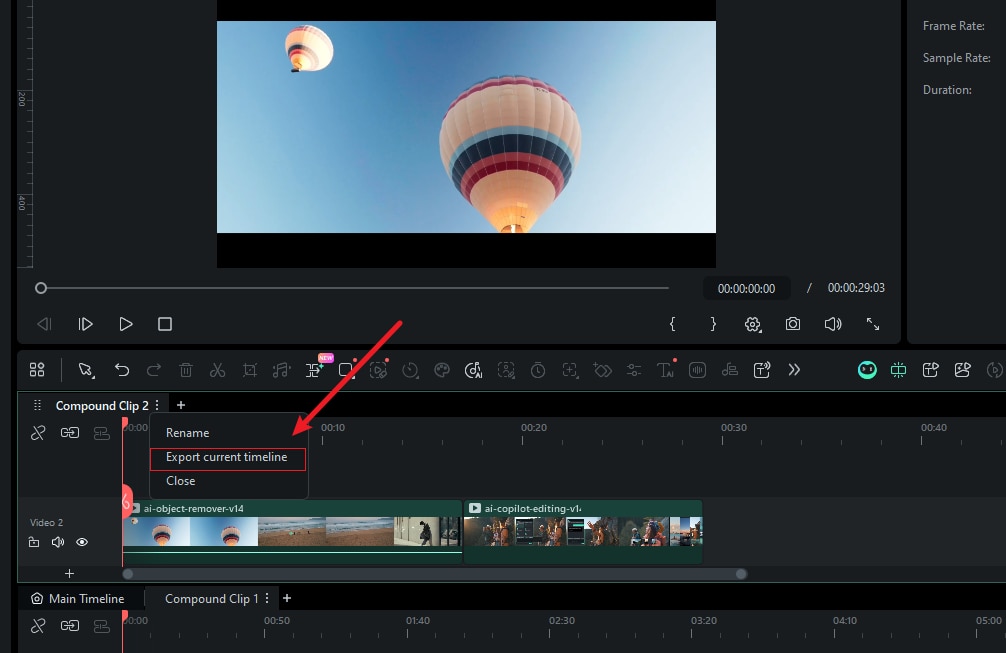
You no longer need to place a compound clip back into the main timeline to export it. Export any sequence directly from its tab.
- How to Export: Right-click on the tab of the timeline you wish to export, or click the three vertical dots icon next to the tab name.
- From the dropdown menu, select "Export Current Timeline". This will open the export dialog, allowing you to choose your desired format, resolution, and output settings for that specific sequence.
With these new features, your video editing experience will be significantly more efficient and streamlined.
Part 4. Workflow for Video Editing with a Video Timeline
There are many ways to edit a video. Find what works best for you. Here are some tips to get started. Adjust them as you get more comfortable.
- Gather all the footage you might use. If unsure, include it anyway. It’s better to have more options.

If you have a lot of footage, label everything. It takes time but makes finding clips easier later.
- Add key footage to the timeline to build the video’s order and flow. This is your main footage for interviews or tutorials. Trim each clip to keep only the key parts. Focus on the message, not effects or transitions.

- Once the main footage is in place, add secondary footage. This includes a b-roll, lower thirds, and other images or text.

- After the visual part is done, add audio-like music.

With the essentials covered, it's time to enhance your timeline editing skills in the next part!
Part 5. Timeline Editing Tips
Editing videos takes time and patience. Each project is unique and may need different approaches. To streamline your editing process, keep these tips in mind.
-
Prepare Your Media Files
Organize all your media files in a folder before you start editing. Name each file clearly so you can find what you need quickly. If you have a lot of files, create a main folder for essential files and a subfolder for optional files.
-
Save Frequently
Save your work often. Even if your project is short, your video editor can freeze. If this happens, you might lose your progress. Frequent saves can prevent this.
-
Use Different Tracks
Create different tracks for different types of media. Some editors do this automatically. Others let you create and name tracks. This makes it easier to navigate and edit.
-
Take Breaks
Take breaks If you're working on a large project. Resting helps you return with a fresh perspective. You might come up with new ideas after a break.
-
Be Inquisitive
Experiment with different features in your video editor. Even if you're a beginner, trying out new options can inspire you. You might discover a tool that helps you achieve the exact look you want for your video.
Let's keep the momentum going and understand why timeline is so crucial in video editing.
Part 5. Why is a Timeline Important in Video Editing?
A timeline in video editing is important for the following reasons.
-
Get Your Edits Under Control: A timeline helps you organize your edits. You can see all your clips, audio, and effects in one place. This makes it easier to manage and adjust them.
-
Visualize the Flow: A timeline allows you to see the sequence of your video. You can watch how each clip transitions to the next. This helps ensure your video flows smoothly.
-
Sync Audio and Video: The timeline helps you match audio with video. You can align tracks precisely. This ensures your audio is in sync with the video.
-
Add Effects and Transitions: Using a timeline makes it easy to add effects and transitions. You can place them exactly where you want. This enhances the overall quality of your videos.
-
Make Quick Adjustments: A timeline allows you to make quick changes. You can easily move or trim clips if something doesn't look right. This flexibility speeds up the editing process.
Conclusion
Understanding a timeline in video editing is crucial for creating great videos. It helps you organize clips, audio, and effects in order, making editing easier and faster.
Wondershare Filmora simplifies the timeline for beginners. Using it well can improve your video's flow and quality. Adding music, syncing audio, or using transitions all rely on the timeline.
Keep practicing and exploring new features. Soon, you'll edit like a pro, fully grasping what a timeline can do for you in video editing.
