Syncing audio with video is an integral part of video editing for any video creator. But believe me; it's not such a difficult task if you know what to do. The point is IF YOU KNOW WHAT TO DO.
That's why in this brief guide, we'll show you the simplest way to sync audio with video using a fantastic video editor easily. But wait a minute, some of you might be confused about why we even need to sync separate audio & video when a single camera can record both. So let's first answer this simple question.
In this article
Part 1: Why Do We Need to Sync Separate Audio & Video?
Creating great video needs extraordinary video graphics, content, and top-notch audio. And you can't expect a single camera to achieve all these goals. That's why all professional video creators use a specialized camera for recording with a separate audio recording device.
You might think it's an exaggeration, but this small change can have massive effects on the quality of your video. Especially the background noise removal effect of separate external microphones.
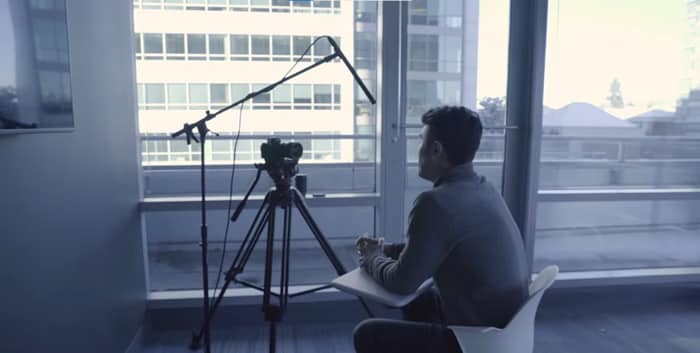
But the downside of using this method is that after the recording is complete, you must sync the audio and video files. And if you don't do it right, all the effort goes to the drain within a split second. Well, nobody wants to watch a video with an audio lag. Isn't it?
Correctly syncing an audio file with a video is easier than you think. You just need to prepare beforehand and use a suitable video editing tool. So considering these factors, let's first see what preparations we need. After that, we'll recommend a top-class video editing tool to achieve this goal in detailed steps. Why are we still waiting? Let's begin our journey.
Part 2: Preparation for Syncing Audio With Video During Recording
You must make some preparations to sync an audio file with a video properly. It's to have a sound spike to match the footage properly with the separate audio file. And it might look disturbing, but even a simple Clap might do the job.
And if you want a professional way, just imagine the clapper board. You must have seen it in the film industry. This clapper board is used not only to mark the shot but also to create a sound spike when it claps. We use this audio spike as a reference to sync the audio files with the video.

Every time you cut your shot, remember to clap on camera again the next time you roll. It's best to clap before you say "Action" or speak so that it's easy to find and sync when editing. But if you forget, you can also clap at the end of the shot before you cut. That is called a Tail Slate!!!
After you've recorded your video like this, the next step is pretty simple. The video editor we recommend is none other than the world's leading tool in the market, Wondershare Filmora. Let's move forward and see how to sync audio with video using Filmora.
Part 3: How To Sync Audio With Video Using Filmora
Before we dive into the step-by-step guide, here's a brief overview of Filmora.
Wondershare Filmora
Filmora is one of the most used video editors that can help all video creators to deliver the best they can. This incredible software from Wondershare contains multiple features that can polish any video.
Moreover, the vast arsenal of video effects, images, short clips, AI avatars, and many other things are also available. You just have to pick out the one you like and add it to your video with just a single click.
On top of that, you can also adjust the audio files like audio ducking, silent detection, audio mixing, and synching audio with the video files.
As far as the audio synching is concerned, you can do it either manually or with auto synchronization. And we will explain both of these processes in a stepwise manner to give you complete mastery over your audio synching. Let's start with the manual process first.
Steps To Manually Sync Audio With Video Using Filmora on Win or Mac
Step1Download & install
If you haven't downloaded the latest version of Filmora yet, click the button below to download it without any cost. And after the download is completed, you can install it on your device right away.
Step2Import your files
The next step is to import all the files. Launch the Filmora and click on the "New Project" button from the opening interface.

When a new project is created, you'll see an "Import Media" section on it. Click on this section to browse your audio and video files from the computer. Or you can also drag and drop these files here to import them.

Step3Prepare your files
Now, it's time to prepare our files for synchronization. First, drag the video file down to the timeline from the "Import Media" section. After that, drag the audio file in the same way below the video on the panel.
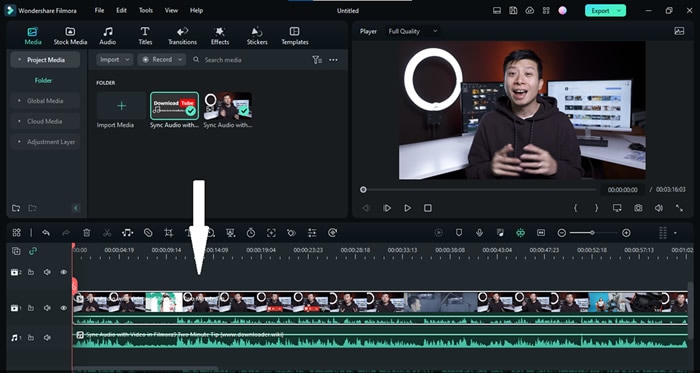
Step4Sync the audio & video files using the audio spike
Now that the video and audio files are on the timeline, you'll have to find the moment you clap your hands. Look at the waveform from the in-camera audio and the independent audio track. At the moment you clap, we'll see a spike.
Bonus Tip: If you can't find the audio spike, zoom the panel to make it easier.
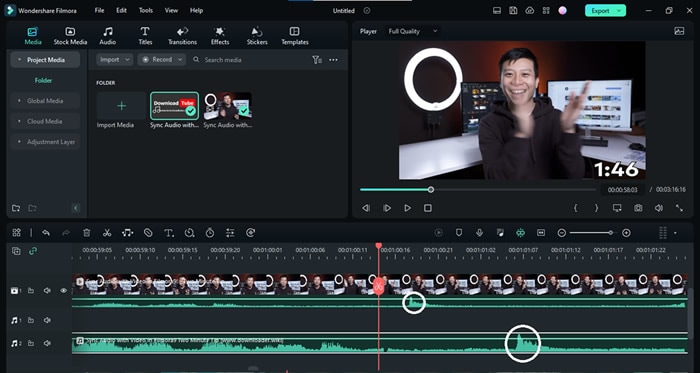
Now take the independent audio clip and align it so that both the spikes match.
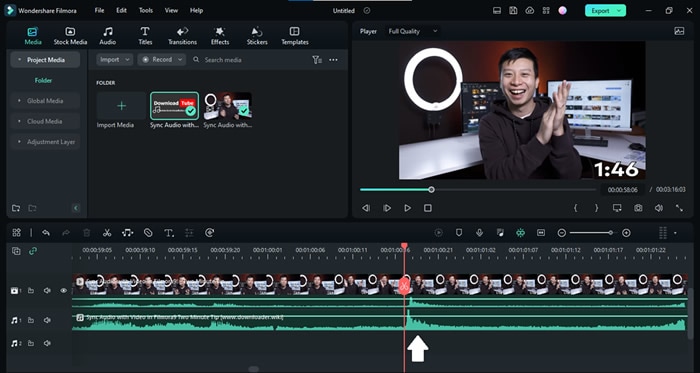
That's it! We just need to remove the in-camera audio now. Let's see how to do it now.
Step5Remove the audio from the video footage
To detach the audio in the video footage, right-click on this file and select the "Detach Audio" option. Or you can also use the "Ctrl+Alt+D" as the hotkey.
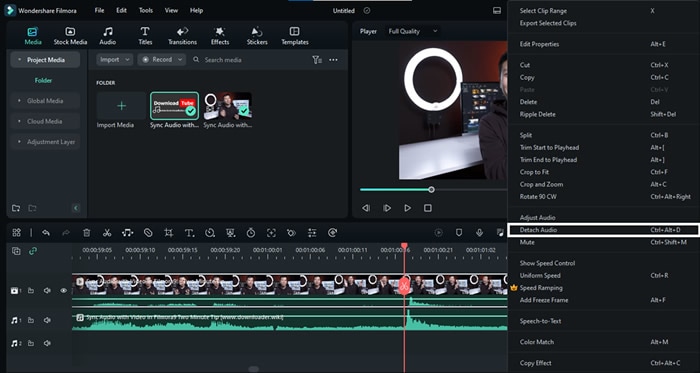
Once the audio file has been separated, you can move forward and delete it. To delete this audio, right-click on it and select "Delete."
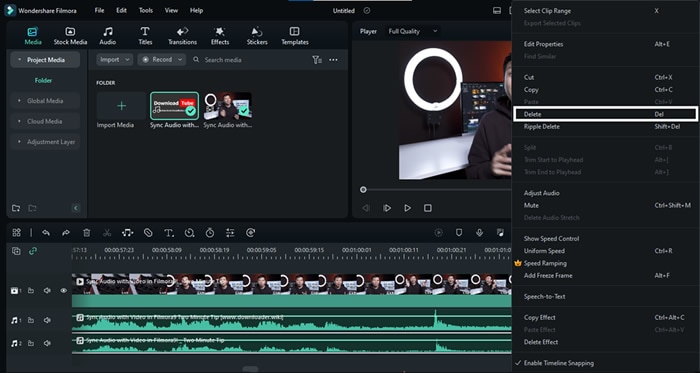
Step6Enjoy your video with the new audio track
So here we go. Our video file has been synced with the high-quality audio file. You can now hit the Export button to get this edited file. But wait a minute. Didn't we say we'll show you a method to automatically sync audio with video? Let's start this method now.
Steps To Manually Sync Audio With Video Using Filmora on Mobile
If your video's audio is out of sync, you can manually adjust it in Filmora's mobile app. Follow these steps to align your audio and video in minutes:
Step 1: Install Filmora
Download Filmora for mobile from the Google Play Store or Apple App Store. Install and launch the app to start with video and audio editing.
Step 2: Import Your Media Files
Tap the + icon in the bottom navigation menu or select New Project. Then, choose a video from your device’s gallery or browse stock media. Tap Import to add it to the editing timeline.
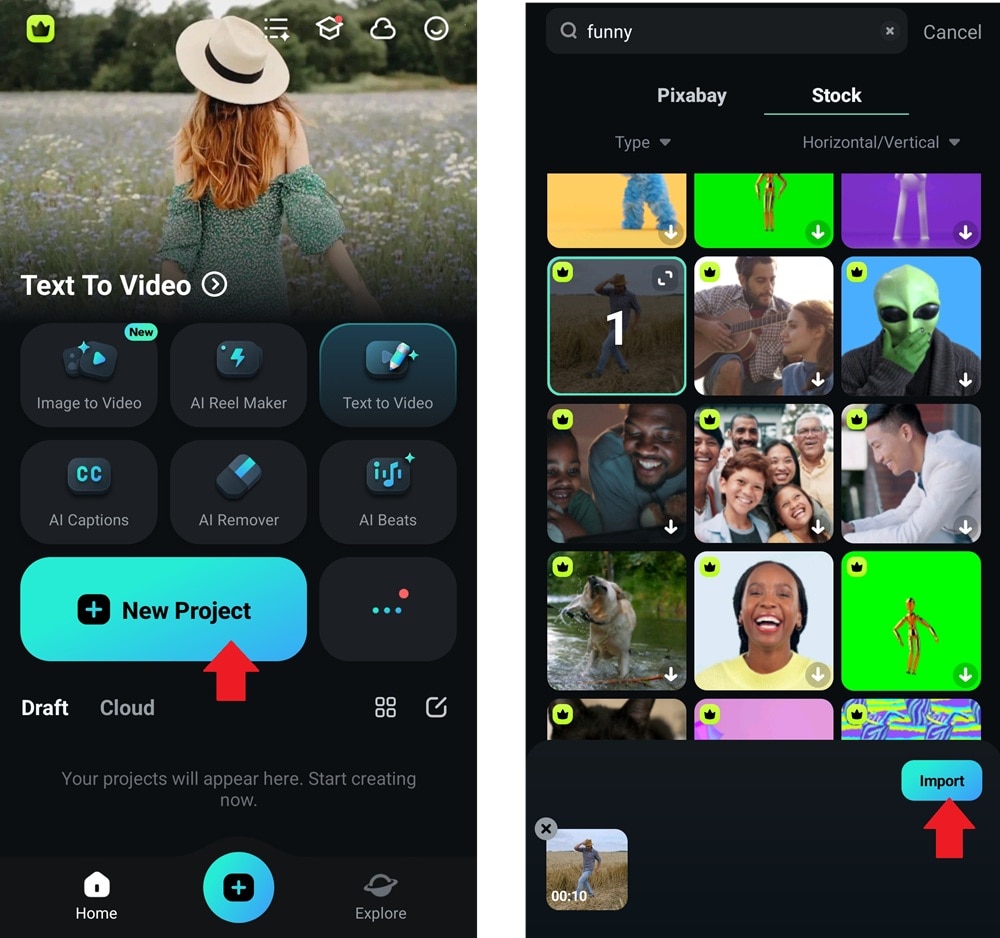
Step 3: Align Your Files
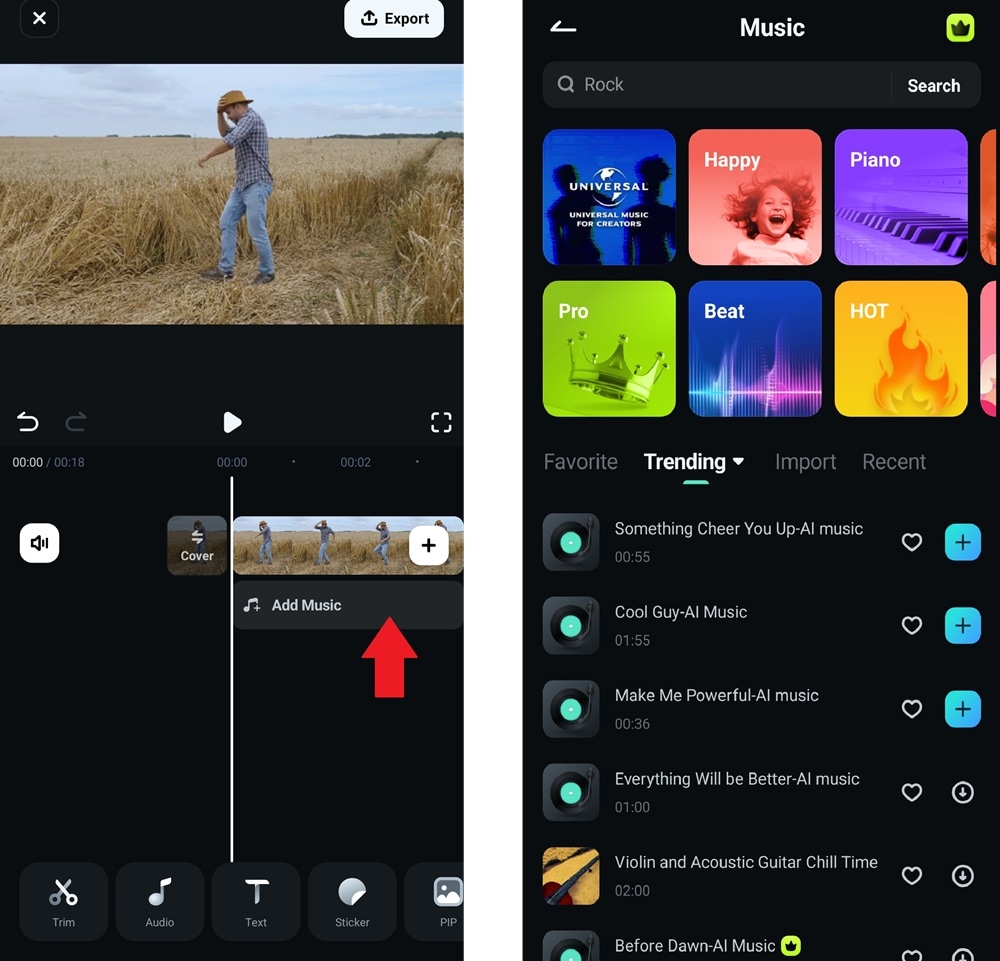
Tap Add Music on the editing timeline to insert an external audio track. Choose a trending sound from the built-in library or import an audio file from your device.
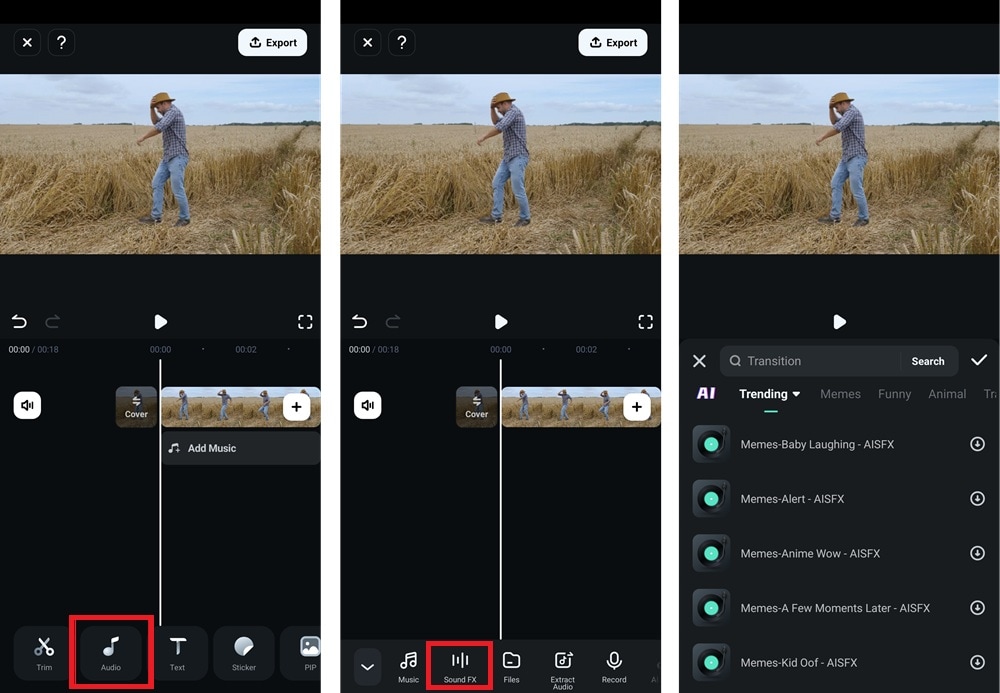
You can also tap Audio in the bottom menu and select Sound FX. Browse various sound effects like walking, typing, and more. Download the one that fits your video and add it to the editing timeline.
Step 4: Manually Sync the Audio Track
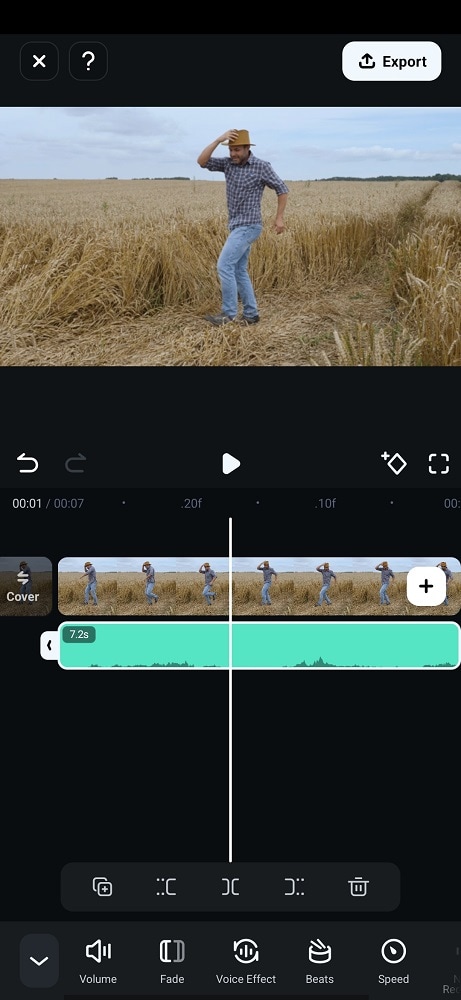
Tap and hold the audio track in the timeline. Drag it left or right until it matches the video’s original sound. Play the video to check if the voices or key sounds align properly. Adjust as needed for precise synchronization.
Step 5: Remove the Original Audio
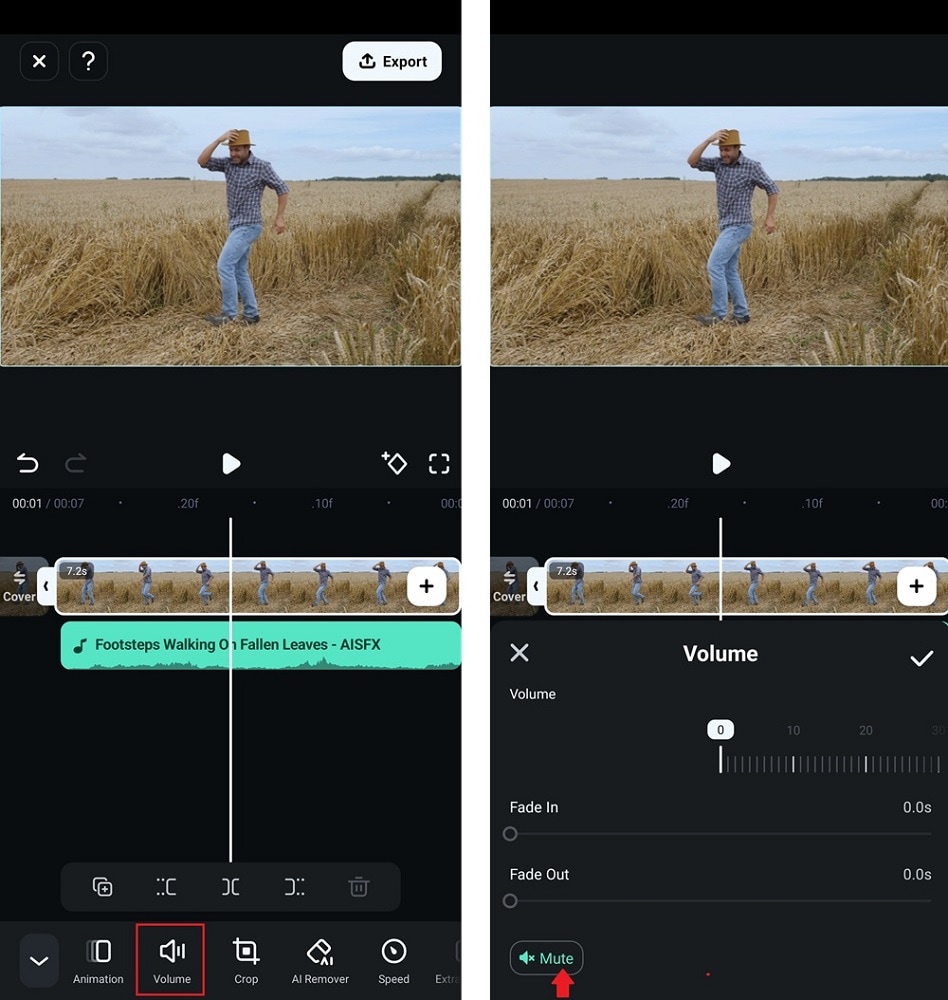
After syncing, remove the video's original audio to avoid overlapping. Select the video on the timeline, tap Volume in the bottom menu, and choose Mute.
Step 6: Export The Synced Video
Your video is now in sync with the added audio. Tap Export to save and share your final edit.
Steps To Automatically Sync Audio With Video Using Filmora
Did you find the above method troubling? Well, be assured because Wondershare Filmora can also automatically sync your audio file with video in a single click. Here are the steps to achieve this feat.
Step1Prepare your files
This method's starting process is the same as the previous one. You'll need to download the Filmora and prepare your file on the timeline by importing them on a New Project.
Step2Select both audio & video files
Once you've got everything ready, select both your audio and files from the timeline.
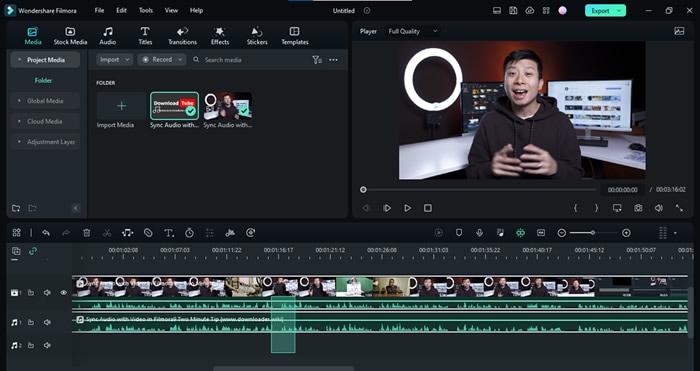
Step3Click on the auto synchronization icon
When you select these files, you'll see that the "Auto Synchronization" icon has appeared on the toolbar below the Import Media section. Click on this icon and wait for the magic.
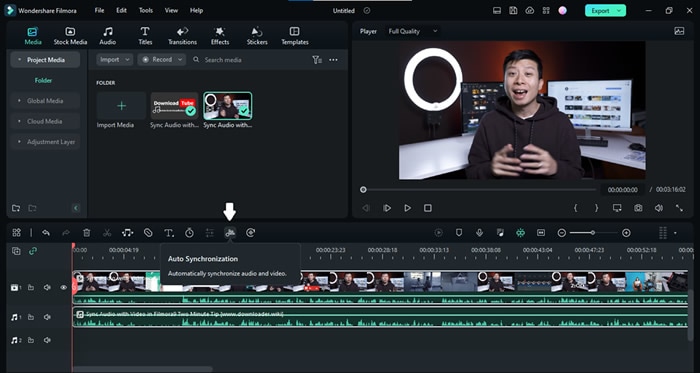
Remember that you need a Premium ID of Wondershare Filmora to use the Auto Synchronization option.
Step4Wait until the syncing is completed
Filmora will start synchronizing your files, and you'll see the "Synchronization in process" prompt on the screen. Wait until the process is completed.
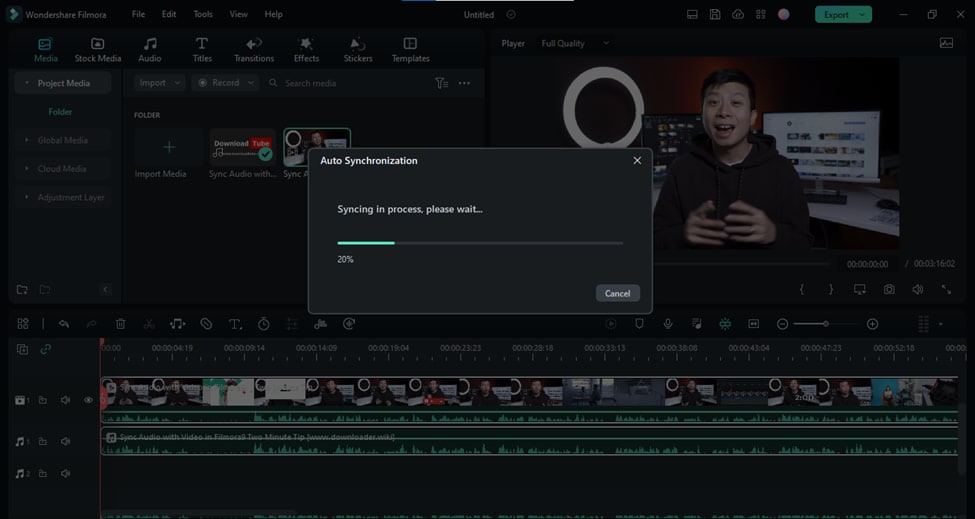
Step5Finish your editing
You can finish your editing when the separate audio file perfectly aligns with the video file. Delete the audio from the in-camera video file and hit the "Export" button.
Congratulations! We have successfully synced separate audio and video files. Now let's take a look at some hot FAQs before we end our guide.
Part 4: FAQs About Synchronizing Audio With Video
Is auto synchronization better than manual syncing?
Well, auto synchronization is no doubt easier than manual syncing. But that doesn't mean you don't need the manual process anymore. Many situations may arise where you may be left with no choice but to use the manual syncing of separate audio and video files. So make sure to properly learn both these methods, and each one of them will definitely come in handy someday.
How can we sync audio & video for free?
Syncing audio and video files for free is not a difficult task. Download the Filmora right now, and after installation, you can freely sync any Audio file with its corresponding video file by using the manual method described above.
Conclusion
For any video creator, knowing how to sync audio with video is a must. That's because most creators record audio and video separately for higher quality.
This brief guide has covered all the details about how to sync audio and video files using an outstanding video editor, Wondershare Filmora. We hope it comes in handy.


