"How to increase the quality of a video in After Effects?" - Quora
After Effects is a useful video editor to achieve professional-grade results, but many people are looking for ways to enhance video quality in After Effects and don't know how to start. Do you encounter the same issue? Keep reading and we will provide the fullest guide.
In this article
Part 1: Understanding After Effects

Before diving into the methods to enhance video quality in After Effects, let's have a brief idea of After Effects. Adobe After Effects is a versatile software for motion graphics, visual effects, and video composition. This is an industry-standard software for the post-production of videos. It can be used by anyone involved in filmmaking, video editing, and even animators when they want to add special effects, animations, or any other feature to their work.
Apart from the creativity that is relatable with After Effects software and the ability to produce some eye-catching graphics and effects, the software is also a powerful video editing tool with numerous features that can enhance your videos in a big way.
Part 2: 4 Methods to Improve Video Quality in After Effects
There are 4 ways you can improve video quality in After Effects, such as upscaling, stabilizing, reducing noise, sharpening, and color correction. Learning the use of these tools and their uses will enable you to produce quality videos. Let's dive in.
Method 1: Enhance Video Quality in After Effects with Upscaling
Video upscaling is the enlargement of the video size and making the video frames look more detailed.
However, to upscale video in After Effects requires additional help. One way is to create a new composition with the needed resolution and then scale the footage you need in After Effects. You may use third-party plugins such as Boris FX's Continuum to upscale the video for better quality.
Steps to Enhance Video Quality in After Effects with Upscaling:
- Import Your Footage: Load After Effects and import the clips you wish to upscale.

- Create a New Composition: Change the composition settings to the aimed output format.

- Add Your Footage to the Composition: Place your clips into the board directly by simply dragging them.

- Scale Up Your Footage: Open the footage layer, press S for the scale options, and set the scale to a percentage to cover the composition area.
- Apply Upscaling Plugins or Effects: If using a third-party plugin, apply it to the whole footage layer until it feels right, depending on the chosen settings.

- Render the Composition: When done upscaling, return to this last step to render the composition to export your improved video.
Method 2: Enhance Video Quality in After Effects with Stabilization
Shaky footage can distract viewers and reduce the overall quality of your video. Stabilizing your footage removes unwanted camera movement and helps create a smoother viewing experience.
After Effects includes a powerful tool called the Warp Stabilizer, which analyzes the motion in your footage and applies stabilization automatically.
Steps to Stabilize Footage to Enhance Video Quality in After Effects:
- Select Your Footage Layer: Select the layer you want the image stabilization to apply.
- Apply Warp Stabilizer: Navigate to the Effects & Presets tab via the Effects button and look for "Warp Stabilizer. " Right-click it and apply it to your footage layer.

- Analyze and Adjust Settings: When working on a composition, After Effects will start rendering your footage and analyzing it. Settings, including Smoothen and Method, can be tweaked to make stabilization more or less pronounced.
If you have higher stabilization requirements, third-party plugins like Mocha Pro and Red Giant's Universe provide additional levels of control and functionality in terms of tracking and stabilizing motion. However, if you need a more straightforward solution, you can use tools like Filmora, which provides AI Stabilization features to instantly stabilize footage and videos of any size.
Method 3: Enhance Video Quality in After Effects with Sharpening
Image sharpening improves the edges and finer details of the recorded video, making it look refined. It is very useful when you need to accentuate small intricacies that could be obscured because of low quality or that are out of focus.
After Effects also has other types of sharpening tools, identical to those you may find in regular photo editors, including the "Unsharp Mask".
Steps for Sharpening Footage to Improve Video Quality in After Effects:
- Select Your Footage Layer: Select the layer you wish to apply the sharpening filter.
- Apply Sharpening Effect: Go to the Effects Control panel and select "Sharp" to filter the effect, then add it to your footage layer.

- Adjust Effect Settings: Adjust the Amount, Radius, and Threshold to fine-tune the level of sharpening you want without going overboard.
Method 4: Enhance Video Quality in After Effects with Color Correction
Color correction is critical in ensuring that the footage you deliver retains the right standard color scheme. It involves working on color, contrasts, and brightness to get the best look on the final product and correct any color issues with the initial capture.
One of After Effects' essential tools is the Lumetri Color effect, which is designed for color correction and grading.
Steps for Color Correction to Improve Video Quality in After Effects:
- Select Your Footage Layer: Select the layer on which you wish to do color correction.
- Apply Lumetri Color Effect: Go to the effects and presets list, enter the search line "Lumetri Color," and apply it to your footage layer.

- Adjust Basic Settings: Begin with the Basic Correction settings to fix the white balance, exposure, contrast, highlight, shadow, and saturation.
- Advanced Color Grading: For more color correction, you should turn to Curves, Color Wheels, and HSL Secondary for more precise control over the color and the tonal range of the video footage.
Part 3: An Easier Alternative to Enhance Video Quality in After Effects
Adobe After Effects is a powerful tool for video editing and offers various ways to enhance video quality, which tends to be a good option for experienced After Effects users. However, due to it requiring manual edits on parameters and redundant attempts, people may look for an easier-to-use alternative solution to improve video quality. That's why we introduce Wondershare Filmora here.
Filmora, offers several AI-powered features that automate the video enhancement process, making it more accessible and efficient.
- AI Video Enhancement: instantly fix blurry videos and boost quality with Topaz-powered AI, just one click away.
- Stabilization: identify camera shakes to improve video quality from weak to strong.
- Color Correction: adjust color balance, contrast, and brightness of the videos easily to make them look better.
- AI frame interpolation: transform low-frame videos to high-frame videos with single steps.
- Video Denoise: remove any grains or low-light visual images from videos with three algorithms.
These powerful AI features allow users to make the necessary improvements and upscaling of the videos in much less time for a professional finish. This makes it a perfect tool for those who wish to get better video quality but do not want to waste time mastering other software.
How to Enhance Video Quality in Filmora with One-Click?
1. Create a New Project
Select the desired aspect ratio and resolution for your project to match the intended output of your enhanced video.

2. Import Your Footage and Drag it to the Timeline
Click the "Import" button to add your video files to the project library. You can drag and drop your video files directly into the media panel. Then drag the video files to the timeline.

3. Apply AI Video Enhancer Features
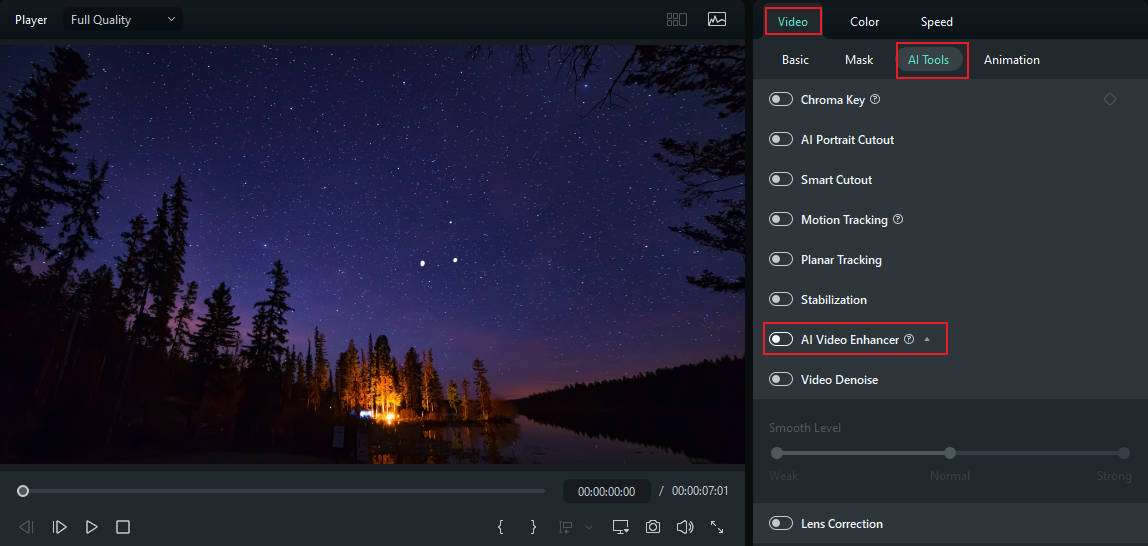
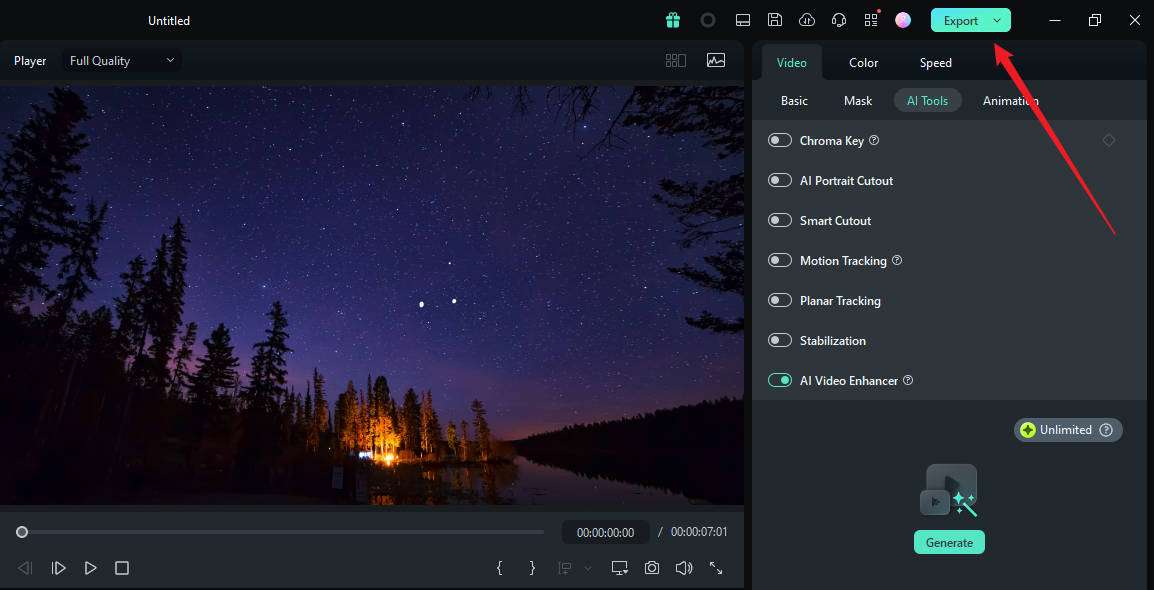
Right-click on the video clip in the timeline, go to Videos > AI Tools at the right side panel. Switch on AI Video Enhancer. Finally, click Generate to start the video-enhancing process.

4. Preview and Refine
Use the preview window to watch the enhancements in real-time. Adjust the settings as needed until you are happy with the results.
5. Export the Enhanced Video
Once satisfied with the enhancements, click "Export" to save your video. Choose the appropriate format, resolution, and quality settings for your final output.

Conclusion
Adobe After Effects and Filmora are both useful in improving the quality of videos, although they have different uses and cater to different users. For those who know and understand video editing and effects, After Effects provides quite options to tweak around with. However, it can be quite cumbersome and may take a long time, especially for beginners or those who wish to use the easiest method.
Filmora's user-friendly interface comes equipped with artificial intelligence video improvement functions that reduce the workload typically involved in enhancing the quality of a video.


 100% Security Verified | No Subscription Required | No Malware

