When you upload your video to YouTube, you want it to be clear and visually appealing to your viewers. However, it is not uncommon to upload only to find that you have blurry YouTube videos! It can create an impression that your videos are of low quality, hurting your conversion rates. "Why are my YouTube videos so blurry? and "How do I unblur a YouTube video?" Do you want to know the fixes? Keep reading, and we will figure you out in this article.
In this article
5 Common Reasons to Blurry YouTube Videos

Blurry YouTube videos are something you want to avoid as a video content creator, given that you want your viewers to watch longer or return for more content.
Generally speaking, blurry YouTube videos are caused by several factors ranging from video creation to video uploading.
1. Slow Internet Connection
YouTube depends on the internet connection to load videos. A slow internet connection makes it difficult for YouTube to effectively load videos. In such a case, YouTube doesn't load videos in quality resolution but instead in lower resolutions that look unclear. YouTube does this to prevent buffing.
2. The Video Has Just Been Uploaded
YouTube also tends to take some time to fully upload and render your videos in higher quality. When you upload your video, YouTube starts by processing the low-resolution segments before high-resolution HD. Therefore, you need to wait until YouTube completes uploading the video. This will often take approximately 30 minutes or so.
3. Low Video Quality Settings
If your video is set to low quality then it will be rendered in low-quality and hence unclear video. This is often seen when the video controls are clear yet the video itself is blurry. This can be solved by choosing higher resolutions in the YouTube studio settings.
4. Outdated Video Card Drivers
If your video card drivers are outdated, they might develop some bugs that can blur your YouTube videos. Just update the video card drivers on your device to solve this issue.
5. Poor Video Recording
When you don't record your videos correctly, they might end up being blurry and unfortunately, the YouTube editor can't fix them. This happens in scenarios where you recorded while maybe shaking or running. Also, you might have used dirty or low-quality lenses, recorded in poor lighting conditions, or used low-resolution recording.
You'll end up with blurry YouTube videos and you will have to redo them or use a dedicated blur remover tool to unblur videos.
How to Fix Blurry YouTube Videos? [5 Ways or Tips]
Here are several solutions you can try to fix blurry YouTube Videos.
1. Make YouTube Video Clearer with AI Using Wondershare Filmora
AI tools like Wondershare Filmora provide one of the simplest ways to fix blurry YouTube videos. The advanced algorithms detect and fix all types of blurs in your video motion blur caused by fast-moving subjects or shaky footage. By using its AI video enhancer, you can enhance the visibility of every detail and sharpen blurry or old videos with ease, no matter if they are old footage, shot in low light, or downloaded after being compressed. In addition to that, you can upscale videos up to 4k with one click.
Thanks to features such as AI frame rate resolution and video stabilization that automatically adjust your video frame rate and stabilize your video respectively for better quality.
You can also manually adjust video parameters to customize the quality of the video according to your needs. Here, you can adjust the brightness, sharpness, saturation, composition, and color aspects of your video to deliver high-quality output.
Key Features
- AI video enhancer - Fix blurry YouTube videos within seconds.
- AI video denoiser - Remove grain from videos easily from three different smooth levels, customize from weak to strong.
- Color Adjustment and Correction- Adjust color temperature, tint, contrast, saturation, and brightness, among others.
- AI Video Stabilization- Smooth out those shaky parts of your video. Therefore, it is useful for blur caused by motion or shaky objects.
- Plenty of Video Effects and Filters- Offer an array of video effects and filters suitable for different videos. With suitable video effects and filters, you can significantly remove blur and improve the quality of your videos.
- AI Frame Rate Interpolation- Transform your low frame rate to high frame rate videos. This intelligent frame generation makes your video look visually appealing even though it was originally recorded in low frame rates.
- AI Audio Denoise- Remove background noise in your videos, allowing you to deliver better audio and visuals.
How to Remove Blur on YouTube Videos Using Wondershare Filmora?
Before proceeding, download and install Wondershare Filmora on your computer.
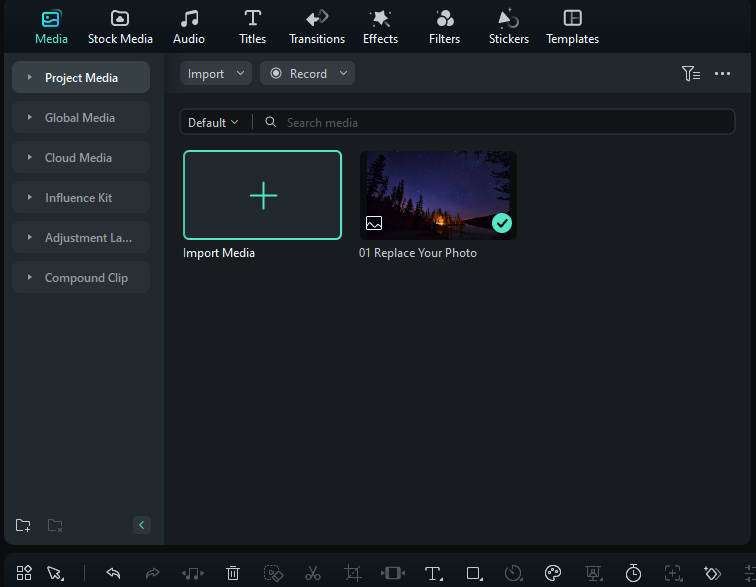
Step 1. Open Wondershare Filmora on your PC and choose the "Create New Project" option. Select the "Import Media" tab, then choose and upload the YouTube video you want to unblur from the file explorer window. Once uploaded, drag it to the program's timeline at the bottom for enhancement.

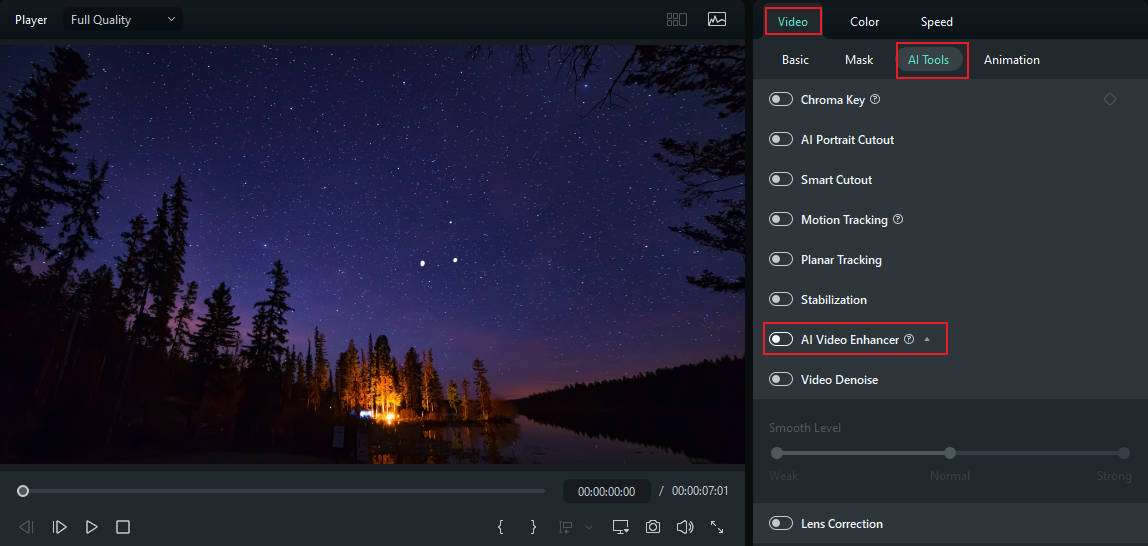
Step 2. To fix blurry YouTube videos automatically, you can use an AI video enhancer. Click the video and select the "Video" tab on the subsequent screen. Choose the "AI Tools" option and click the "AI Video Enhancer" button to activate it. Then, click on the generate button to fix blurry YouTube videos automatically.

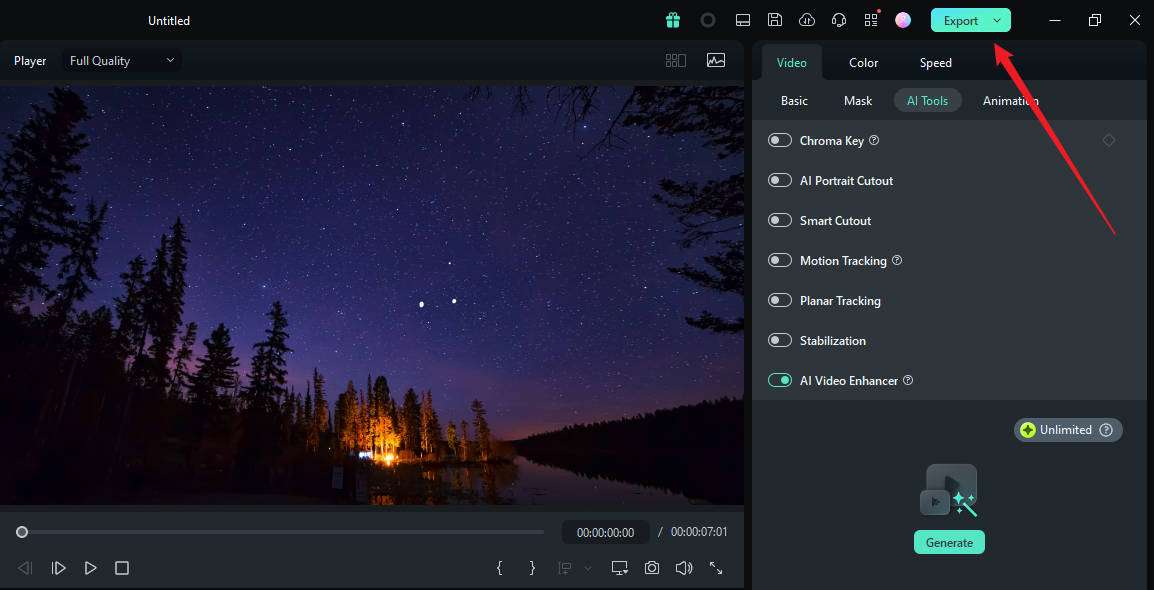
Step 3. When satisfied, click the "Export" button and choose suitable output options, including file format, resolution, and save path. Choose high-quality formats and resolutions like MP4 and 4K, respectively.

2. Ensure High-Resolution Export
Another way to avoid blurry YouTube videos is to make sure you export them in high-quality formats and resolutions, such as 1080p and 4K, using your editing software.
Additionally, upload your videos for processing in the highest possible quality and formats, such as MP4 with the H.264 codec. The beauty of the H.264 codec is that it is a lossless compression technology, meaning it takes less storage space without a loss in quality.
3. Check Your Internet Connection:
Faster video upload rates ensure high-quality streaming. Therefore, you should ensure that your internet connection is steady and fast when uploading YouTube videos. Consider testing your internet speed to ascertain that your upload rates are fast enough. If not, consider restarting your router and fixing potential internet issues for faster speeds.
4. Adjust YouTube Playback Settings
If you are watching a video, then your YouTube playback settings can also affect your YouTube video viewing experience.
So, check your default playback quality and change it to a higher resolution, like HD. To do so, click the "Settings" option and choose a higher resolution, like HD.

5. Wait for YouTube Processing
Again, remember that YouTube normally takes approximately 30 minutes to process and upload videos. As mentioned, it starts with low-resolution segments followed by high-resolution segments. Therefore, you need to wait at least 30 minutes to see whether the quality of your YouTube videos changes.
Bonus: Best Practices for Preventing Blurry Videos on YouTube
If you are a content creator, you can avoid blurry YouTube videos by simply getting better raw footage.
Here are some of the best practices you can adopt.
- Invest in a good camera and microphones to ensure your source video is clear and sharp.
- Invest in tripods and stands to avoid blurs caused by shaky movements. This will ensure more stable footage.
- Use professional-grade video editing software to maintain the clarity of your video. Tools like Wondershare Filmora, for example, use AI to remove blur and ensure clarity in your videos automatically. It will help you avoid excessive zooming or filters that reduce the quality of your videos.
- Clean your lenses with the proper material and cleaning agent.
Wrapping up
Fixing blurry YouTube videos is a must to attract and retain viewers. We have discussed several ways to prevent blurry videos. After learning the causes and solutions for blurry YouTube videos (such as using a powerful video editor like (Wondershare Filmora), let's keep that in mind to avoid more such issues!


