


 ChatGPT
 Perplexity
 Gemini
 Claude
 Grok
Grok
Do you want to lengthen or shorten your videos in a sequence? Now, you don’t need to adjust your clips manually after editing. In this article, you will learn about the Ripple edit tool in Premiere Pro.
The Ripple tool is a game changer for the professional video editing process. Explore how it changes your video flow. Maintain your clip sequence and adjust the clips positions easily.
Whether trimming a clip or adding a new one, it maintains your project sequence. It saves you time, and you don’t have to work hard to adjust the clips.
We will now discuss each aspect of this tool in Premiere Pro and Filmora. Let’s get started!
In this article
What Is the Ripple Edit Tool in Premiere Pro?
The Ripple edit tool in Premiere Pro allows you to move a specific edit point in your clip. While doing so, it maintains the timeline sequence by moving the same amount to compensate for the gap. It is very useful to adjust the length of your clips. In the editing process Ripple tool is a game changer for both professional editors and beginner video editors.
This Ripple Edit tool in Premiere Pro can help you handle complicated projects and sequences. It can also save you from the manual adjustment of clips, this way it saves your time.
Now, we will discuss the main features of the Ripple edit tool and how to use it.
Main Features of the Ripple Edit Tool in Premiere Pro
- Automatic clips adjustment: This tool automatically shifts the clips to fill in the gap made while editing or trimming clips.
- Precise control: Allow for precise trimming of clips, whether shortening or extending them, without affecting the overall synchronization of the project. This precision is crucial for maintaining the intended pacing and rhythm of the video.
- Maintains sequence: It maintains the sequence by avoiding clips overlapping the timeline and filling in the gaps.
- Track Targeting: Ripple edits can be applied to specific tracks if track targeting is enabled, allowing for more controlled edits across multiple layers of video and audio.
- Keyboard Shortcut: The Ripple Edit tool in Premiere Pro can be quickly accessed using the keyboard shortcut 'B', making it easy to switch between tools and maintain an efficient workflow.
The Ripple Edit tool is an essential feature in Premiere Pro that enhances editing efficiency and precision, making it a valuable tool for both novice and experienced video editors. So, let’s see how to use the Premiere Pro Ripple Edit Tool.
How Do You Use the Ripple Edit Tool in Premiere Pro?
The Ripple edit tool in Premiere Pro is easy to use. Below are the steps to do a Ripple edit:
How To Use Ripple Edit tool in Premiere Pro
- Select the desired video clip that you want to edit in the timeline.
- Then, press B on the keyboard to activate the ripple edit tool.

- Now, click and drag the end of your clip left to right to shorten it or lengthen it.

How To Ripple Delete in Premiere Pro
- Click the clips in Premiere Pro to use or select the Lasso Tool.

- Click the Track Select forward or backward tool to select the clips behind or in front of your chosen clip.
- You will see that the clip selection overrides the Track selection.
- Select clip and press Shift + Delete to ripple Delete.

How Can I Prevent Audio Tracks From Blocking the Ripple Edit Tool?
Sometimes, audio tracks can interfere with your clips while performing Ripple edits. To ensure that the ripple edit works well without any interference from audio tracks, there are a few things to keep in check:
To avoid the audio track movements, lock the audio tracks so they don’t interfere with the ripple edit. You can also use nested sequences for complicated audio tracks. Separate and unlink the audio tracks from editable clips. Also, make sure that there are no overlapping audio tracks.
Let’s look into more issues we encounter while doing Ripple edit in Premiere Pro.
Why Is the Ripple Edit Tool in Adobe Premiere Pro Not Working?
The Ripple Edit Tool in Adobe Premiere Pro may not work for several reasons, often related to how clips are organized on the timeline. Here are some common issues and solutions:
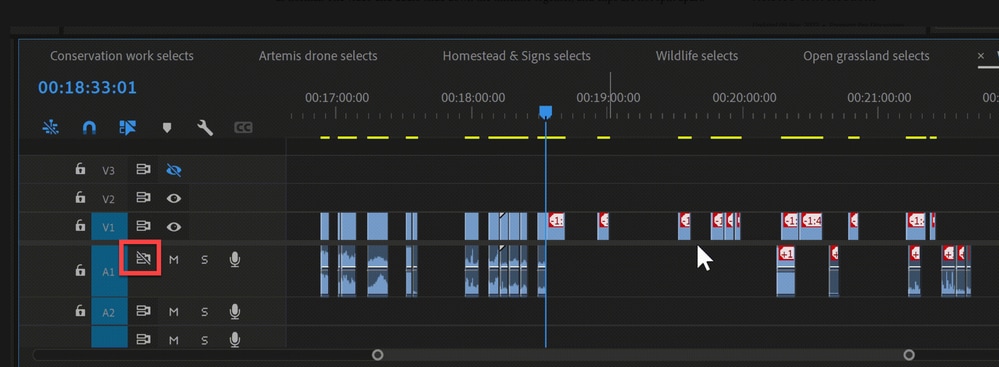
1. Synchronized tracks
The Ripple edit might not work correctly if multiple tracks are synced. This issue occurs because Premiere Pro cannot ripple edit synchronized tracks independently.
2. Unlinked Clips
The Ripple Edit tool works best on linked clips, video, and audio. Having unlinked clips can interfere with your Ripple edit process.
3. No Extra Frames
The Ripple Edit tool requires extra frames to shift into. If there are no extra frames in the clip you're trying to edit, the tool won't work.
4. Audio Blocking
Sometimes, audio tracks can block the ripple edit if they are not linked correctly. Ensure that audio tracks are not interfering with the edit by checking their placement and links.
5. Overlapping Audios
Sometimes, overlapping audios, especially if synced further down the timeline.
To avoid these issues, you can perform the following methods:
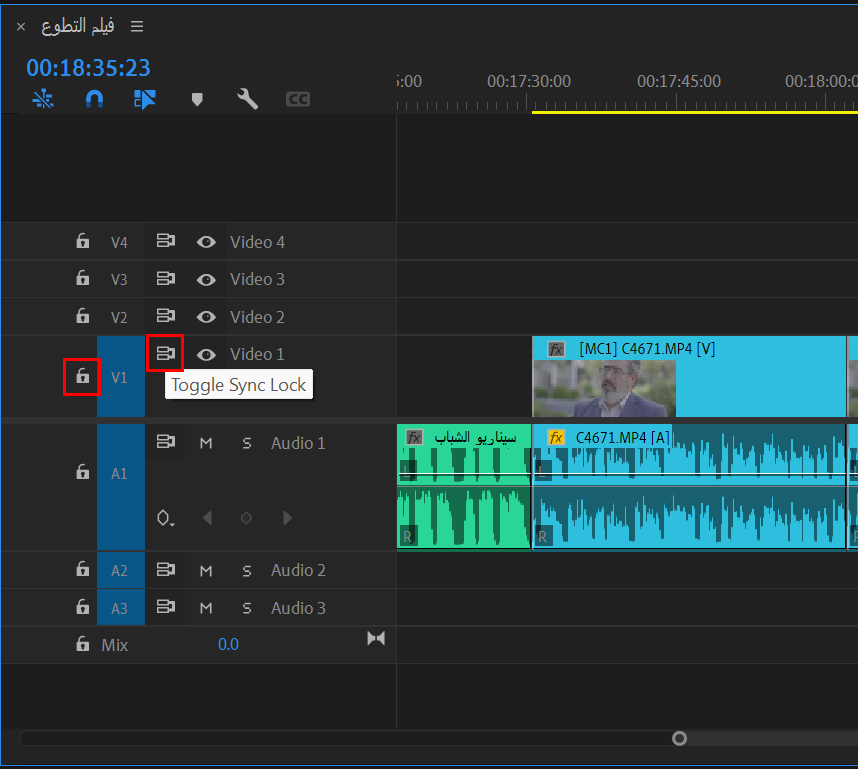
- Disable sync locks: Click the "Toggle Sync Lock" icon for the relevant tracks to disable synchronization. This often allows the Ripple Edit tool to function again.
- Lock other tracks: Lock the tracks you don't want to be affected by the ripple edit. This can prevent these tracks from interfering with your ripple edit performance.

- Remove the interfering tracks: If possible, temporarily move or remove tracks interfering with the ripple edit.

- "Close Gap" feature: Instead of using Ripple Edit on each clip, you can use the "Close Gap" feature. It is under the Sequence menu and removes all the gaps at once.

- Check Preferences: Ensure your Trim preferences are set correctly by going to Preferences > Trim.

Remember, the Ripple Edit tool works well on individual or linked clips without interruptions from other tracks. Understanding these limitations can help you use the tool more effectively in your editing workflow.
If all these solutions don’t work, you can try copying the part that creates the problem to a new sequence.
As we have discussed, the Premiere Pro Ripple Edit Tool in detail. We will also learn about another alternative to it, Wondersahre Filmora. Let’s discuss this tool in detail.
Filmora: Best Alternative to Adobe Premiere Pro Ripple Edit Tool
Wondershare Filmora offers a Ripple edit tool that trims the clips and ripples them to fill the gap. When you delete a section in the middle of your track, it can create a huge gap if you have not enabled Ripple edit. Ripple edit moves your items from the right side towards the left side to fill this gap and maintain sequence. It is easy to use, and it saves you time.
Main features of the Ripple Edit Tool in Filmora
- Auto Ripple Adjustment: Automatically adjusts the position of clips on the timeline when a clip is trimmed or deleted, eliminating gaps and ensuring a smooth flow between video segments.
- Seamless Transitions: Helps create smoother transitions between clips by ensuring that all adjacent clips move together, which is particularly useful in multi-clip projects.
- Manual Ripple Options: You can also manually activate ripple edits, giving them control over how and when to apply the effect during the editing process.
- Speed Control Integration: When adjusting the speed of a clip, the Ripple Edit Tool can automatically readjust the duration of surrounding clips to prevent gaps, enhancing the overall editing efficiency.
How To Use the Ripple Edit Tool in Filmora
Let's breakdown the how-to steps on using Ripple edit in Filmora:
- Download Filmora with the Ripple edit feature by clicking the buttons below.
- Drag and drop your desired clip in the Filmora timeline to edit.

- Right-click on the clip, select duration and speed and tick Ripple Edit on the pop-up that appears.

Now, your Ripple edit feature is enabled, and however you edit or delete your clips, Filmora will maintain the image sequence.
We have discussed Filmora and Adobe Premiere Pro, and now we will discuss their main differences.
Filmora vs. Premiere Pro: Ripple Edit & Timeline Management Features Comparison
| Feature | Filmora | Premiere Pro |
| Ease of Use | User-friendly, low learning curve. | Complicated, advanced for professionals. |
| Ripple Edit Functionality | Auto adjustments, fills gaps. | Precise control, maintains sequence. |
| Multiple Timelines | Focuses on single timeline efficiency. | Supports multiple open timelines. |
| Project Handling | Simplified for efficient workflows. | Designed for complex projects. |
| Built-in Effects/Filters | Wide range of built-in filters. | Professional effects, customizable. |
Final words
Ripple editing is essential for precise and professional video editing. It not only saves you from the mess of adjusting clips manually while editing, but it also saves you time. You can easily adjust your video content by learning about its features and limitations. Both Wondershare Filmora and Adobe Premiere Pro have their limitations and specifications.
Filmora offers a user-friendly workspace, while Premiere Pro provides complicated and advanced features of industrial levels. Whether it is the Filmora Ripple edit tool or the Ripple edit tool in Premiere Pro, by learning these softwares, you can utilize the best ones for you.
So, say goodbye to the editing mess you encounter while trimming clips by enabling the Ripple edit tool.
