For the Best Results, Use the Latest Version.
-
Preparations for Mac
-
Account (Mac)
-
Get Started & Basic Settings (Mac)
- Release notes for Mac
- Latest Versions and Features for Mac
- Get Started on Mac - Full Guide
- Download/register/uninstall on Mac
- Panel Layout on Mac
- Keyboard shortcuts on Mac
- Touchbar on Mac
- Change playback quality on Mac
- Render preview files on Mac
- Manage timeline on Mac
- Media for use on Mac
- Logo Reveal For Mac
- Marked Favorites for Mac
-
Compatibility & Tech Specs (Mac)
-
Performance Settings (Mac)
-
-
Creating Projects - Mac
-
Creating New Projects (Mac)
-
-
Importing & Recording - Mac
-
Importing (Mac)
-
Recording (Mac)
-
-
Video Editing for Mac
-
Basic Video Editing for Mac
- Edit Live Photos on Mac
- Enable/Disable Clip for Mac
- Magnetic Timeline For Mac
- Select All Clips on Timeline for Mac
- Auto Ripple for Mac
- Split & cut videos on Mac
- Compositing on Mac
- Crop and zoom on Mac
- Playback Zoom Level for Mac
- Change speed on Mac
- Play video in reverse on Mac
- Mark In and Mark Out for Mac
- Markers for Mac
- Group clips on Mac
- Customized Backgrounds for Videos and Images in Mac
- Video snapshot on Mac
- Freeze frame on Mac
- Auto enhance on Mac
- Applying Drop Shadow for Mac
- Adjustment Layer for Mac
- Mark clip on Mac
- Video Editing Ruler – Mac
- Apply Transforming for Mac
-
Advanced Video Editing for Mac
-
AI-Powered Video Editing for Mac
- Smart Scene Cut for Mac
- Smart Short Clips for Mac
- Image to Video for Mac
- AI Idea to Video for Mac
- AI Text-to-Video for Mac
- Instant Cutter Tool on Mac
- AI Face Mosaic for Mac
- Keyframe Path Curve for Mac
- Planar Tracking for Mac
- AI Extend For Mac
- AI Script-to-Video for Mac
- AI Text-Based Editing in Mac
- Create With Instant Mode on Mac
- ChatGPT Plugin - AI Copywriting on Mac
- AI Smart Cutout for Mac
- Auto reframe on Mac
- Lens correction on Mac
- AI Portrait Cutout on Mac
- Scene detection on Mac
- AI Smart Masking for Mac
- AI Mate Editing for Mac
- Motion Tracking on Mac
- Stabilize video on Mac
- AI Object Remover For Mac
- AI Smart Search for Mac
- AI Skin Tone Protection for Mac
- Green screen on Mac
- Super Slow Motion with Optical Flow for Mac
- AI stylizer on Mac
- Video Denoise for Mac
-
-
Audio Editing for Mac
-
Basic Audio Editing for Mac
-
Advanced Audio Editing for Mac
-
AI-Powered Audio Editing for Mac
- Audio To Video for Mac
- AI Sound Effect for Mac
- Smart BGM Generation for Mac
- AI Voice Enhancer for Mac
- Audio Stretch for Mac
- AI Audio Denoise for Mac
- Auto synchronization for Mac
- AI Vocal Remover for Mac
- Auto Beat Sync on Mac
- AI Music Generator for Mac
- How to Perform AI Voice Cloning in Wondershare Filmora?
- Silence detection on Mac
-
-
Text Editing for Mac
-
Basic Text Editing for Mac
-
Advanced Text Editing for Mac
-
AI-Powered Text Editing for Mac
-
-
Video Customizations for Mac
-
Video Effects (Mac)
-
Audio Effects (Mac)
-
Transitions (Mac)
-
Stickers (Mac)
-
Filters (Mac)
-
Color Editing (Mac)
-
Animations (Mac)
-
Templates (Mac)
-
Asset Center (Mac)
-
-
Exporting & Share & Cloud Backup - Mac
Retouch for Mac
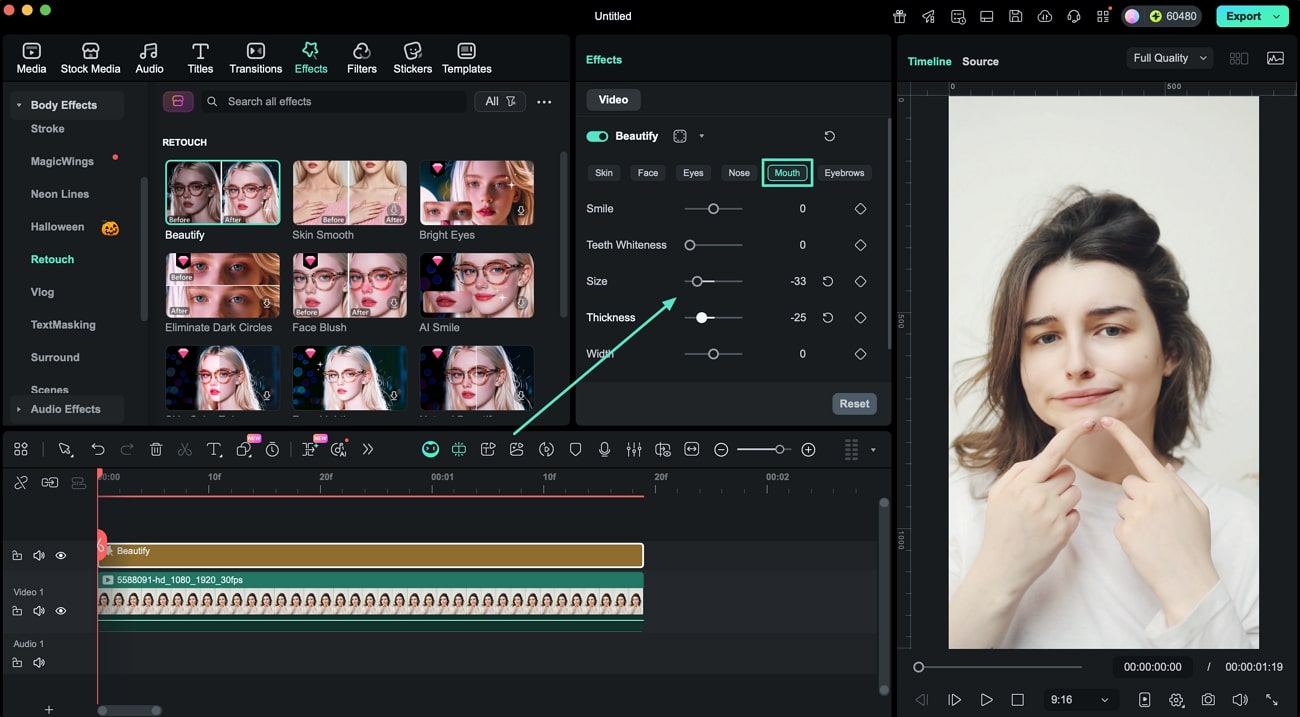
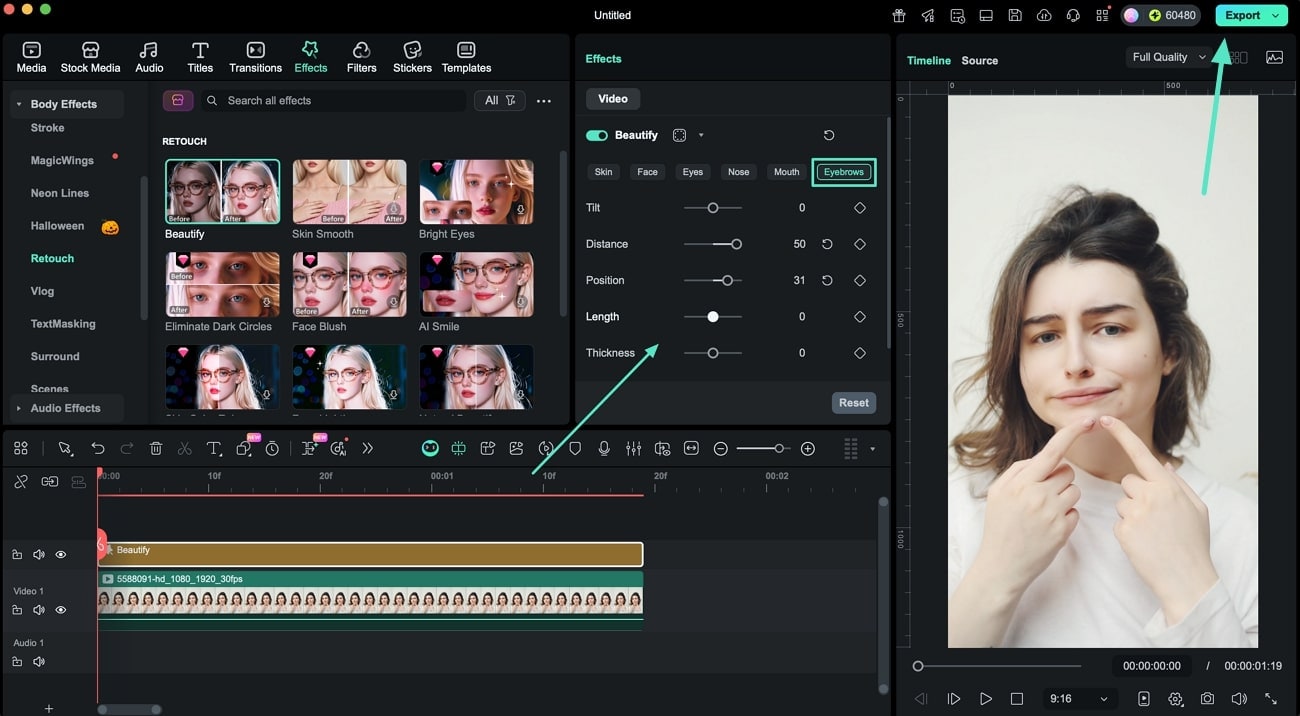
For people who are conscious about their looks and expressions in a video, Filmora’s retouch feature is a game-changer. From changing the gap between your eyes to widening your smile, you can enhance and modify each attribute of your face using AI on your Mac.
The "Beautify" effects of the tool let you seamlessly make changes to the facial features. Filmora’s retouch feature offers natural, subtle beauty adjustments at the bone structure level, avoiding artificial looks. It supports diverse facial aesthetics, adapting to various face shapes for personalized effects.
Index
Step 1. Open a New Project
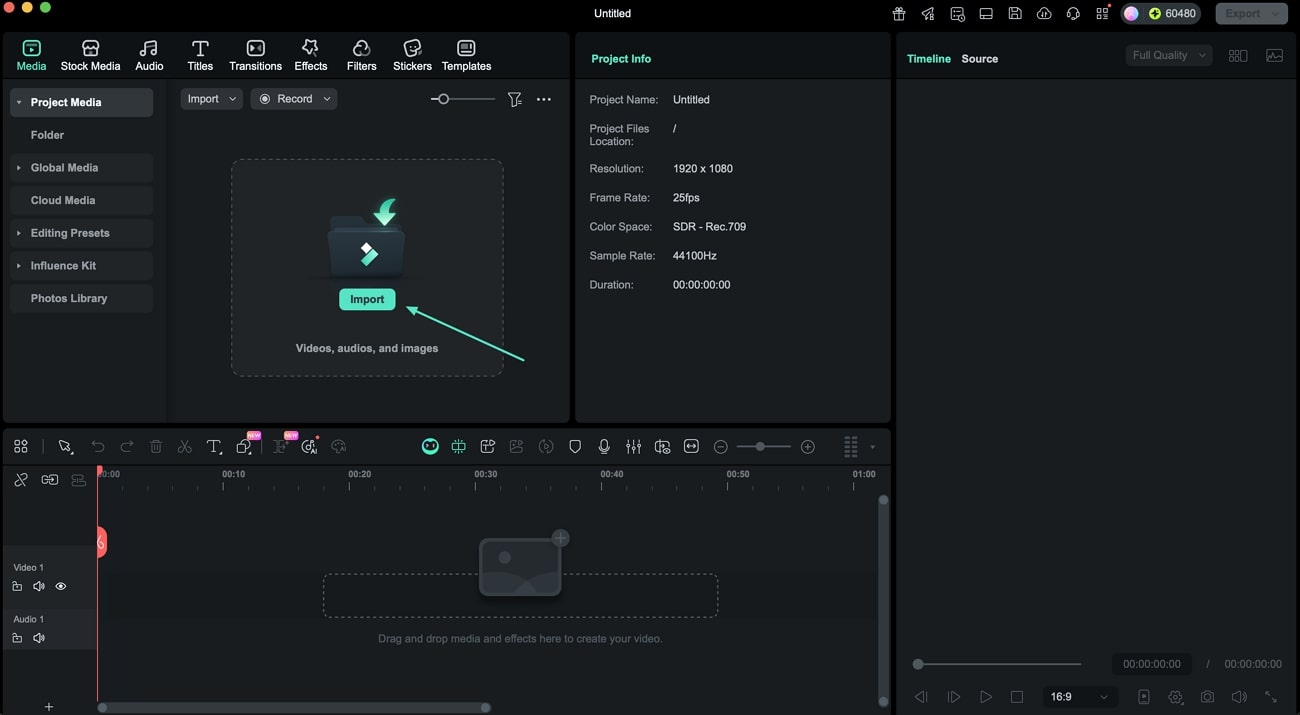
Once you have Filmora on your Mac, click the New Project tab from the homepage. Now add your video and drag it to the editing timeline.
Step 2. Apply the Body Effect
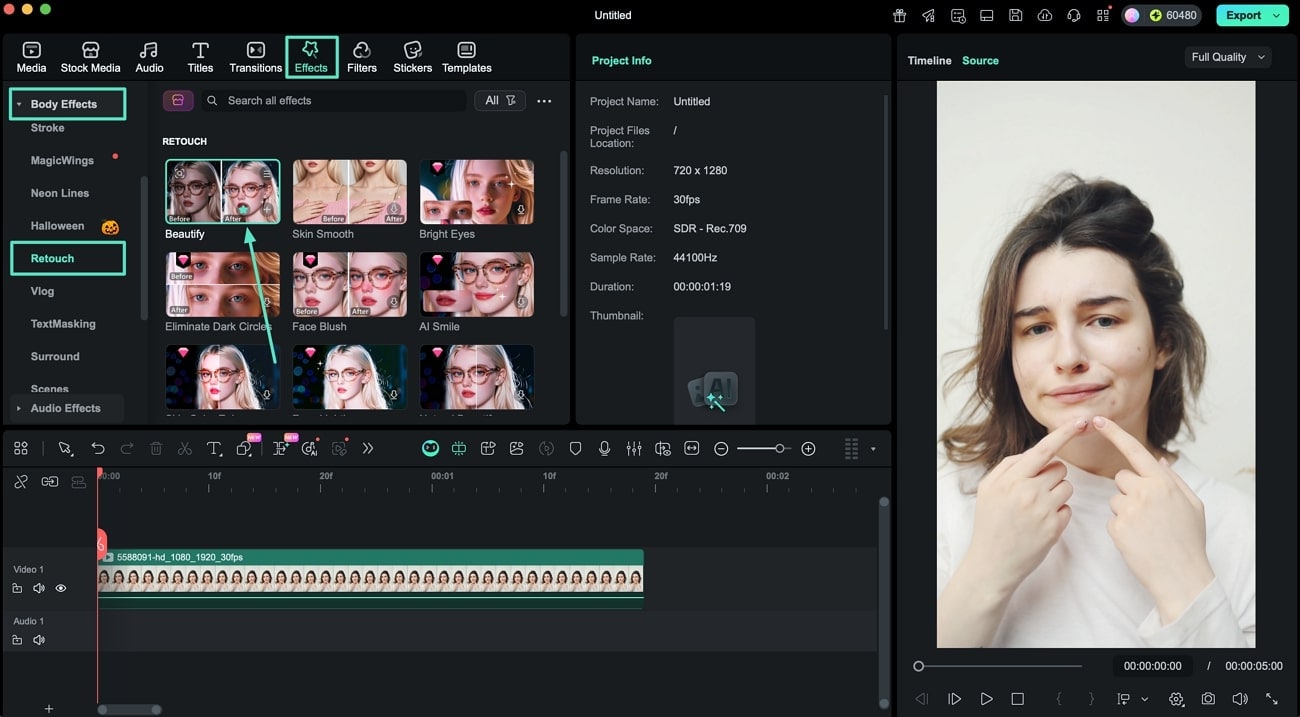
In the editing interface, head to the menu bar and enable the Effects library and the Body Effects section from the left. Choose the Beautify effects from the Retouch sub-section and apply it to your video by dragging it on the timeline.
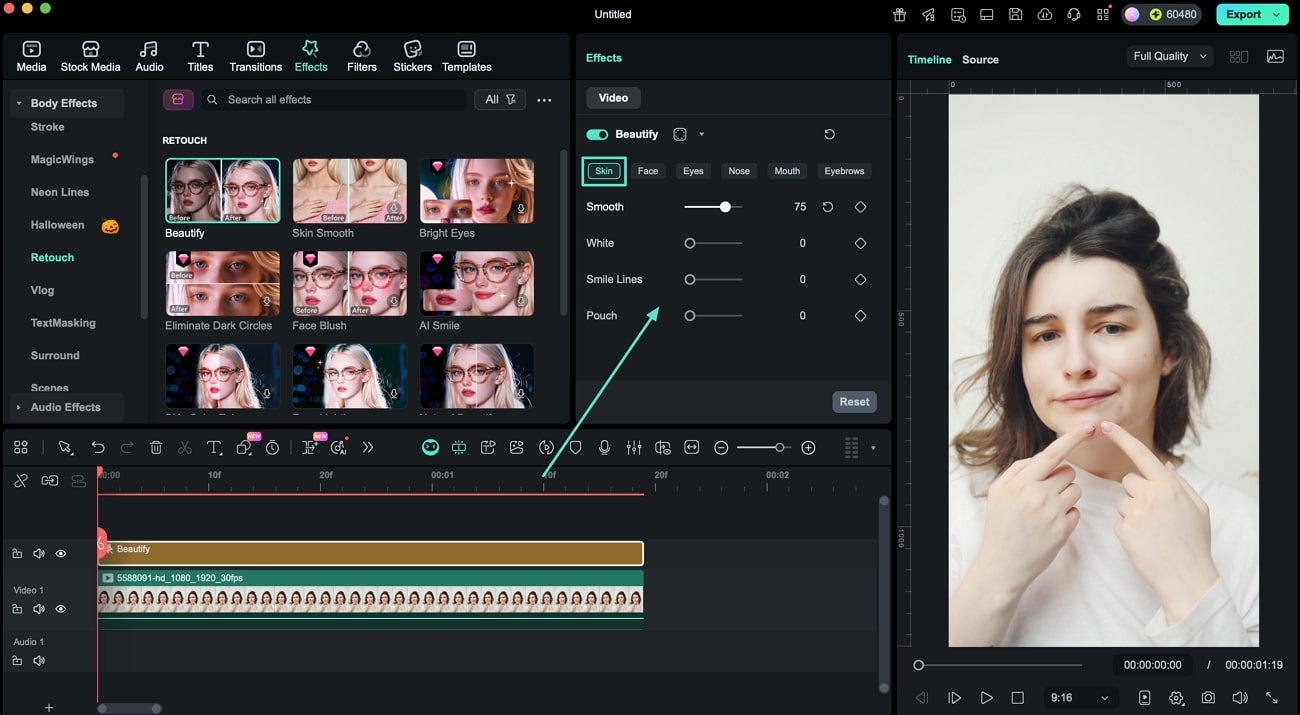
Step 3. Enhance Skin in Video
Once the effect is applied, access the panel on the right and enable the Skin section. Drag Smooth and other sliders to adjust the attributes according to your preferences.
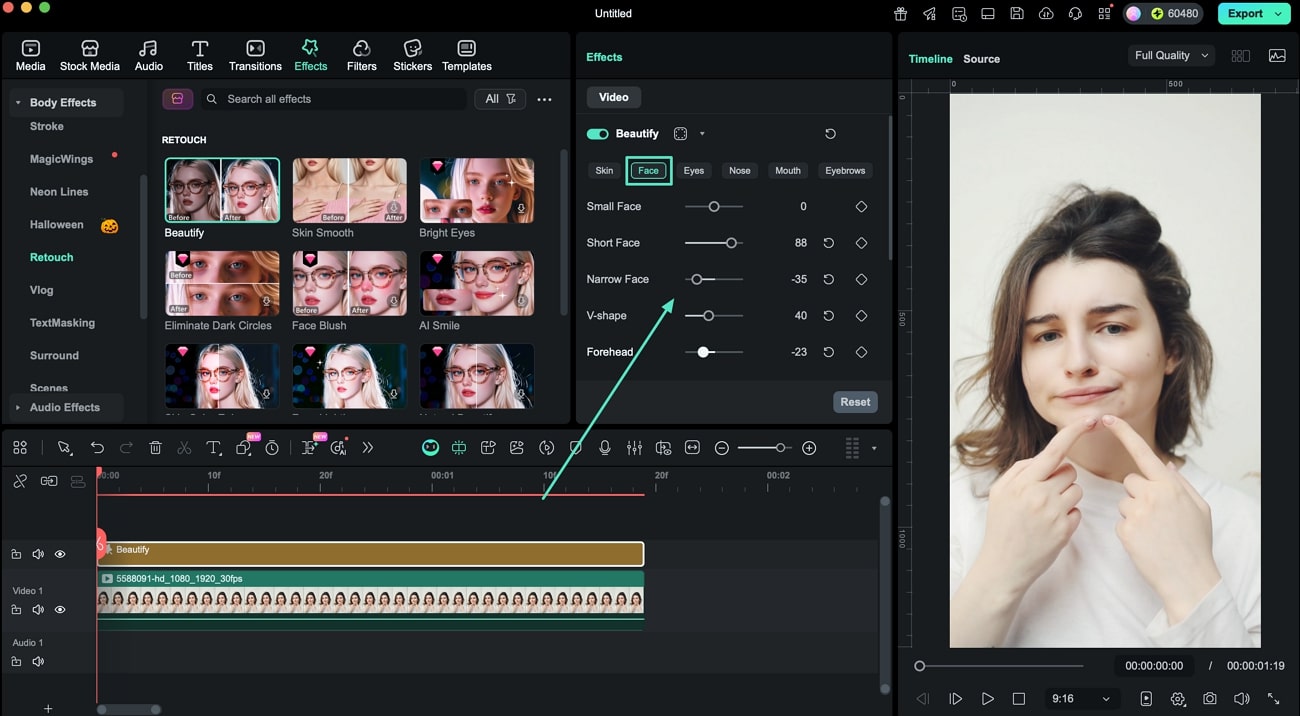
Step 4. Improve the Face Features
Now, enable the Face section and adjust attributes like face shape, jawline, hairline, and more by dragging the respective sliders.
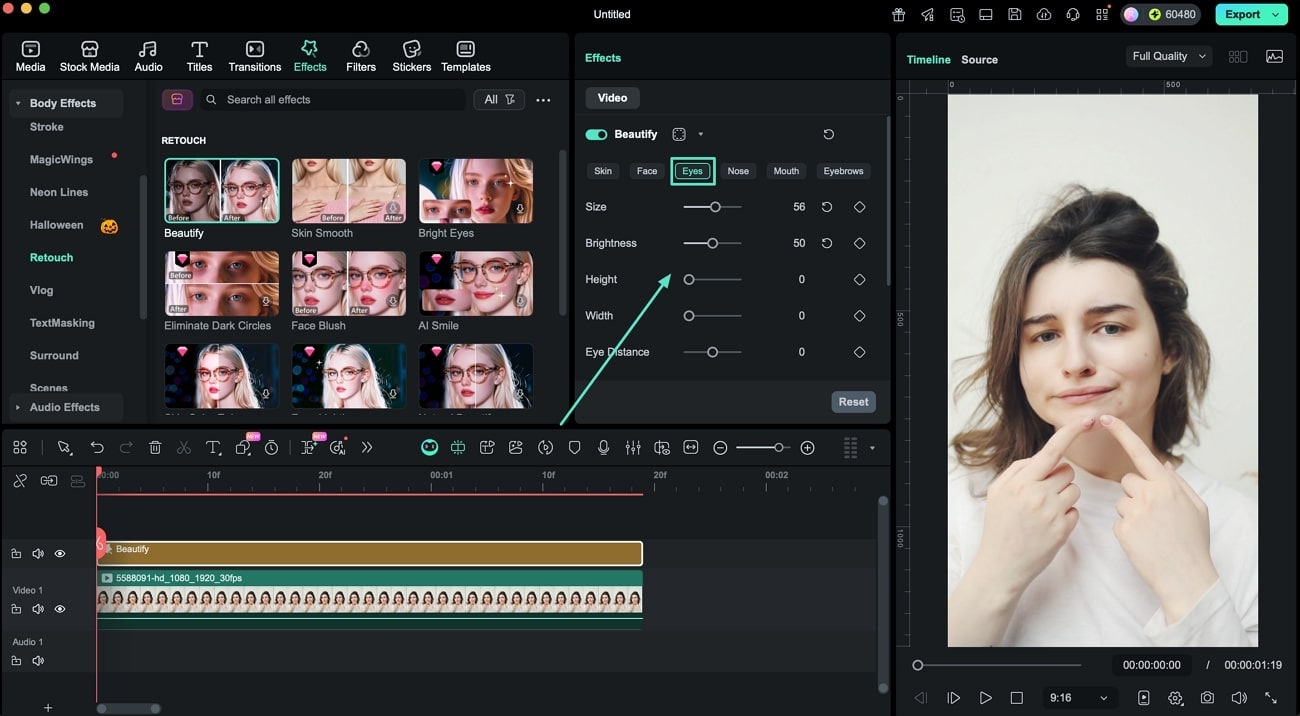
Step 5. Make Changes to Eyes
Next, head to the Eyes section and enhance the features like size, brightness, and width of eyes using the sliders.
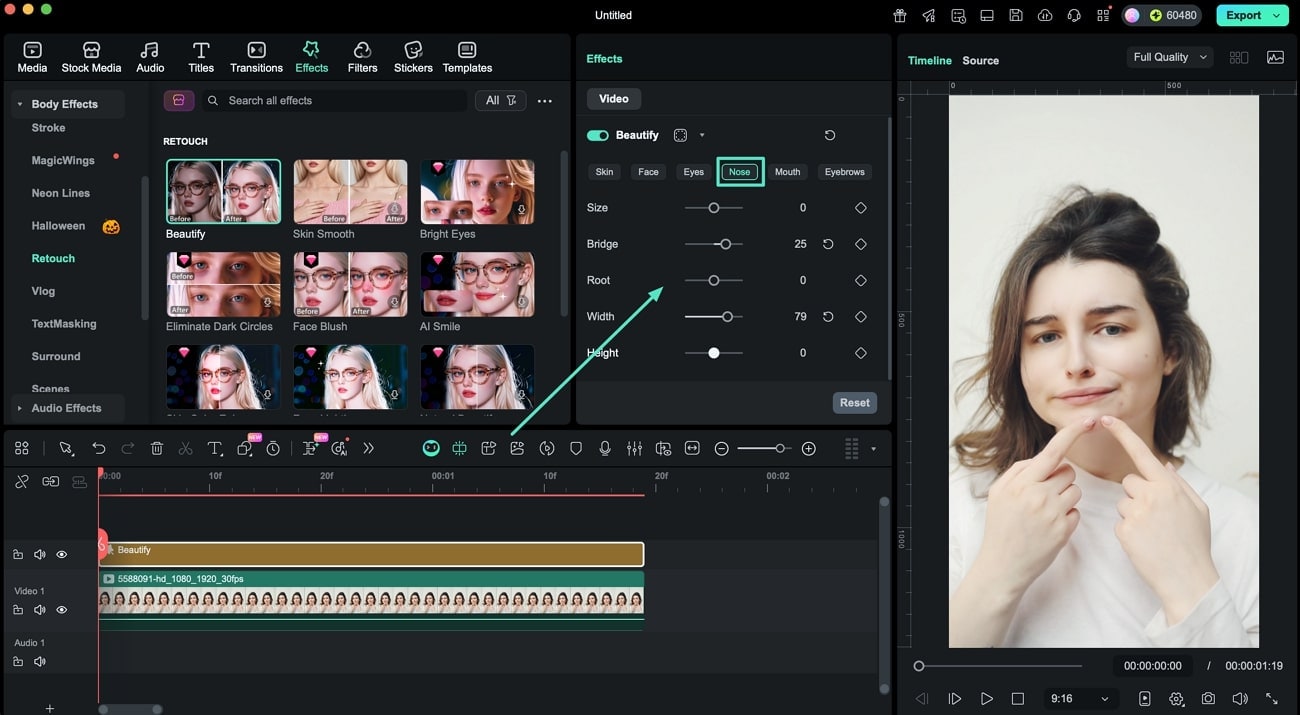
Step 6. Improve the Nose Appearance
Moving forward, head to the Nose section and drag the sliders of bridge, root, and other attributes to adjust.
Related Posts
Featured Articles
A Guide to Beef Recipe Videos
Eager to learn how to make beef stew or other recipes like Beef Wellington? Start by watching beef stew YouTube recipes to visually learn how to make them.
Mastering Video Editing Through Kinemaster Transitions
Do you want to give a professional look to your video? Read that article and learn how you can use the Kinemaster transitions to create a smooth flow.
Create Creepy-Cool Halloween Promotions for Your Restaurant
Make your Halloween restaurant promotion more appealing by using Wondershare Filmora. Create eye-catching and engaging ads with the best features of Filmora.
Recommended User Guide
Body Effects for Mac
Overview of AR Stickers.
Different Types of Video Effects for Mac
Overview about types of video effects.
Filmstock Assets for Mac
Overview of Filmstock Assets.
