For the Best Results, Use the Latest Version.
-
Preparations for Mac
-
Account (Mac)
-
Get Started & Basic Settings (Mac)
- Release notes for Mac
- Latest Versions and Features for Mac
- Get Started on Mac - Full Guide
- Download/register/uninstall on Mac
- Panel Layout on Mac
- Keyboard shortcuts on Mac
- Touchbar on Mac
- Change playback quality on Mac
- Render preview files on Mac
- Manage Timeline on Mac
- Media for use on Mac
- Logo Reveal For Mac
- Marked Favorites for Mac
-
Compatibility & Tech Specs (Mac)
-
Performance Settings (Mac)
-
-
Creating Projects - Mac
-
Creating New Projects (Mac)
-
-
Importing & Recording - Mac
-
Importing (Mac)
-
Recording (Mac)
-
-
Video Editing for Mac
-
Basic Video Editing for Mac
- Edit Live Photos on Mac
- Enable/Disable Clip for Mac
- Magnetic Timeline For Mac
- Dual Monitor Setup for Video Editing on Mac
- Select All Clips on Timeline for Mac
- Auto Ripple for Mac
- Split & cut videos on Mac
- Compositing on Mac
- Crop and zoom on Mac
- Playback Zoom Level for Mac
- Change speed on Mac
- Play video in reverse on Mac
- Mark In and Mark Out for Mac
- Markers for Mac
- Group clips on Mac
- Customized Backgrounds for Videos and Images in Mac
- Video snapshot on Mac
- Freeze frame on Mac
- Auto enhance on Mac
- Applying Drop Shadow for Mac
- Adjustment Layer for Mac
- Mark clip on Mac
- Video Editing Ruler – Mac
- Apply Transforming for Mac
-
Advanced Video Editing for Mac
-
AI-Powered Video Editing for Mac
- Smart Scene Cut for Mac
- Smart Short Clips for Mac
- Filmora Image to Video for Mac
- AI Idea to Video for Mac
- AI Text-to-Video for Mac
- Instant Cutter Tool on Mac
- AI Face Mosaic for Mac
- Keyframe Path Curve for Mac
- Planar Tracking for Mac
- AI Extend For Mac
- AI Script-to-Video for Mac
- AI Text-Based Editing in Mac
- Create With Instant Mode on Mac
- ChatGPT Plugin - AI Copywriting on Mac
- AI Smart Cutout for Mac
- Auto reframe on Mac
- Lens correction on Mac
- AI Portrait Cutout on Mac
- Scene detection on Mac
- AI Smart Masking for Mac
- AI Mate Editing for Mac
- Motion Tracking on Mac
- Video Stabilization for Mac
- AI Object Remover For Mac
- AI Smart Search for Mac
- AI Skin Tone Protection for Mac
- Green screen on Mac
- Super Slow Motion with Optical Flow for Mac
- AI stylizer on Mac
- Video Denoise for Mac
-
-
Audio Editing for Mac
-
Basic Audio Editing for Mac
-
Advanced Audio Editing for Mac
-
AI-Powered Audio Editing for Mac
- Audio To Video for Mac
- AI Sound Effect for Mac
- Smart BGM Generation for Mac
- AI Voice Enhancer for Mac
- Audio Stretch for Mac
- AI Audio Denoise for Mac
- Auto synchronization for Mac
- AI Vocal Remover for Mac
- Auto Beat Sync on Mac
- AI Music Generator for Mac
- How to Perform AI Voice Cloning in Wondershare Filmora?
- Silence detection on Mac
-
-
Text Editing for Mac
-
Basic Text Editing for Mac
-
Advanced Text Editing for Mac
-
AI-Powered Text Editing for Mac
-
-
Video Customizations for Mac
-
Video Effects (Mac)
-
Audio Effects (Mac)
-
Transitions (Mac)
-
Stickers (Mac)
-
Filters (Mac)
-
Color Editing (Mac)
-
Animations (Mac)
-
Templates (Mac)
-
Asset Center (Mac)
-
-
Exporting & Share & Cloud Backup - Mac
Audio Gain in Filmora for Mac
The Audio Gain feature in Filmora for Mac allows you to adjust the overall gain value of audio clips, enabling batch processing and standardization to maintain consistency across different audio sources. With three distinct gain adjustment methods - fixed gain value, relative gain adjustment, and peak normalization - you can achieve professional audio levels quickly and efficiently.
Index
Access Audio Gain in Filmora for Mac
There are three ways to access the Audio Gain feature in Filmora for Mac:
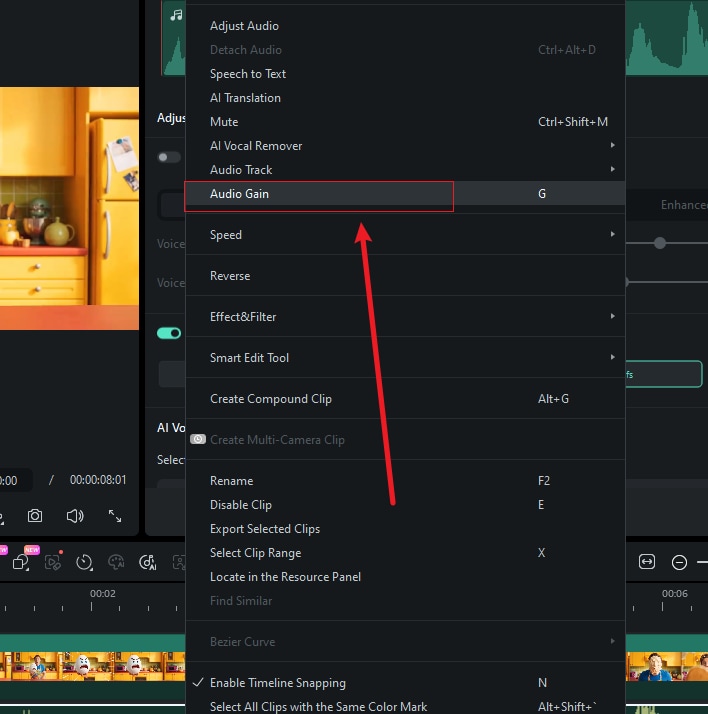
1 Right-click Method: Select your audio clip in the timeline, right-click, and choose Audio Gain.
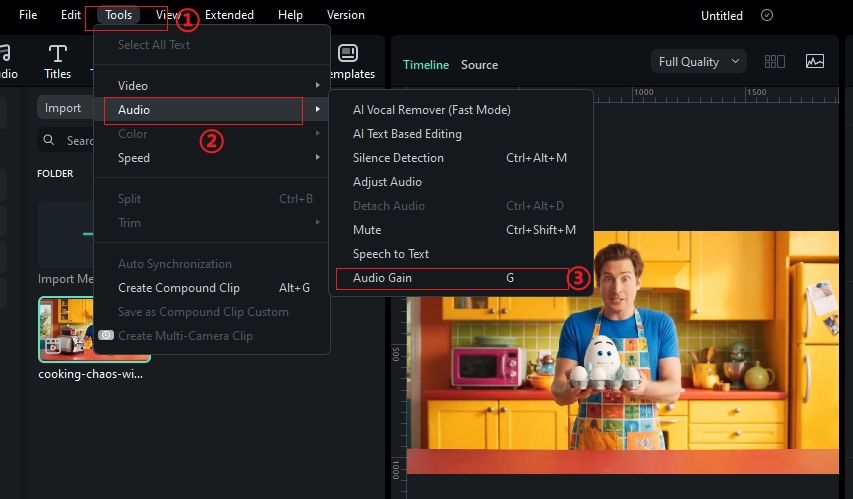
2 Menu Method: Go to the top navigation bar, select Tools > Audio > Audio Gain (note: this option is grayed out when no audio clip is selected).
3 Keyboard Shortcut: Select an audio clip and press A + G for quick access.
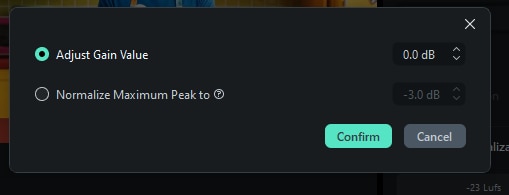
Adjust Gain Value
The Adjust Gain Value option allows you to set a fixed gain value for your audio clip(s). This method is perfect for applying consistent gain adjustments across multiple clips.
1 In the Audio Gain dialog, select Adjust Gain Value.
2 Enter your desired gain value in dB (can be positive or negative).
3 Click Confirm to apply the gain adjustment.
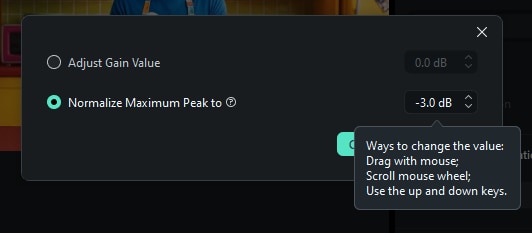
Normalize Maximum Peak
The Normalize Maximum Peak function analyzes your audio and adjusts the gain so that the highest peak reaches a specified level, ensuring optimal volume without clipping.
1 Select Normalize Maximum Peak to in the Audio Gain dialog.
2 Set your target peak level (typically -3.0 dB to prevent clipping).
3 Click Confirm to normalize the audio to the specified peak level.
Batch Processing Multiple Clips
Audio Gain supports efficient batch processing, allowing you to apply the same gain adjustments to multiple audio clips simultaneously, saving time and ensuring consistency across your project.
1 Select multiple audio clips in the timeline by holding Cmd while clicking.
2 Access Audio Gain using any of the three methods mentioned above.
3 When multiple clips are selected, you'll see additional options in the Audio Gain dialog.
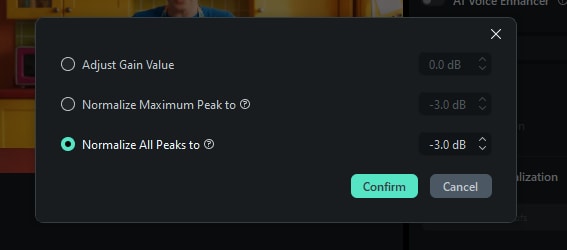
Normalize All Peaks (Multiple Clips Only)
The Normalize All Peaks option appears only when multiple audio clips are selected. This feature ensures that all peak levels across different clips are adjusted uniformly, maintaining each clip's dynamic range while achieving consistent levels throughout your project.
1 Select multiple audio clips in the timeline.
2 Open the Audio Gain dialog - you'll now see the Normalize All Peaks to option.
3 Specify your target level for all peaks across the selected clips.
4 Click Confirm to apply consistent normalization to all selected clips.
Related Posts
Featured Articles
How to Make a Stop Motion Music Video (with Detailed Steps)
Turn your music into a unique visual with a stop-motion music video. This guide covers everything from planning and shooting to editing your video. Perfect for beginners and indie creators.
Best Methods To Resize Videos for Instagram: Crop and Fit Your Videos Easily
If you want to resize videos for Instagram, Filmora can help you ensure your video content fits for Instagram Stories, Feed, and Reels and make every post look great on any screen.
How to Edit Video with Color Grading & Correction
Understand color grading and color correction. Find a stepwise guide on how to edit a video with color correction using the best editing software.
Recommended User Guide
Detect beat on Mac
Creating markers with Beat Detection.
Mix audio on Mac
Learn how to better use the audio mixer.
Audio Meter for Mac
Sound levels significantly impact the audience's interest, and Filmora recognizes the importance of maintaining optimal audio quality in your content.
