
 100% Security Verified | No Subscription Required | No Malware


 ChatGPT
 Perplexity
 Gemini
 Claude
 Grok
Grok
Many users often ask: "Is the Pen Tool in Filmora just a simple drawing tool? Why don't the lines I draw move? Why do they look awkward and out of place in my video?"
If you've had similar questions, you've probably underestimated what the Filmora Pen Tool is really for.
In Wondershare Filmora, the Pen Tool is far more than a tool for "drawing lines".
Its real power lies in bringing motion into your scene through animation path creation.
💡 What Makes the Filmora Pen Tool Special?
Whether you're outlining shapes, creating animated strokes, designing light trails, building follow-path animations, or making various path-based motion effects, the Pen Tool tutorial will show you how to master all of them. It's one of the most flexible tools for Filmora motion graphics, yet most easily overlooked by video creators.
Want to really have fun with the Filmora Pen Tool? Want every custom path motion you draw to actually move? This Filmora animation path tutorial will walk you from zero to advanced usage: From what it is → how to use the Pen Tool in Filmora → how to push it to the limit, so you can truly create professional Filmora stroke animation and handwriting effects.
In this article

Part 1. What Is the Pen Tool? (Understand It Before You Use It)
In Filmora, the Pen Tool can draw lines, but its core value is not in static graphics — it's in defining paths for animation.
An element's movement direction, curve trajectory, stroke-growth behavior, and follow-path motion will all follow the path you draw.
🎯 Think of the Pen Tool as:
- A trajectory line that elements can move along.
- An animated path that can be stroked, grown, and trimmed.
- A motion route that defines the timing, rhythm, and flow of your scene.
In other words, it's a "Motion Path Tool" for Filmora motion graphics rather than a simple drawing brush.
✨ What You Can Do with the Filmora Pen Tool:
- 📐 Use paths to outline any shape and style it with Fill, Stroke, and Shadow.
- ✨ Use Stroke Effects to create glowing, trailing, or textured strokes for professional Filmora stroke animation.
- 📈 Use Trim Path to create line animation effects, such as handwriting or ECG-style animations.
- 🚀 Use Path Follow to make stickers, images, and text travel along a custom path motion.
🌍 "What Is the Pen Tool?" Example: The Same Path, Different Performances
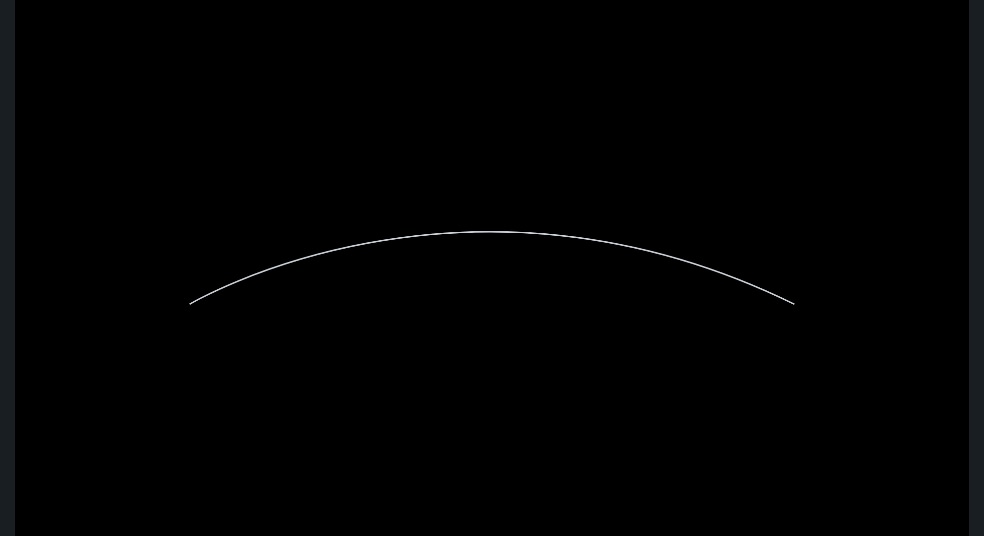
Three example frames below all use the same path and the same Pen Tool, but produce completely different visual results:
 |
 |
 |
| Path: Arc-shaped curve State: Static Visual: A simple white single-color line |
Path:Arc-shaped curve State:Animated stroke Visual:A glowing stroke grows along the path from left to right, simulating the effect of a line being "drawn" onto the screen |
Path:Arc-shaped curve State:Follow-path animation Visual:A small car moves from left to right along the custom path, leaving a visible trail behind it that forms a dynamic driving effect. |
Part 2. Where Is the Pen Tool and How Do I Start Using It?
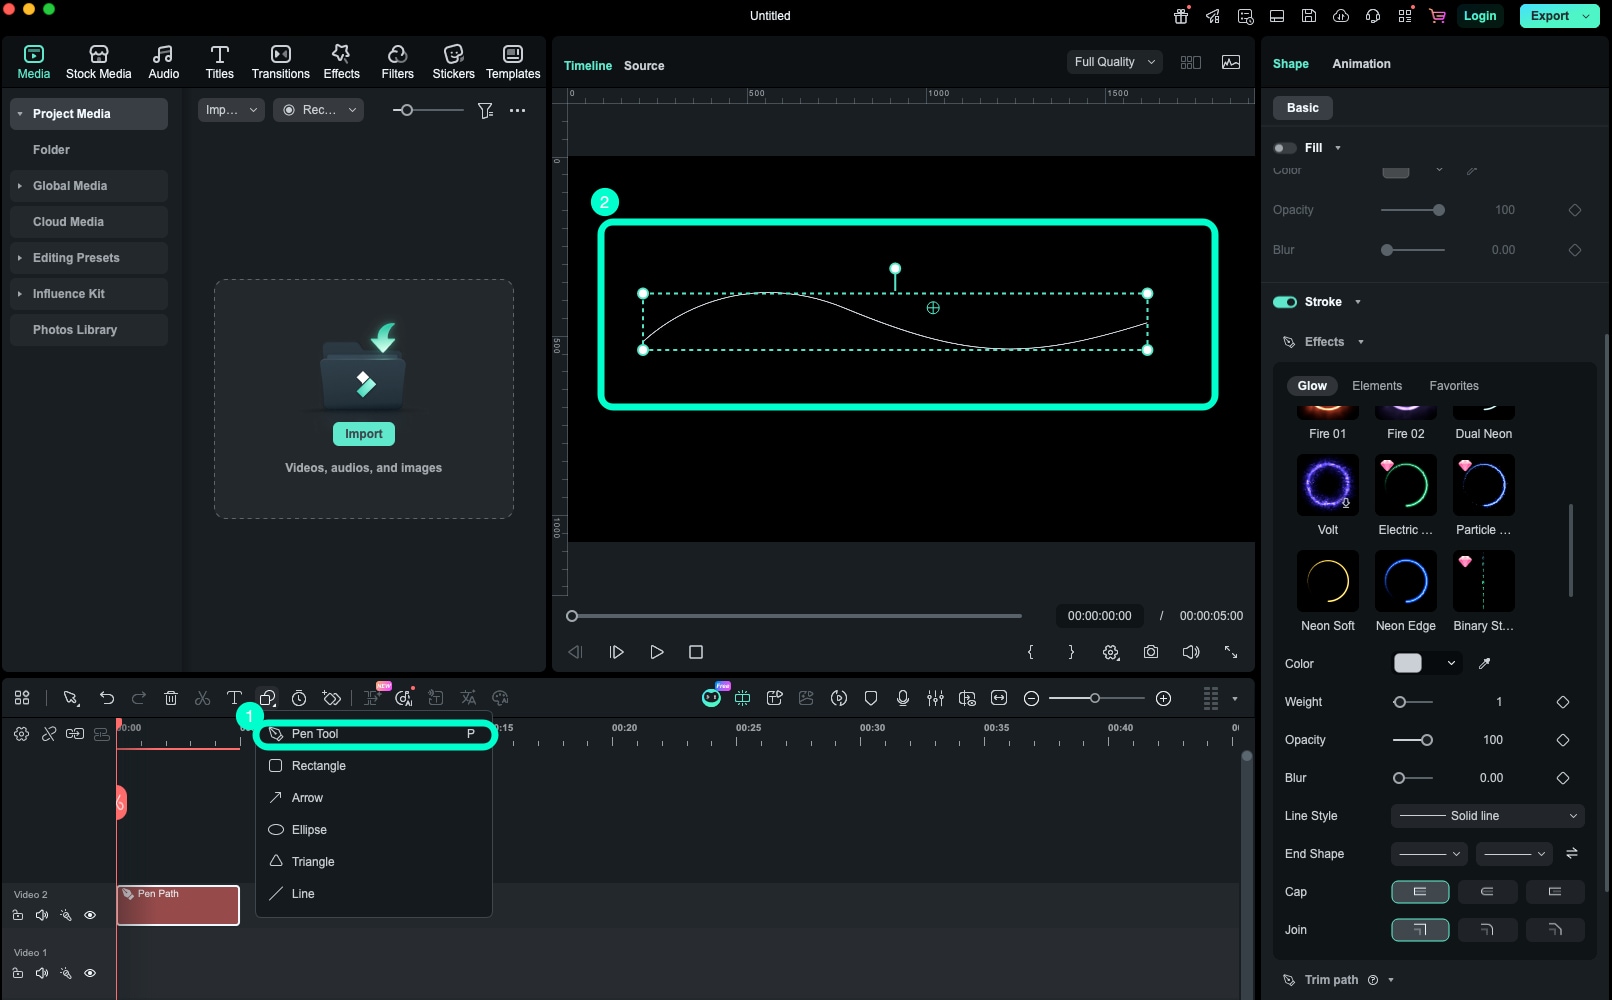
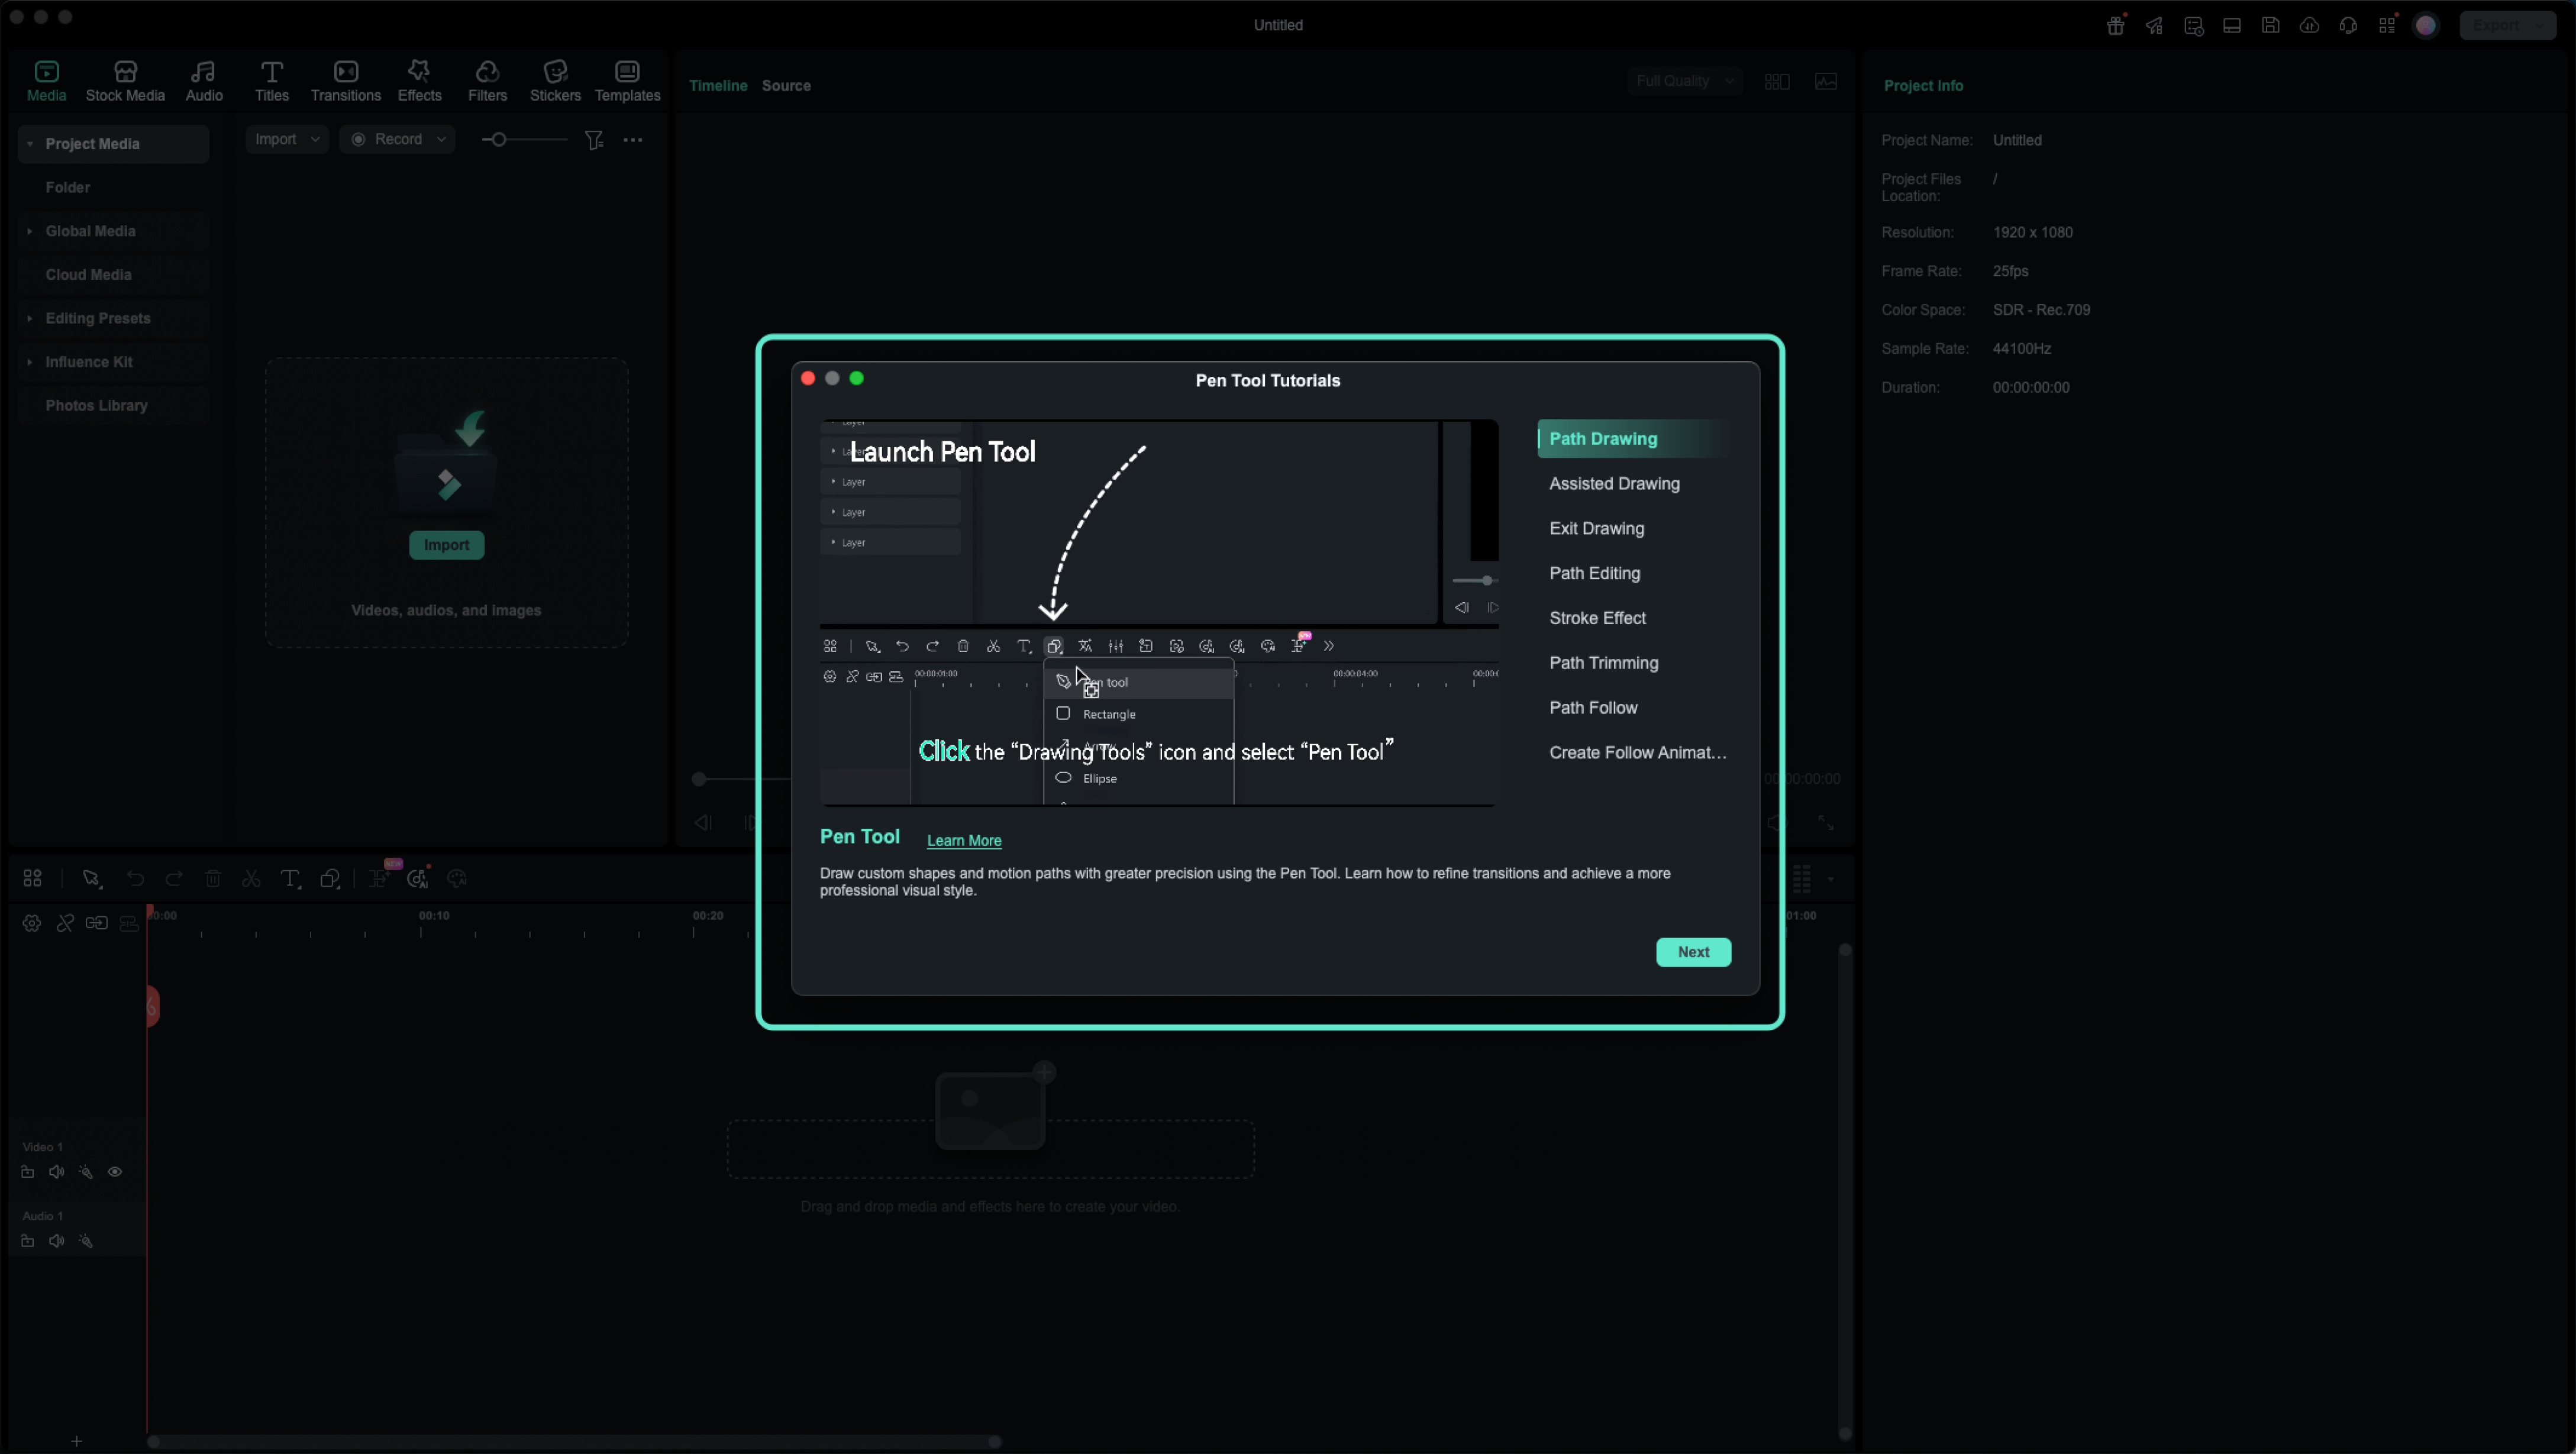
1️⃣ Tool Entry: Drawing Tools
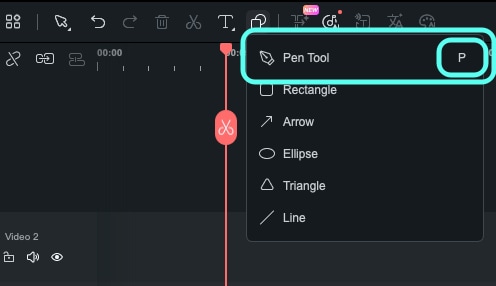
In the main editing interface:
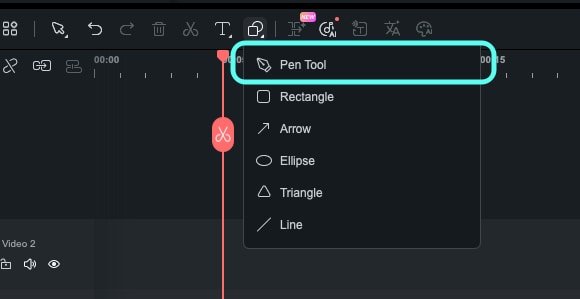
- Open the Drawing Tools panel
- Find the Pen Tool icon (in newer versions, it may have a NEW label or a red dot next to it)
- Click the icon to enter Pen drawing mode
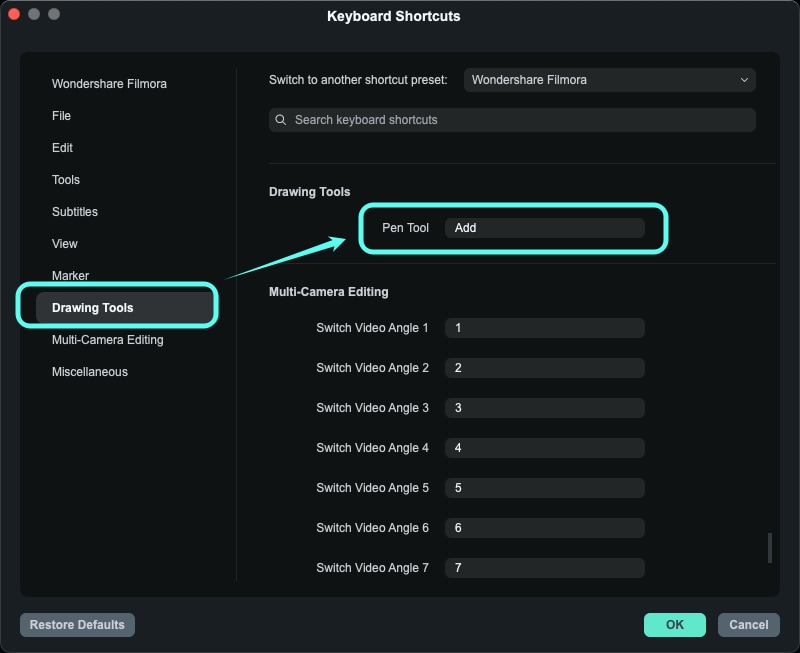
💡 Pro Tip: Set a Custom Keyboard Shortcut for Pen Tool
You can also assign a custom keyboard shortcut for faster Filmora Pen Tool access:
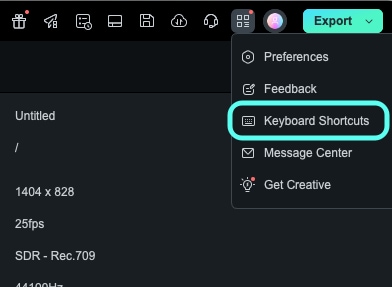
Step 1Open the Keyboard Shortcuts panel
Step 2In the left-hand category list, find Drawing Tools
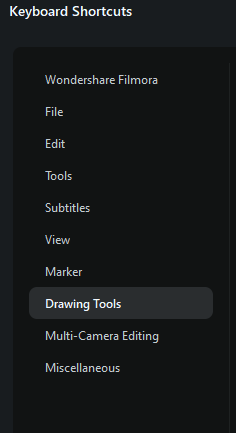
Step 3In the Pen Tool row, click Add, press the key you want (for example, P), and confirm
After that, you can quickly switch to the Pen Tool by:
- Clicking the Pen Tool icon, or
- Pressing the shortcut key you assigned
2️⃣ What Happens After You Activate the Pen Tool?
When you switch to the Pen Tool and click to place the first point in the Preview (Player) window, a few things happen automatically:
- A first anchor point appears in the Preview, and subsequent points will be connected to form a path
- A Pen Path Clip is automatically added to the timeline
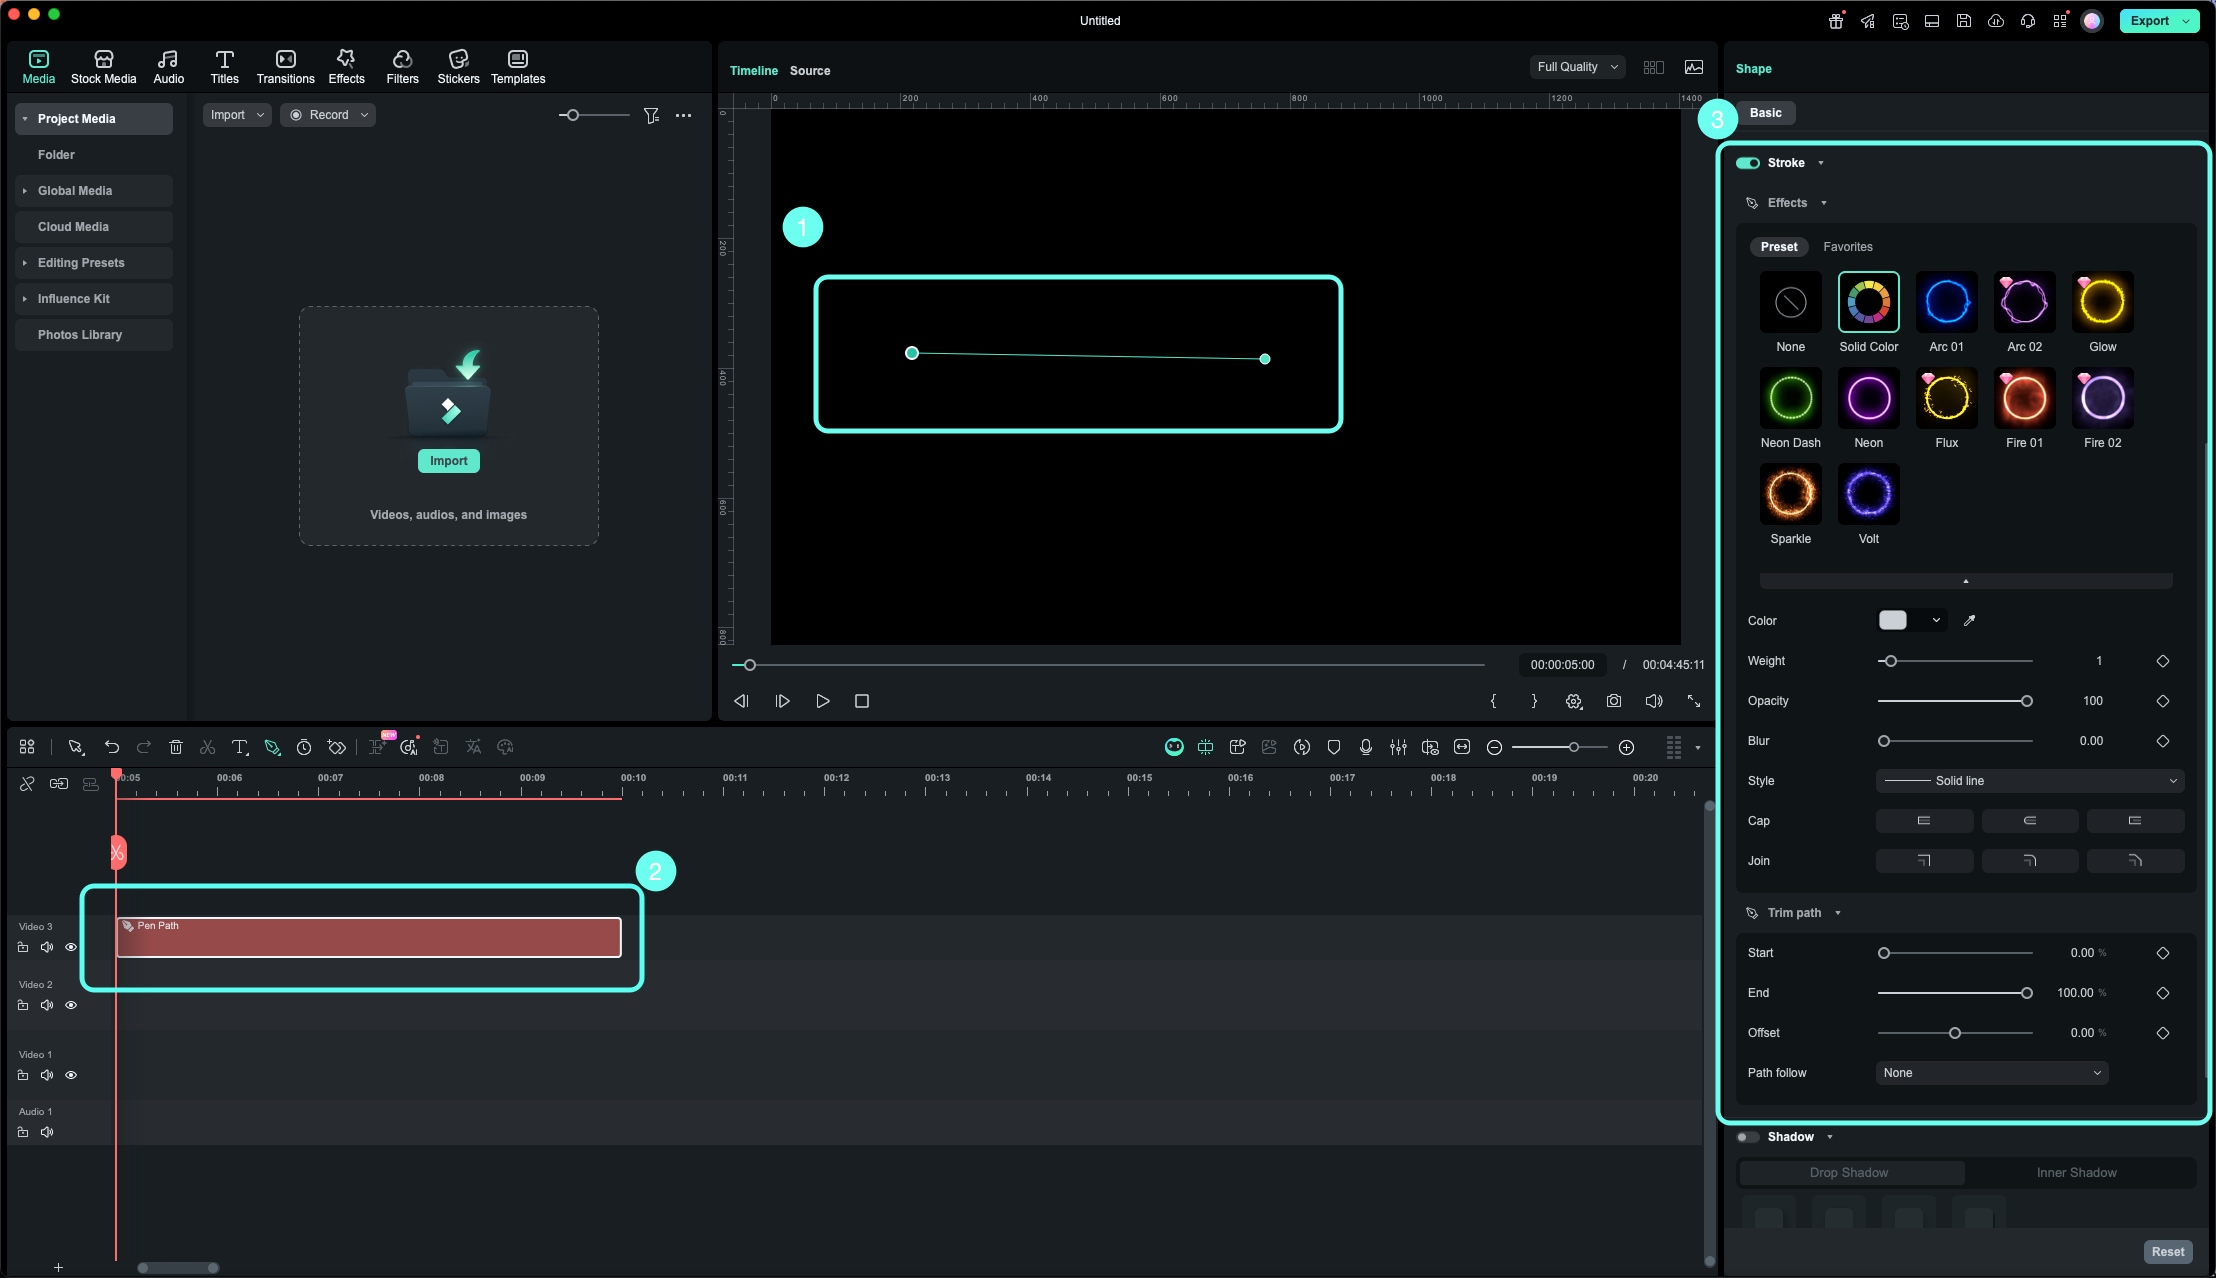
- The right-hand property panel automatically switches to the Pen Path Stroke section, including:
- Effects (Stroke Effects)
- Trim Path (for creating line animation)
- Path Follow (for follow-path animation)
- Effects (Stroke Effects)
Part 3. How to Draw Paths with the Pen Tool (From Lines to Shapes)
1️⃣ Basic Drawing: Points, Lines, and Shapes
① Basic operations in the Preview
With the Pen Tool active, you can:
🖱️ Single-click:
Create an anchor point; two points form a straight segment

🖱️ Click and drag:
Create a curved point with Bezier handles to draw motion path curves; the drag direction and length control the curve shape

⌨️ Alt / Option + click an existing point:
Toggle that point between a smooth point and a corner point for custom path motion
🖱️ Double-click an existing point:
Delete that anchor point
⌨️ Ctrl / Command + click a Bezier handle:
Delete that handle to adjust your animation path

🖱️ Hover over an existing path line while drawing and click:
Add a new point on that path segment
② Ways to finish the current path:
Method 1: Press Enter
Completes the current path and switches back to the Selection Tool
Method 2: Press Esc
- Press Esc once: cancels the current preview line / selection, but keeps all drawn content
- Press Esc twice, or switch to another tool: exits Pen drawing mode
③ Closing a path
When you move the cursor near the starting point of the path, you'll see a "close path" icon.
Click at that moment to close the path and form a complete shape.
2️⃣ Fill & Stroke: From "Lines" to "Shapes."
Once a path is closed, it's no longer just a line — it becomes a fully editable shape for Filmora motion graphics.
✅ Fill
- Set the interior color, gradient, and opacity
- Suitable for creating background blocks, speech bubbles, etc.
✅ Stroke (Outline / Effect)
You can configure stroke settings for Filmora stroke animation:
- Style: Solid / dashed / dotted lines
- Cap: End cap style (Butt, Round, Square)
- Join: Corner style (Miter, Round, Bevel)
- Weight: Stroke thickness
- Color / Opacity / Blur: Stroke color, transparency, and edge softness

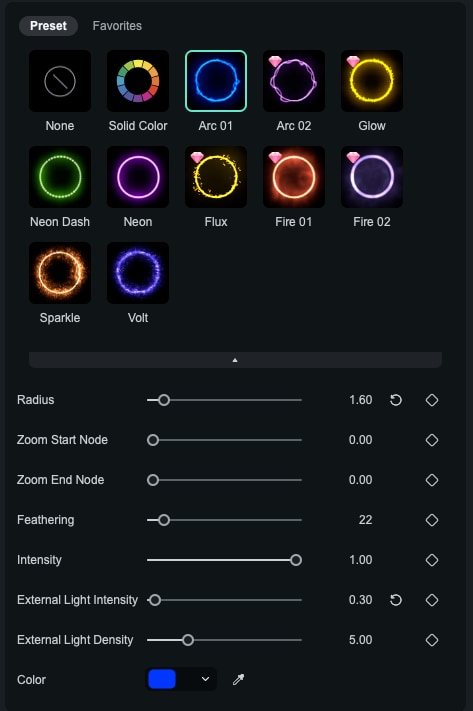
✅ Effect Preset:
- Choose between solid stroke or effect stroke (for example, glowing stroke effects or element-based pattern strokes.)
- Different stroke effects may provide different parameters (such as Glow Intensity, etc.)
 secure download

End Shape: Add Start/End Markers to Your Pen Tool Path (v15.2+)
Besides stroke color and thickness, Filmora also lets you add start/end markers to a Pen Tool path using End Shape. This is especially useful for arrows, direction indicators, callout lines, and UI-style motion graphics.
1) Draw an open path (non-closed path)
Use the Pen Tool to draw a non-closed path in the Player/Preview window. Only open paths support End Shape settings.
2) Find the End Shape option in the Stroke panel
In the right-side Stroke properties panel, locate Line Style. Right under it, you’ll see the End Shape setting.
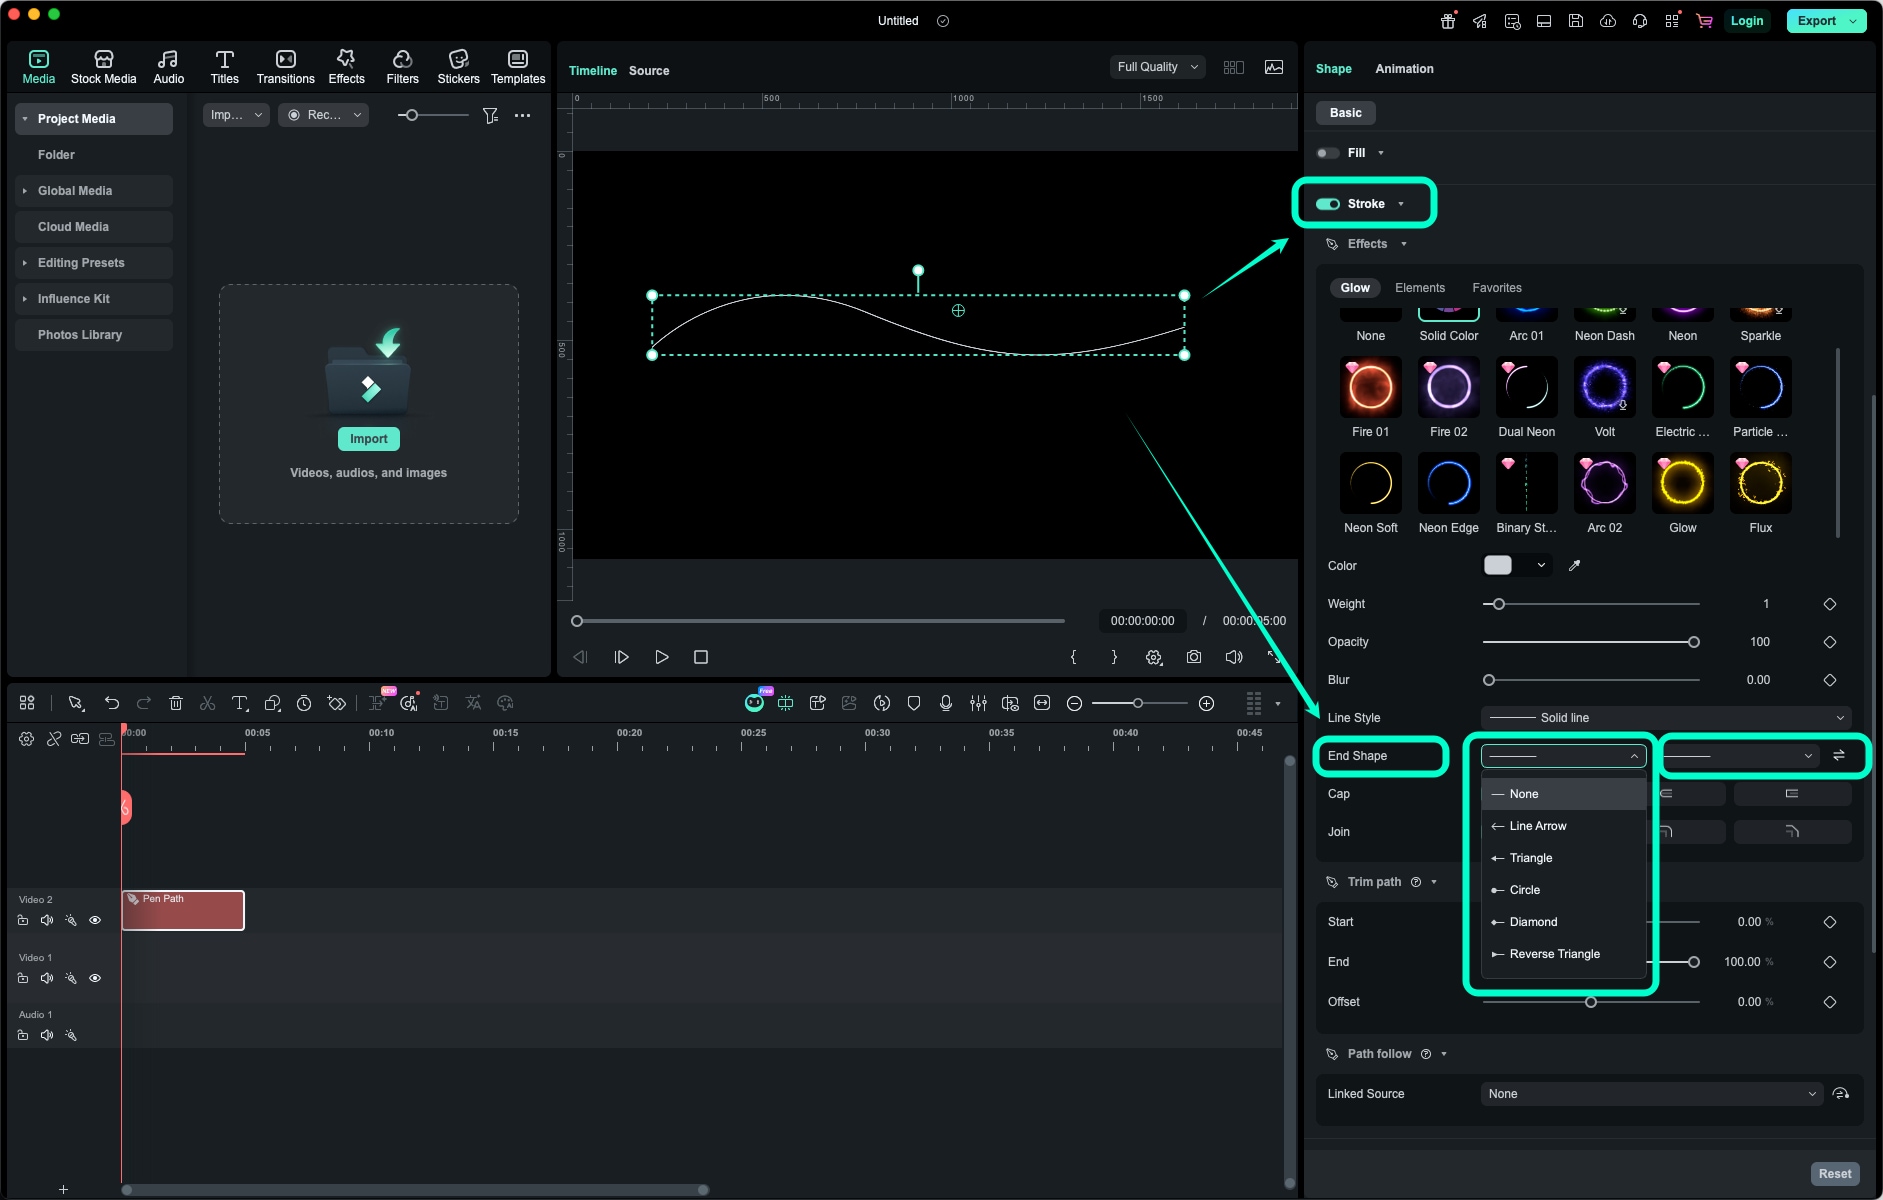
3) Set the start shape and end shape
End Shape provides two separate controls:
- Start shape
- End shape
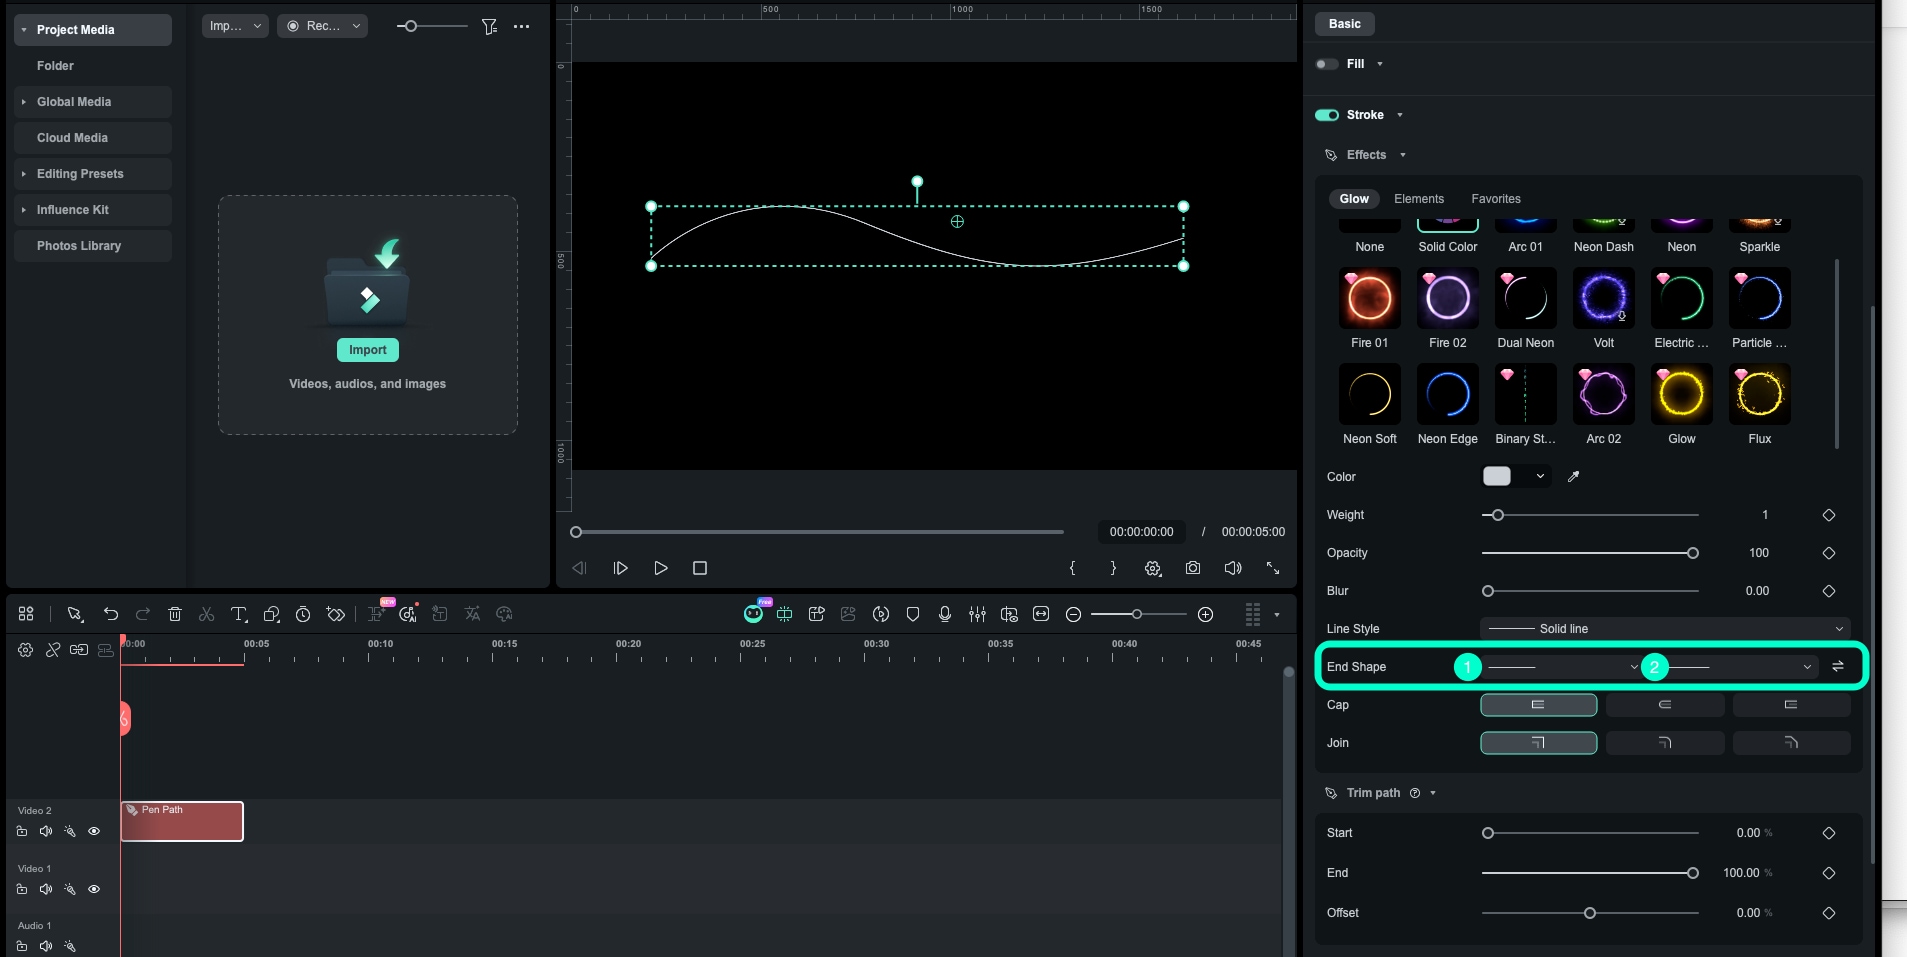
Click either button to open the dropdown and choose a shape style. The result updates in real time in the Player. Also, the end-shape size scales with your Stroke thickness, so increasing the stroke weight will make the marker larger.

4) Swap start/end shapes with one click
Between the start and end shape controls, Filmora includes a Swap button that lets you instantly exchange the current start and end marker styles.
- Works even if one side (or both sides) is set to None
- Only changes the marker display — it does not modify the path itself
Part 4. How Do You Make the Path "Move"?
In Filmora, path-driven animation mainly relies on two capabilities:
- 🎬 Trim Path – Lets the stroke "grow in" or "wipe out" along the path to create line animation
- 🚀 Path Follow – Lets a specific object move along the path for follow-path animation
They can be used independently or often combined for advanced Filmora motion graphics.
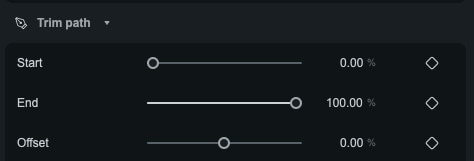
1️⃣ Trim Path: Make the Stroke "Grow"
Once you enable Trim Path, you'll see three key parameters for creating line animation:
- 📍 Start: Starting position of the trimmed path (0%–100%)
- 📍 End: Ending position of the trimmed path (0%–100%)
- 📍 Offset: Overall offset, allowing the trim position to shift along the animation path
⭐ Most Common Usage for Filmora Stroke Animation:
- Keep Start = 0%
- Add keyframes to End, animating from 0% → 100%
- When you play back, you'll see the stroke gradually "grow" along the path
🎯 This can be used for:
✍️ Hand-drawn line animations
📊 ECG / waveform growth effects

⏱️ Video progress bars with custom path motion
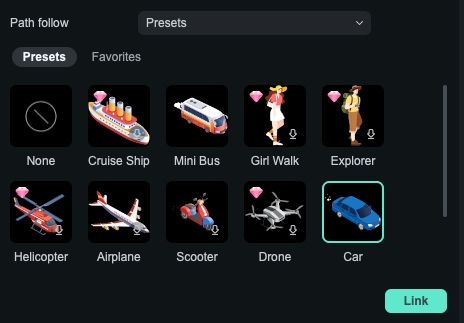
2️⃣ Path Follow: Make Objects Move Along the Path
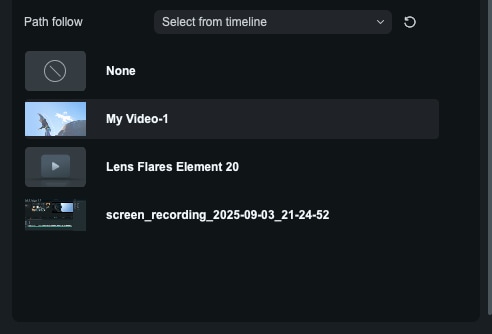
In the Path Follow section for follow-path animation, you can choose:
- ⊘ None: No follower object
- 📦 Preset Library: Use built-in presets for Filmora follow-path animation (planes, people, cars, location pins, blinking dots, etc.)
- 🎬 Select from timeline: Use existing clips on the current timeline
- 💻 Import from computer: Import a local asset and bind it to the path
Option 1: Preset Library

Option 2: Select from the timeline
Option 3: Import from the computer


🔗 What Happens After linking?
- The timeline will automatically create or link a follower clip based on your selection (preset, timeline clip, or imported file).
- The follower clip's In/Out points will match the Pen Path Clip, ensuring they play in sync on the timeline.
- When you set keyframes at the start and end of the path and combine them with Trim Path to control path progress, the follower object will move smoothly along the end point of the path during playback.
- The linking relationship is indicated by a small "chain" icon, which only appears when the related clips are selected, so you know which clip is linked to which path.

⚠️ Rules for "Select from timeline"
- Only clips that have at least 1 frame of overlap with the current Pen Path Clip on the timeline will appear in the Select from timeline list.
- Clips with no overlap will not appear as selectable options.

📌 What Happens If You Move / Trim After Binding?
- You are free to move either the Pen Path Clip or the follower clip on the timeline.
- As long as they still have an overlapping region on the timeline, the follow-path animation will remain active.
- If you move the follower clip completely outside the overlapping range:
- The binding relationship still exists
- But in that time range, the follower will no longer move along the path
- The chain icon will turn gray, indicating that Path Follow is currently not active
- Once you drag it back into a range where it overlaps with the Pen Path Clip, the follow animation will automatically resume.
❓ Why Are Some Original Animations Cleared?
When you bind a timeline clip as a follower for follow-path animation, Filmora clears or disables some motion-related settings to prevent conflicts between multiple "movement controllers":
- Motion-related animation such as position keyframes, planar tracking, and motion tracking may be cleared or disabled
- Color, style, and filter-related effects are retained
Part 5. Three Ready-to-Use Practical Examples
Below are three Filmora Pen Tool tutorial examples you can follow step by step. Even if you're new to the Pen Tool, you can recreate these motion graphics effects quickly.
Example 1: ✈️ Airplane Following a Flight Route (Trim Path + Path Follow)
This is one of the most common dynamic uses of the Pen Tool. Just draw a route, then let the airplane follow it, and you'll have a classic "map flight route" animation.
🎬 Use cases
- Travel route presentations
- Map animations
- Flight route diagrams
- Vlog location transitions with follow-path animation
Step 1Draw the flight route with the Pen Tool
On a map or any background, use the Pen Tool to draw motion path as the flight route.
It doesn't need to be complicated; a simple natural curve is enough.

Step 2Enable Stroke to visualize the route (optional)
In the property panel, enable Stroke for Filmora stroke animation and set:
- A high-contrast color against the background
- Stroke thickness
- Optional Glow to add a modern or tech-style look
Step 3Use Trim Path to create a "route growing" effect
To make the route look like it's being drawn to create line animation:
- Turn on Trim Path
- Keep Start = 0%
- Add keyframes to End, animating from 0% → 100%
On playback, you'll see the flight route gradually extend along the map.
Step 4Use Path Follow to bind an airplane sticker
In the Path Follow panel:
- Select Preset
- Choose a built-in airplane sticker (or your own airplane asset)
- Click to bind for follow-path animation
After binding:
- An airplane clip appears on the timeline
- Its duration matches the Pen Path Clip
- It becomes the follower object of the path
Step 5Play back: the airplane flies along the route
With Trim Path + Path Follow combined:
- The route gradually appears
- The airplane moves smoothly along the end of the path
You get a very natural "flight route animation" effect.
✨ Final result
You'll see:
- A glowing flight route gradually drawn across the map with Filmora stroke animation
- An airplane flying smoothly along this route with custom path motion
- A complete "flying to the next destination" map animation
Example 2: ✍️ Handwriting-Style Titles
This is one of the classic uses of the Pen Tool: creating a "handwritten" text effect with Filmora handwriting effect in just a few steps.
🎬 Use cases
- Title animations
- Signature effects
- Hand-drawn captions
- Callout lines with handwriting effect
Step 1Draw a "writing path" with the Pen Tool
In the Preview window, use the Pen Tool to draw motion path that matches the writing direction of your text.
It doesn't need to be perfect — just keep it smooth and consistent.
Step 2Enable Stroke in the property panel
Turn on Stroke for Filmora stroke animation and set:
- A stroke color that matches your design
- Stroke thickness
- Optionally, a bit of Glow or Blur for a softer or more stylized look
Step 3Use Trim Path to create the "line growth" effect
In the Trim Path panel to create line animation:
- Keep Start = 0%
- Add keyframes to End:
- First keyframe: 0%
- Last keyframe: 100%
When you play it back, you'll see the stroke being "drawn" along the path, following your writing direction for Filmora handwriting effect.
Step 4(Optional, Advanced) Add a glowing dot via Path Follow
To make the animation more dynamic:
- Use Path Follow to bind a small glowing dot or circle
- Combine it with the existing Trim Path animation
- When played, it looks like a pen tip or light point "drawing" the line in real time
✨ Final result
The text appears as if it is being handwritten on screen with Filmora handwriting effect, with far more control and personality than a simple fade-in text effect.
Example 3: 🎄 Christmas Path Follow Animation
This example shows how to use Stroke Effects and Path Follow to create a festive Christmas animation:
a path at the bottom uses a gift-themed stroke effect, while Santa Claus moves along this path.
🎬 Use cases
- Christmas video intros / outros
- Holiday greeting animations with follow-path animation
- Festive Vlog decorations with custom path motion
Step 1Draw the route with the Pen Tool
In the Preview window, use the Pen Tool to draw motion path you want Santa to follow.
Step 2Apply a gift-style Stroke Effect
In the property panel:
- Turn on Stroke
- Switch to Effect Stroke
- Choose a "gift-style" stroke effect (e.g., a pattern made from gift icons or holiday-themed elements)
Now, the path will appear as a line composed of small gifts or holiday icons.

Step 3Use Trim Path to "light up" the gift route
If you want the gift line to appear from left to right to create line animation:
- Enable Trim Path
- Keep Start = 0%
- Add keyframes to End from 0% → 100%
When you play back, the gift pattern will grow along the path with a nice rhythm.
Step 4Use Path Follow to bind a Santa sticker
To make Santa move along the gift route with follow-path animation:
- Open Path Follow
- Choose Select from timeline or Import from computer (depending on where your Santa asset is)
- Click Bind
After binding:
- The Santa clip becomes the follower object
- Its In/Out points align with the path clip
- Santa will move along the gift route during playback
🛠 You Can Edit the Path Anytime: From Straight Lines to Curves
If you're not satisfied with the drawn path, you can always fine-tune it with the Pen Tool:
- Double-click a path to enter point-editing mode
- Click an anchor point to select it and then drag to move it
- Drag Bezier handles to turn straight segments into smooth curves
- Alt / Option + drag a handle to break the tangents and turn a smooth point into a corner point
- Click on a path segment to add a new point, or double-click a point to delete it
Whether you want to turn a straight line into a gentle curve or refine an existing curve to look more elegant, you can tweak the path at any time until it matches your desired motion.
Step 5Preview playback
You'll see:
- The gift-stroke path forming a complete festive route
- If Trim Path is used, gifts appearing gradually from one side to the other
- Santa moving along the path, creating a rich Christmas atmosphere with custom path motion
✨ Final result
You get a very festive Christmas path animation:
- A base route formed by a gift-style stroke effect
- Santa moving along the gift path with follow-path animation
- You can further enhance the scene with Glow, Shadow, or other effects for Filmora motion graphics
Perfect for use as:
- Holiday greetings
- Vlog packaging
- Social media video accents
- Powerful Pen Tool for custom path animations.
- Professional stroke effects and motion graphics.
- Intuitive path follow and trim path features.
- Easy to learn, powerful for creative projects.
- Works on Mac, Windows, iOS, and Android.

Part 6. Still Not Comfortable Using It? Filmora Will Actively Help You
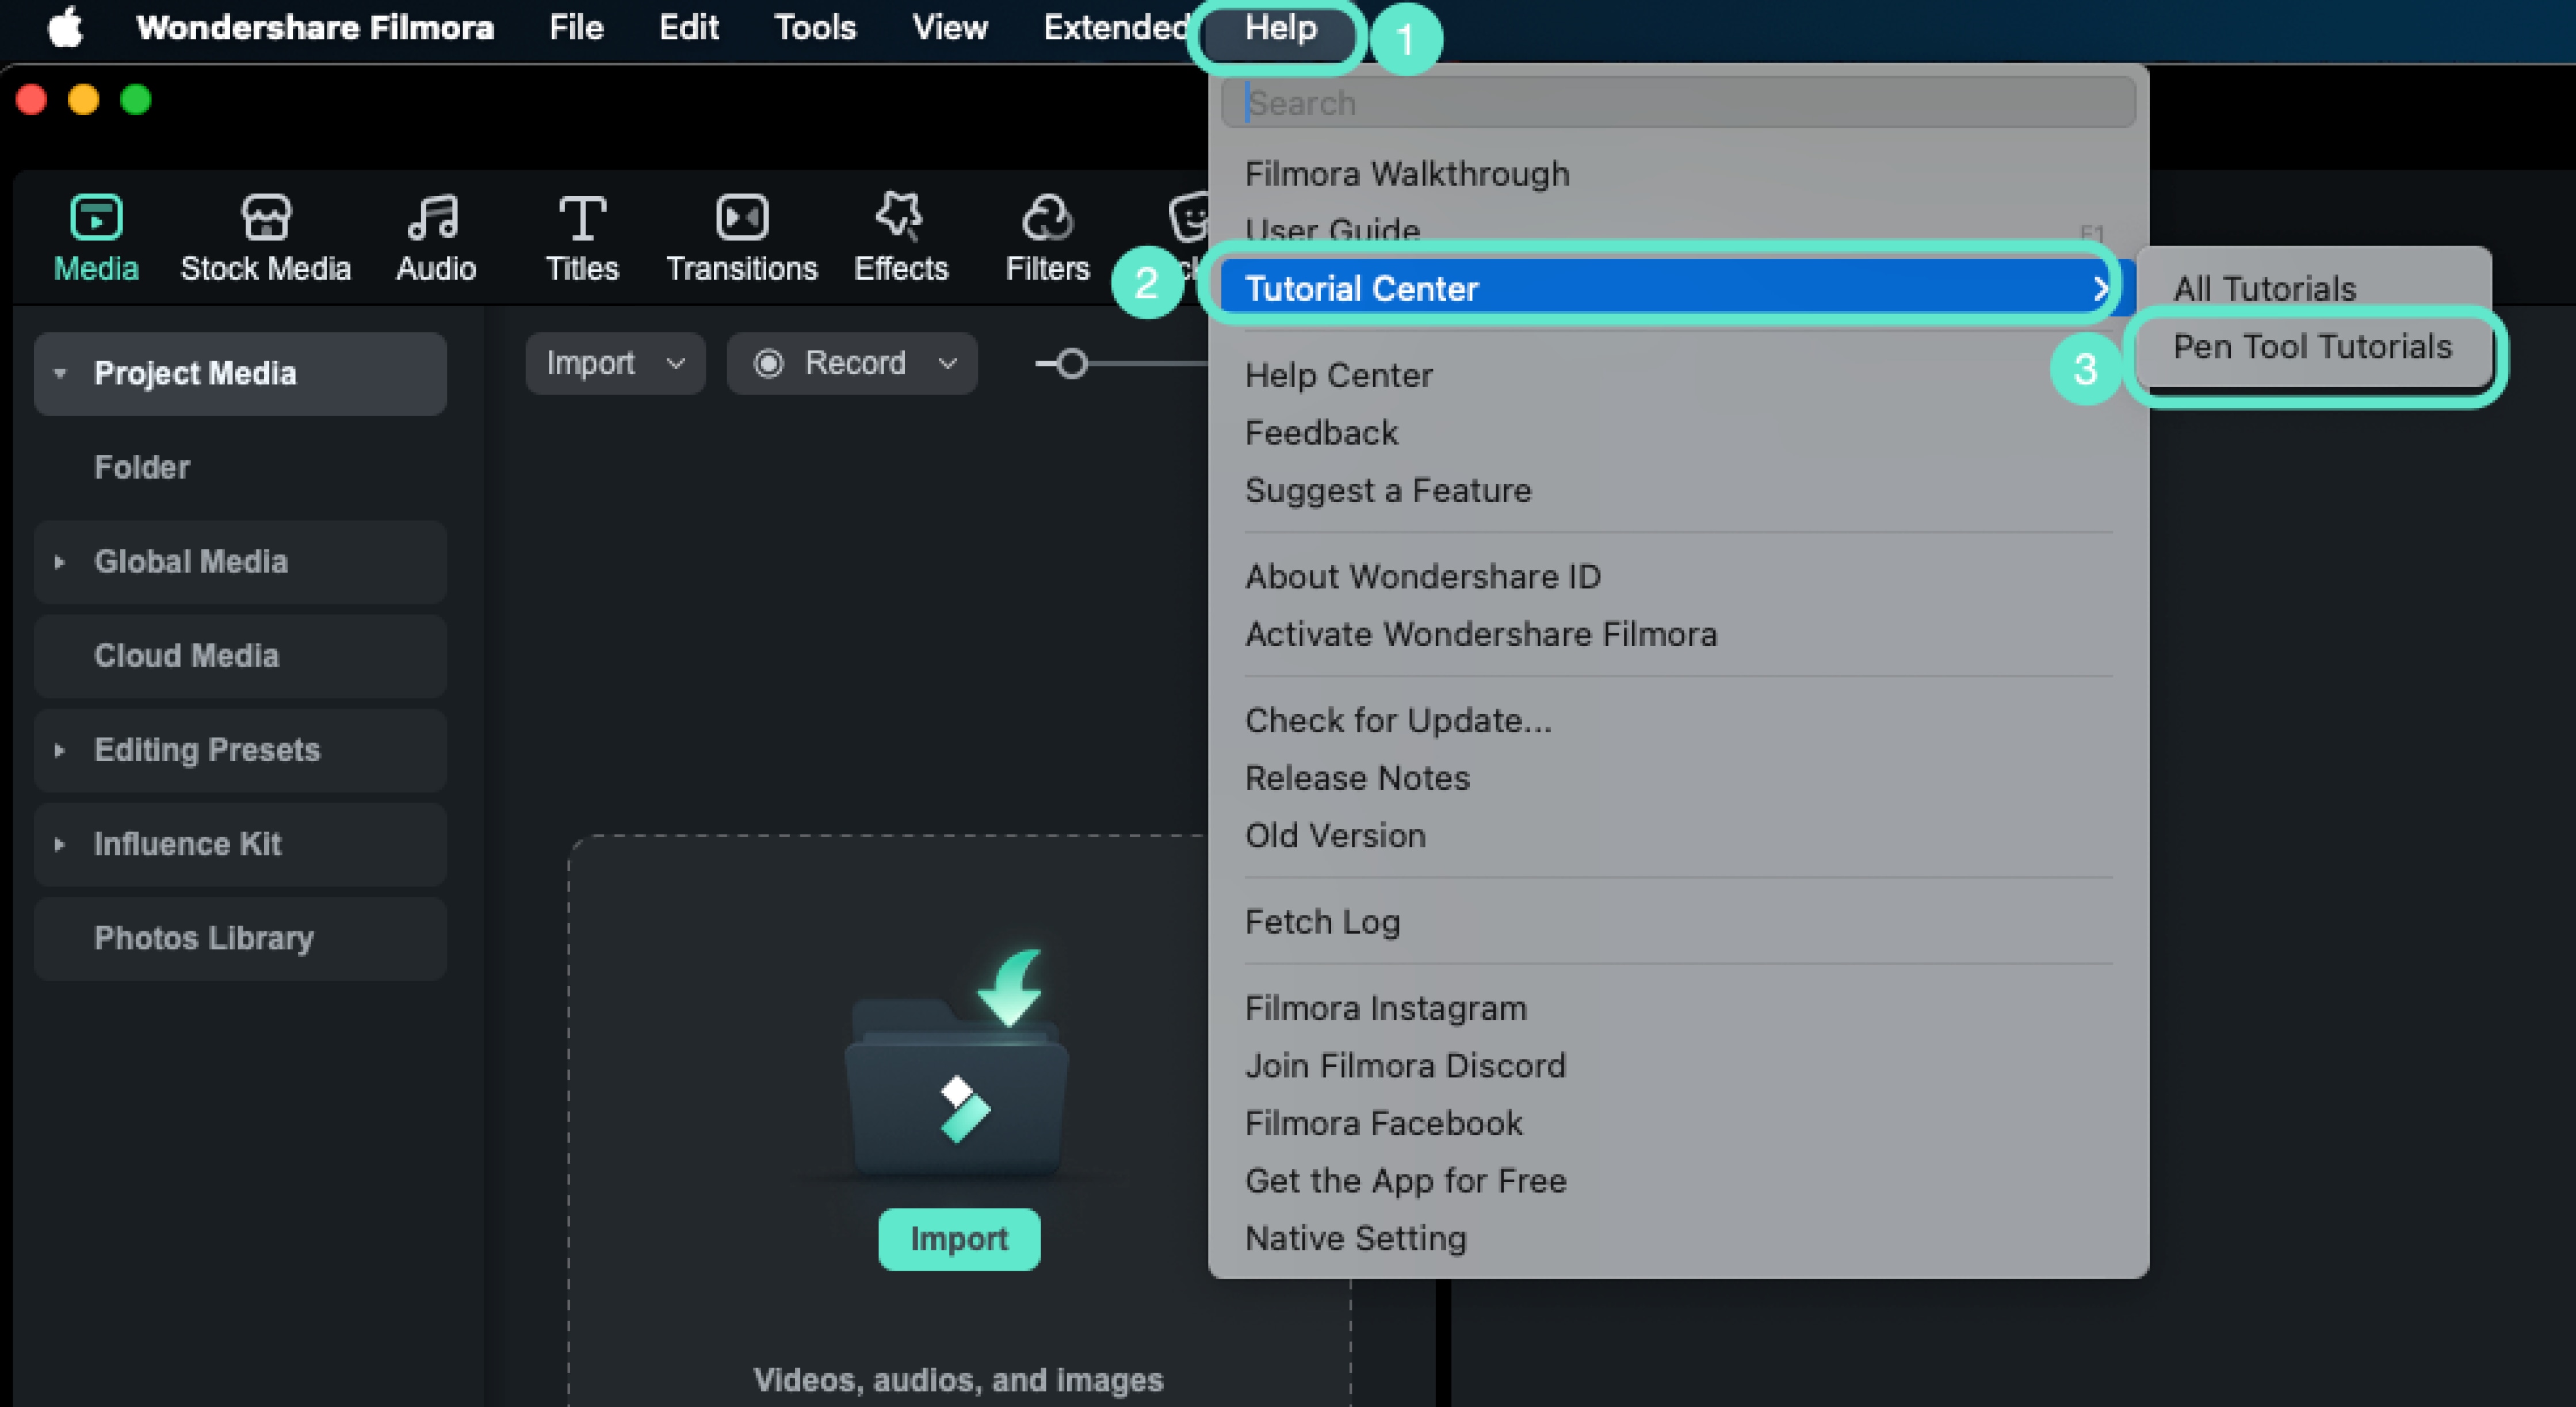
"Pen Tool Tutorial" in the Help Menu
In Filmora, you can access dedicated Pen Tool tutorials via:
- Help → Tutorials Center
- All Tutorials
- Pen Tool Tutorials
In the tutorial pop-up, content is organized by tabs:
- 📝 Path Drawing
- 🤝 Assisted Drawing
- 🚪 Exit Drawing
- ✏️ Path Editing
- ✨ Stroke Effect
- ✂️ Path Trimming
- 🚀 Path Follow
- 🎬 Follow Path Animation
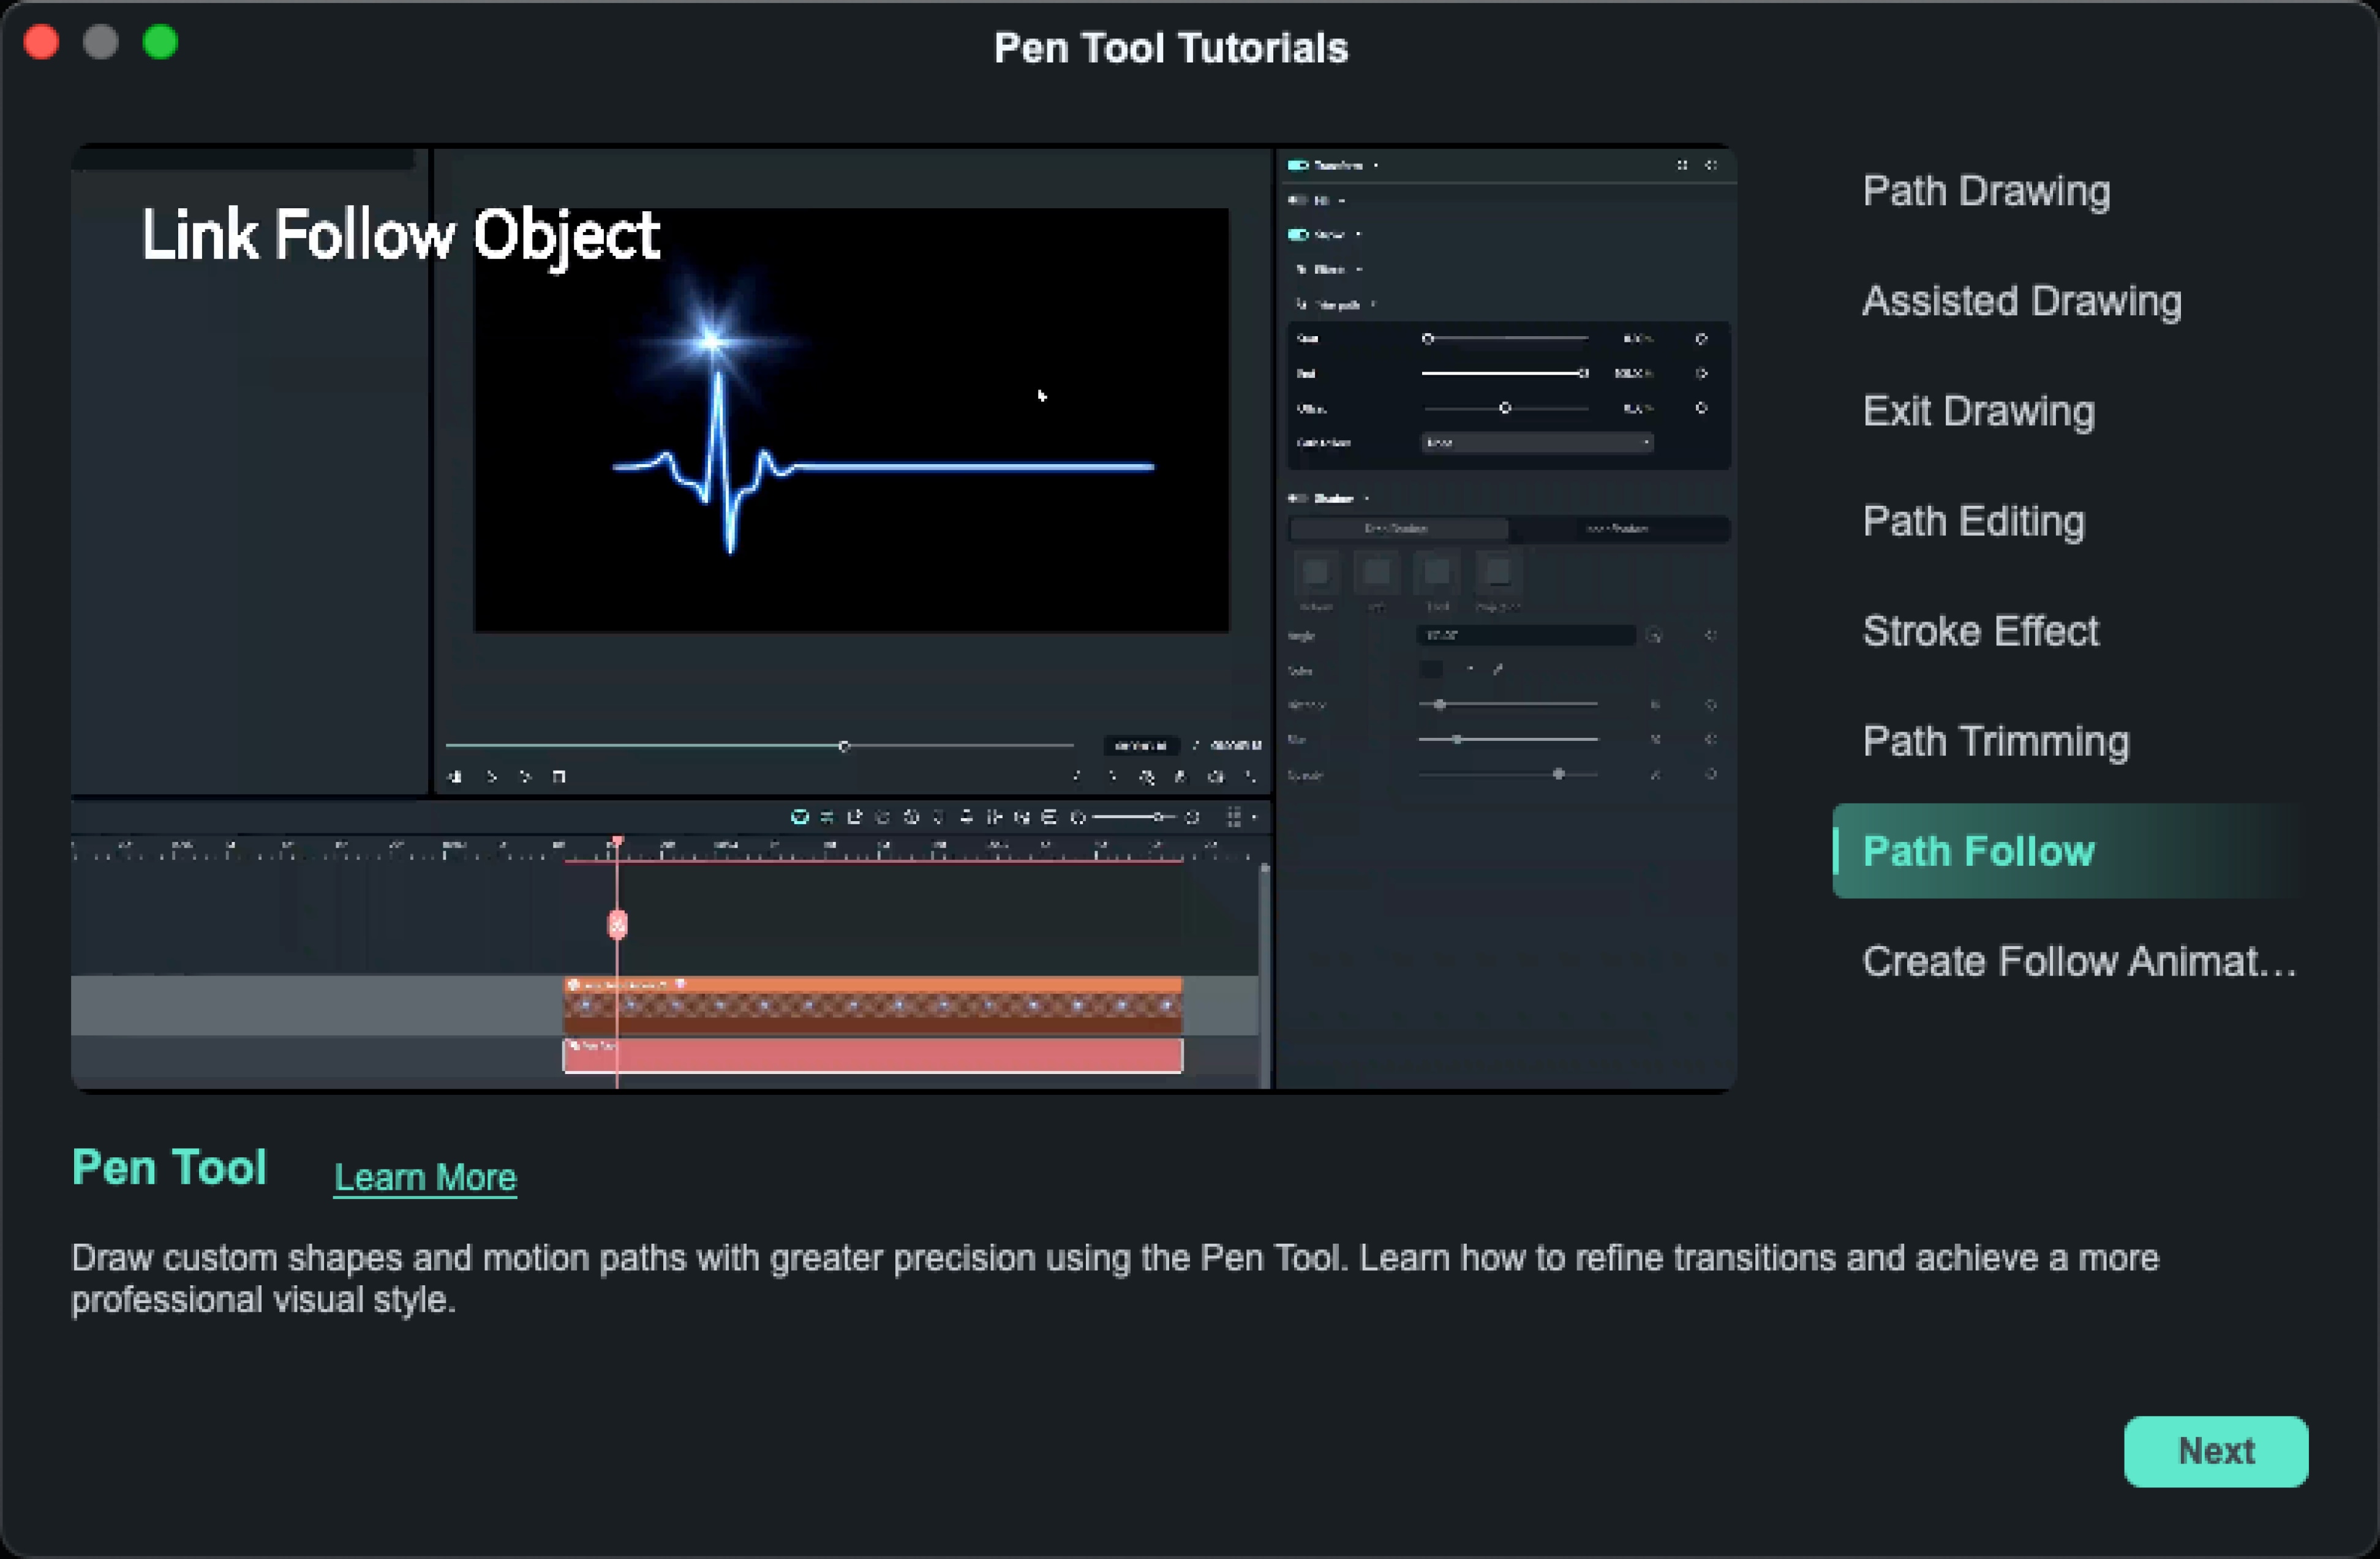
Each tab provides a short video plus brief text, so you can learn step by step while following along inside the editor to master how to use the Pen Tool in Filmora.
Stuck While Using It? The System Will Ask If You Need Help
Starting from V15.1.0 and later, if any of the following happen, Filmora will assume you might be struggling with the Pen Tool:
- ⚠️ While using the Pen Tool, you undo three times in a row for the first time
- ⚠️ You create a Pen Path Clip and then delete it within 6 seconds
- ⚠️ You create your first Pen Path Clip, delete it, and there are no Pen Paths left on the timeline
In these cases, a dialog will appear in the center of the screen: "Are you having trouble using the Pen Tool?"
You can choose:
- Cancel: close the message
- View: open the Pen Tool Tutorial popup directly
The tutorial then walks you through the core features step by step:
From Path Drawing → Path Editing → Path Trimming → Follow Path Animation
When you close the tutorial popup for the first time, Filmora will show a gentle reminder:
To view it again, go to:
"Help > Tutorials Center > Pen Tool Tutorial".
