

 TL;DR:
After Effects provides granular control for animating lines via manual path drawing and Trim Path keyframing, but Wondershare Filmora serves as a highly efficient alternative for users who want to bypass complex layer setups.
● Animating a line in After Effects requires drawing a path with the Pen Tool, adding a Trim Path effect to the shape layer, keyframing the End value from 0% to 100%, and applying the Auto-Orient setting to align any attached arrowheads.
● Because the After Effects workflow involves manual masking, constant layer switching, and occasional paid plugins for advanced strokes, it is strictly suited for professional motion graphic designers requiring precise multi-segment control.
● Wondershare Filmora targets beginners and short-form video creators by integrating drawing tools, Trim Path sliders, and an automatic Path Follow preset into a single interface to attach media to lines without manual keyframing or plugins.
Ask AI for a summary
 ChatGPT
 Perplexity
 Gemini
 Claude
 Grok
Grok
Curious about how to make lines that trace paths or outline shapes in a video?
That's exactly what line animation in After Effects does — it lets you create smooth, dynamic lines often seen in infographics, travel routes, and logo reveals.
While this technique gives you full control over timing, shape, and motion, it can be a bit time-consuming since it relies on keyframes and masking.
This guide walks you through how to animate lines in After Effects from start to finish — and shows a faster alternative if you want the same result with less effort. Let's dive in!
Part 1. How to Animate a Line in After Effects
Creating line animation in After Effects gives you full control over how a line moves, bends, or connects objects in your scene. You can use this technique to make routes, infographics, or any shape animation that follows a clean path.
Follow the steps below to learn how to animate a line in After Effects:
Step 1. Create a New Composition
Open After Effects and create a new composition with your preferred settings. Keep the duration long enough for the line to draw across the screen.
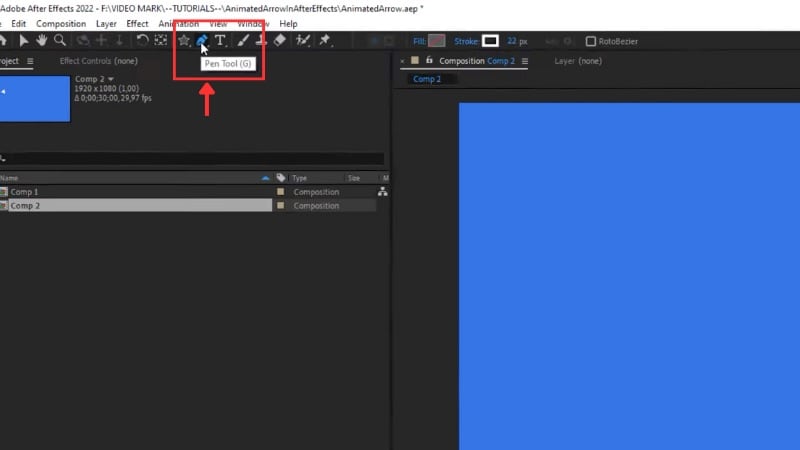
Step 2. Draw the Path
In the toolbar, select the Pen Tool (G) from the toolbar and click on the composition to plot points.
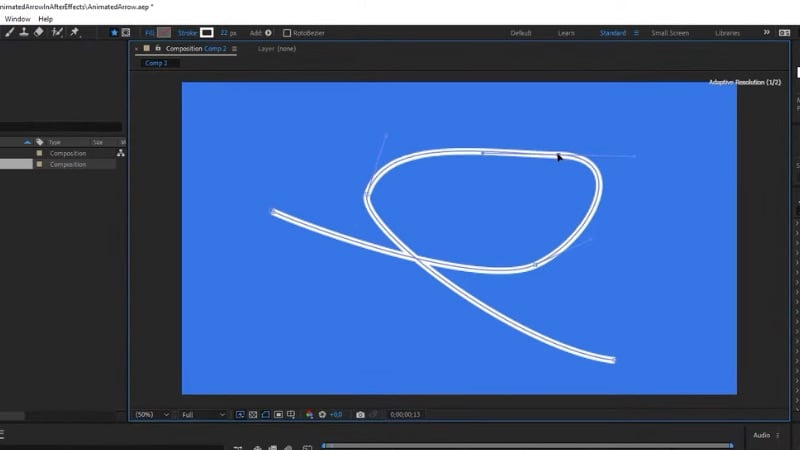
Draw a line in After Effects to define the path where your line will move.
- For straight routes, click once per point.
- For curved paths, click and drag to shape the handles.
Step 3. Add a Trim Path
Once the line is created, go to the Shape Layer 1 & Contents & Shape 1 & Path 1, and click on Path and copy it. We're going to need the copy for the actual arrowhead.
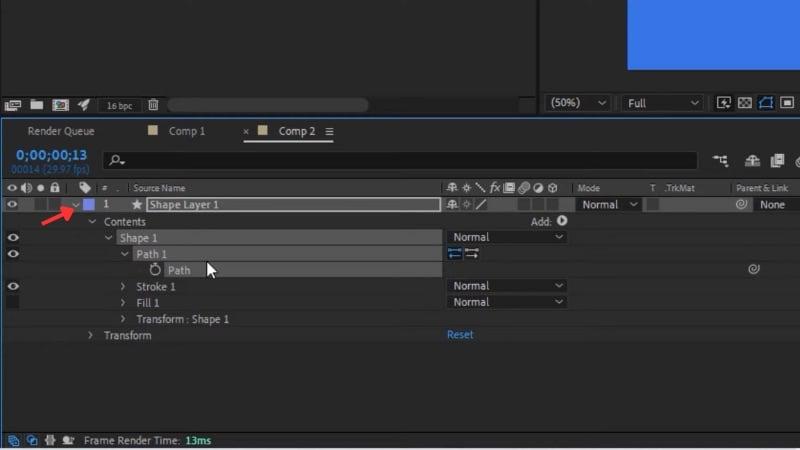
Next, go to Contents & Add & Trim Path.
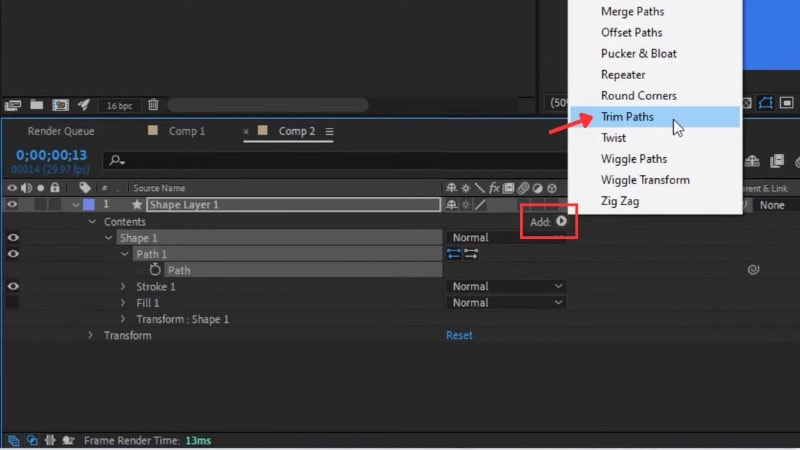
Open the Trim Path 1 that we just added, and animate the End value.
Set the first keyframe to 0% at the start of your timeline, then move the playhead forward and change it to 100%. This makes the line draw itself across the path.

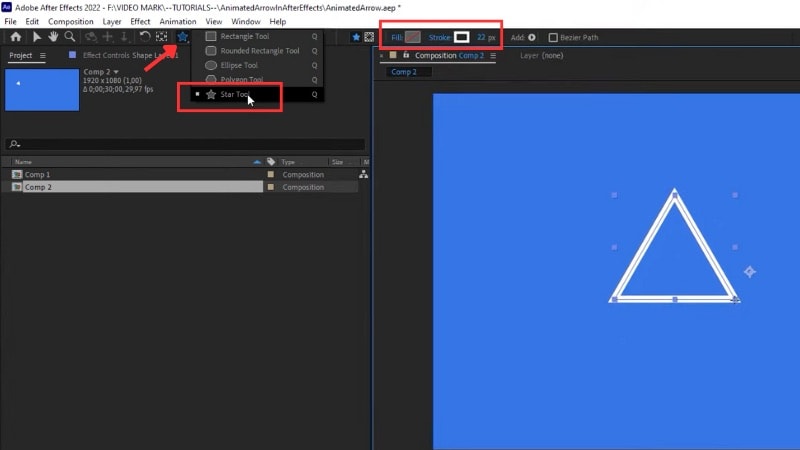
Step 4. Create the Arrowhead
To make an arrow tip to the animated lines in After Effects, select the Star Tool from the toolbar.
While dragging, press the Down Arrow key until it forms a triangle shape. Hold Shift to align it evenly.
Set the Fill to solid and the Stroke to transparent. Adjust the color and size to match your line.
Step 5. Align the Arrowhead with the Line
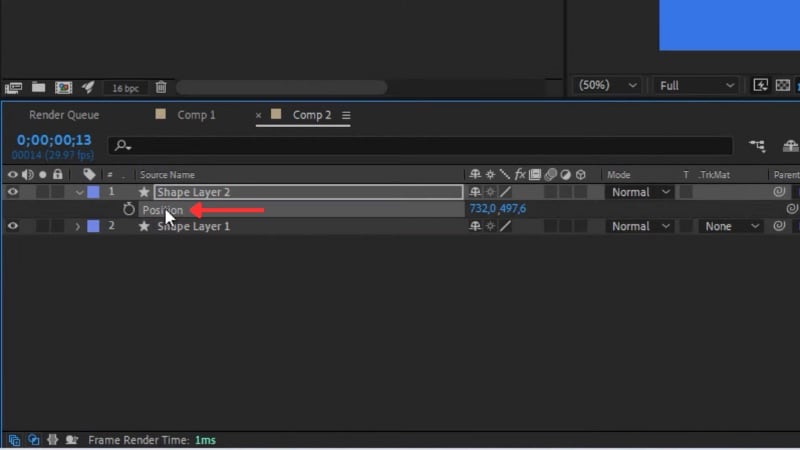
We need to ensure the arrowhead's anchor point is centered. Select the arrowhead layer, then press Ctrl + Alt + Home (or Cmd + Option + Home ) to recenter the anchor.
Next, go to the Position property of the arrowhead and paste the path you created earlier. This links its movement to the animated line.
Step 6. Orient the Arrowhead Along the Path
Right-click the arrowhead layer and choose Transform & Auto-Orient.
In the pop-up window, select Orient Along Path. This makes the arrowhead follow the direction of your line naturally.
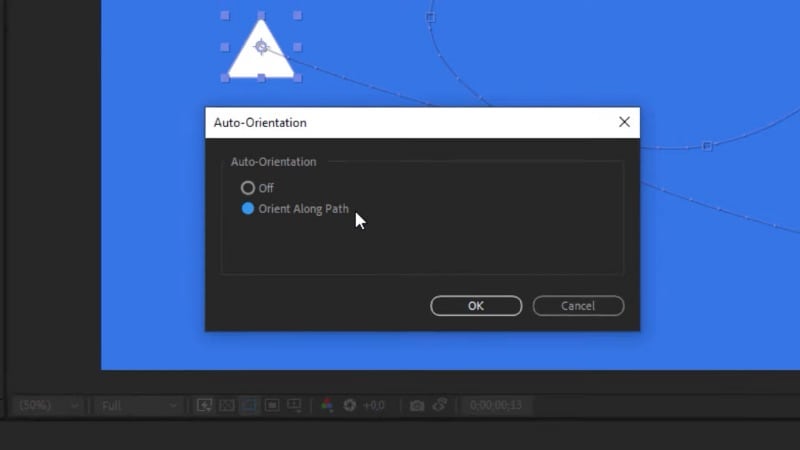
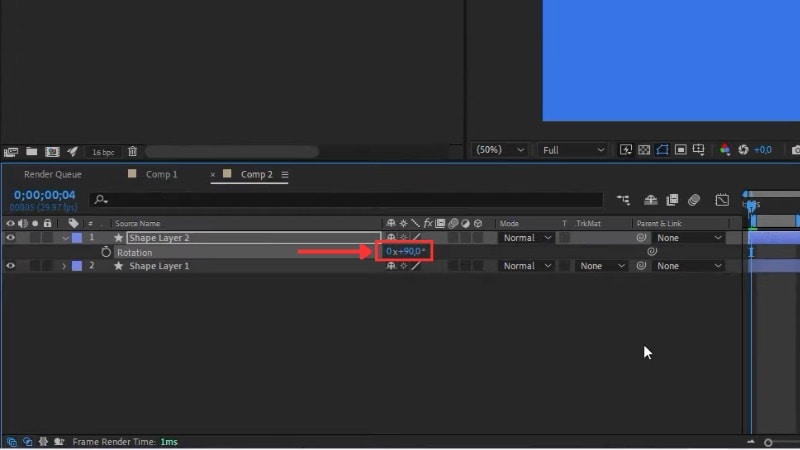
Rotate the arrowhead 90 degrees if needed to face the right direction.
Step 7. Add Smooth Motion
Select both shapes' layers, and press the U on your keyboard to show all keyframes.
Select them, right-click, and go to Keyframe Assistant & Easy Ease. This setting smooths out the line animation in After Effects, creating gradual acceleration and slowing at the start and end.

Now, when you play back the timeline, you'll see your arrow move perfectly along the path. Once you've mastered this technique, it's clear how powerful line animation can be.
Next, let's explore why many editors still find this process more complex than expected.
Part 2. Why Line Animation in After Effects Can Feel Complex
Using After Effects' draw line tools gives you full control over shape, motion, and timing. But that same control also adds manual setup that can slow your workflow. For beginners or quick projects, this process can feel heavy and technical.

Here are some of the most common challenges editors face when creating line animation in After Effects:
- Too many steps: You switch between layers, masks, and effects before the animation even starts to move. Every path needs a Stroke or Trim Paths setup, which adds time to each project.
- Extra work for visual effects: Adding glow, taper ends, or handwriting trails often needs duplicate layers or plugins that slow the workflow.
- Plugin dependence: Some custom line styles or advanced strokes still rely on paid plugins, which increases setup and cost.
- No quick presets: Most effects must be built from scratch, so repeating the same animation style for multiple clips can take more effort than expected.
These points don't mean line animation in After Effects isn't powerful; it just demands patience and precision. That's why many creators look for faster tools that can achieve the same visual results with less setup and more flexibility.
Bonus: A Faster Way to Animate a Line – Alternative Editor
After learning how to draw lines in After Effects, you might realize that even simple animations require multiple steps — setting up masks, keyframes, and effects.
If you want to create similar line animations more quickly, Wondershare Filmora offers a simpler way to do it.

Filmora offers that option through its new Pen Tool, which combines drawing, animation, and styling in one panel. You still draw your line manually, but the animation, timing, and styling happen through simple sliders and real-time previews.
Why Choose Filmora for Line Animation
- Pen Tool: Draw custom lines or paths right on the preview screen. It feels like sketching directly on the video canvas.
- Trim Path + Stroke Effects: Adjust the start, end, and offset values to animate a line, trace shapes, or add glowing outlines.
- Path Follow: Attach any object, like text, stickers, or icons, to your drawn path so they move along it naturally.
Filmora vs After Effects: Comparing Line Animation Workflows
While After Effects offers full control and precision, it requires multiple steps, keyframes, and sometimes plugins to create line animations. Filmora simplifies this process without sacrificing visual quality. Here's a clear comparison:
| Feature / Aspect | After Effects (AE) | Wondershare Filmora |
| Precision Control | Full control over multi-segment paths, offsets, start/end points, and dashed lines. Keyframes can be adjusted with high accuracy. | Simplified control with intuitive keyframes. Less granular than AE but faster to create animations. |
| Line Styles | Straight, curved, dashed, gradient, and glowing lines with advanced customization. | Multiple built-in line styles. Easily adjust color, thickness, opacity, and stroke effects. |
| Animation Complexity | Fully flexible for complex paths, handwriting effects, or curved motions. | Streamlined workflow. Multi-segment paths and object follow can be set up quickly. |
| Attachable Elements | Can link text, icons, or shapes, but requires manual path and keyframe setup. | Built-in Path Follow lets arrows, icons, or stickers move along the path automatically. |
| Plugin Dependency | Advanced strokes or special effects may require plugins. | Most effects are built-in; no extra plugins needed. |
| Ideal Users | Professional animators, motion graphic designers, and users needing precise control. | Beginners, short-form video creators, or anyone wanting high-quality line animations quickly. |
| Workflow Efficiency | Manual setup of masks, keyframes, and layers makes the process slower. | Simplified workflow with real-time preview speeds up creation. |
| Best Use Cases | Advanced motion graphics, detailed route animations, precise infographic lines. | Social media videos, tutorials, logo reveals, travel route animations, and fast-paced projects. |
|
Show more
Show less
|
||
Filmora's Pen Tool allows creators to draw and animate lines directly on the canvas, skipping the multi-step setup required in After Effects. It's perfect for quick, high-quality line animations while still offering creative flexibility.
How to Animate a Line in Filmora
Follow this step-by-step guide to animate a line in Filmora like this:

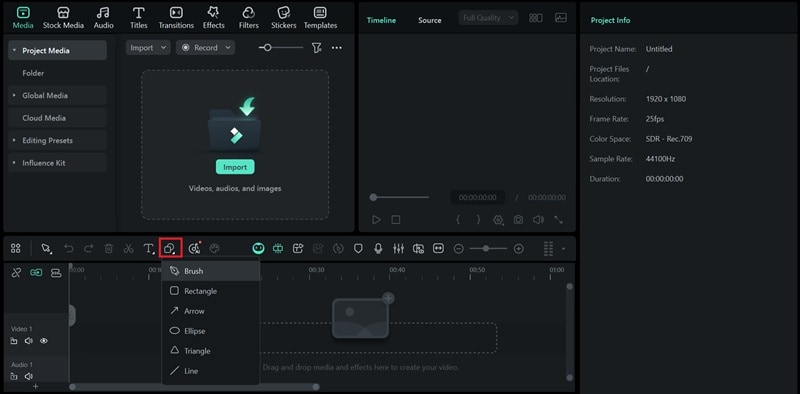
Step 1. Access the Pen Tool
- On the toolbar menu above the timeline, open the Drawing Tool and select Brush.
Step 2. Draw Your Line
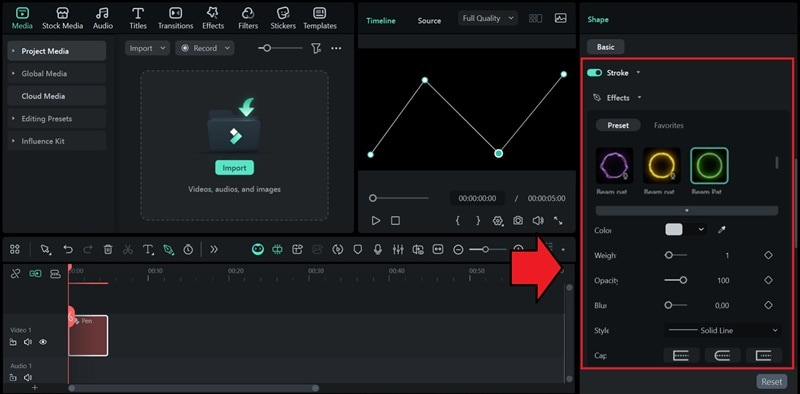
- Use the Pen Tool to sketch your line or shape on the video. You can trace a route, outline a logo, or mark a motion path.
- After drawing, adjust the color, thickness, and opacity in the Property panel.
Step 3. Animate with Trim Path
- Go to the Property panel & Trim Path to control the path of your line.
- Move the playhead to the start of the timeline, set both the Start and End values to 0%, and add a keyframe to the End point.

- Next, move the playhead to where you want the animation to finish, change the End value to 100%, and add another keyframe.
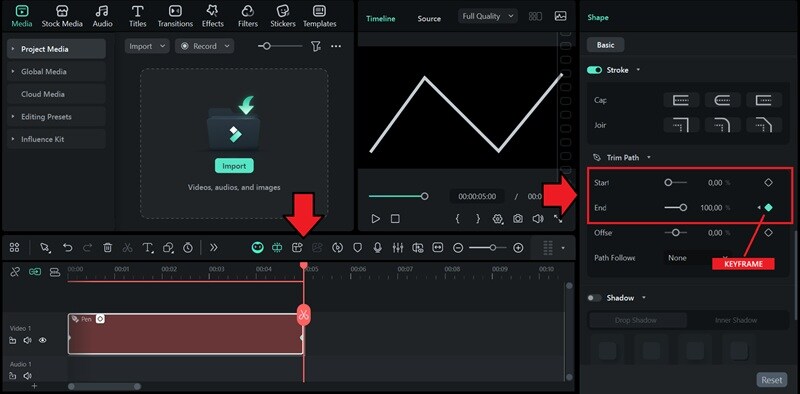
To reverse the animation, you can simply swap the keyframes by setting the End value to 100% at the start and 0% at the end. Use the Offset setting to adjust where the animation starts along the path.
Step 4. Add an Object
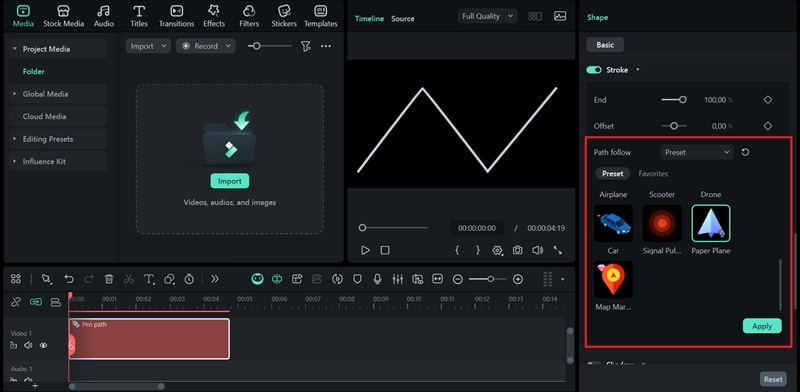
- Click Path Follow, then choose Preset to view built-in assets such as arrows, cars, or icons. You can also attach media from your timeline or import your own files from your computer.
- Select one and drop it onto your timeline. Align its duration with your animation and fine-tune the path so the object follows your line smoothly.
- Press Apply to save the changes.
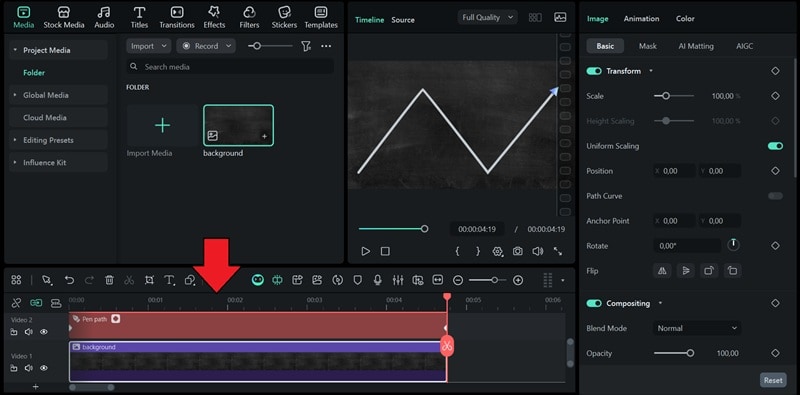
Step 5. Import Background Image or Video (Optional)
With your line animation ready, you can add a background image or video to complete the scene.
- Click the Import button on the Media tab.
- Place it below your Pen Path track on the timeline.
- Adjust the timing by trimming or extending the background clip.
What You Can Do With Filmora's Line Animation Tool
Filmora's Pen Tool gives you the freedom to draw and animate paths directly on the canvas. Here are a few creative ways to use Filmora's new Pen Tool:
Travel Route Animation
Show a moving line tracing a route across a map. It's ideal for travel videos or storytelling vlogs where you want to highlight a journey step by step.

Logo Outline Reveal
Use a stroke animation to reveal your logo as if it's being drawn on screen. It's a simple way to build brand intros or motion openers.

Product Feature Highlight
Animate clean lines to point out product details or key features in tutorials, ads, or explainer videos.

Handwriting Motion
Simulate a pen writing effect for titles, quotes, or digital signatures. Adjust stroke width and motion speed to make the animation feel smooth and natural.

Conclusion
Creating line animation in After Effects is a reliable way to add motion to your videos. It helps you visualize paths, outlines, or transitions with precision. It's useful for travel routes, logo reveals, and motion graphics.
Still, animated lines in After Effects take time to set up, especially when every step involves keyframes and multiple layers. For faster results, Filmora's Pen Tool offers a simpler workflow while delivering the same smooth effect.
Try Filmora and see how it speeds up your editing process.
