

 TL;DR:
Animating strokes with Trim Paths in After Effects requires applying the modifier exclusively to a Shape Layer and keyframing the Start and End properties, while Wondershare Filmora serves as a simpler alternative for users seeking less technical path animations.
● After Effects Trim Paths will fail to animate if applied to masks or imported solid/image graphics, and the modifier must be nested directly inside the same layer group as the target shape to work.
● To execute a self-drawing line in After Effects, set both Start and End sliders to 0%, keyframe the End value to 100% further down the timeline, and apply the Easy Ease Keyframe Assistant to prevent rigid, constant-speed motion.
● Wondershare Filmora is best suited for beginners creating travel routes or UI infographics, as it provides a dedicated Path Follow tool that binds an object or icon to travel along a custom stroke without the manual position keyframing required in After Effects.
Ask AI for a summary
 ChatGPT
 Perplexity
 Gemini
 Claude
 Grok
Grok
When you want to animate lines, shapes, or outlines in After Effects, you need to know how to add and use Trim Path. This tool is used to control how a stroke appears, disappears, or moves along a path, often seen in logo animations or map routes in a motion graphic video.
If you have difficulty understanding or setting up the After Effects Trim Path, our tutorial below will simplify the steps and even provide a simpler solution that might fit you better.
Part 1. How to Use Trim Paths in After Effects
To add a Trim Path in After Effects, let's start with the basics first. In this example, we'll create a simple line animation that draws itself from one point to another on the screen.

How to Add a Trim Path in After Effects
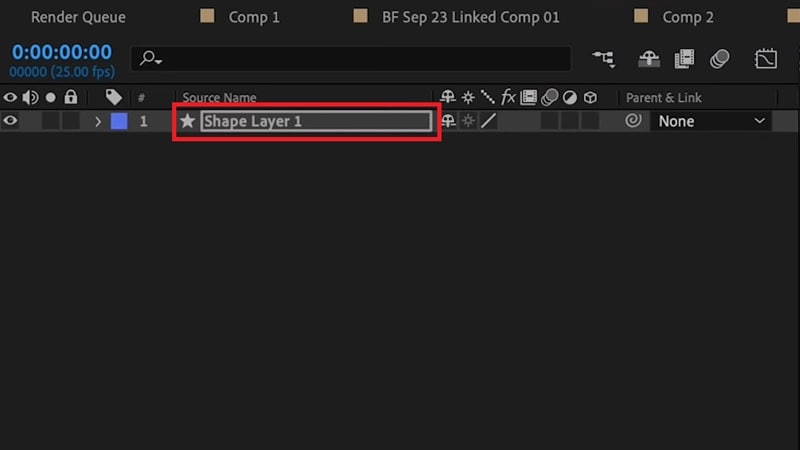
First, create a new composition and then add a Shape Layer. After that, you can create the shape that you want to animate first.
- If you want to draw a custom path or line, select and use the Pen Tool from the toolbar. You will have full control to create any shape or direction for your animation.
- If you prefer to use a basic shape, choose the Shape Tool and select the shape you want, such as a circle, rectangle, or polygon.
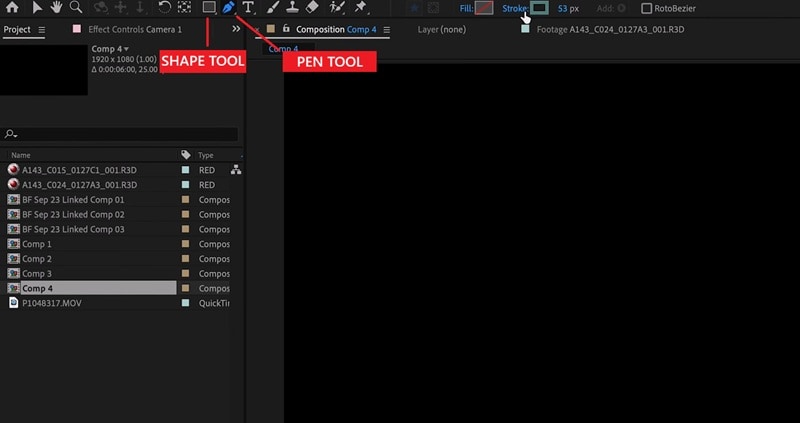
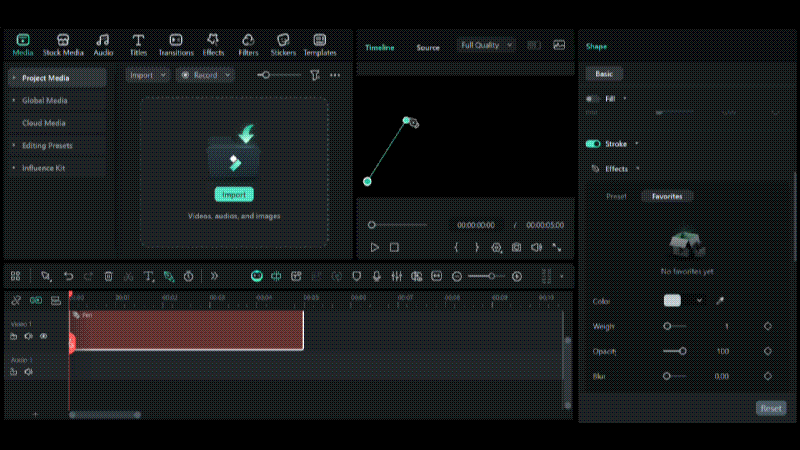
Draw your line or shape on the canvas to create the path you'll animate. Make sure the Stroke is visible so the line shows clearly. And if you don't need any color inside the shape, you can turn off the Fill by clicking the Fill icon and selecting None.
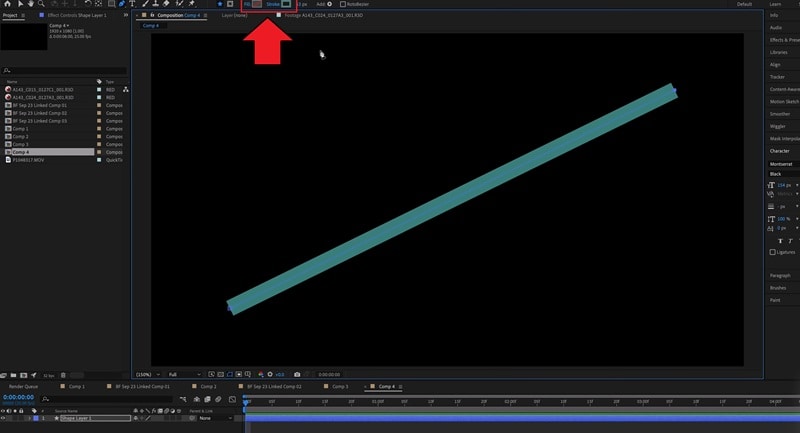
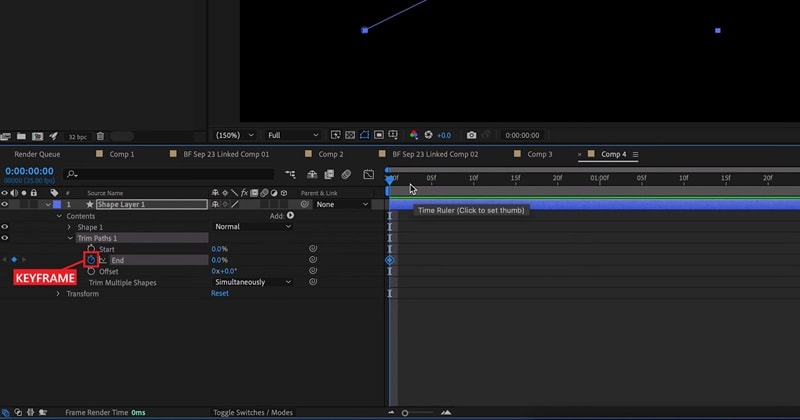
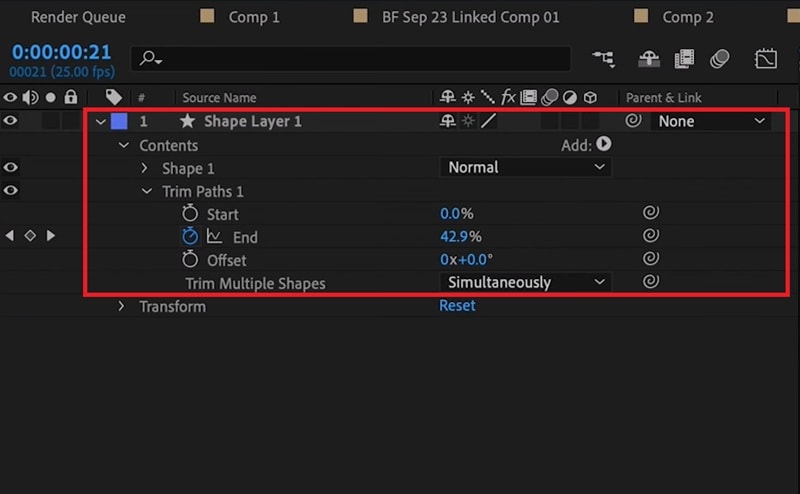
With your Shape Layer selected, open the Add menu next to "Contents" in the timeline panel and choose Trim Paths.
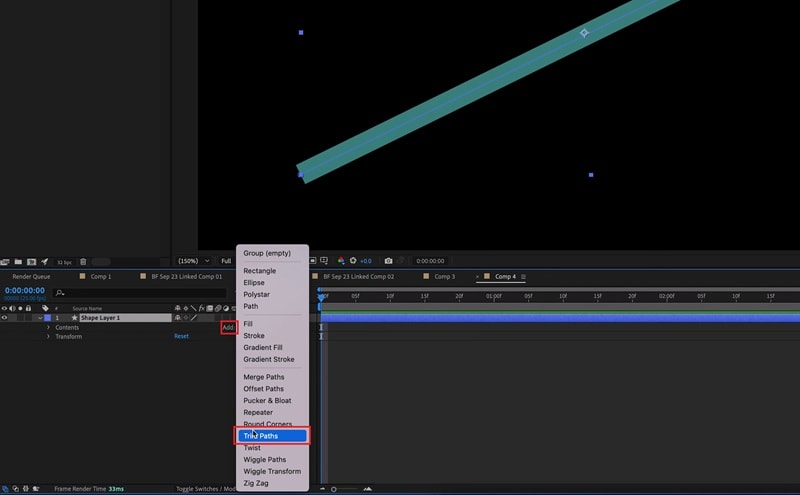
If you do it correctly, you'll see a new "Trim Paths" layer appear under the layer contents.
Now, open the Trim Paths layer settings. You'll find two sliders: Start and End. They control how much of the path is visible. To make the line draw itself:
- Set the Start value to 0%
- Set the End value to 0% and click the keyframe icon.
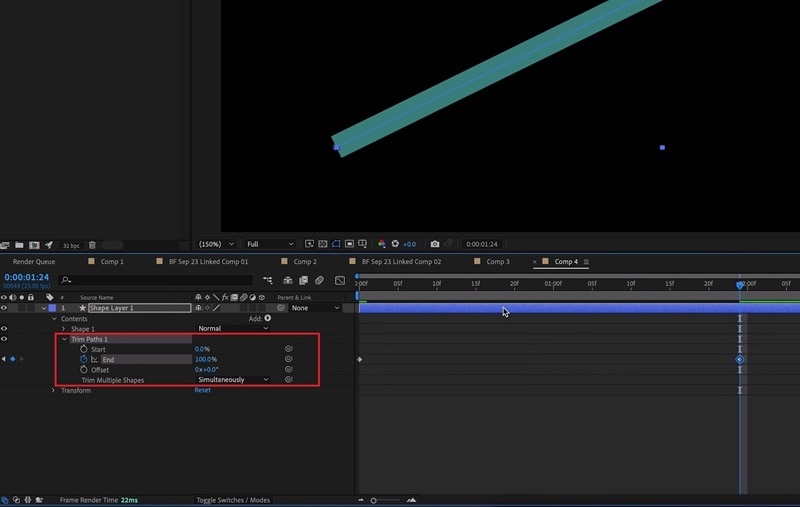
Move the playhead forward and change the End value from 0% to 100%. When you play it back, your line or shape will draw smoothly on the screen. To make it disappear, you can reverse those values.
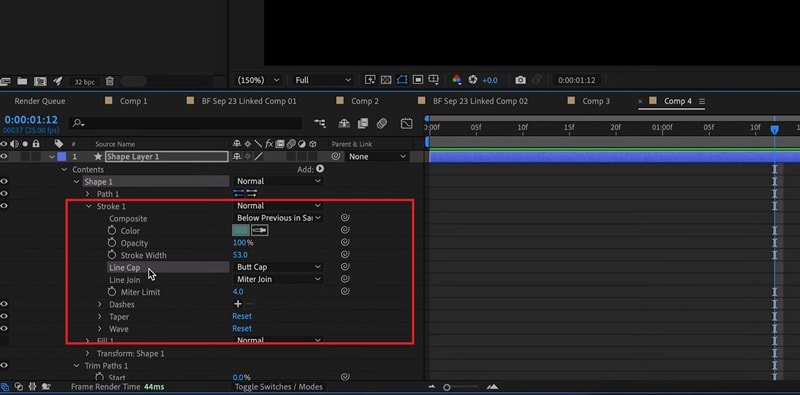
Tip: If you want to customize the line or shape, you can open the Shape Layer settings on the timeline, where you can adjust the Stroke width, color, and cap style, or even tweak the path points to refine its look.
How to Make a Smoother Trim Path in After Effects
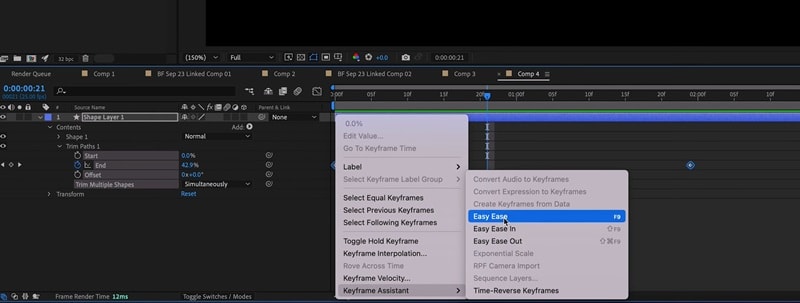
After creating a basic Trim Paths animation in After Effects, you might notice that the line moves at a constant speed. If you want to make it move more smoothly, you can get help from the Keyframe Assistant.
- In the timeline, highlight the keyframes you created for the Trim Paths (for example, the End property).
- Right-click the selected keyframes and go to Keyframe Assistant > Easy Ease. It will smooth the start and end of the animation so it feels more fluid.
Part 2. Quick Fixes When Trim Paths Isn't Working
If you've followed all the steps on how to use trim paths in After Effects, but nothing seems to move, you may have run into some setup issues. Trim Paths can be sensitive to how your layer and path are structured. You can try a few solutions here and see if they resolve your problem.
1. Trim Paths is Not Used in Shape Layers
Trim Paths only works with Shape Layers, not masks or imported graphics. If you accidentally applied it to a mask path, it won't animate. So, you need to make sure your path is inside a Shape Layer, not a solid or image layer.
If you drew a mask by mistake, copy the mask path (Ctrl/Cmd + C) and paste it (Ctrl/Cmd + V) into a new Shape Layer path. Then reapply Trim Paths in After Effects.
2. Trim Paths Placed Outside the Group
Trim Paths also needs to be placed inside the same group as the shape you want to animate. If it sits outside that group, it won't affect anything, even if you've set all the keyframes correctly.
If you're not sure how to check this:
- In the Timeline panel, expand your Shape Layer.
- Make sure Trim Paths is nested under the same Group as your shape (for example, Contents > Shape 1 > Trim Paths 1).
If you see Trim Paths directly under Contents while your shape sits inside Shape 1, just drag Trim Paths into that group.
Part 3. Simpler Solution for Trim Paths Without Complex Setup
Trim Paths isn't something you can only do in professional tools like After Effects. If you need to work on line or stroke animations but find Trim Paths in After Effects too technical, you can create similar path animations easily with Wondershare Filmora.
Filmora's Pen and Drawing Tools let you draw custom paths, lines, or shapes directly inside the video editor. And then, use the Trim Paths feature if you want to make the stroke moves. Compared to After Effects, the workflow is much simpler, with a real-time preview that lets you see every change as you make it.

What You Can Do with Filmora's Pen Tool
Draw Custom Paths and Shapes Freely with Ease
When you start designing, the Pen Tool in Filmora (found under the Drawing Tool) gives you the freedom to draw a custom path, be it a straight line or a curve one. You can adjust every detail, like thickness, color, and transparency, and even pick from built-in presets to instantly add glow and style to the strokes.
Animate Strokes & Elements with Real-Time Preview
With your path in place, adjust the Trim Path settings if you want to animate the stroke smoothly along the line. While you edit, you can fine-tune and preview the results instantly without dealing with complex keyframes beforehand. Then, you can also bind an object to follow along the path, all within just a few clicks.
How to Use Trim Paths in Filmora
Start a new project in Filmora, then select the Drawing Tool and choose Brush to begin your custom path.
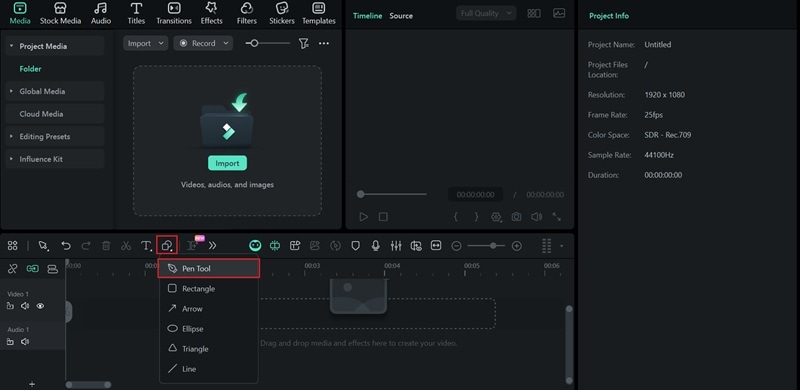
Click anywhere on the preview window to start drawing. Then, click on another point to create a straight line. If you want to create a curve, hold and drag before releasing the mouse to shape the line.
Press Esc on your keyboard to finish the path and exit the drawing mode.
Once your drawing is complete, refine it by adjusting the anchor points. Then, you can style your path in the Properties panel on the right under Stroke > Effects, such as:
- Apply built-in presets like glow, fire, and more.
- Adjust line thickness.
- Change the stroke color.
- Add blur for softer edges.
- Modify cap and joint styles.

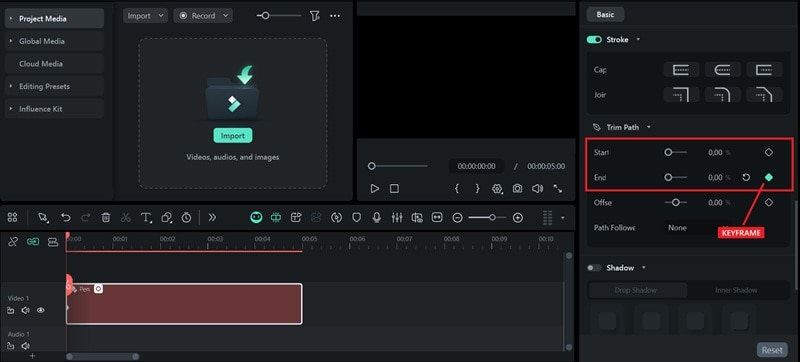
To animate your line, head to the Trim Path option, and then follow the steps below:
- Move the playhead to the beginning of the timeline, set the Start value to 0% and End point to 0%, and add a keyframe on the End point.
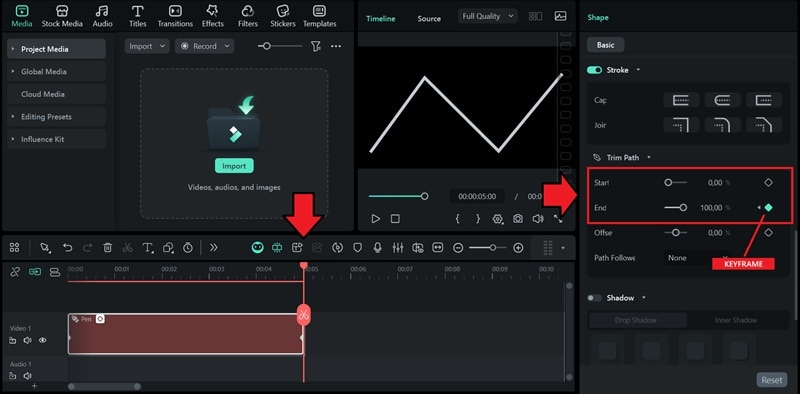
- Move the playhead to the point where you want the animation to end, set the End value to 100%, and add another keyframe on the End point.
If you want to make a reverse animation, swap the keyframes: set the End value to 100% at the beginning and 0% at the end.
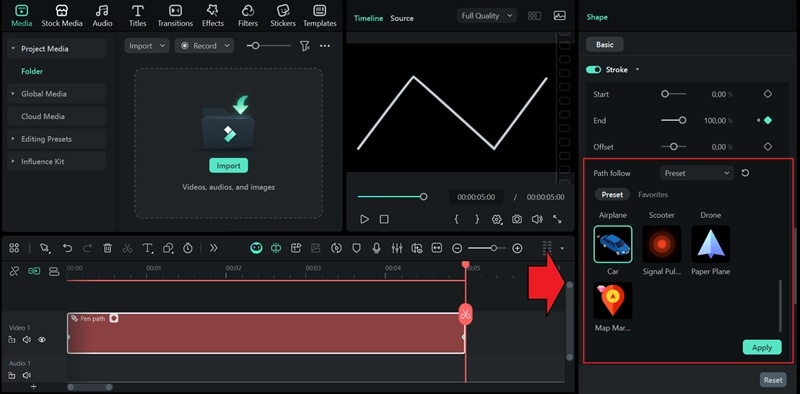
Tip: Bind an Object to Follow Along the Path

If you want to bind an object to follow along the path, you can use the "Path Follow" feature. For the object, you can either use one of the available presets, import from your computer, or select from the timeline. Click Apply to save the changes.
Part 4. Common Use Cases of Trim Paths
Trim paths is the tool that you need to create any line-based motion. Now that you've learned how to use it in both After Effects and Filmora, you can start experimenting and implementing it in your projects.
| Use Cases | AE | Filmora | Notes |
| Logo or Icon Animation | Draw Shape Layer path, apply Trim Paths modifier, and keyframe Start/End values | Draw a custom path with the Pen/Brush Tool and activate the Trim Path tool | Great for creating clean logo reveals or minimalist motion intros |
| Handwriting Effect | Draw text/signature with Pen Tool, apply Trim Paths on the stroke | Use built-in title animation templates, or draw a custom line with the Pen Tool | Great for signature or personal branding effects |
| Path or Travel Route Animation | Draw map route with Pen Tool, animate with Trim Paths, then manually keyframe/link the icon's position to the path | Draw the path, use the Trim Path tool, and select the option to bind an object (icon) to follow the path | Perfect for travel and vlog videos |
| Circular or Progress Animations | Create a circle Shape Layer, apply Trim Paths, and animate the End value to 100% | Add a circle shape, adjust the look, and set the Trim Paths settings. | Simple UI or infographic animations |
Conclusion
If you're learning motion design, using Trim Paths in After Effects is one of the first things you should know. It's especially helpful when you're working with line animations, logos, or shape outlines. You can use it to make strokes draw themselves, reveal text, or create smooth path-based motion for your designs.
Even if you find Trim Paths in After Effects a bit complex, you can start with a simpler editor like Filmora to achieve the same results. Filmora's Pen Tool and Trim Path feature make it easy to draw, animate, and customize paths, with real-time results that help you see every adjustment as you create.
