

 ChatGPT
 Perplexity
 Gemini
 Claude
 Grok
Grok
Imagine you have created a perfect video; everything looks great, but you miss a piece of sensitive information, or an unwanted face shown in the video. You must blur out that subject within the frame before sharing it across multiple platforms. However, the task is challenging, especially if you have no command of video editing.
Thankfully, with Wondershare Filmora, you do not need to be a professional editor to handle this. In this article, we will guide you through the effective solutions on how to blur parts of a video using Filmora desktop and mobile. Whether you're a beginner or have some experience, we will cover different methods to ensure that there's an option that suits your needs.
In this article
Part 1. How To Blur Part Of Video Using Filmora Desktop
This section covers 4 top methods that this ultimate video editing tool offers to hide an area of a screen in your visual content seamlessly. Let us explore them to learn how they cater to the different needs of the users.
- Blur faces in videos with extensive tools and dynamic interface.
- Motion tracking ensures moving faces stay blurred in every frame.
- AI face mosaic blurs crowds with a single click.
- Apply face-off effect to selectively obscure faces in your video edits.


Method 1. AI Face Mosaic
This is a dedicated feature of Filmora that detects the faces in your visual content and protects them automatically. Leveraging the advanced mosaic technology, the feature tracks the unwanted faces and covers them seamlessly. Users get different face blurring mosaic filters within the Effects library of the tool. Moreover, they can adjust the attributes like strength and opacity of the applied mosaic effect.
Steps for Blurring Face in a Video Using AI Face Mosaic from Filmora
To learn how to blur some parts of a video using this dedicated feature, let us explore the step-by-step guide mentioned below:
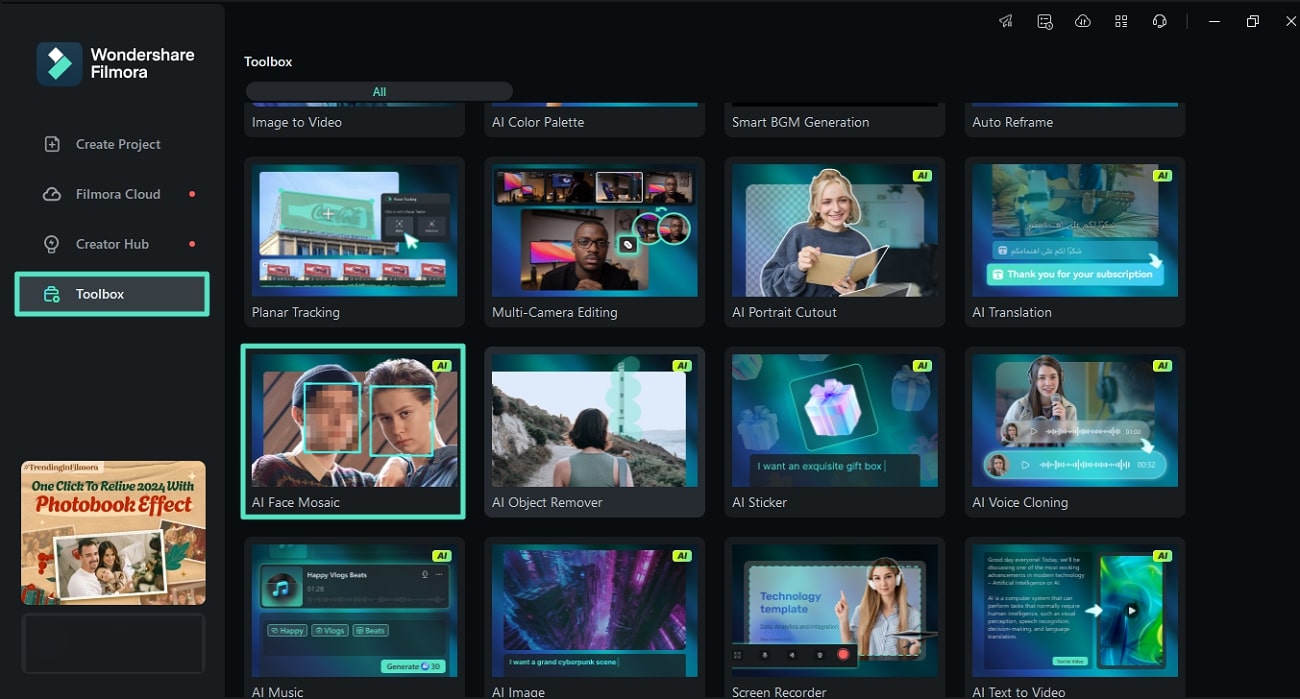
Step 1. Select the AI Face Mosaic Feature
To initiate the process, launch the Filmora software on your computer and head to the "Toolbox" section on the homepage. Next, browse through different features to locate "AI Face Mosaic" and click on it. Now, import the video to the tool's interface for which you want to blur out the part.
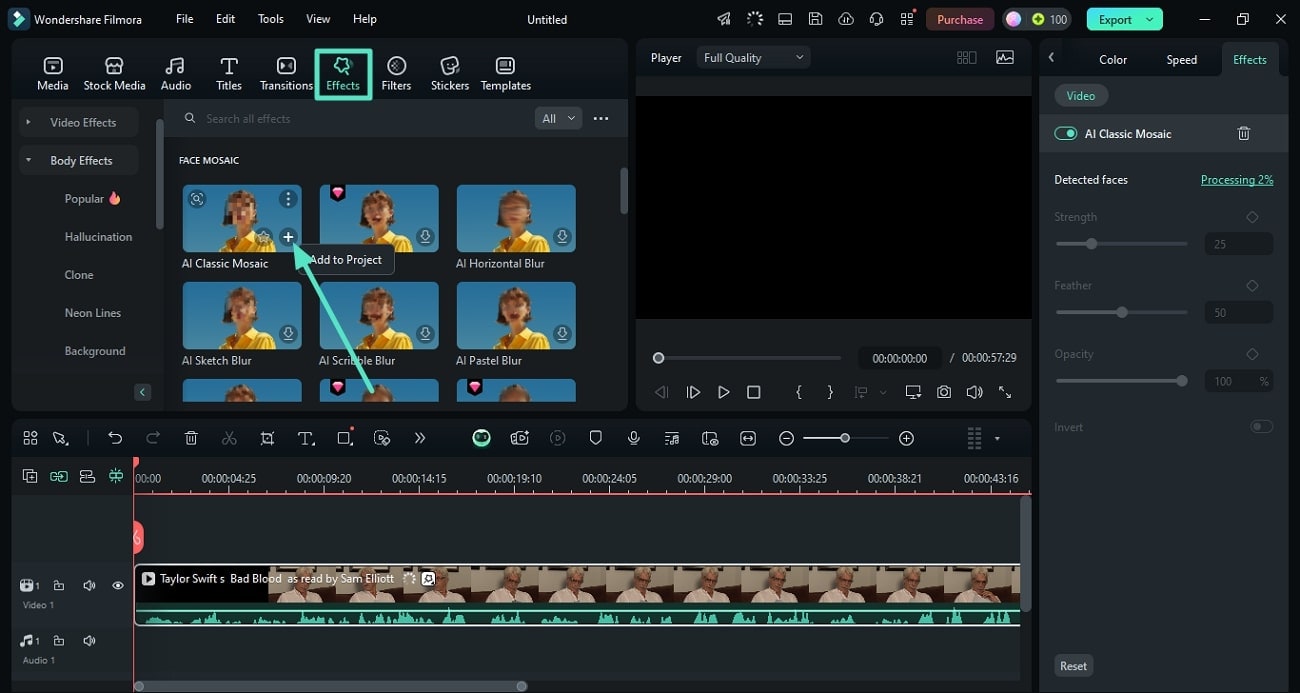
Step 2. Choose the Desired Mosaic Effect
In the editing interface, the "Effects" library will be enabled, from which you can choose your desired mosaic. To apply it to your video, click the small "+" icon or simply drag it over the video on the timeline.
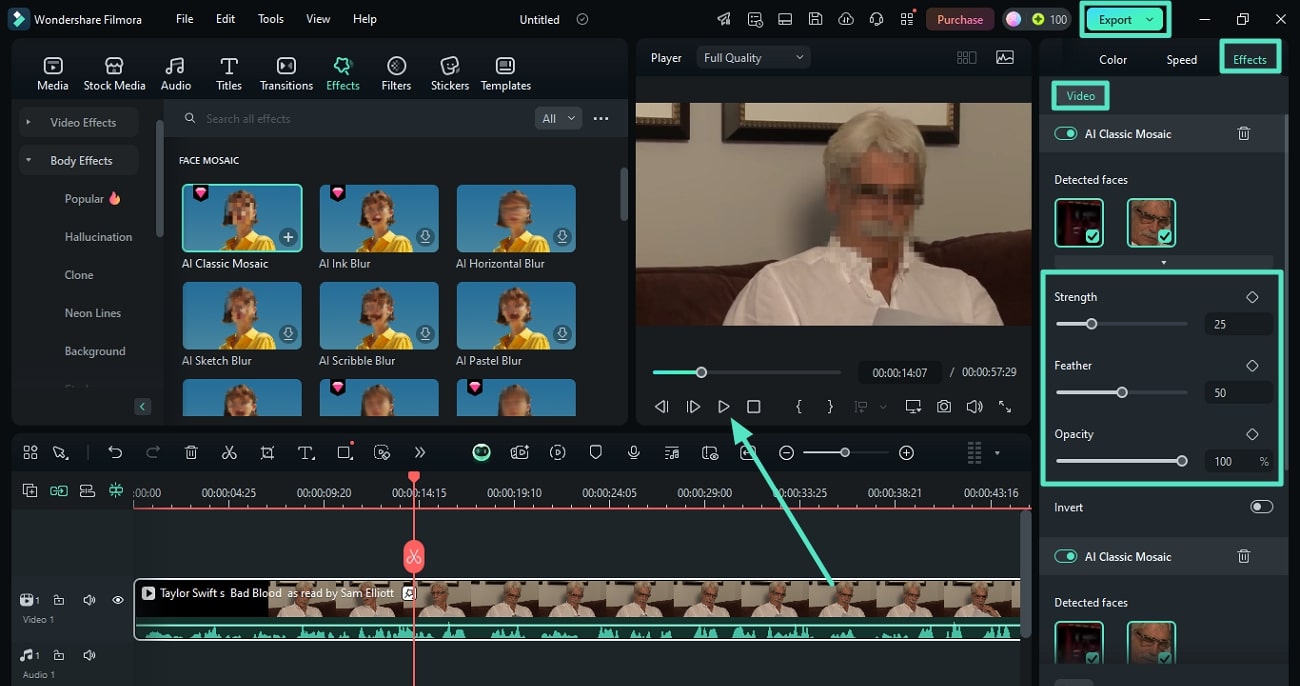
Step 3. Adjust the Attributes of the Effect
Once the mosaic is applied on the detected face, you can preview it within the preview window by clicking the "Play" button. Next, head to the "Effects" panel on the right side of the screen and access the "Video" section. Here, adjust the "Strength," "Feather," and "Opacity" by dragging the respective sliders according to your preference. Once you are done, head to the top-right corner of the screen and press the "Export" button.
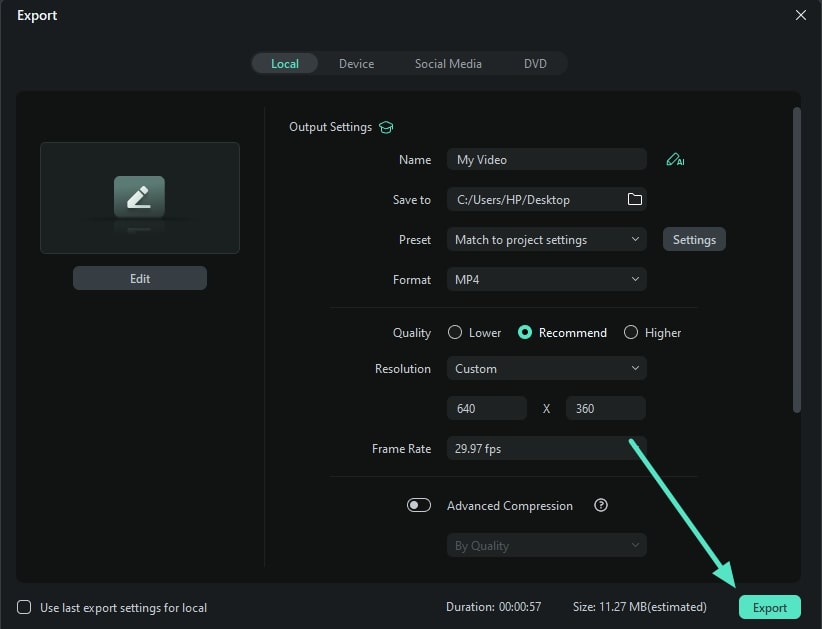
Step 4. Input Export Settings and Save
In the "Export" window, select "Output Settings" for format, quality, resolution, and more. After setting them up successfully, press the "Export" button to save the blurred video to your PC.
Method 2. Blur Effects in Special
Apart from providing a solution on how to blur a part of a video using the AI Mosaic Effect, Filmora also offers the ability to add multiple blur effects to your visual content. The platform provides a vast library of effects, including the blur category. Moreover, you get various customization options to select the area within the frame according to your preferences.
Tutorial for Adding Customized Blur Using Filmora's Special Effects
With the effects library offered by this video editing tool, users can select from a wide variety of blurs with different textures and visuals. Learn how to use these effects in the steps mentioned below across Filmora:
Step 1. Choose the Desired Effects From the Library
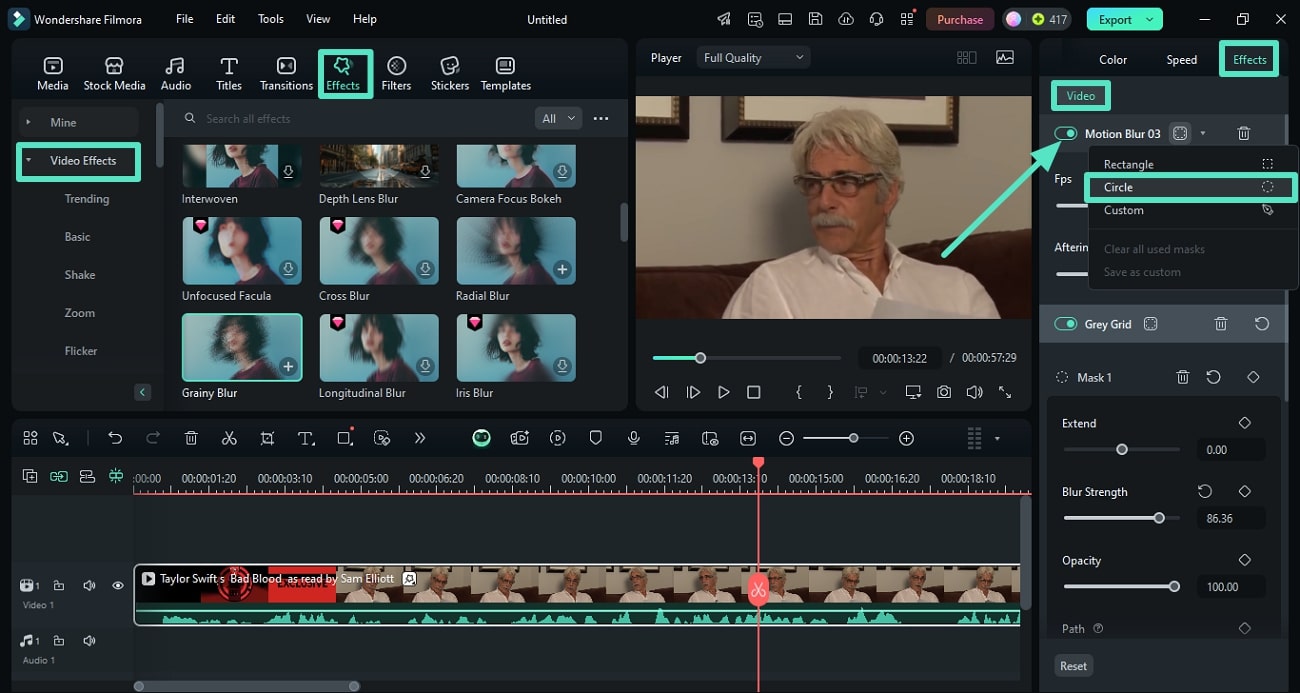
Once you have launched the tool on your device and imported the video to the interface, drag it to the editing timeline for further processing. Head to the "Effects" section on the menu bar to enable the effects library. Next, expand the "Video Effects" and select your desired effect to apply by dragging it to the editing timeline.
Doing so will enable the "Effects" panel on the right side to allow you to access the "Video" section. Here, click on the arrow next to the "Motion Blur" effect and select "Circle" from the expanded list.
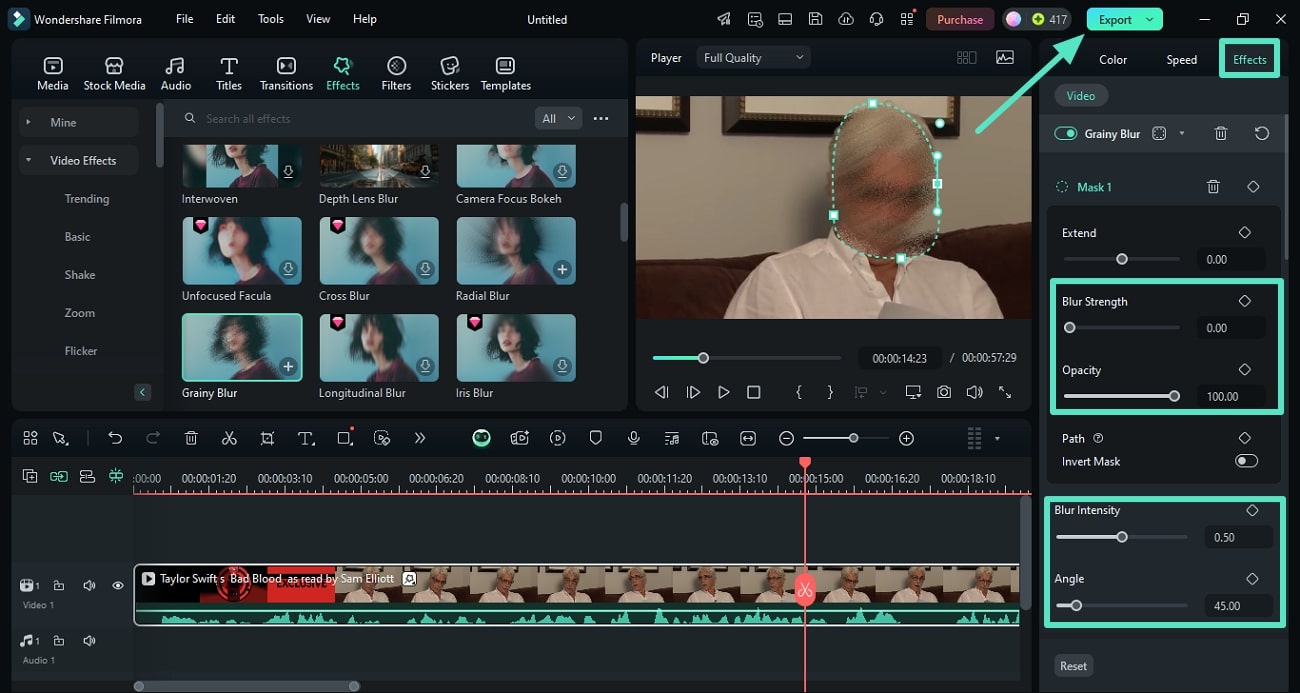
Step 2. Pick the Area for Blur and Customize
Next, head to the video previous and drag the nodes of the circle to cover the area for blur in your video. Move back to the "Effects" panel and adjust the "Blur Strength" and "Opacity" by sliding the sliders. You can also adjust other attributes like "Blur Intensity" and "Angle" from the same panel. Once done, click the "Export" button at the top-right corner to save the blurred video.
Method 3. Blurring Video With Motion Tracking
To demonstrate how to blur a portion of a video, Filmora offers another approach that detects the motion in your video through AI. After the detection, it asks you whether you have to apply a mosaic or any other clip to the tracked area. There, you can adjust the intensity and opacity of the applied mosaic.
Step-by-Step Guide For Applying Motions Tracking With Filmora
Using this functionality, users can ask the tool to automatically detect moving objects and blur them out. Provided below are the comprehensive steps for applying motion tracking within Filmora:
Step 1. Start Motion Tracking After Importing Your Video
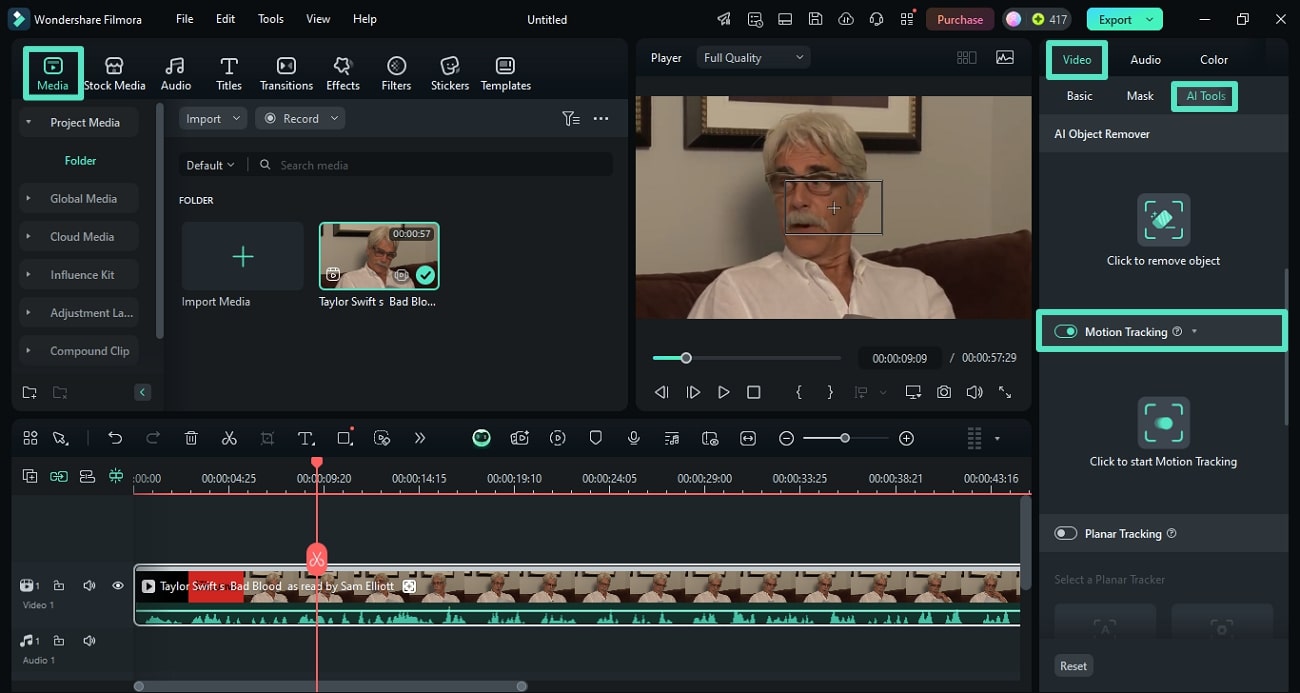
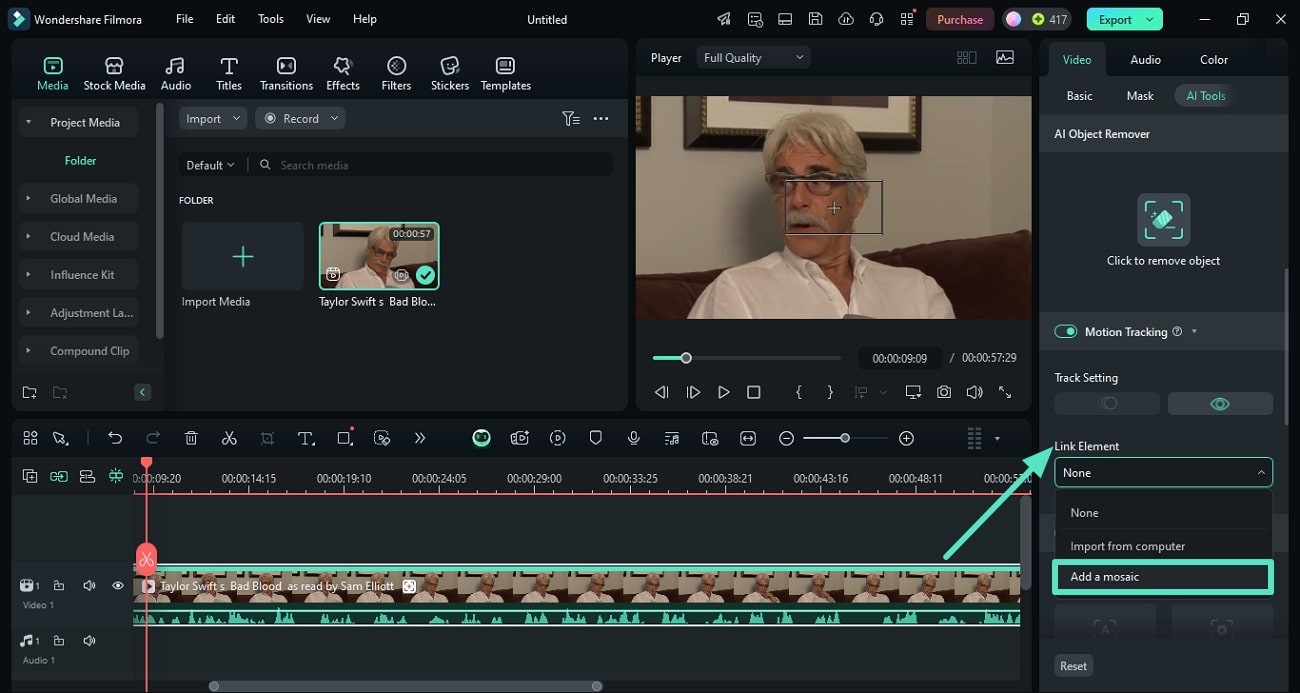
Once you enter the editing interface of Filmora, import your desired video under the "Media" section and then drag the video to the editing timeline. Head to the right side of the interface and acquire the "Video" section panel. From here, enable the "AI Tools" section and scroll through to locate the "Motion Tracking" option. Toggle it on and click the relevant button to let the tool begin motion tracking.
Step 2. Add Linked Element For Tracked Motion
Once the movement is successfully selected in your video, the area will be automatically selected within the video preview. Moving forward, access the same panel and expand the "Link Element" from the down menu to choose "Mosaic."
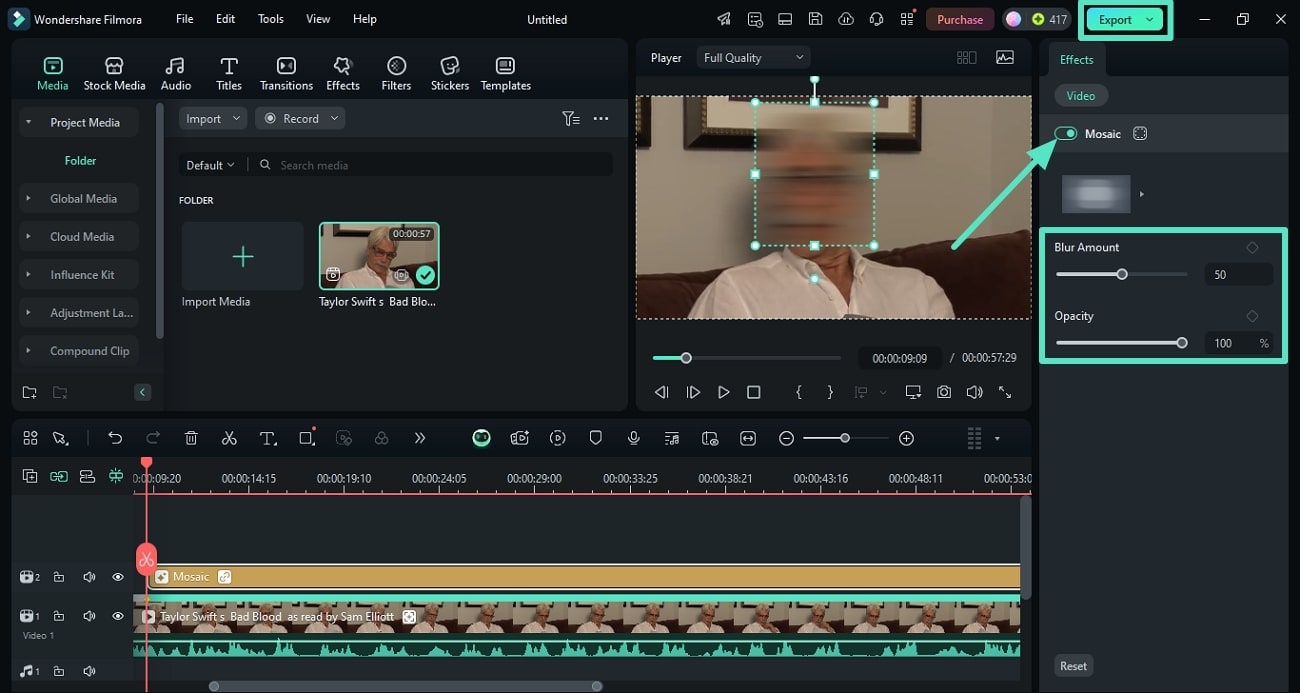
Step 3. Adjust the Tracked Area And Export
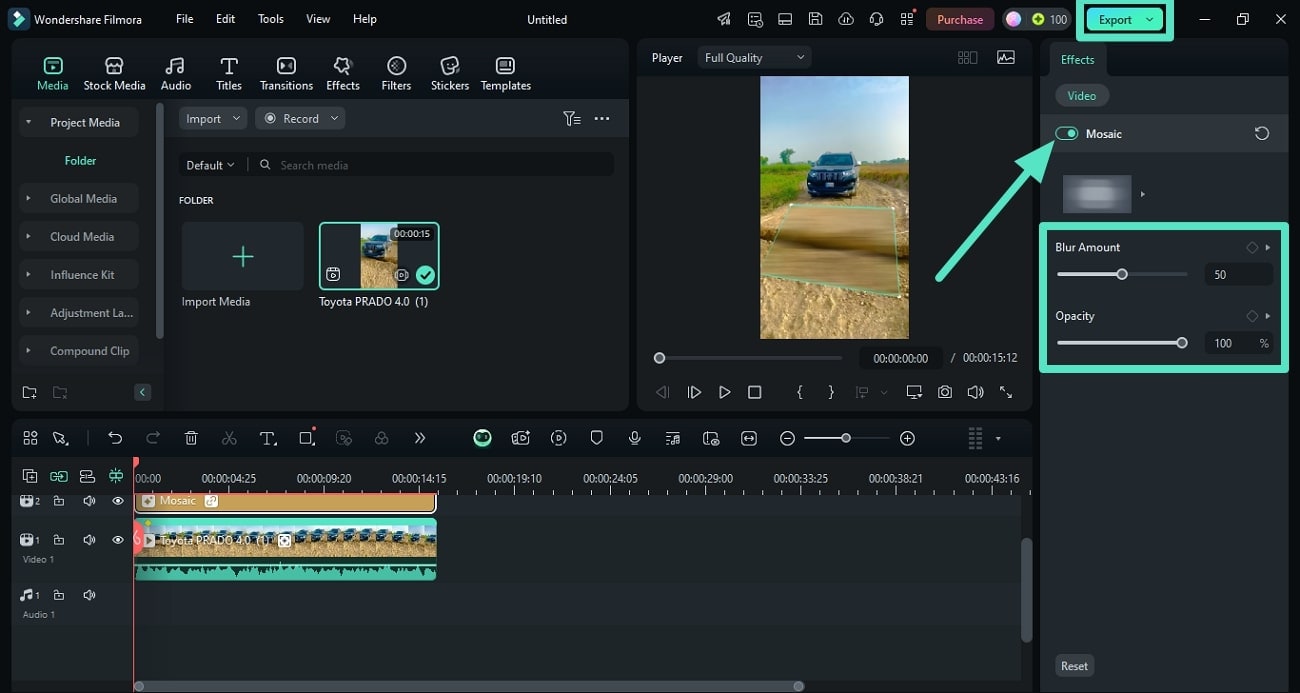
Once the mosaic is applied, the specific part within the video will be automatically blurred. To adjust the selection, drag it according to your preferences. You can also access the "Mosaic" panel on the right and customize the "Blur Amount" and "Opacity." When you are satisfied with the generated results, hit the "Export" button to save the video.
Method 4. How To Blur With Planar Tracker
This dedicated feature by Wondershare Filmora is used to detect a plain surface in a video and replace it with another element. However, you can use this function to detect unwanted objects or parts in your video. The tool uses 4-point tracking and tracks the reference point in the media to make the selection.
Guide on How to Blur With Filmora's Planar Tracker
The automatic detection of this feature allows users to add multiple elements like text, images, and even mosaics. Let's learn how to blur out part of a video using this incredible feature of Filmora:
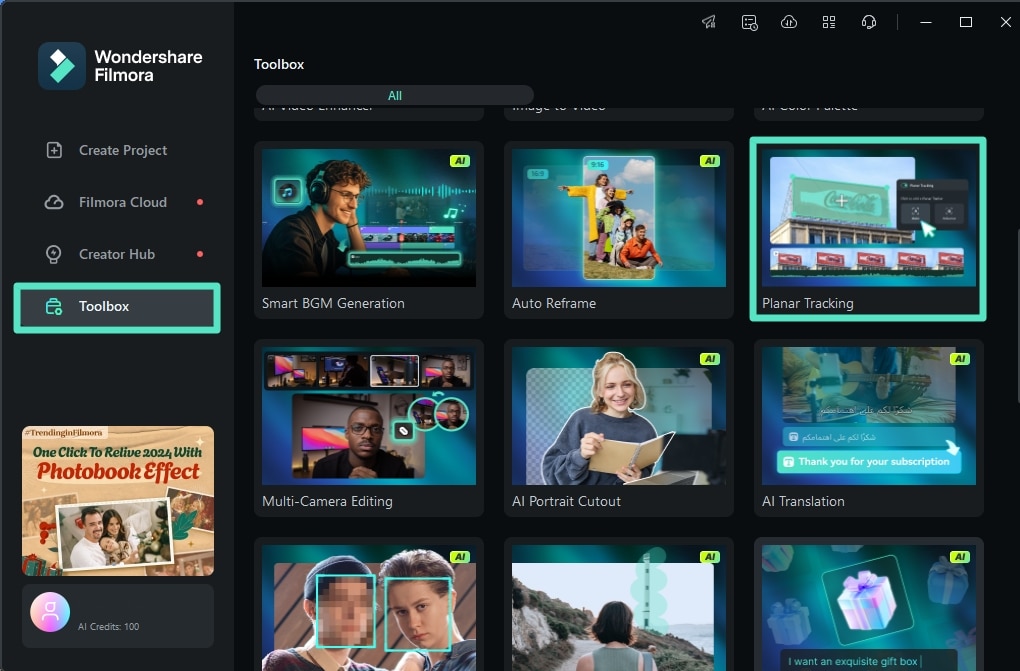
Step 1. Initiate by Opting For Planar Tracking
Upon launching Filmora, access the "Toolbox" from the homepage and select the "Planar Tracking" function. Next, import your video to the tool's interface and import it to the editing timeline to proceed forward.
Step 2. Choose The Auto Planar Tracker
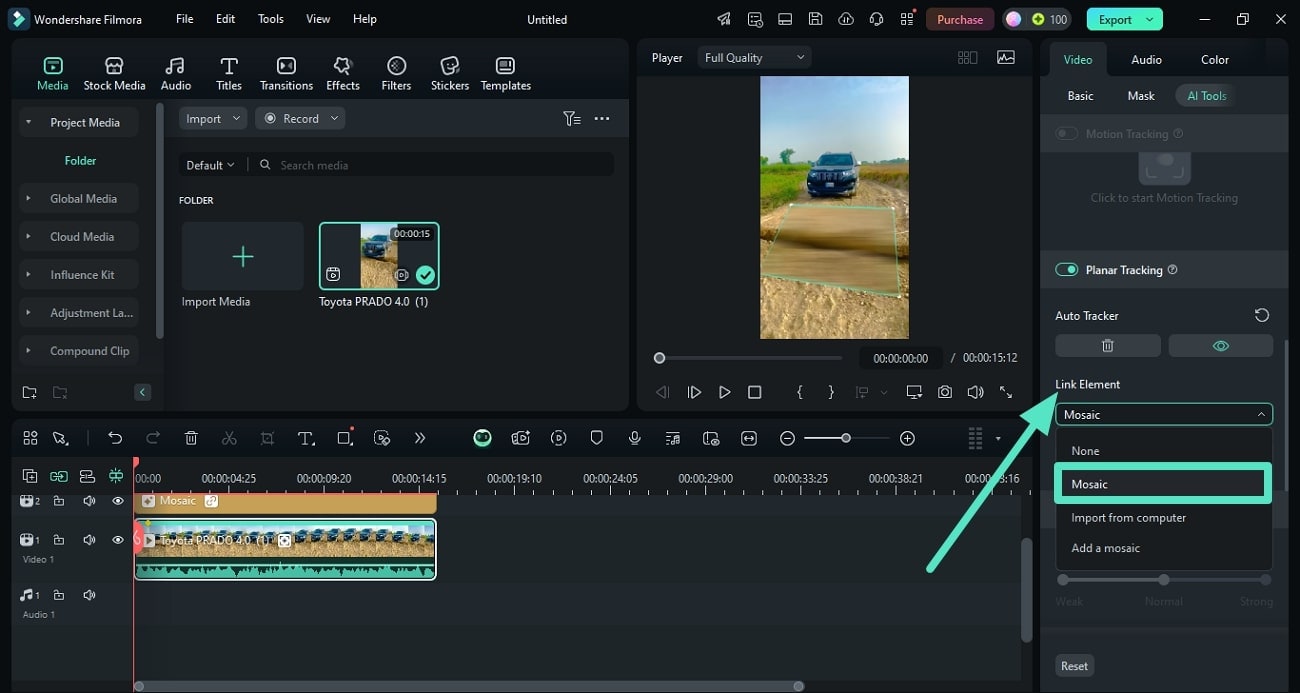
In the main interface, access the "Video" panel on the right side and opt for the "AI Tools" section. Scroll through the panel to locate the "Planar Tracker" and enable it. Next, select the "Auto" option and press the "Start" button to let the tool automatically detect the video.

Step 3. Link Mosaic Element Within Filmora
Once the plain is detected, the selection will be made on the preview window in square. Now, expand the "Link Element" drop-down menu and opt for the "Add a Mosaic" feature.
Step 4. Adjust the Blur and Export
After the mosaic is added, adjust the "Blur Amount" and "Opacity" using their sliders. Once you are satisfied with the results, click the "Export" button from the top-right corner to save the final video.
- Blur faces in videos with extensive tools and dynamic interface.
- Motion tracking ensures moving faces stay blurred in every frame.
- AI face mosaic blurs crowds with a single click.
- Apply face-off effect to selectively obscure faces in your video edits.
Part 2. Adding Blur Effect in Videos Using the Filmora App
If you are on the go and looking for an instant solution to blur out a part of the video, Filmora App is the right resource. The app offers a vast library of stickers that includes numerous types of stickers, including the mosaic style. You can conveniently apply those stickers to hide a specific area in your video.
Filmora for Mobile Filmora for Mobile Filmora for Mobile Filmora for Mobile Filmora for Mobile
Perfect Blur Effecr on Mobile
- • Powerful Brand New AI Features.
- • User-friendly video editing for beginners.
- • Full-featured video editing for professional.


As discussed, you can utilize the sticker library to apply blur to your visual content using your smartphone. Provided below are the steps explaining how to blur out part of a video using the Filmora App:
Step 1. Create A New Project and Select Blur Sticker
After launching the application on your smartphone, tap on the "New Project" option located on the homepage. Next, import your video to the app to add blur. Once the video is successfully imported, head to the toolbar at the bottom and select the "Sticker" icon.
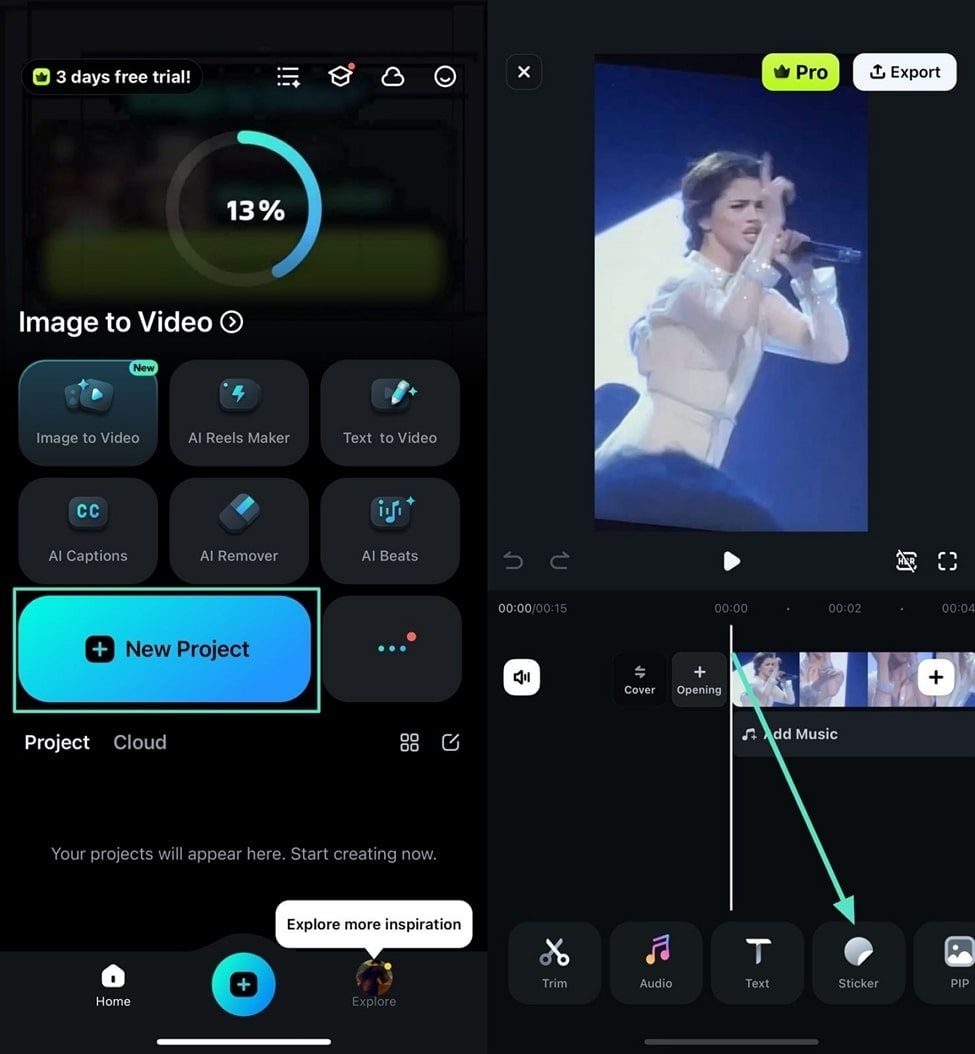
Step 2. Apply The Blur Sticker and Export Results
Once the sticker library is accessible, search for the "Mosaic" sticker by typing in the search bar. Choose the mosaic sticker of your choice by tapping on it and dragging it to the screen area. Now, place the sticker on the part and adjust the size accordingly. Once done, head to the top right corner of the screen and press the "Export" button to save the results.

Conclusion
To conclude, this article explored the top solutions for how to blur out certain parts of a video in a selective area in your video using Wondershare Filmora. The tool offers AI-powered functionality to smartly detect the motion in your video and distort the moving object using motion tracking. Moreover, different mosaic filters are offered that can be applied to hide an object or sensitive information.
