
 100% Security Verified | No Subscription Required | No Malware


 ChatGPT
 Perplexity
 Gemini
 Claude
 Grok
Grok
If you're just starting out with editing, there's a good chance you've come across the term video annotation but never really knew what it meant. You might've heard it used for teaching AI how to recognize things, and maybe also for helping students learn through interactive videos. It sounds like the same thing, but it's not, and that's where most people get lost.
That's exactly what this guide is here for. We'll break down exactly what is video annotation and show you how to annotate a video in a way that actually helps your content stand out using tools that actually make sense. Scroll down to find out!

In this article
Part 1. What Is Video Annotation? A Simple Breakdown for Non-Techies
Before we move further, let's clear up the basics and learn what video annotation actually means because it's not just one thing. Depending on who's using it, the term can point to two very different worlds:
Type 1: AI / Machine Learning Video Annotation

The first one is all about AI and machine learning. This version of video annotation is used to help computers understand what's happening in a video.
For example, when someone marks where a car moves or where a person walks, the AI studies those patterns and learns to recognize them on its own later. It's a bit like teaching the system how to watch and make sense of the world, frame by frame.
Common Tools to Use:
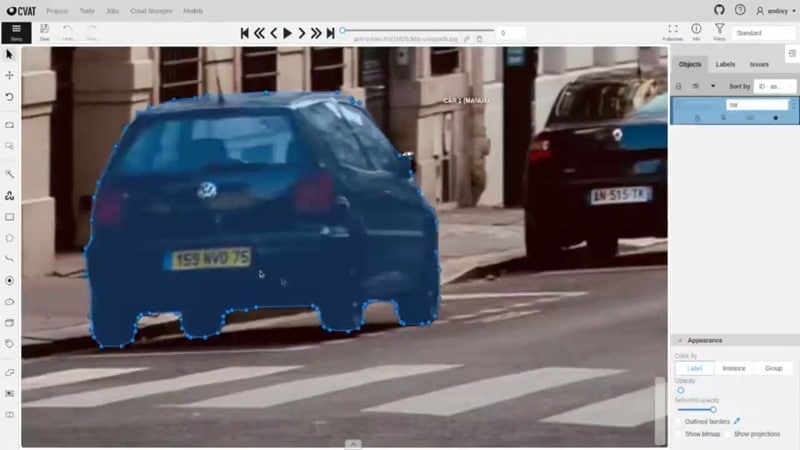
- CVAT: It is a free, open-source tool perfect for detailed video annotation. It's easy to use and helps you label every frame with accuracy.
- Labelbox: This one is a cloud-based video annotation tool made for teams handling large AI projects. It keeps everything organized and makes collaboration smooth.
- SuperAnnotate: This tool uses AI to make video annotation faster and more efficient. It automatically helps label objects while keeping your work consistent and neat.
Who Uses It:

- Data Annotators: At the front line of video annotation are data annotators who handle every small detail. They carefully tag people, objects, and movements so the AI can learn to read each frame correctly.
- AI Engineers: AI engineers step in to make sense of all that labeled data. They use those annotations to train systems that help machines detect patterns, track motion, and recognize real-world actions.
- Researchers: In research labs, scientists rely on video annotation to study how computers interpret visuals. Their experiments help develop smarter technologies that can understand images and videos more like humans do.
Type 2: Video Annotation for Content Creation & Editing
The second type of video annotation is where creativity takes over. Here, to annotate a video means adding text, arrows, doodles, or little motion paths that make your clips more engaging and easier to follow. It's the kind of annotation that helps explain an idea, guide attention, or simply make your videos look more alive.
Common Tools to Use:

- VEED.io - Quick And Handy: When you just need something fast and simple, VEED.io is your go-to tool for video annotation. It lets you drop in text, arrows, or highlights right from your browser, no heavy setup needed.
- Markup.io - Built For Teamwork: This one is great when you need others to jump in and review your video. It lets teams leave comments and feedback directly on specific parts of the video, keeping everything clear and organized.
- Wondershare Filmora - Creative And Powerful: For creators who want more than just notes, Wondershare Filmora opens up endless possibilities. You can animate text, draw moving lines, or design stunning visual annotations that instantly grab attention.
Who Uses It:
- Educators: Teachers use video annotation to make their lessons more engaging and clear. They highlight key points, add notes, or draw visual cues that help students understand complex topics faster.
- Content Creators: Creators rely on video annotation to make their videos more interactive. They use text, arrows, and fun visuals to guide viewers' attention and keep their content lively from start to finish.
- Marketers and Social Media Editors: These professions use video annotation to make ads and short clips stand out. By adding creative tags, animations, and motion graphics, they turn simple videos into scroll-stopping content that connects with audiences.
Which Type Is This Guide For?
If you're reading this as a content creator, educator, or marketer, Type 2 is exactly what you need. Among the tools we mentioned, Filmora stands out for one simple reason: it gives the most creative freedom without overwhelming complexity.
- VEED.io is perfect for quick, simple edits.
- Markup.io is great for team collaboration.
- Filmora hits the sweet spot: easy to use, yet powerful enough to animate, draw, and design annotations that really pop.
That's why the rest of this guide will focus on how to annotate videos in Filmora.
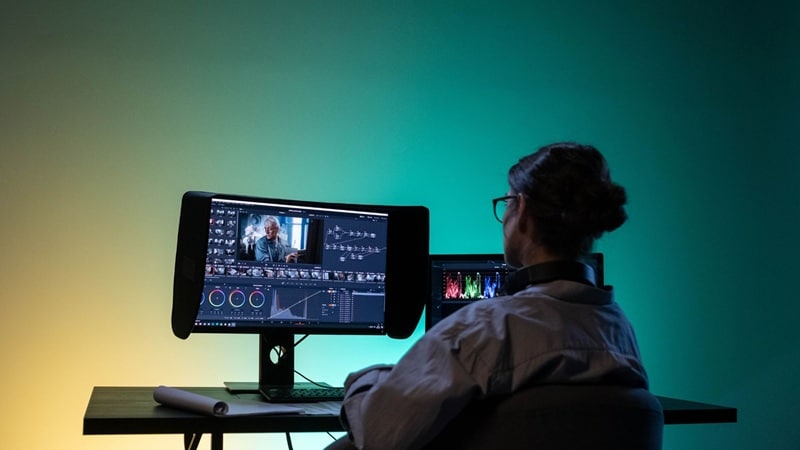
Part 2. How to Annotate Videos in Filmora for Content Creation
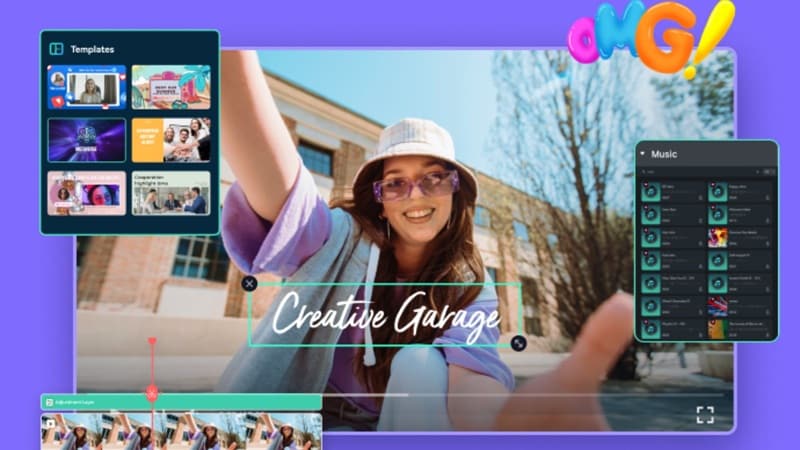
Filmora isn't just about dropping text or arrows on your video. It allows you to:
- Animate elements smoothly
- Layer effects and visual cues
- Create annotations that feel alive and engaging
Plus, it works offline, handles complex projects, and grows with your skills. In short, if you want annotations that stand out, Filmora is the tool to start with.
Now let's dive into the fun part - actually creating annotations in Filmora!
 secure download

1. Visual Markup Tools - Pen Tool That Feels Like Drawing On Screen
In their latest version, Filmora introduced a new feature called Pen Tool. This feature makes video annotation feel natural and fun. You can draw paths, circles, arrows, or even outline icons and shapes to highlight important details. It also works with keyframing, so your drawings can move and follow the motion in your video.

Step-by-Step Guide to Annotate a Video in Filmora using Pen Tool
The best part about this feature is that even though it might look a little tricky at first, it's actually very easy once you try it yourself. Check out the simple guide below to learn how to annotate a video in Filmora using this creative tool.

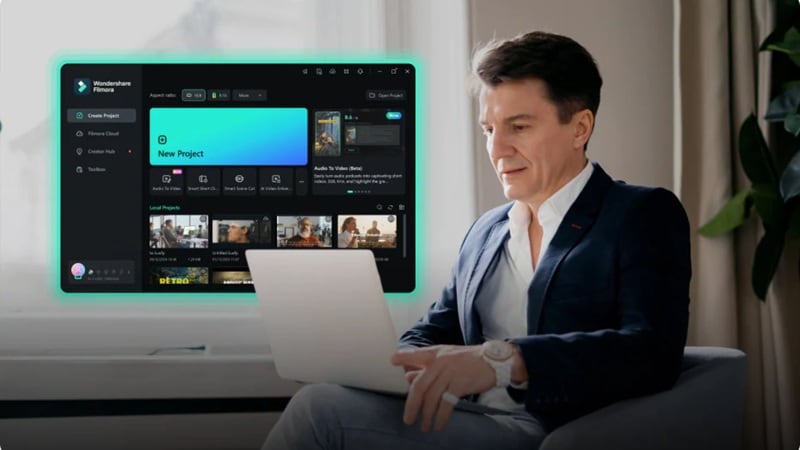
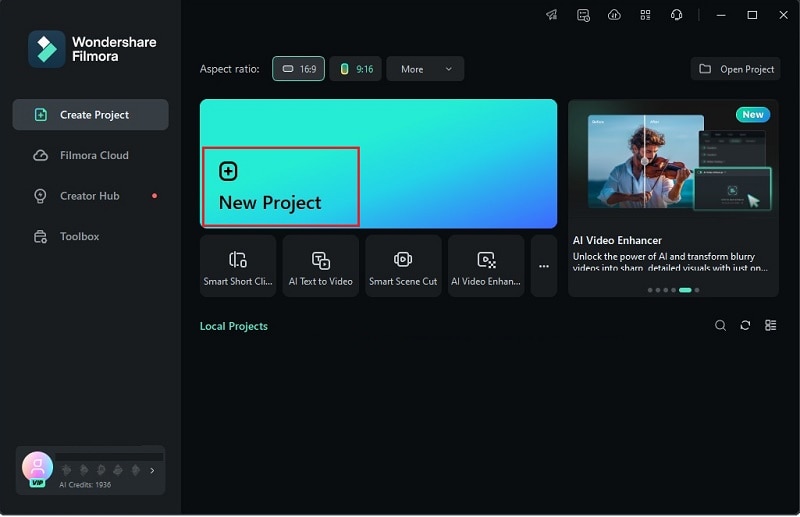
Step 1Launch Filmora and Start a Fresh Project
Make sure you've got the latest version of Filmora installed. Open the app, click on "New Project", and you'll have a clean workspace ready for editing.
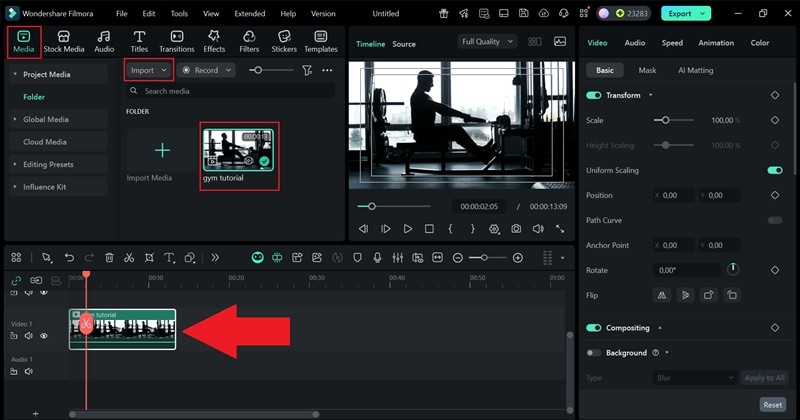
Step 2Import Your Video
Head over to the "Media" tab, click "Import", and choose the video you want to work on. After it loads, drag it onto the timeline below.
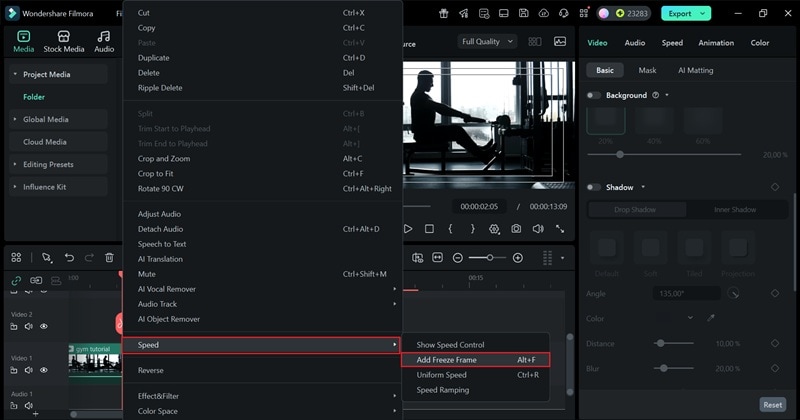
Step 3Freeze Frame Your Video
Drag the playhead to the exact moment you want to work on with the Pen Tool. Then, right-click the clip, choose "Speed", and select "Add Freeze Frame". This step helps lock the scene in place, giving you a steady frame to focus your video annotation on.
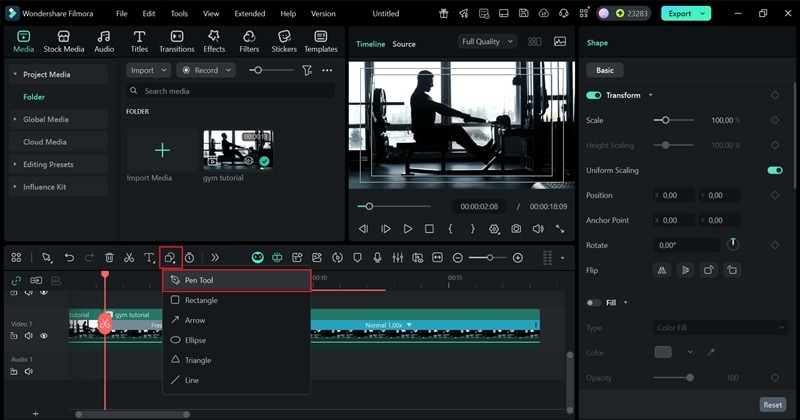
Step 4Open the Pen Tool
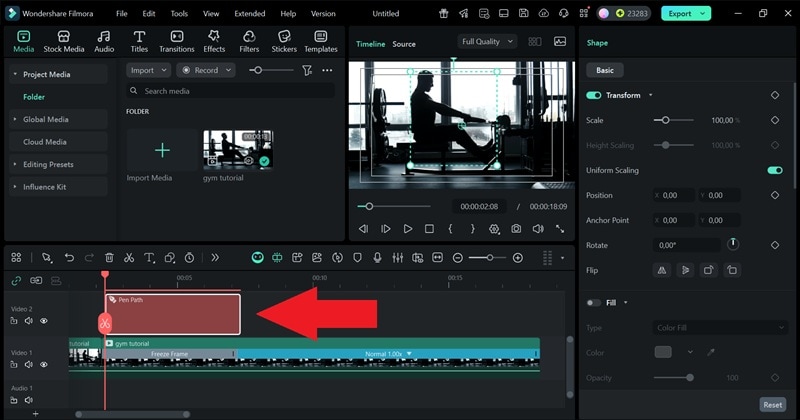
Click on the shape icon located just above the timeline, next to the text option. From the menu that appears, select "Pen Tool" to begin drawing and creating your video annotation.
Step 5Use the Pen Tool to Annotate a Video
The Pen Tool in Filmora really stands out when you use it for outlines or path animations, but it all depends on what kind of video annotation you're creating. For example, if you're showing the right posture in a gym tutorial, just use your mouse to trace along the body's correct position. Move carefully and follow each curve so your outline looks neat and smooth.
Step 6Add Effects and Movement
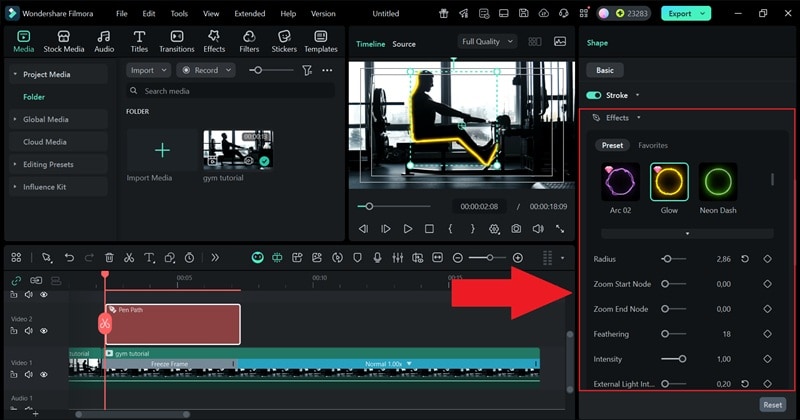
- Select the outline you created with the Pen Tool in the preview window.
- Then open the settings panel on the right and look for the "Effects" section.
- Choose a style you like and tweak the glow, color, or animation until it fits the look of your video annotation.
- To make your highlight look like it's being drawn in real time, add a bit of motion.
- Scroll down and open the "Trim Path" settings.
- Find the "End" option, which starts at 0%. Keep the playhead at the start and click Add Keyframe.
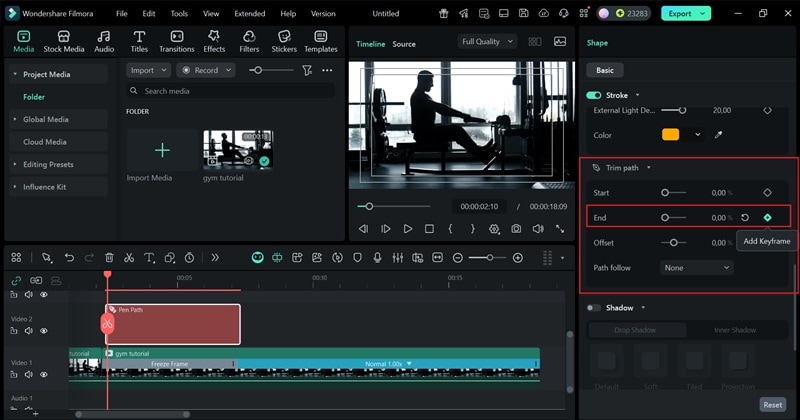
- Move the playhead to the end of the clip and drag the End slider up to 100%.
- Add another keyframe to lock it in.
- Play it back, and you'll see your annotation smoothly animate across the screen, creating that hand-drawn effect.

Step 7Enhance Your Video
Once your video annotation is done, you can polish your tutorial to make it look more professional. Try adding stickers, titles, or other creative elements that match your video's theme. Browse through Filmora's library and drop anything you like onto the timeline to complete your edit.

Step 8Export and Save Your Video
Hit play to preview your animation and check how your video annotation flows. Once you're satisfied, click "Export" to finish your edit. You can save it to your computer under "Local" or upload it straight to your social media from Filmora. Add a title, pick your preferred format and resolution, choose where to save it, and click "Export" one last time.

And that's all it is! As you can see, the Pen Tool in Filmora makes it surprisingly easy to annotate a video and bring your ideas to life. You can draw freely, customize the look with presets, and create smooth animations that make your clip stand out. Now hit play and enjoy the result of your work.
2. Data Visualization - Turn Numbers Into Motion
This method of video annotation is very useful if you're working with data. The Animated Charts Maker in Filmora lets you transform raw data into smooth, dynamic visuals. You can import data from Excel and instantly generate animated charts that bring numbers to life in your video.

If you're interested in learning how to annotate a video using this method, check out this official tutorial guide: Filmora Animated Charts Official Guide.
3. Text And Caption Annotations - Words That Stay Clear And Catchy
With tools like AI Captions and Text Overlays, Filmora makes it easy to add context to your clips. You can display subtitles, highlight points, or place animated text that keeps your audience focused.

Check out the official tutorial below to learn how to use this feature and add subtitles with ease: How to Add Subtitles to Videos
4. Interactive Elements - Add Personality And Engagement
Filmora also lets you use stickers, icons, and shapes that react to your video. These little interactive touches make your video annotations feel more connected and visually exciting.

Sounds exciting, right? Lucky for you, we've got a full article that covers this topic in more depth: How To Make Interactive Video: A Guide for Engaging Content. Go ahead and check it out to learn how to turn your video annotation into a fully interactive experience.
Part 3. Creative Ways to Use Video Annotation (and Have Fun Doing It)
Now that you've seen how easy it is to annotate a video with Filmora's Pen Tool, it's time to get creative with it. The tool isn't just simple to use, it's also incredibly versatile for any kind of project. Here are some fun ideas you can create with Filmora's Pen Tool:
1. Educational Videos - Annotate Lessons With Visual Paths

Teachers and online creators can use video annotation to make lessons clearer and more interactive. Add circles, arrows, or animated paths to highlight key points and guide students through the material step by step.
2. Travel Videos - Draw Animated Routes On Maps

Travel vloggers can use Filmora's Pen Tool to trace their journey and show movement between destinations. It adds a storytelling layer that helps viewers follow along and feel part of the adventure.
3. Product Demos - Showcase Features With Stroke Animations

When making product videos, you can use video annotation to draw attention to specific features or details. Outline buttons, trace shapes, or add glowing highlights to make each part stand out clearly and professionally.
Conclusion
Video annotation can mean two very different things. One is used for AI and machine learning, while the other is all about adding creative visuals to your videos. This guide focused on the latter: how to annotate a video in a way that brings your ideas to life.
With an all-in-one video editor like Filmora, the process is easy to learn and fun to explore. Its Pen Tool lets you draw, highlight, and animate right on your clip, turning any project into something more engaging and visually clear.
Whether you're working on an educational tutorial, a travel vlog, or a product demo, Filmora gives you everything you need to create professional-quality video annotations without the extra hassle.
secure download 