If you are a content creator who creates content for different platforms but faces less engagement, you need to try something new. Making interactive videos and posting them on different platforms can help you grab attention and more followers. Interactive videos help you go viral and get a chance to collaborate with other creators. To know how to make interactive videos, you can read this article, where we discuss everything in detail.
In this article
Part 1. What is an Interactive Video and What Makes it Interactive?
This type of visual content contains multimedia that allows users to engage directly with the content. Viewers can make choices and click on different elements to explore different paths within the video itself. These interactions can be as simple as clickable buttons and shopping links. Mentioned below are some of the points that make this content type interactive:
- Clickable Hotspots: You can click these areas and more information will pop up and it will take you to other web pages. This element makes videos more engaging by providing additional layers of information.
- Decision Points: If you want your viewers to choose what happens next in a video, you can add decision points to shape the storyline.
- Polls and Quizzes: Many clickable video software allow you to generate quizzes and polls in your visual content by offering templates. These elements invite users to participate and generate feedback-driven content.
- Hover Effects: Having these types of elements triggers visual changes without clicking. This subtle interactivity helps in grabbing users' attention and adds dynamic responses.
- Calls-to-Action and Forms: CTAs encourage audiences to take specific actions like purchasing or subscribing. These are often paired with forms to collect valuable user data.
Part 2. What are the Benefits of Making Interactive Videos?
Creating videos with interactive elements has compelling benefits over traditional video content. Here are a few benefits that resonate with why you need to create such visual content:
- Better Engagement: Users are likely to pay more attention and stay longer on the screen when they can interact with the content. You can use interactive elements to minimize drop-off rates and convince viewers to watch complete videos.
- Improved Learning and Retention: It gets better for the audience to retain information when there are interactive elements added to it. For instance, the "Learn More" button promotes better understanding in educational videos.
- Personalized Experience: When you create interactive video, you allow viewers to choose the content path that matches their interests. For instance, an interactive workout video allows users to choose their goals, muscle gains, and flexibility.
- Valuable Data Collection: Adding such elements lets creators track how users engage. You can keep a record of what the audience clicks or skips, which helps you to generate content accordingly.
Part 3. Recognizing The Different Types of Interactive Videos You Can Create
If you are confused about what sort of interactive videos to create, you can take inspiration from different types of content recommended in the following section:
1. Branching Video (Netflix's Bandersnatch)
Branching videos are a form of interactive media that allow viewers to make decisions at key moments during playback. One of the most popular and ambitious examples of this format is Bandersnatch, an interactive film released by Netflix in 2018 as part of the Black Mirror anthology series.
The story is about a young programmer who takes inspiration from a branching novel for making his video game. While viewers watch this, they feel that they must make a decision on Stefan's behalf. Viewers can make choices, such as what cereal he eats, or major choices affecting his mental state.

2. Shoppable Videos (Ikea Bedroom Habitats)
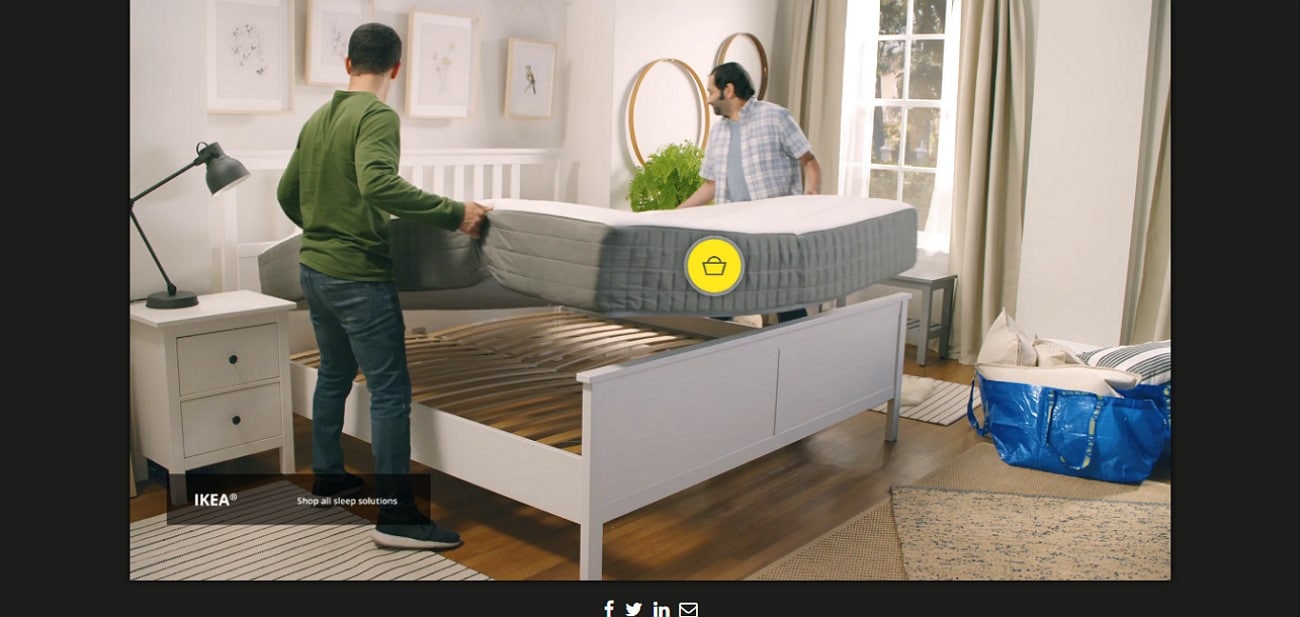
Shoppable videos are a powerful e-commerce tool that allows viewers to interact with the items in the videos every day. One such video is Ikea's Bedroom Habitats video that lets users click and explore individual products such as pillows and beds. This approach converts a simple video into an immersive showroom experience for users.
3. Educational Interactive Videos (Smoothie Recipe Video)
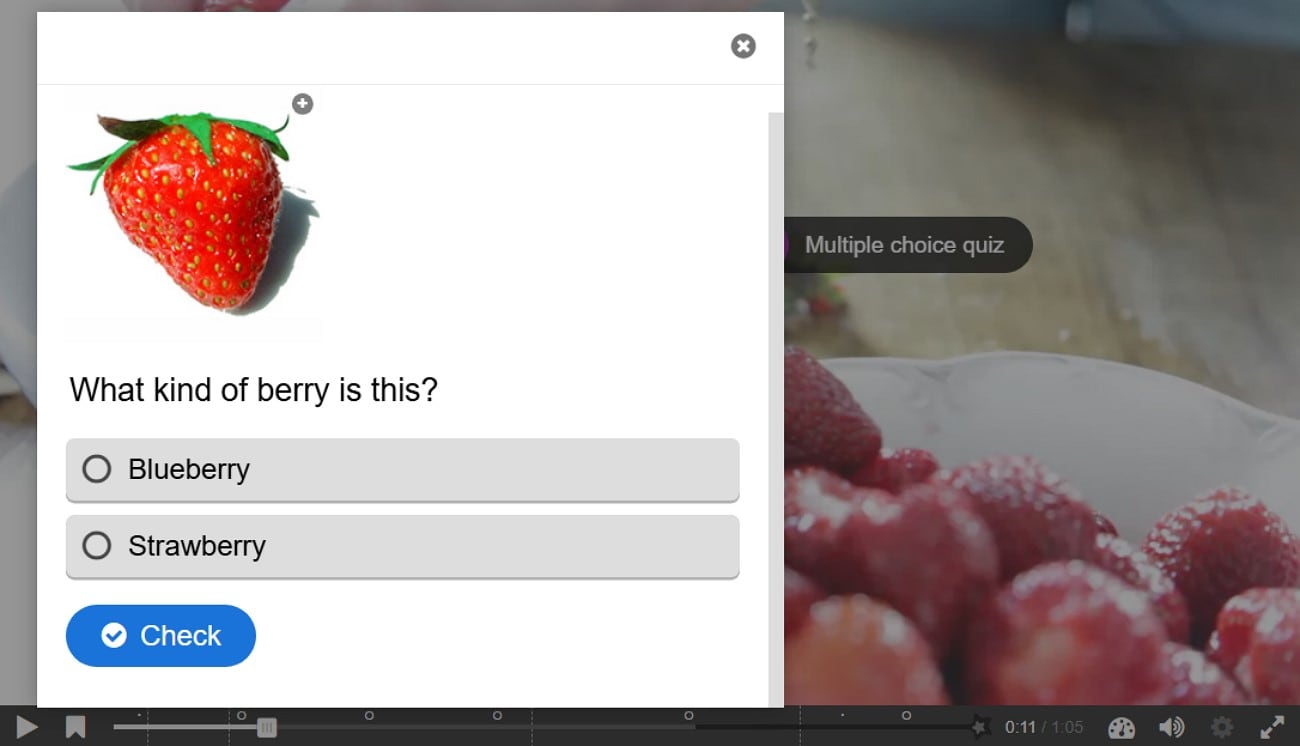
These videos are specially designed for learning processes using high-end interactive video makers. The smoothie recipe available on the H5P website has various interactive elements like multiple-choice questions and pop-up text. As the video walks through a smoothie-making process, users encounter multiple-choice questions and pop-up facts. This is ideal for culinary education or nutrition classes, where learners can test comprehension immediately after learning each step.
4. Interactive Training Videos (Deliottes Recruitment Video)
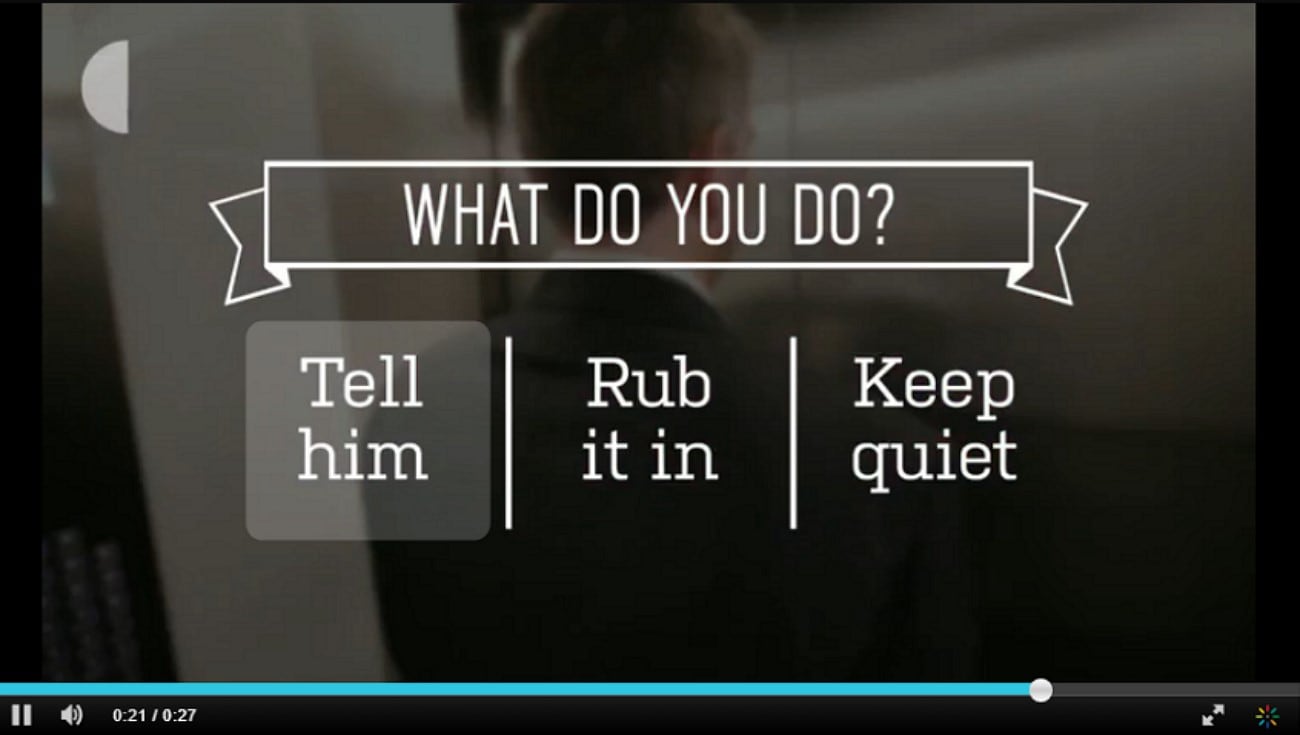
Interactive training videos are used in corporate and professional development settings to simulate real-life scenarios and guide decision-making. Deloitte created an innovative interactive video experience aimed at potential recruits, offering them a realistic look at what life is like at the company. Viewers play the role of a new hire and are guided through various workplace situations, making decisions along the way.
Part 4. How To Make the Perfect Interactive Video? A Real-Life Tool Guide
If you are looking for a handy tool that lets you create interactive videos using a vast variety of elements, you can choose tools like Wondershare Filmora. This all-in-one multimedia editor allows users to create compelling visual content and save it in multiple formats. Moreover, users can create interactive videos from their PC as well as their smartphones using the dedicated Filmora App [iOS/Android].
Steps for Creating Interactive Videos With Filmora Desktop Version
As discussed, Filmora provides various video elements to create interactive videos through its intuitive interface. To learn how to make interactive video using this efficient tool, read the steps mentioned below:
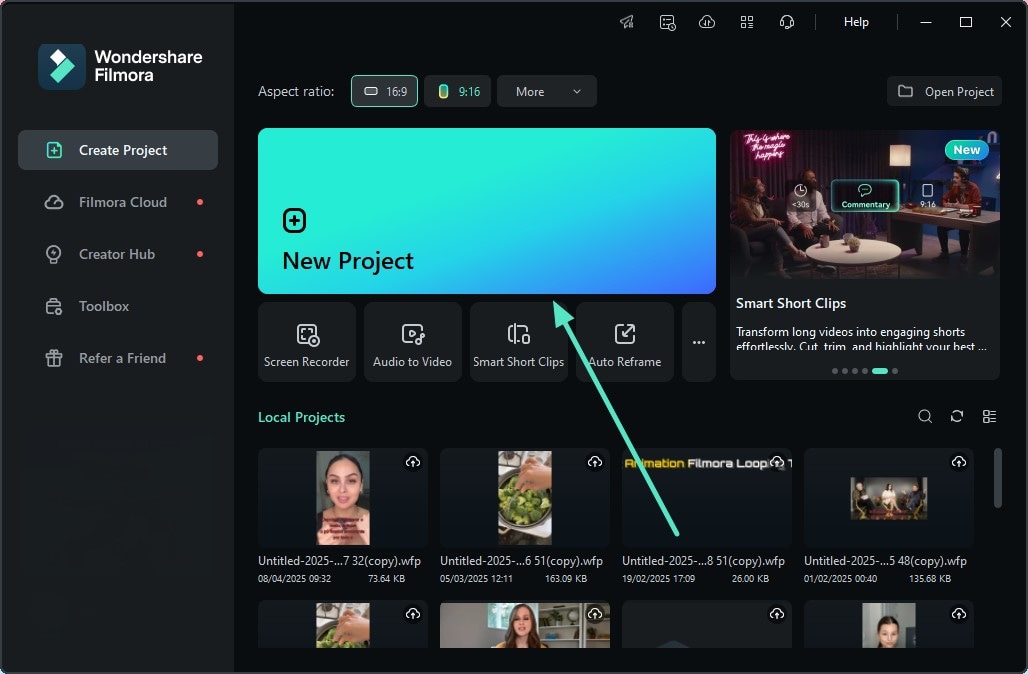
- Step 1. Start By Creating a New Project. To begin the process, click on the "New Project" option from the homepage after launching the tool on your device. Next, import the video to the tool's interface to add interactive elements to it and drag the video to the editing timeline to start making your interactive video。
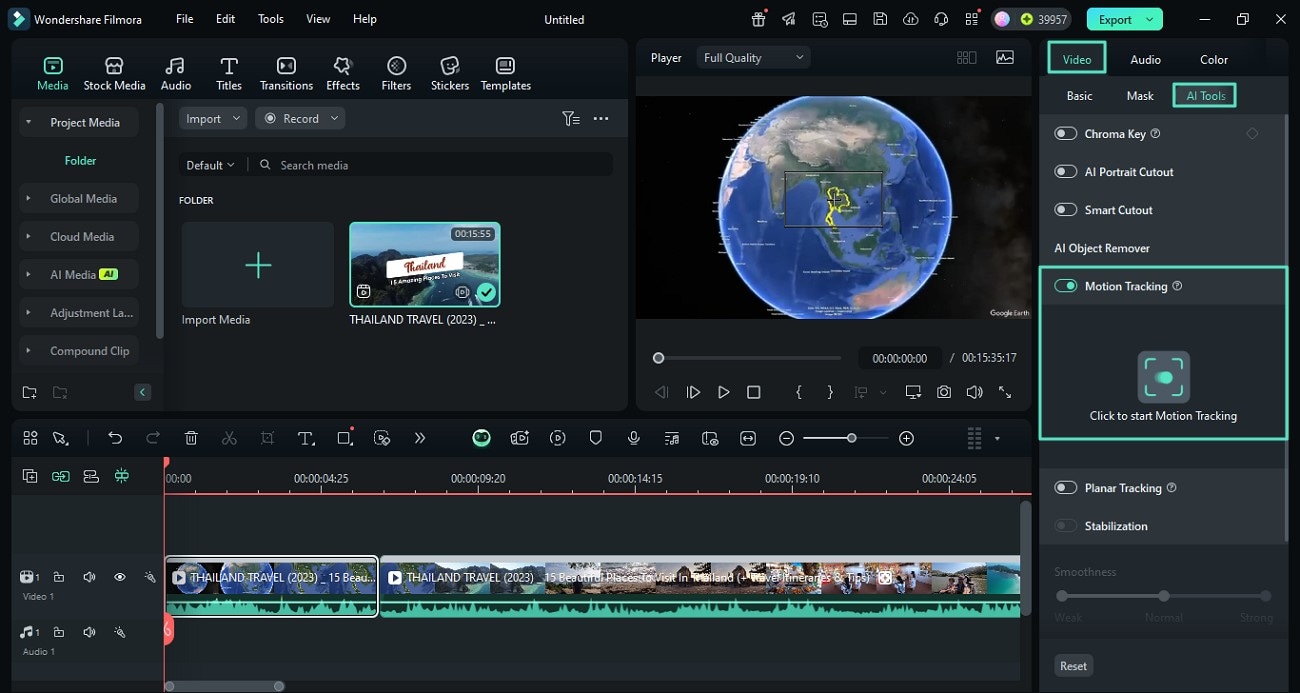
- Step 2. Start Motion Tracking of Video. Once the video is added to the timeline, add a motion effect using the AI motion tracking feature offered by the platform. Select your clip from the timeline and look for the "AI Tools" section under the "Video" panel on the right of Filmora's interface. Next, you can use the preview window to select your element and press the "Click to Start Motion Tracking" to start the process。
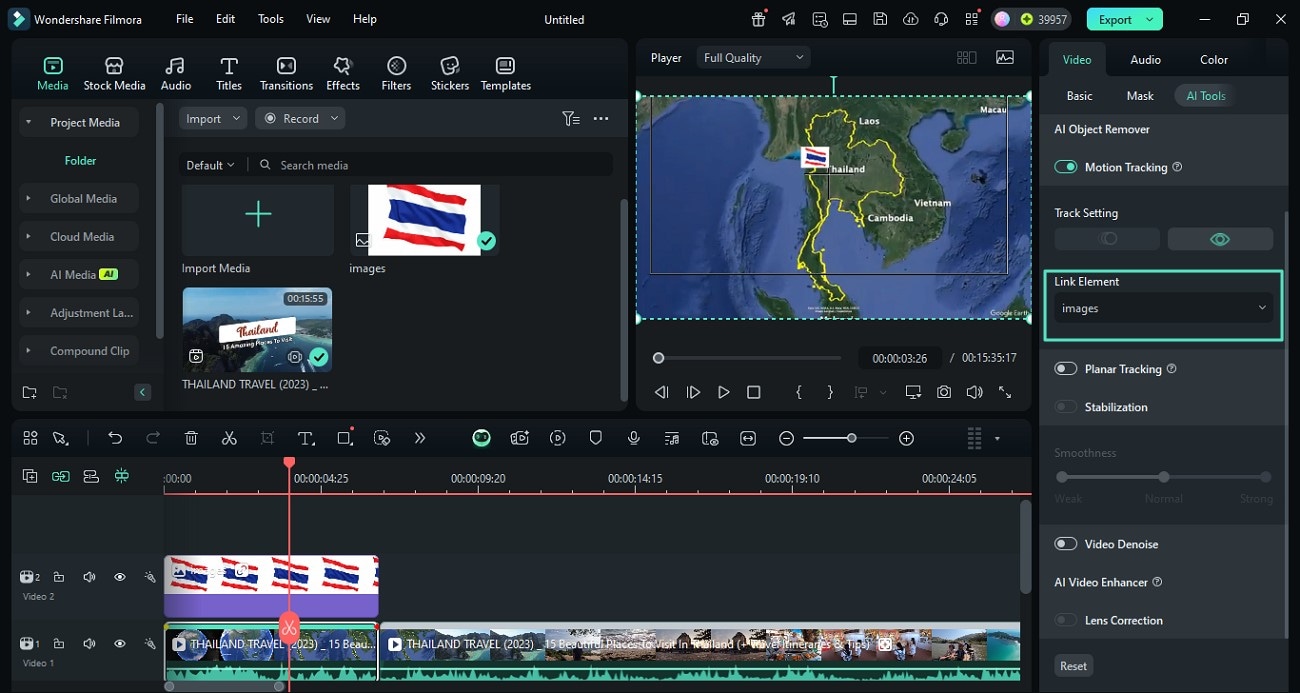
- Step 3. Link Element To the Tracked Object. Once the tracking is complete, expand the "Link Element" drop-down menu and select the "Import From Computer" option. Now, choose the image or media from your device's storage to add as the element for tracked motion。
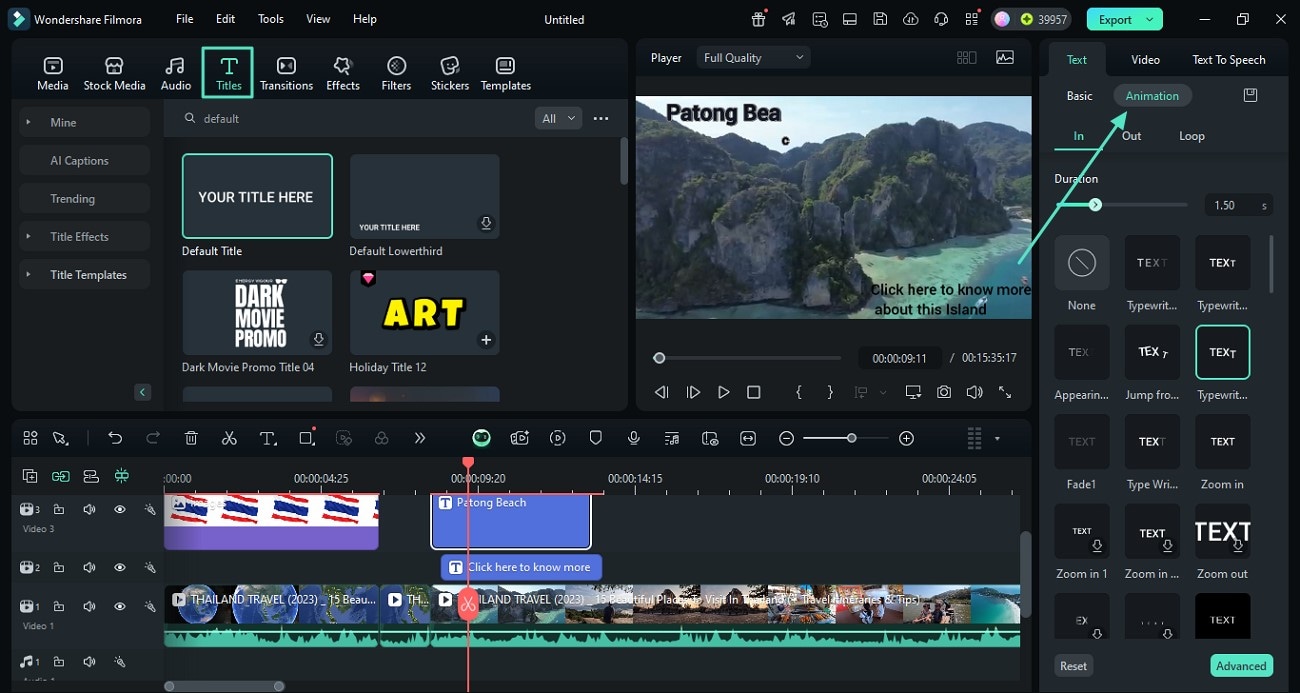
- Step 4. Add Pop-Up Text Info. Moving forward, click on the "Titles" section from the toolbar and choose the template for the text from the options provided. Next, type the text from the panel on the right and add the desired animation by enabling the "Animation" section within the panel。
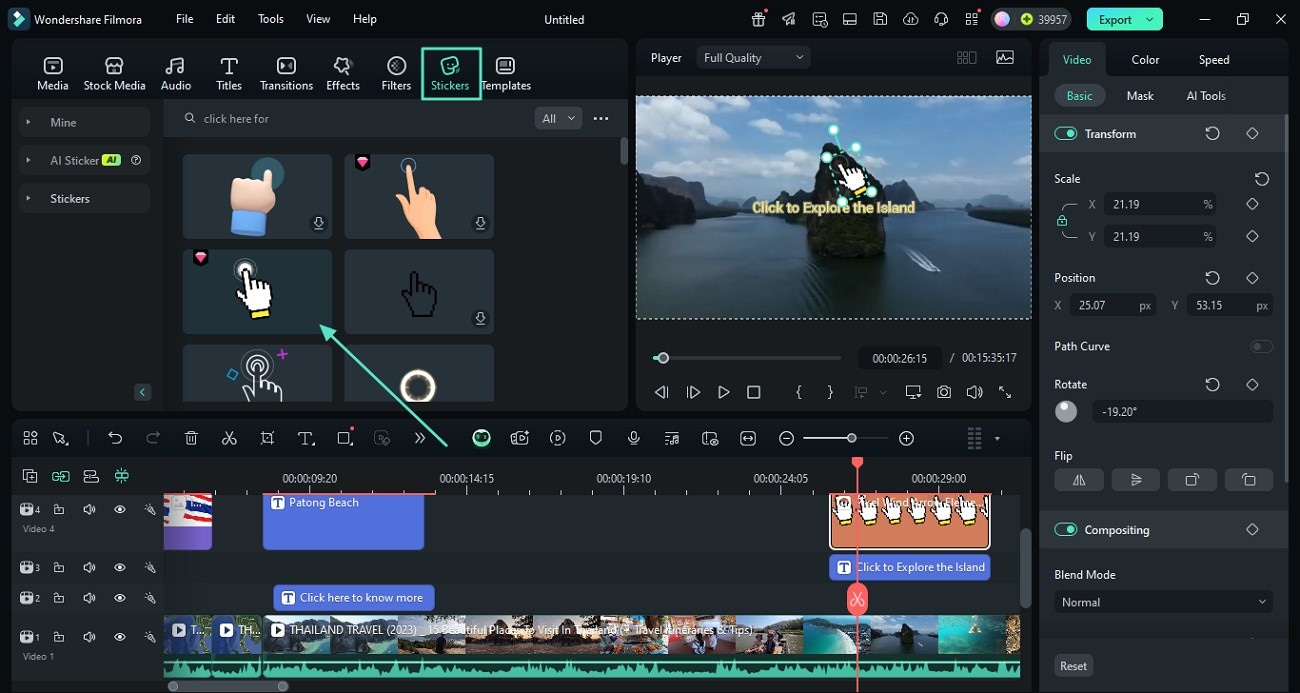
- Step 5. Add Interactive Stickers To Video. Next, enable the "Stickers" section from the toolbar and choose the sticker of your choice from the library by clicking the "+" icon. Add the relevant text for the action to be performed on the sticker to make the video more interactive。
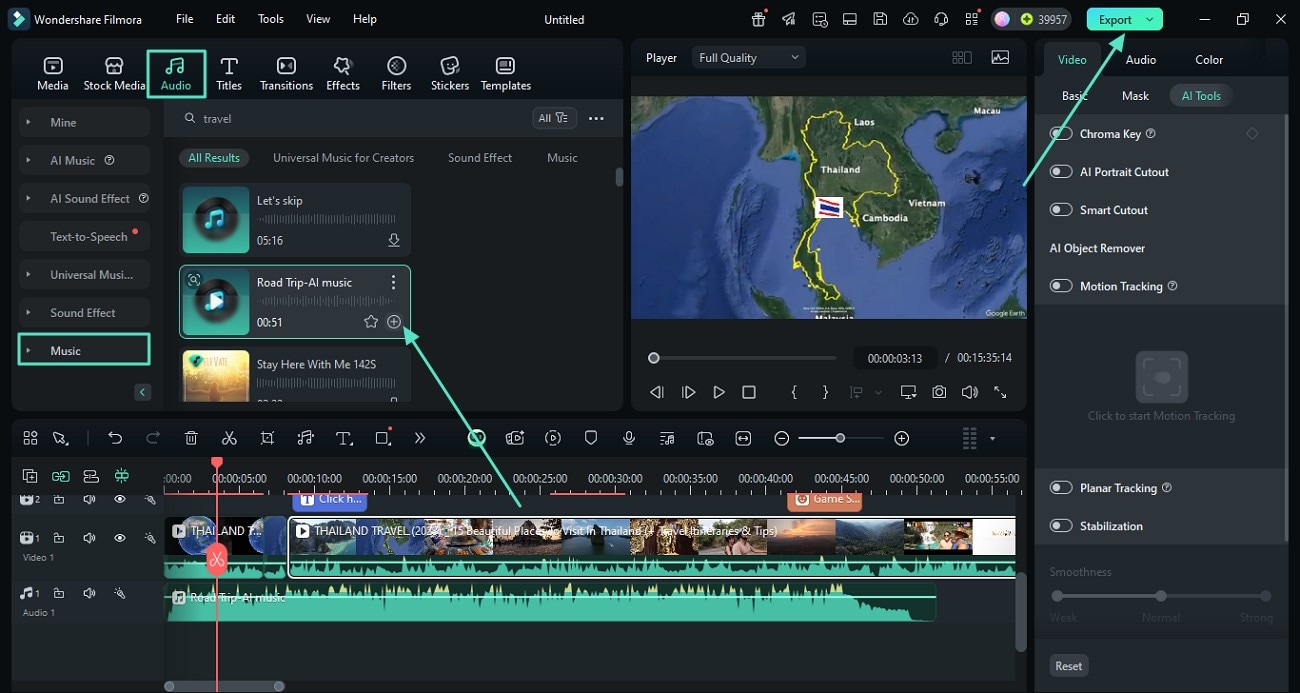
- Step 6. Add Relevant Background Audio. Once you have added all the interactive elements, make the video more engaging by adding relevant music. Head to the "Audio" section on the toolbar and expand the "Music" library. Next, choose the music of your choice and apply it to the video using the "+" icon. When all the editing is done, head to the top-right corner of the interface and press the "Export" button to save the interactive video。
Step-by-Step Guide to Create Interactive Video with The Filmora App
If you want to post the video right from your smartphone, you can use the Filmora App to create videos. Follow the steps mentioned below to learn how to make interactive video tutorial using this efficient application:
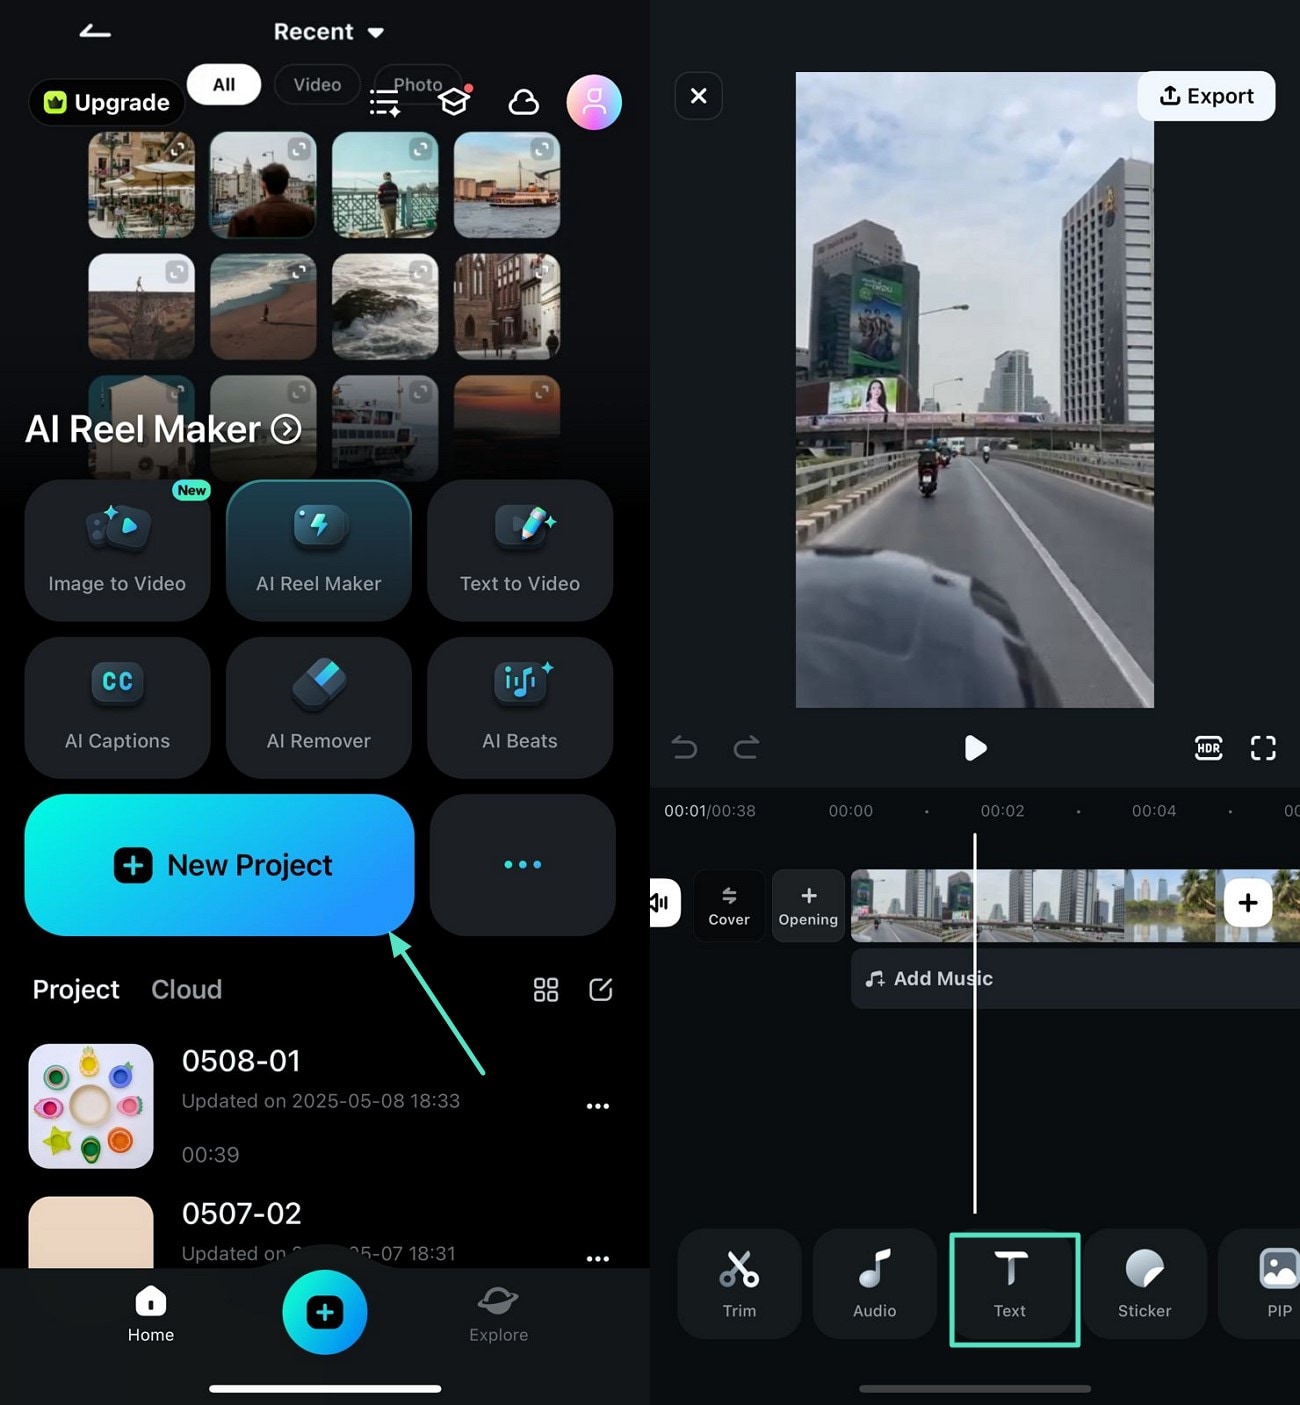
- Step 1. Opt For a New Project and Import Video. After launching the Filmora App, head to the homepage and tap on the "New Project" option. Next, import the video you want to make interactive to the app's interface. Tap on the "Text" icon located within the toolbar at the bottom. Press the "Add Text" icon from the following toolbar and input the informational text。
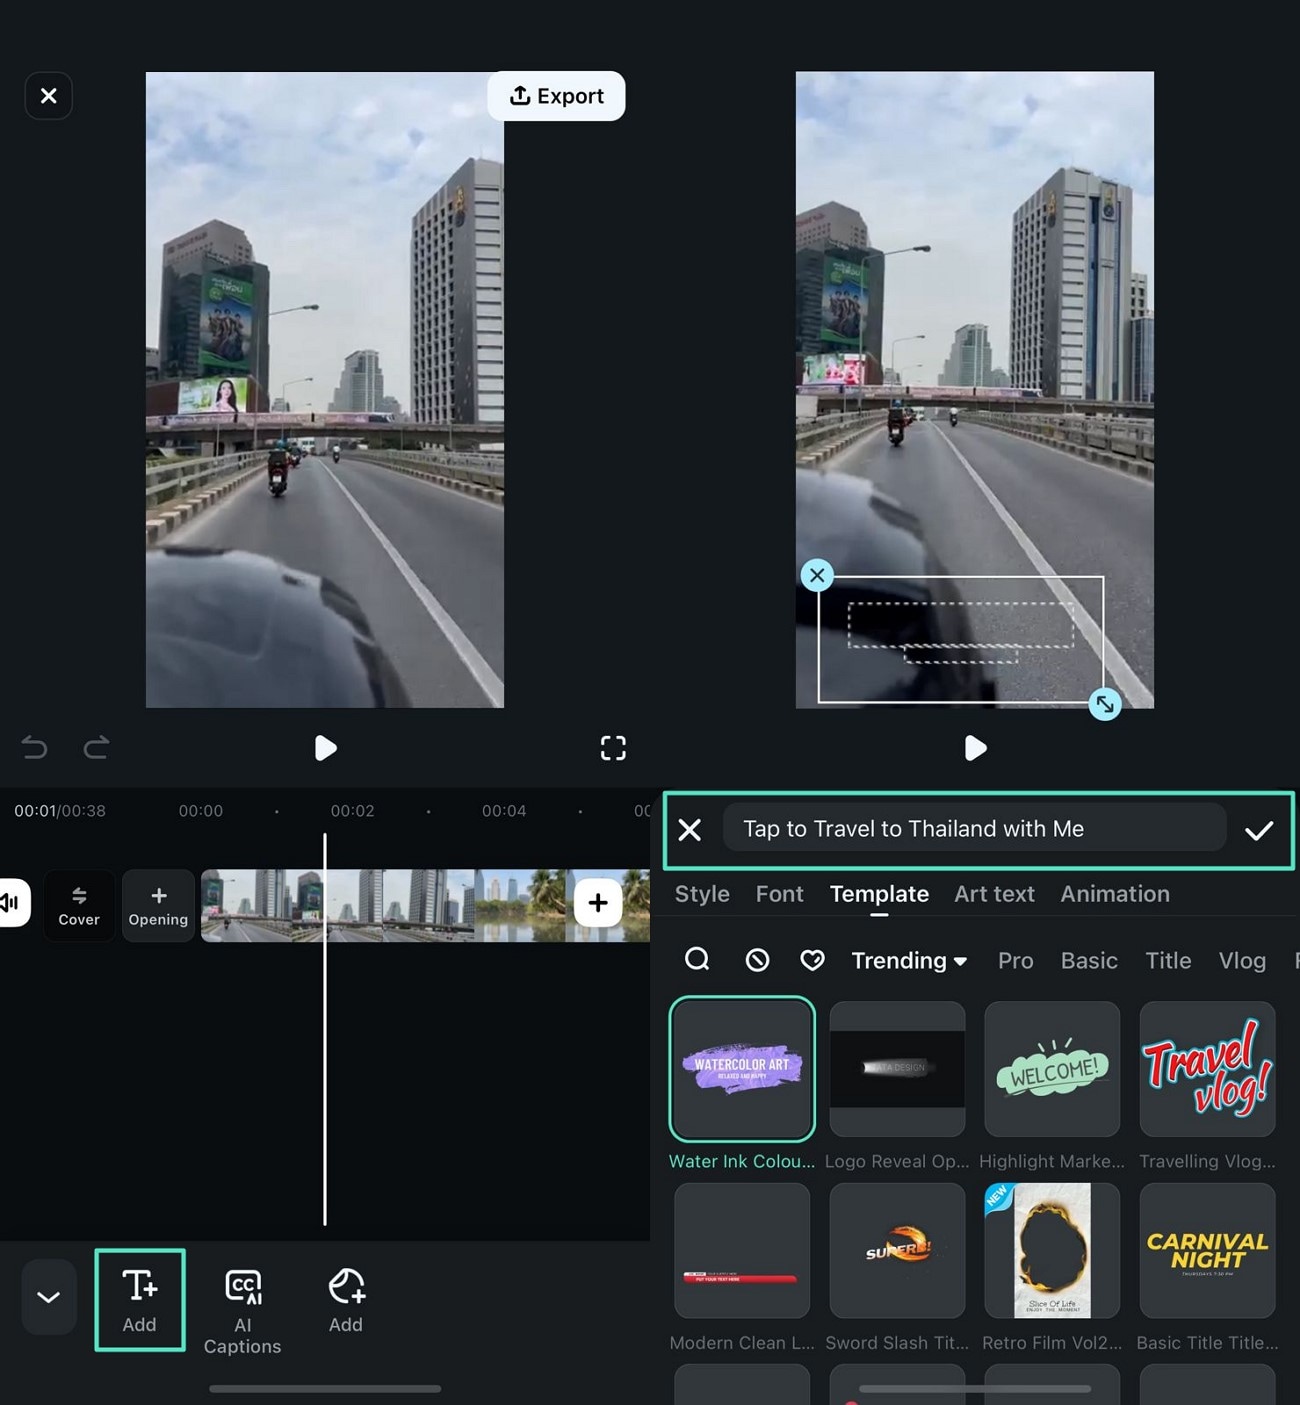
- Step 2. Input and Stylize Text. Once you have added the text using the keyboard, stylize it using the "Art Text" library offered by the application. Reposition the text accurately within the preview window to adjust accordingly。
- Step 3. Add Music to Make Your Video Interactive. Access the "Music" library through the audio button and pick a song that matches your video's vibe. With the "+" button in Filmora App, you can add that song to your video and play it to check the results。
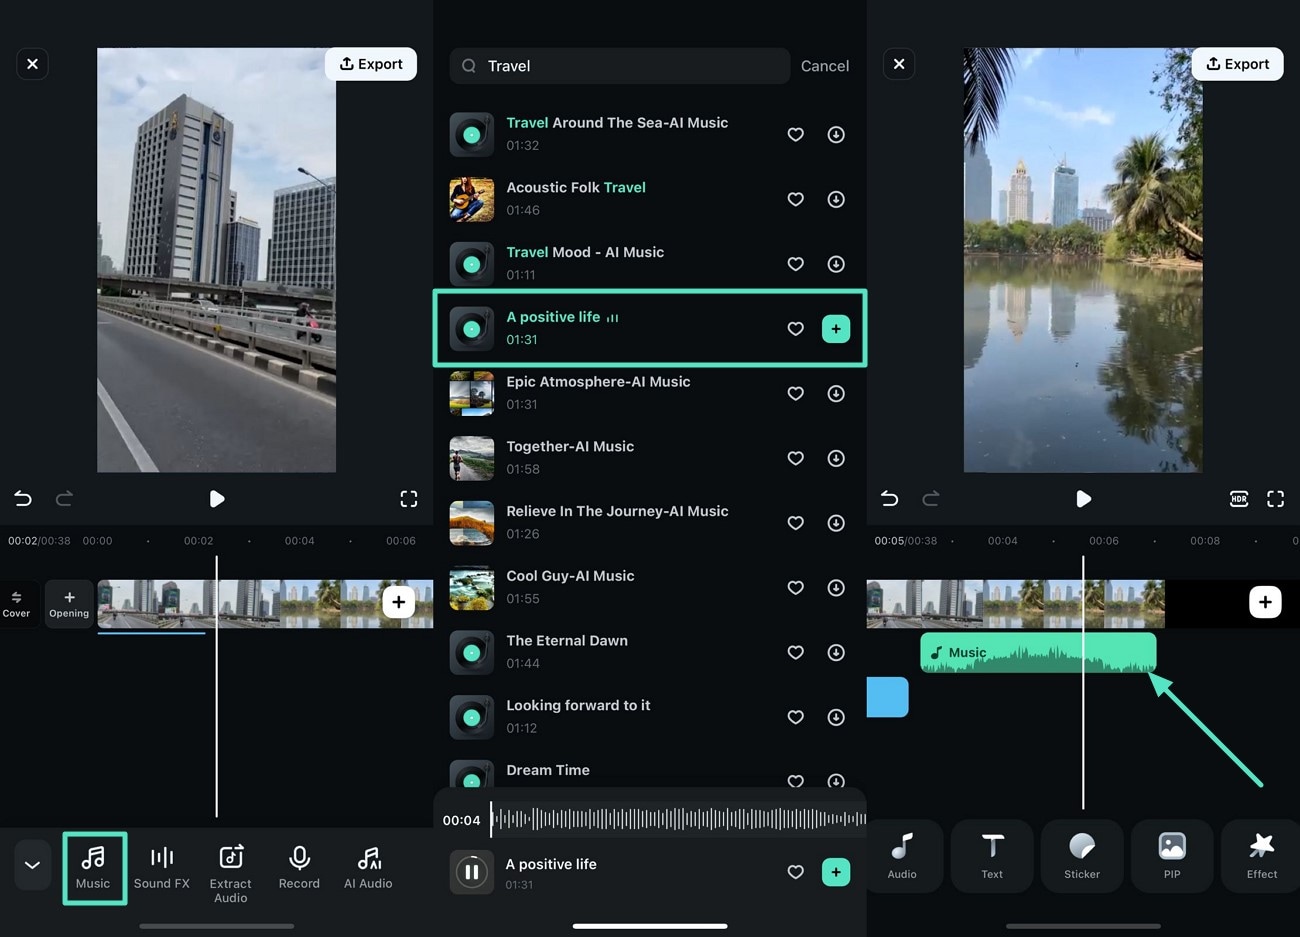
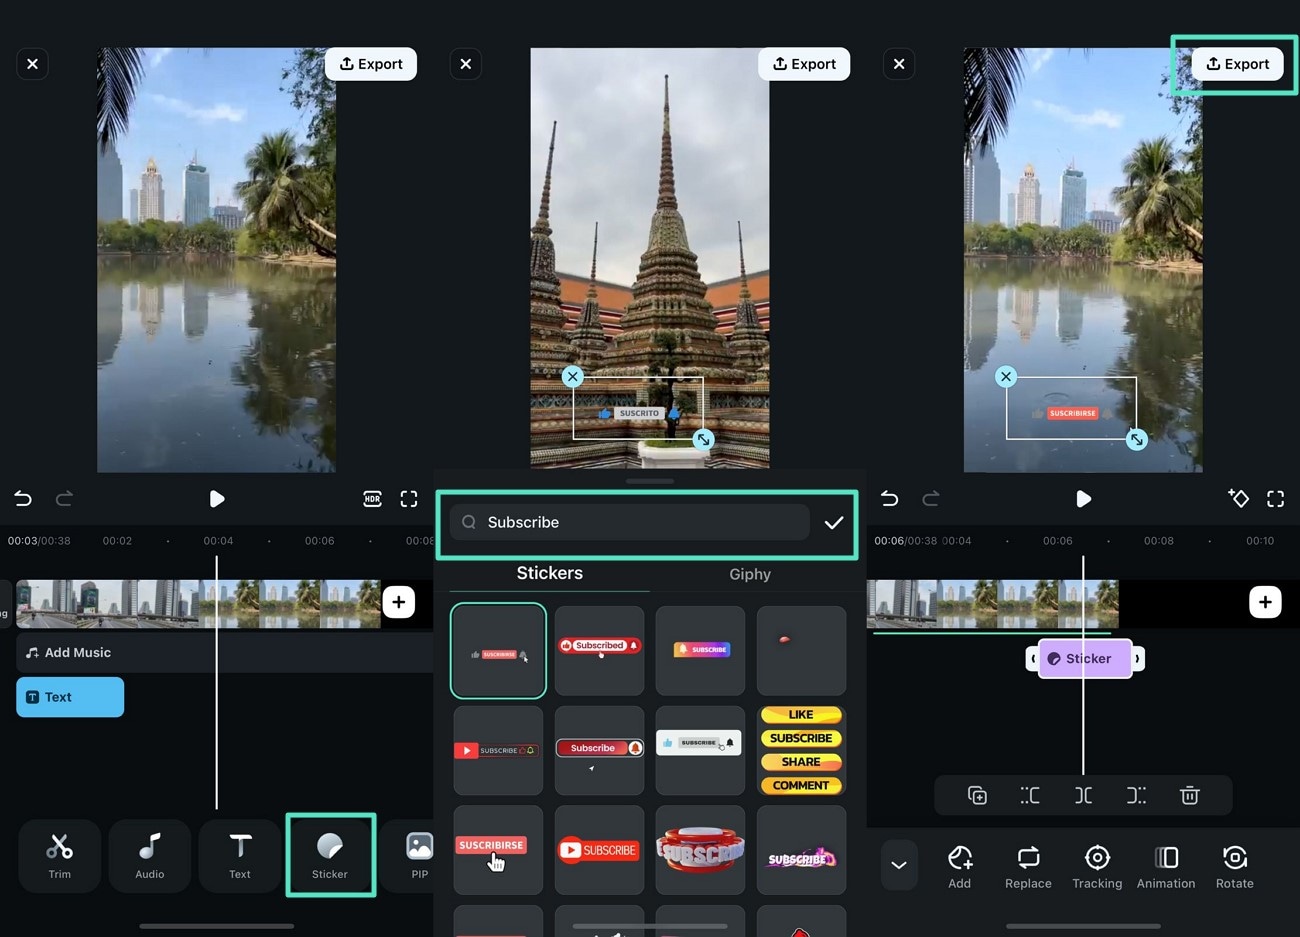
- Step 4. Add CTA Stickers, Like Subscribe and Export the Clip. Another way to make your video interactive through this interactive video creator is to add stickers. Press the "Sticker" button from the bottom bar, type "Subscribe" in the search bar, and hit the "Tick" button after selecting your sticker. Finally, when the subscribe sticker is applied to your interactive video, save it through the "Export" option。
Part 5. Some Other Interactive Video Creators You Can Supplement
Here is a list of some other interactive video creators that you can use for making clips that get better engagement:
1. Colossyan
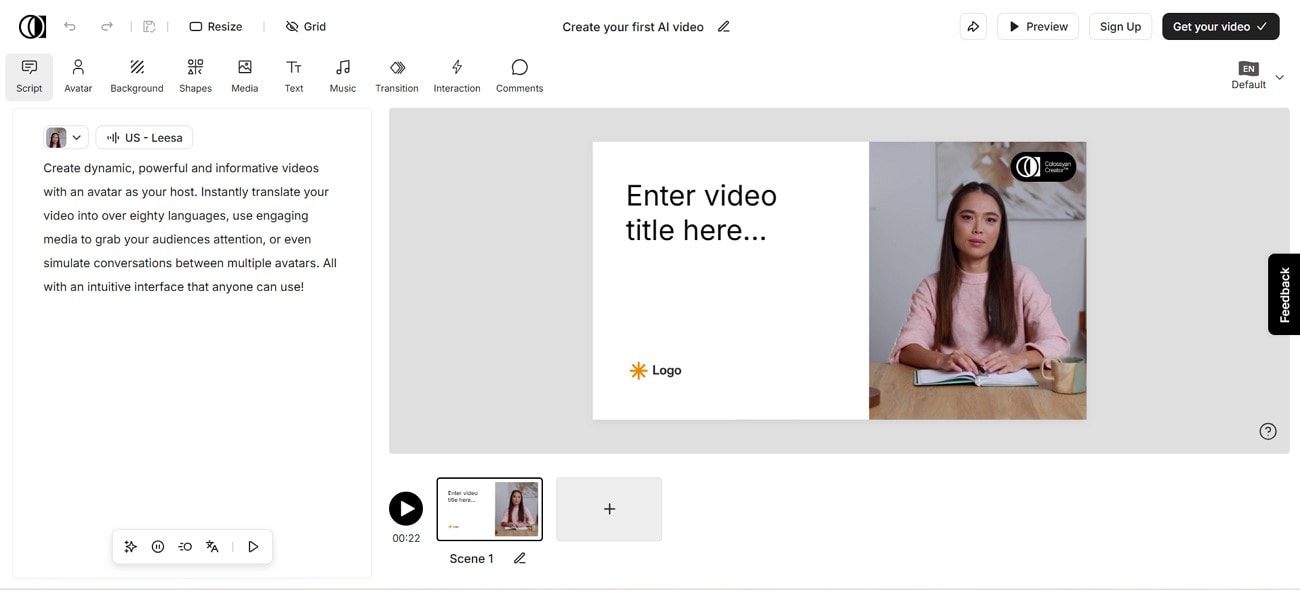
Colossyan is an interactive video editor that allows you to create free videos using AI. Users can write detailed prompts and also choose an AI avatar that looks like a human and speaks like them. It is a complete editing tool that allows you to change the background by uploading a picture from your device. Moreover, you can also add music from its stock library according to your video, such as corporate.
Key Features
- On Colossyan, access 600+ voices and use any of them in your video.
- You can resize your video in different formats and platforms, such as for YouTube.
- There are also ready-made templates available in Colossyan that can be customized.
Compatibility: Online
2. WeVideo
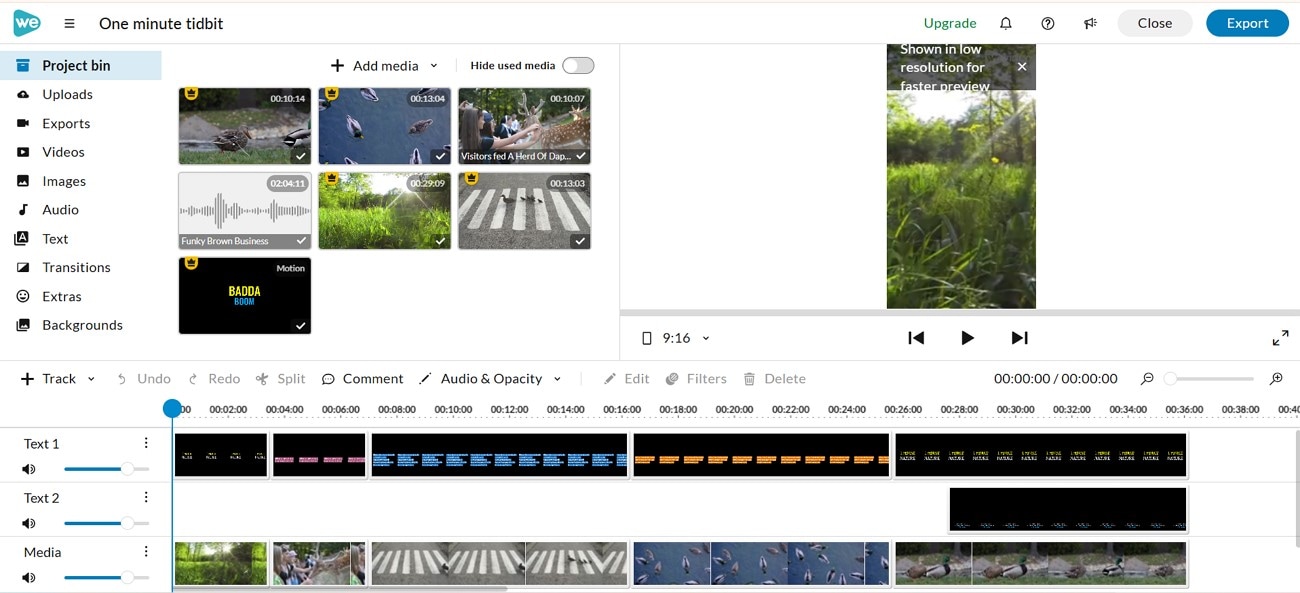
If you want to transform your instructional content from boring videos to interactive ones, WeVideo is the right choice. The platform also offers resources on how to make an interactive video, which you can explore and then add your video by importing or through a URL. You can also take an interactive template and add your images for further customization.
Key Features
- WeVideo divides its royalty-free image library into types such as nature and wildlife.
- After creating your interactive video, export it to different places, such as your Google Drive.
- Access different transition templates in your video to convince viewers to continue watching it.
Compatibility: Online
3. Mindstamp
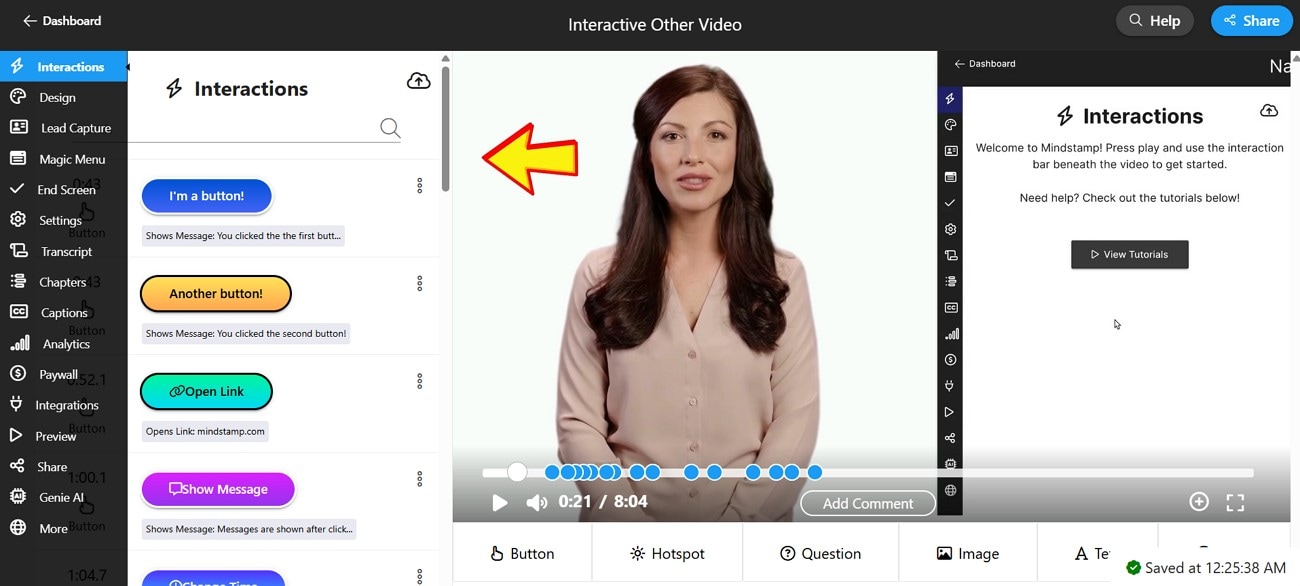
Mindstamp helps you create interactive video and personalize it by adding a custom font from your device. If you want to add captions in your clip, pick one of the available languages or transcribe them from an MP4 file. Moreover, the platform has its own interface where you can post your interactive videos and check analytics of each of them regularly.
Key Features
- You can choose a language and customize translations for common words in your interactive video.
- After creating your video, invite people to check it by sending a link through email.
- Once you create your video preview it that how it will look on your mobile and desktop.
Compatibility: Online
Conclusion
To conclude, this article discussed how to make interactive videos and why you must create them nowadays to grab attention. We also discussed a tool, Filmora, that enables you to create an interactive video from scratch by adding music from its audio library. With Filmora, you can add engaging and relevant stickers to your interactive videos from your desktop and mobile. So don't stay behind; make your video interactive with Filmora!


 100% Security Verified | No Subscription Required | No Malware


