For the Best Results, Use the Latest Version.
-
Preparations
-
Account
-
Get Started & Basic Settings
-
Compatibility & Tech Specs
-
Performance Settings
-
-
Creating Projects
-
Creating New Projects
-
-
Importing & Recording
-
Video Editing for Windows
-
Basic Video Editing
- Enable/Disable Clip in Windows
- Magnetic Timeline for Windows
- Dual Monitor Setup for Video Editing on Windows
- Select All Clips on Timeline for Windows
- Manage Timeline and Tracks on Windows
- Auto Ripple for Windows
- Split & trim video
- Crop & Pan & Zoom Video in Filmora for Windows
- Compositing
- Change Video Speed on Windows
- Playing videos in reverse
- Mark In and Mark Out for Windows
- Markers for Windows
- Group editing
- Customizable Backgrounds for Videos and Images in Windows
- Video snapshot
- Using Freeze Frame in Filmora for Windows
- Logo Reveal For Windows
- Auto Enhance in Filmora for Windows
- Applying drop shadow
- Adjustment layer for Windows
- Apply Transforming for Windows
- Video Editing Ruler – Windows
-
Advanced Video Editing
- Drawing Tools for Windows | Filmora Guide
- Create Multi-Camera Clip in Filmora for Windows
- Compound Clip for Windows
- Multi-Clip Editing for Windows
- Filmora Motion Blur | Windows
- Video Chapters in Filmora on Windows
- Filmora Flicker Removal Guide | Windows
- Apply mask to video
- Creating a PIP Effect for Windows
- Keyframe Graph Editor for Windows
- Add animation keyframing for Windows
- Keyframe Path Curve for Windows
-
AI-Powered Video Editing
- Smart Scene Cut for Windows
- Smart Short Clips for Windows
- AI Face Mosaic for Windows
- Filmora AI Eye Contact- Windows
- AI Video Enhancer for Windows
- AI Text-to-Video for Windows
- Planar Tracking for Windows
- AI Idea to Video for Windows
- Filmora Image to Video for Windows
- Filmora Image to Prompt for Windows
- Instant Cutter Tool for Windows
- AI Extend
- Filmora AI Relight - Windows
- Filmora AI Image Enhancer Guide - Windows
- AI Script to Video Guide for Windows
- AI Text-Based Editing for Windows
- AI Mate Editing for Windows
- Instant Mode in Filmora
- ChatGPT Plugin - AI Copywriting
- AI Smart Cutout for Windows
- Lens correction on Windows
- Auto Reframe Video for Windows
- AI Portrait Cutout
- Scene detection feature
- AI Smart Masking for Windows
- Motion Tracking on Windows
- Video Stabilization for Windows
- AI Video/Photo Object Remover for Windows
- AI Smart Search for Windows
- AI Skin Tone Protection for Windows
- AI Image for Windows
- Chroma key (green screen)
- Super Slow Motion with Optical Flow for Windows
- Video Denoise for Windows
-
-
Audio Editing for Windows
-
Basic Audio Editing
-
Advanced Audio Editing
-
AI-Powered Audio Editing
- Auto synchronization
- AI Sound Effects in Filmora for Windows
- Smart BGM Generation on Windows
- AI Voice Enhancer in Filmora
- AI Voice Cloning in Wondershare Filmora
- AI Music Generator for Windows
- Audio To Video
- AI Vocal Remover for Windows
- AI Auto Beat Sync for Windows
- AI Audio Stretch for Windows
- AI Audio Denoise for Windows
- Silence Detection on Windows
-
-
Text Editing for Windows
-
Basic Text Editing
-
Advanced Text Editing
-
AI-Powered Text Editing
-
-
Video Customizations
-
Video Effects
-
Audio Effects
-
Transitions
-
Stickers
-
Filters
-
Color Editing
-
Animations
-
Templates
-
Asset Center
-
-
Exporting & Share & Cloud Backup
Filmora AI Image Enhancer - Windows
Filmora AI Image Enhancer helps users improve the clarity and quality of images directly inside the editor without needing advanced photo editing skills. The feature uses AI-powered super-resolution technology to analyze the selected image and enhance details automatically.
With a simple one-click process, creators can restore old photos, improve low-resolution pictures, and refine portraits while keeping the original image dimensions intact. The feature works efficiently for social media visuals, thumbnails, and archived photos that need a quick quality boost.
Highlights of This Feature
- AI-Powered Image Upscaling: Uses advanced super-resolution technology to improve the sharpness and clarity of the selected image while preserving the original resolution.
- Automatic Face Detail Enhancement: If a human face is detected, the system enhances facial details separately and blends them naturally with the rest of the image.
- Simple One-Click Enhancement: Requires no manual parameter adjustments. Users only need to select the image and apply the Enhance/Upscale model to generate improved results.
- Supports Up to 4K Resolution: Compatible with images up to 3840 × 2160, ensuring high-quality enhancement for large visuals.
- Maintains Original Resolution: The enhanced image keeps the same pixel dimensions as the original file.
- Optimized for Portraits and Low-Quality Photos: Delivers better results when improving portraits, old images, and low-resolution pictures.
Step-by-Step Guide to Use the AI Image Enhancer in Filmora
After understanding how this feature works, follow the steps below to enhance images using Filmora on your Windows device.
Index
Step 1. Start a New Project in Filmora
To begin, launch Filmora on your Windows computer and click the New Project option from the home interface. Import the image you want to enhance and drag it into the editing timeline to start working on it.
Step 2. Access the AI Image Enhancer
Once the image is added to the timeline, select it and move to the Properties Panel on the right side of the interface. Navigate to the Basic section and locate the Enhance option. Choose the enhancement model and enable the Auto Enhance feature. After selecting the model, click the Generate button to begin processing.
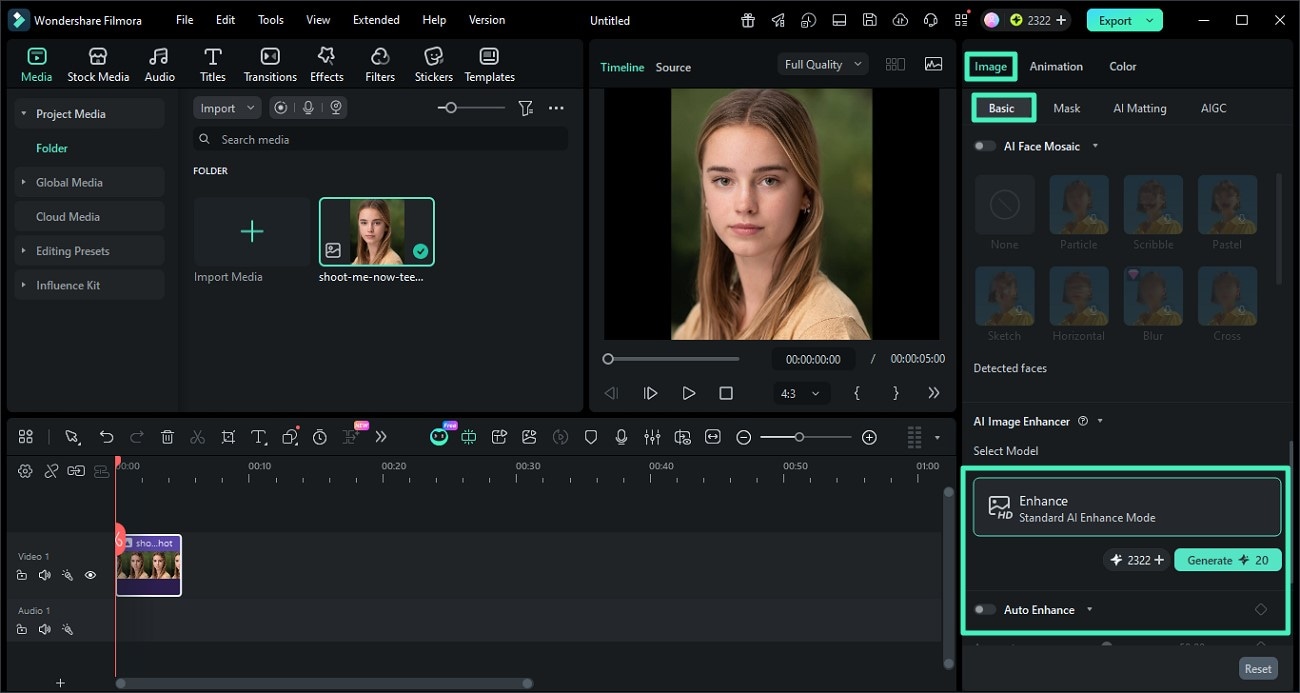
Step 3. Preview and Export the Enhanced Image
Filmora will automatically analyze the image, enhance details using super-resolution technology, and apply facial enhancement if a person is detected in the picture. Once the enhancement process is complete, preview the improved image in the preview window. If you are satisfied with the results, click the Export button to save the enhanced image to your device.

Related Posts
Featured Articles
Top 7 Subtitle Apps in 2026 to Add Captions Easily (Free & Paid)
Discover the best app for subtitles in 2026. Compare top tools like Filmora, MixCaptions, and Mojo to add subtitles to video on Android, iOS, and PC for free and professional results.
Stable Diffusion Logo Prompt: How to Perfect Them?
Looking for ways to enhance your Stable Diffusion logos? Read this article to learn how to bring life to your static brand images using the right resource.
The 10 Best Video Editing Software to Edit Videos Like a Pro
This guide will help you learn more about the 10 best editing software tools for top-grade videography. Find out more about their features, compatibility, user ratings, strengths, weaknesses, and pricing plans.
Recommended User Guide
AI Face Mosaic for Windows
The AI Face Mosaic feature is an advanced tool designed to automatically recognize and protect faces in videos or images. Utilizing intelligent mosaic to track and cover faces in real-time, ensuring that privacy is safeguarded regardless of face movement within the frame.
AI Idea to Video for Windows
Here is the guide on how to master the AI Idea to Video feature using Filmora on the Windows version.
AI Extend
This is a guide for how to extend your video with our AI
