If you’ve ever wanted to create animated videos without spending hours learning complex software, then VideoScribe software could be the answer. With its intuitive design, this software promises to make creating whiteboard-style animations easy, and plenty of people say it’s budget-friendly, too!
But is it really as good as they say? If you're curious about VideoScribe's free options or just want to know how it all works, this review has you covered. Plus, we’ll throw in an alternative to give you a fresh perspective. Let’s dive in!
In this article
Part 1: Comprehensive Overview of VideoScribe
To put it simply, VideoScribe is a video editing tool that brings ideas to life with animated videos. VideoScribe software is widely used and trusted by worldwide companies such as Google, Deloitte, Unicef, and many more.
But what does it create? Well, if you've ever seen those captivating videos where a hand draws out text or illustrations on a whxteboard, that's exactly what VideoScribe helps you create—quickly and easily. With this format, you can make all kinds of projects, like explainer videos, promo videos, and educational content.

Key Features:
- Huge Template Library: VideoScribe offers a large variety of templates, illustrations, icons, characters, backgrounds, GIFs, fonts, and more to help make your videos unique.
- Different Animation Styles and Drawing Hands: Choose from classic whiteboard styles or more modern animations, with different hand-drawing options to match your style.
- Audio and Voiceover Recording: Record your own voiceover and sound effects directly in the app, or pick from a royalty-free music library to add audio.
- Camera Control: You can guide your viewer’s attention by zooming in to highlight key points or pan across the canvas to create a smooth, engaging visual flow.
Limitations:
- Customization options can feel basic if you’re looking for highly advanced edits or effects.
- The scenes feature is only available on the browser version, not on VideoScribe software.
- You can only create a 5-minute video length for the free version and only 15 minutes for the premium version.
- The free version adds watermarks to your videos.
Target Audience: Marketers, HR/Training Managers, Small/Medium Businesses, and Educators who want to create engaging animated videos.
System requirements and supported devices: VideoScribe Browser can be accessed from any web browser and works best on desktops, laptops, or tablets. VideoScribe Software is a downloadable app available for both Windows and macOS.
Price: VideoScribe software offers a free trial for 7 days. But to access all its features, VideoScribe subscription costs start from $9.99 per month (billed annually). For more details, you can check out their pricing page.
- Bountiful video editing features to improve efficiency.
- Vast video/audio effects and creative assets.
- Powerful AI for effortless content creation.
- Intuitive, professional yet beginner-friendly.
- Works on Mac, Windows, iOS, and Android.

Part 2. How to Create Animated Video Using VideoScribe
Now that you’ve got a good feel for what VideoScribe software is all about, it’s time to dig a little deeper and learn how to actually use it to create your own animated videos. Thankfully, VideoScribe makes it pretty easy, even if you're a beginner.
With the help of TNO TM on YouTube, we'll cover everything from picking a template to adding animations and audio so that it becomes a complete animated video. Just follow this guide to get started:
Step 1. Download or Log in and create a new project
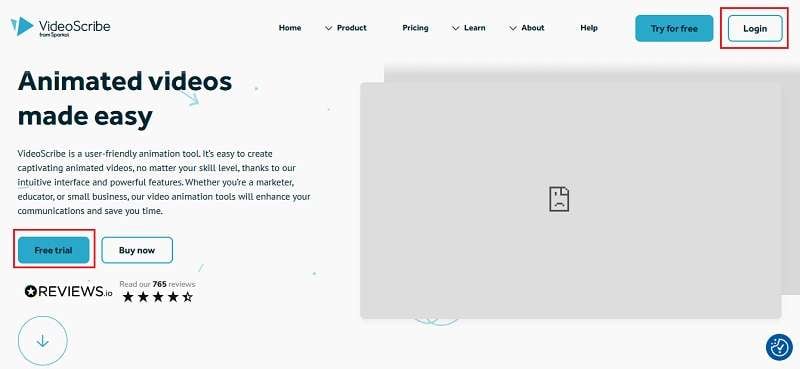
First, head over to the official VideoScribe website. As we mentioned before, there are two ways to use VideoScribe. If you want to use it directly on the website, just click “Login” and create your account. But if you want to use the VideoScribe free software, click “Free Trial” to try it out for 7 days, then follow the installation steps.
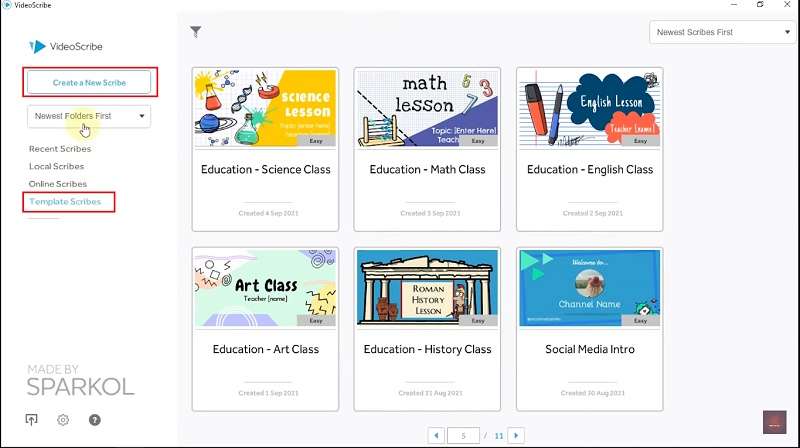
Once you open the program, you can start the project from their ready-to-use templates by clicking on “Template Scribes”. But if you want to start from scratch, select “Create a New Scribe”.
Step 2. Add images
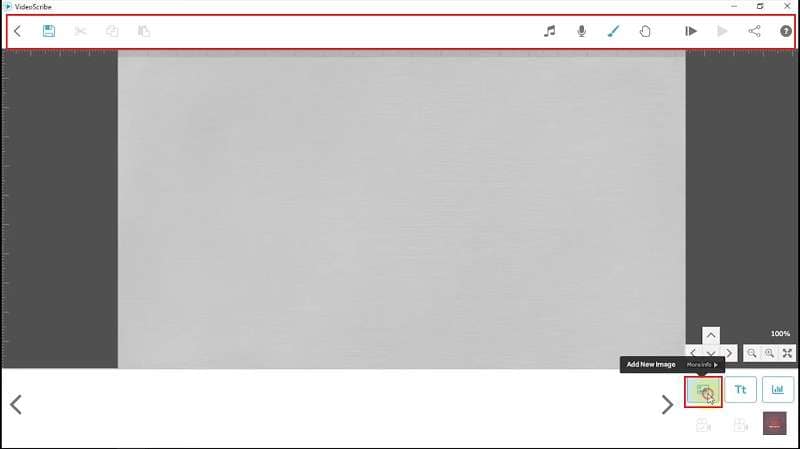
Now you’re in the main editing interface! Here, you’ll find lots of options to edit your animated video, like adding music, recording audio, choosing a background canvas, and more. To kick things off, start by adding images—just click the picture icon to get started.
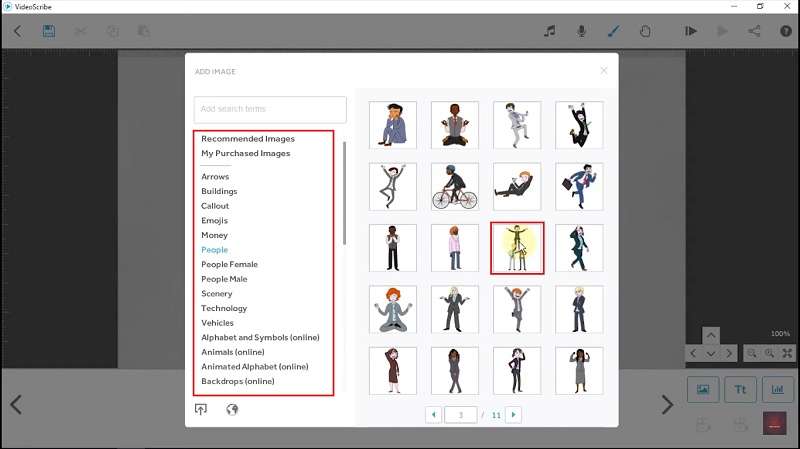
On the left side of your screen, you’ll see different image categories. Just browse through them to find the ones that best fit your video.
Step 3. Add hand animations
Once the images are added to your canvas, you can move and resize them however you like. To add hand animations that control how each image appears in your video, just click the hand icon.
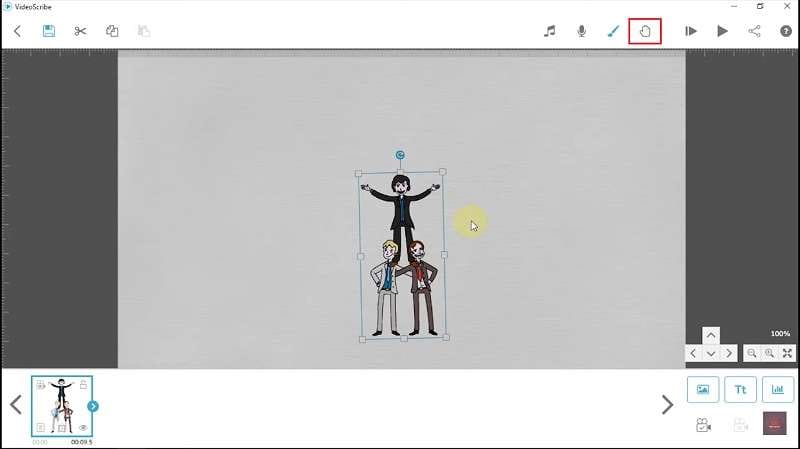
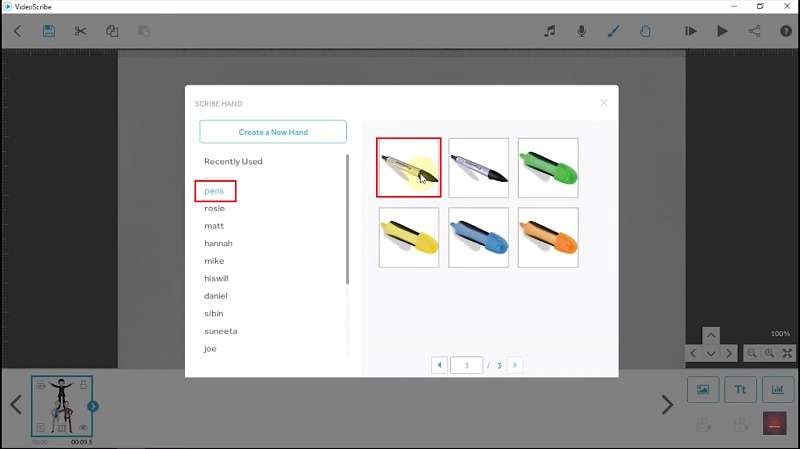
On the left side of the screen, you’ll see different categories for choosing the type of "hand" you want in your video. If you’d like an animation where the images are drawn and colored, just select the “pens” option and pick the style you like best.
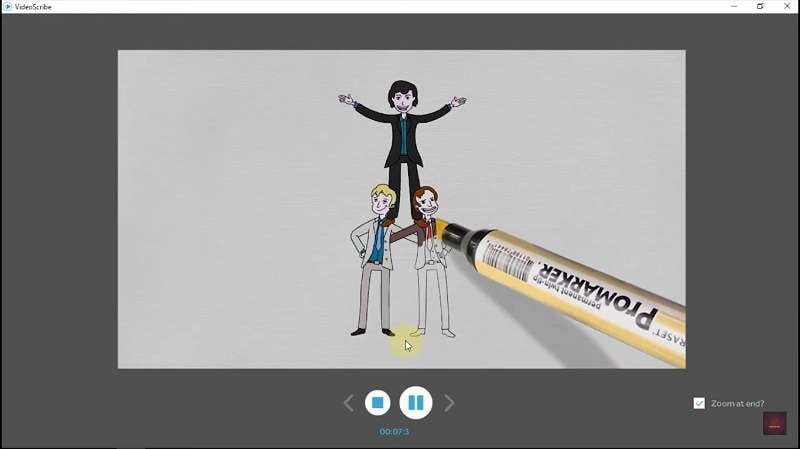
Now you’ll see the animation in action, with the pen moving as if it’s drawing and coloring the images.
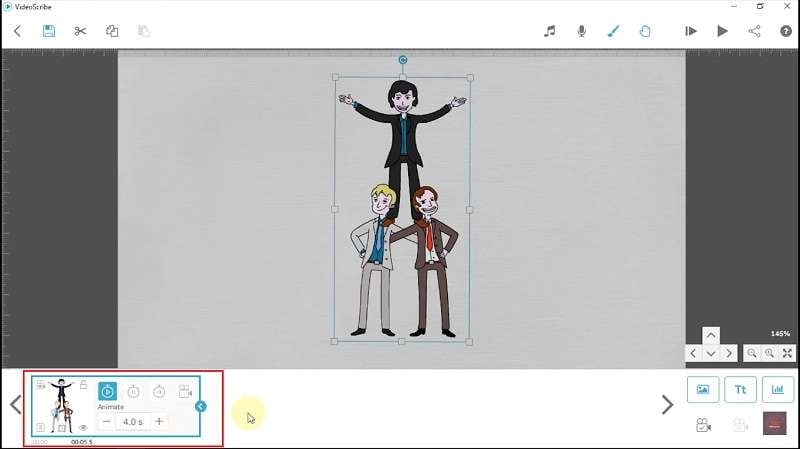
To set the duration of the animation, just click the image on the timeline and customize it to your liking.
Step 4. Insert text
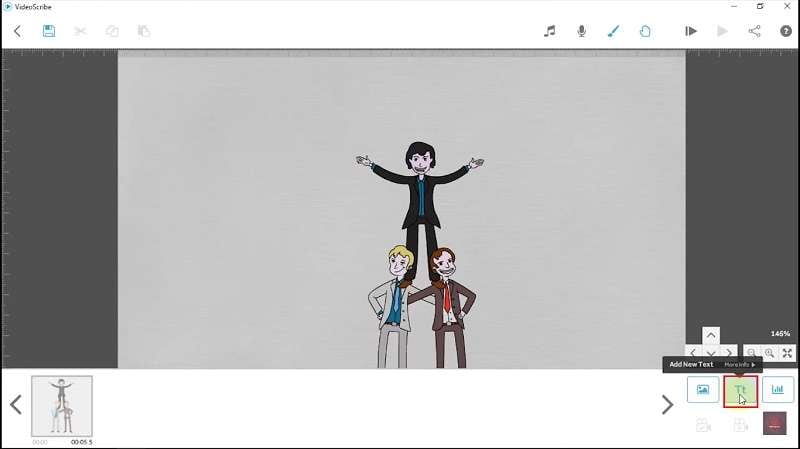
The next step is to add text to your animated video. To do this, just select the text icon.
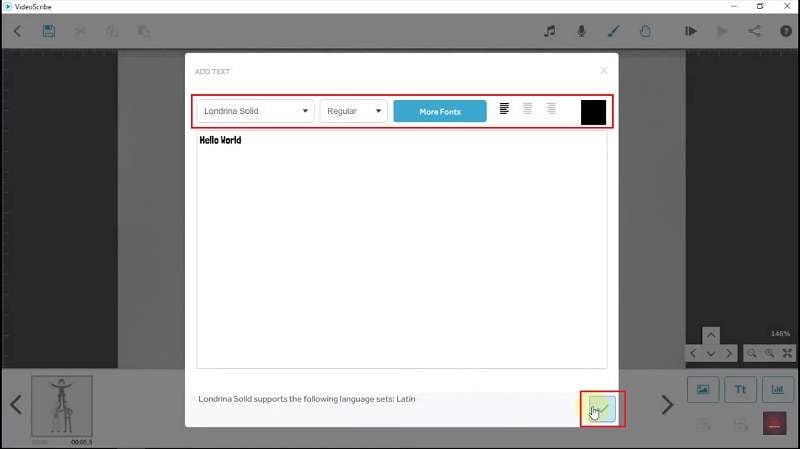
In the next window, type in the text you want to appear in your video. You can customize it by adjusting the font and colors. When you’re finished, just click the checkmark button at the bottom.
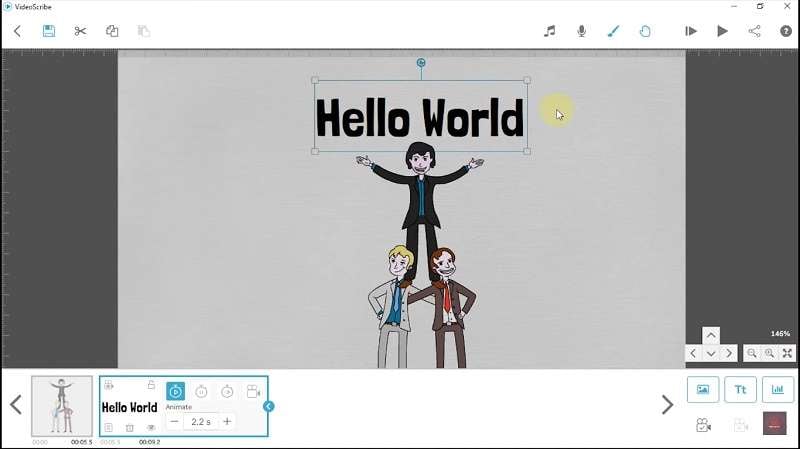
Then, adjust the position and size of the text according to your liking, just like how you would adjust the images.
Step 5. Add another image, text, and insert music
To start the next part of your video, move to a blank area on the screen. Just drag the image and text from your video to the left until a new canvas appears.
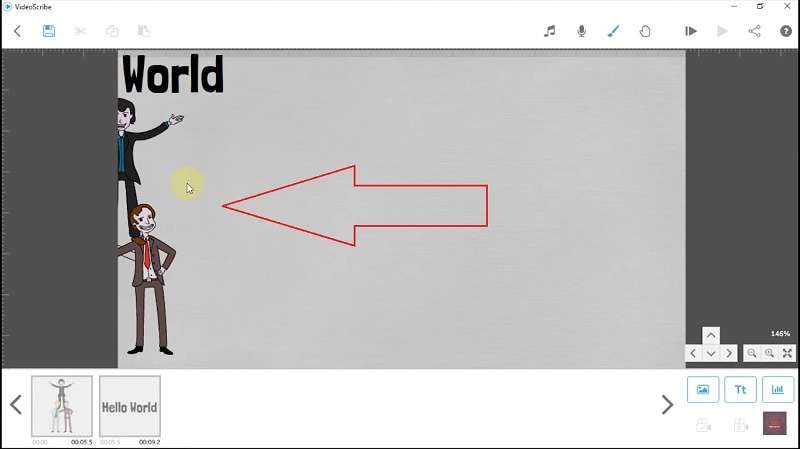
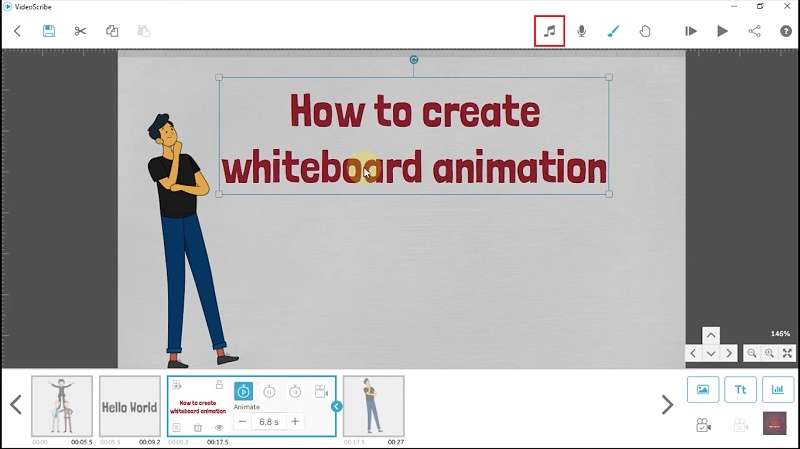
Then, you can repeat the steps—add images, hand animations, and text, and make any adjustments you need. To insert music into your animated video, just click the music icon.
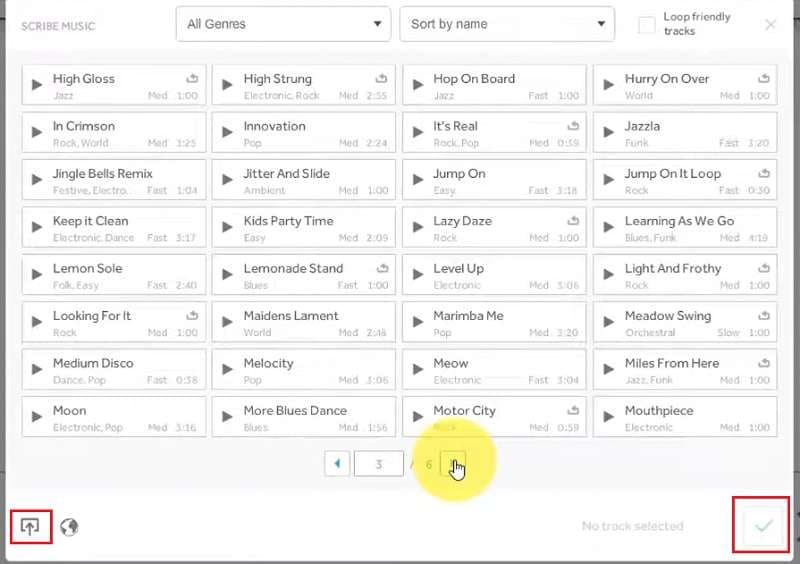
You’ll see lots of music options from the VideoScribe library. If you want to use your own music, just click the import icon at the bottom left of the window. After selecting your music, click the checkmark button at the bottom right.
Step 6. Save and download your video
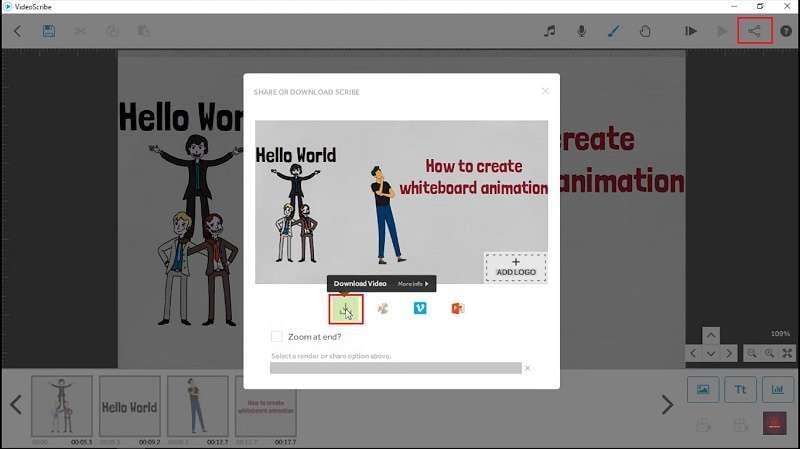
When you’re done and satisfied with your animated video, save it by clicking the share icon in the top-right corner. If you don’t want a zoom effect at the end of your video, make sure to turn off the “Zoom at the end?” option. Then, click the download icon and choose your video’s format, size, frame rate, name, and where you want to save it on your computer device.
And that’s it! You’ve created your first animated video with VideoScribe software. With some practice, you’ll get the hang of adding elements, setting up camera positions, and timing everything perfectly to make your videos look professional and engaging.
Part 3. More Feature-Rich Solution to Create Animated Video: Wondershare Filmora
While VideoScribe software is great for making whiteboard-animated videos, it does have some limitations that can be hard to ignore. For instance, it doesn’t offer much versatility other than creating animated videos because it lacks advanced AI tools for further edits. And the most important part, the free version only allows 5-minute videos, and the premium version caps at 15 minutes, which can be limiting for larger projects.
In that case, it’s worth exploring other options that can overcome VideoScribe’s limitations. After all, it never hurts to have another tool in your toolkit that could offer even more benefits. If you’re looking for something more versatile, Wondershare Filmora is a standout choice. Here's why:
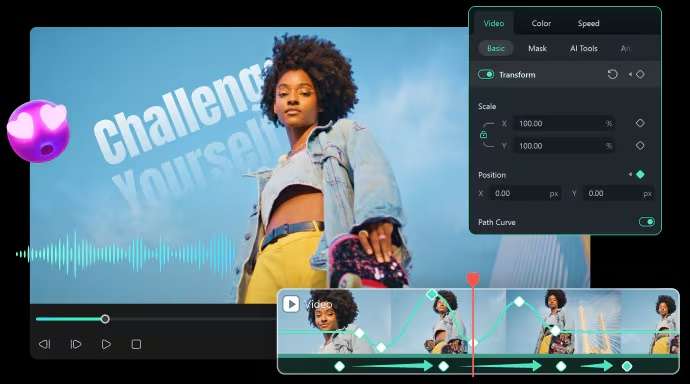
- Tools for Animation: Filmora offers tools like Keyframing for smooth, custom animations, giving you more control over every detail.
- Full Control Over Edits: Filmora allows you to add animation text, trim, cut, and transition scenes exactly how you want, giving you the flexibility that’s missing in simpler tools like VideoScribe.
- AI-Powered Enhancements: It includes advanced features like AI Image for adding visuals easily and AI Music Generator to create custom music for your videos.
- Unique Effects: You can use Filmora’s Voice Changer and other effects to make your video more dynamic and engaging.
- Complete Video Editing Toolkit: Once you've created your animated videos, you can take them to the next level with features like AI Color Palette, Automatic Captions, AI Translation, and more.
Plus, even with all these amazing features, Filmora is super affordable! It has flexible, budget-friendly pricing plans and even offers a free trial so you can test it out before deciding to buy. So, no more excuses—give it a try! Here’s a simple guide to help you start creating animated videos with Filmora:
Step 1. Launch Filmora and start a new project
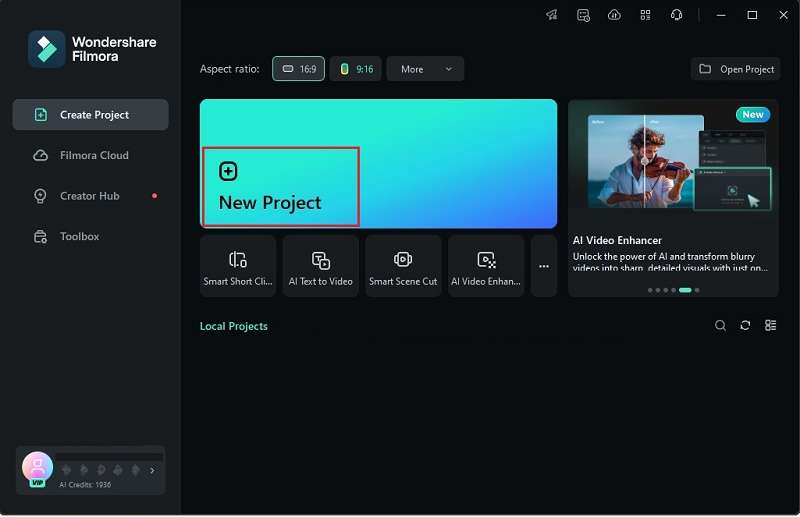
Before we start, make sure you have the latest version of Wondershare Filmora. If you haven’t downloaded it yet, grab it below. Once it’s installed, open Filmora by double-clicking the icon and choosing “New Project” to get started.
Step 2. Use AI Image to create photos to animate
For photo resources to create your animated videos, you can start with Filmora’s “Stock Media” library. But if you need a specific image, try the “AI Image” tool.
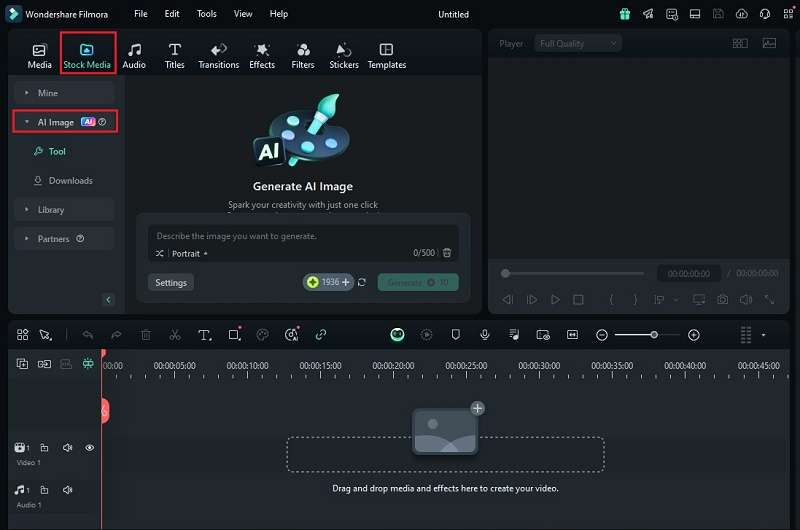
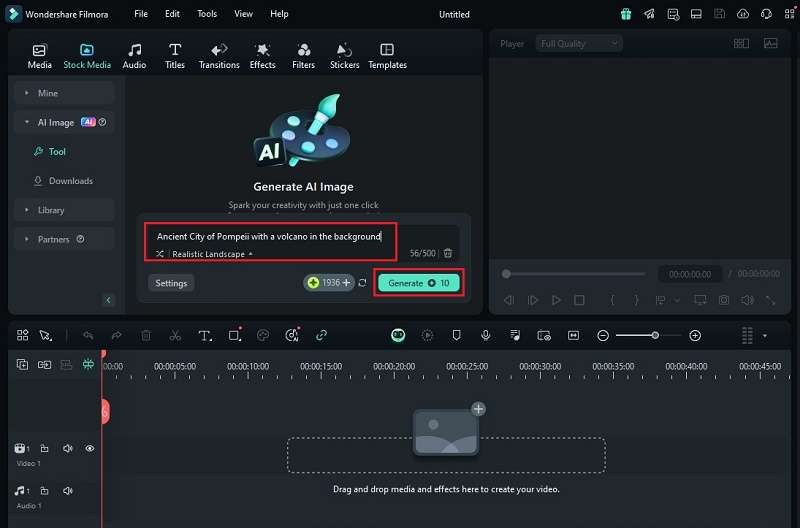
For example, if you're making an explainer animated video about the destruction of the ancient Roman city of Pompeii, just type a detailed description of the image you need into the text box. The more descriptive you are, the better the result. Choose your preferred style, then click “Start Creating”.
Once the image is generated, click the icon in the lower right corner—it will download directly to your local folder and import to Media at the same time.
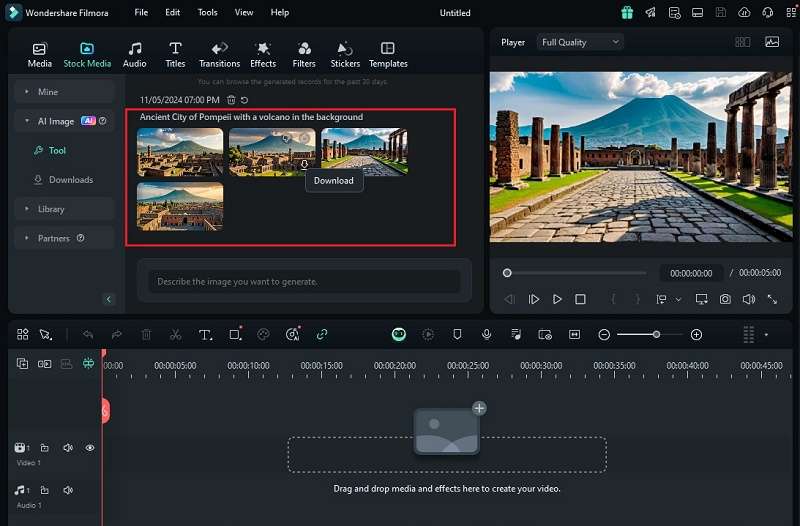
Repeat this process until you have all the images you need for your animated video. Then, drag it to the editing timeline to begin editing. Don’t forget to adjust their size and position them so that it seems like they belong in the same place.
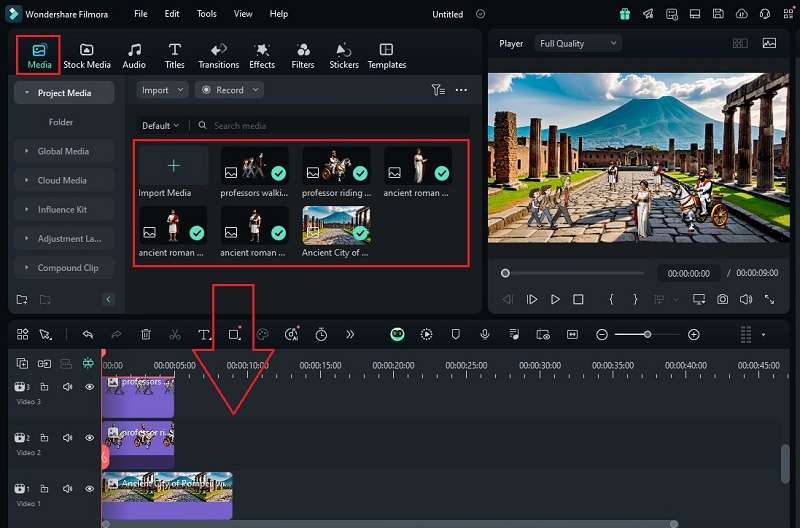
Step 3. Add keyframe for animation effects
Now it’s time to add some animation to your pictures by using the keyframes technique. To do this, click on the image you want to animate and drag it out of the frame so it doesn’t show up right away. Then, on the right side of your editing panel, go to the “Basic” tab, find the “Scale” and “Position” options, and click the diamond icon to “Add Keyframe”.
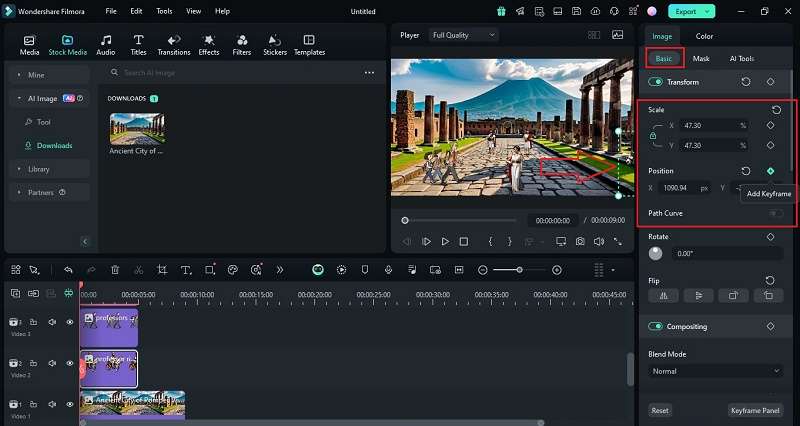
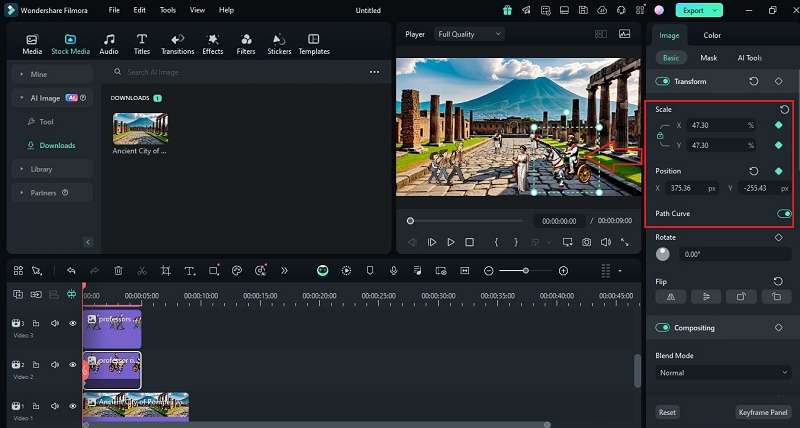
To set the movement, adjust the “Position” options for “X” and “Y”, or just drag the image to create the movement you want. You can preview the movement to see how it looks, and if you like it, go ahead and add keyframes to each picture to make your video more dynamic.
Step 4. Add animation text
Now, let’s add a title text as the opening line of your animated video. Go to the “Titles” tab, pick a style you like, and drag it onto the timeline above your video.
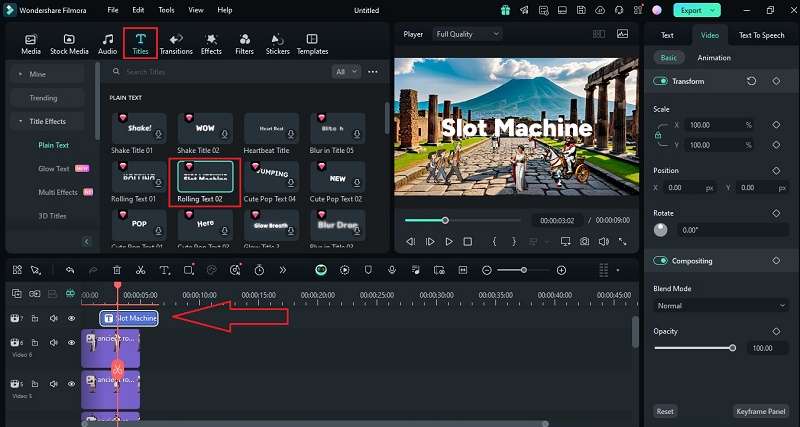
Double-click the text box to customize the text, font, color, and size.
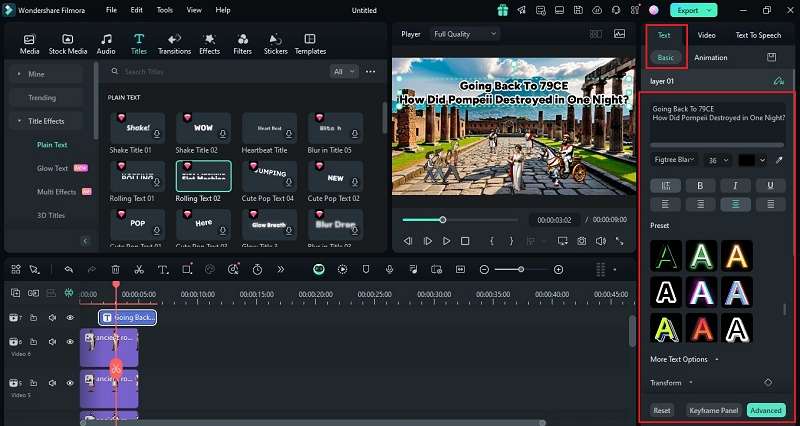
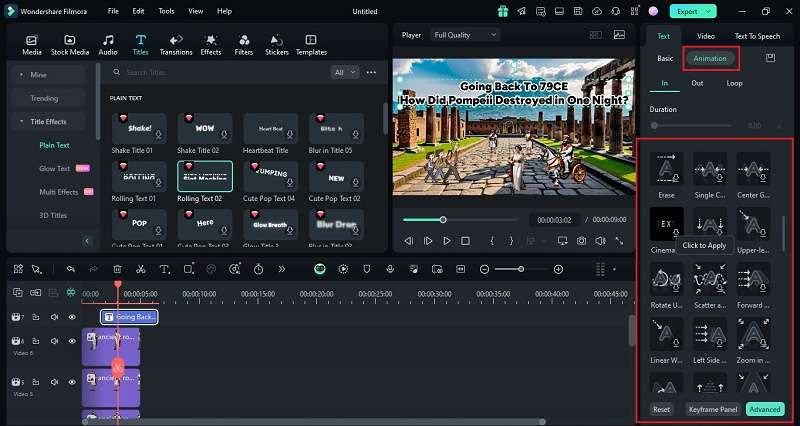
If you want your title to have some movement, click on the "Animation" tab to choose how it will appear in the video. Just find an animation you like and apply it!
Step 5. Add voiceovers and use Voice Changer
You can add voiceovers to narrate your video or bring characters to life with dialogue. To record directly in Filmora, go to "Media", click "Record", and choose "Record Voiceover". If you already have a recording, just upload the audio file and drag it onto the timeline.
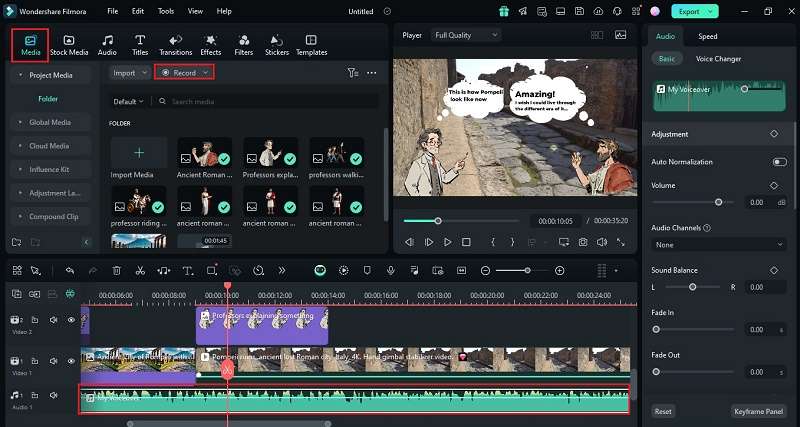
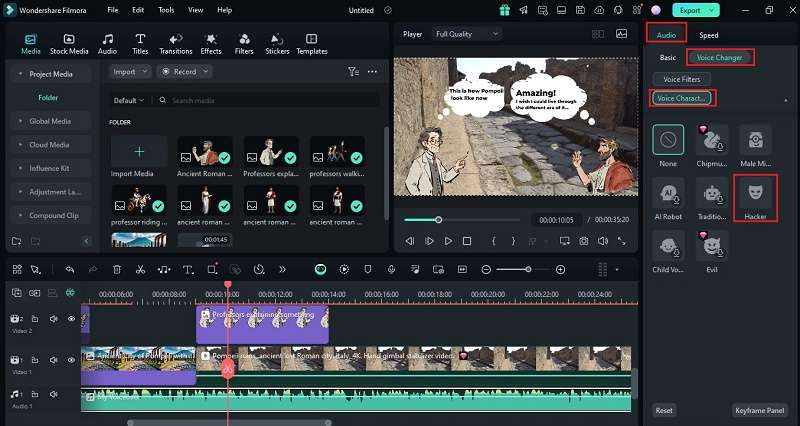
To make your voiceovers more dramatic and add fun effects, try using Filmora’s Voice Changer! Just double-click on the audio track in the timeline, go to the "Audio" settings and look for the “Voice Changer” section.
In the “Voice Characters” menu, you’ll find different effects—like "Hacker" for a deep, mysterious tone. Just double-click the effect you want to apply to your voiceover, and you’re good to go!
Step 6. Insert custom music
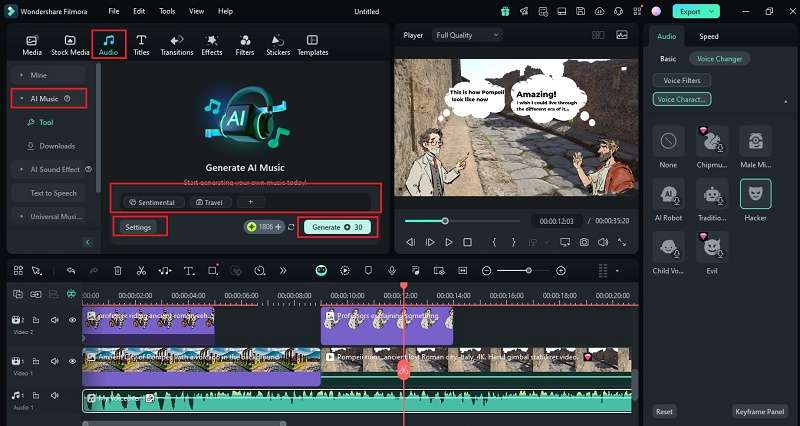
To make your animated video more immersive, try using the AI Music Generator to create background music that perfectly fits your story. Just go to the “Audio” tab at the top of the screen and select “AI Music” from the left panel.
You can customize the music by picking the Mood, Theme, and Genre. For more control, click on “Settings” to adjust the Tempo and Music Duration. When you’re happy with your choices, hit “Generate”, and the AI will create a soundtrack that matches your video!
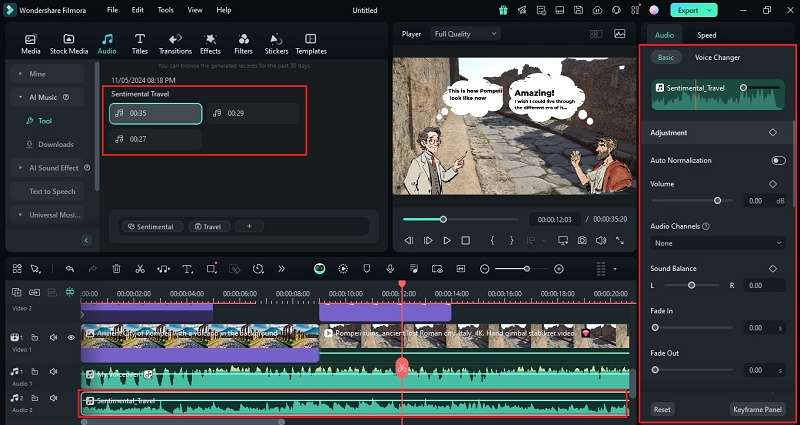
Once the music is generated, you’ll see it in the panel. To download the track for commercial use, just click the download arrow and drag it into your timeline. Be sure to adjust the volume so the music doesn’t drown out your voice narration.
Step 7. Apply transitions and further enhance your video
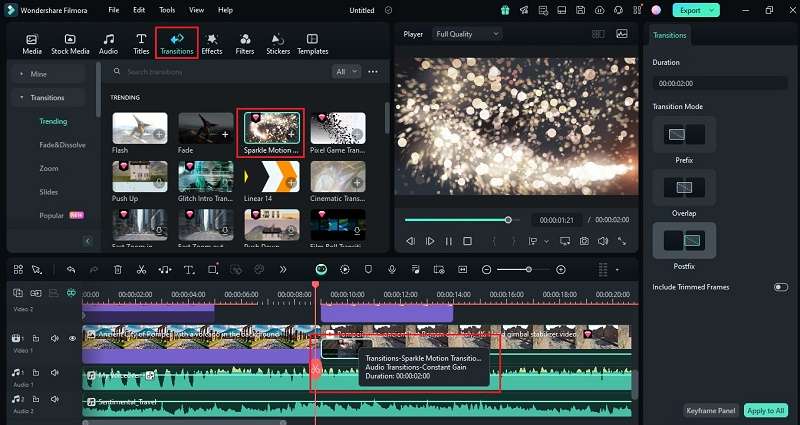
To make your animated video flow smoothly, try adding transitions between scenes. Just head to the “Transitions” tab and apply the ones you like to your video.
You can also level up your video with some of Filmora’s advanced features, like AI Color Palette for color grading, Automatic Captions for easy subtitles, and AI Translation to reach a global audience. For more details on using these tools, check out Filmora’s guides below:
Step 8. Save and share your animated video
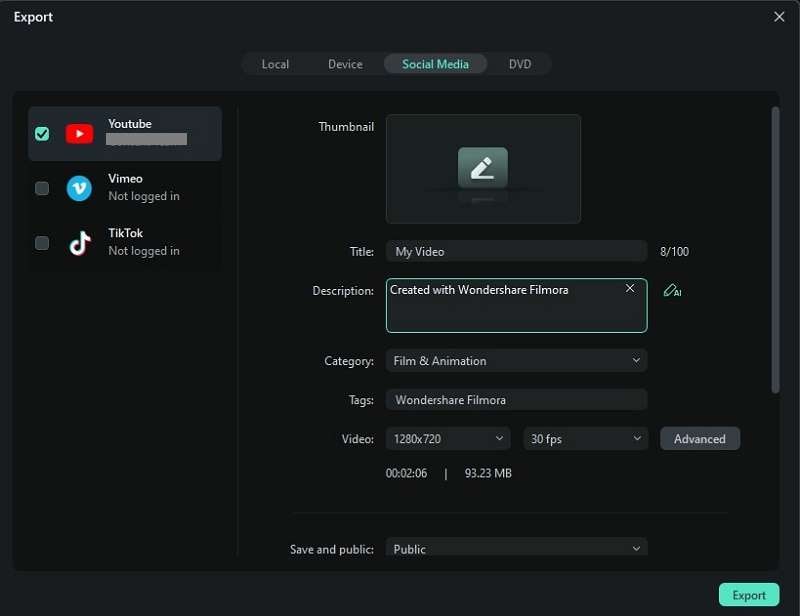
When your video is ready, click “Export". In the pop-up window, go to “Social Media” and select the platform you want to upload to. You can also customize the title, description, category, resolution, and other details to make it perfect!
Part 4. VideoScribe vs. Filmora: Which Animation Tool is Right for Your Creative Projects?
After checking out how VideoScribe and Filmora handle animated videos, it’s clear they each have something unique to offer. VideoScribe software is all about creating smooth hand animations, making it look like a hand is really drawing and coloring each image. On the other hand, while Filmora can be a bit trickier for animation, it offers more advanced AI features for general video creation, ideal for those who want more creative control and detail.
So, let’s break down when each tool works best and how you can use them together for a smooth, efficient workflow.
Use Case Scenarios:
- When to Use VideoScribe: It is perfect for creating whiteboard-style animations. It’s ideal for projects like "Draw My Life" videos popular with YouTubers or educational content where you’re explaining concepts visually. The simple, hand-drawn animation style makes complex ideas easy to understand and keeps viewers engaged.
- When to Use Filmora: It is great when you need more in-depth editing and want more than just basic whiteboard animations. It’s ideal for projects that require extra details, effects, or creative flair, thanks to its advanced AI features. You can add things like color grading, voice effects, or even subtitles to give your video a polished, professional look.
- How They Can Work Together: For the best of both worlds, you can create your main animation in VideoScribe software, and then export it to Filmora for those finishing touches. This way, you get VideoScribe’s fluid, hand-movement animation combined with Filmora’s powerful customization options.
Conclusion
Many people consider VideoScribe software a cost-effective solution for creating animated videos. This article breaks down everything you need to know about it, including VideoScribe’s cost, key features, limitations, and how to use it to make animations.
After testing it, we found that VideoScribe is excellent for whiteboard-style animations, but its editing limitations are hard to overlook. That’s why we’re also introducing Wondershare Filmora—a more feature-rich option with advanced tools like AI Music, various effects, and more.
Each tool brings something unique. By using VideoScribe software for the whiteboard-style animations and Filmora for extra polish, you get the best of both worlds—smooth animations with the flexibility to create high-quality videos.


 100% Security Verified | No Subscription Required | No Malware

