The most popular activity you'll get from video creators is to remove unpleasant noises like rumble or buzz from a final film, whether a promotional video, a short story, a short advertisement, or something else entirely. When mixing and capturing sound effects or even other multimedia design elements, it's typical to have to remove background noises.
Thankfully, there are some techniques for eliminating these background noises. In this guide, I will illustrate how to eliminate background noise on Windows, Mac, and Online.
How to Remove Background Noise from Video Sony Vegas?
Nothing is more frustrating than watching your film's current video footage and hearing excessive background noise. Well, if you're unfamiliar with Vegas Pro, don't worry; we'll show you how to reduce noise with these simple steps.
Here's a quick guide on reducing background noise in Sony Vegas. Follow these techniques to minimize background noise quickly and effectively, leaving you with clear audio:
Method #1: Lower the Volume
Consider lowering the volume of your video. Low-level noise is frequently seen in audio at the lowest volume settings. Simply decrease the general volume levels to fight this, and it may clean any mild, below-the-floor background noise.
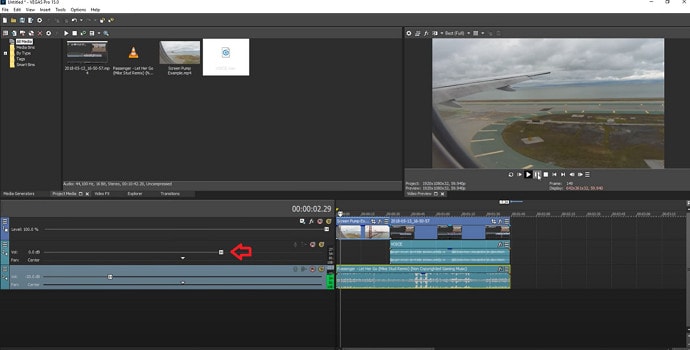
Slide down the volume lever in the track to the left to lower the level of all audio occurrences within the track. To equalize the course, press the top of the track and drag the gain level down.
Method #2: Utilize the Noise Gate Feature
Reducing the volume and implementing the first method does not always eliminate background noise, so you must explore further.
There may be circumstances where the background noise is louder than the speaker, and decreasing the total volume makes it incomprehensible.
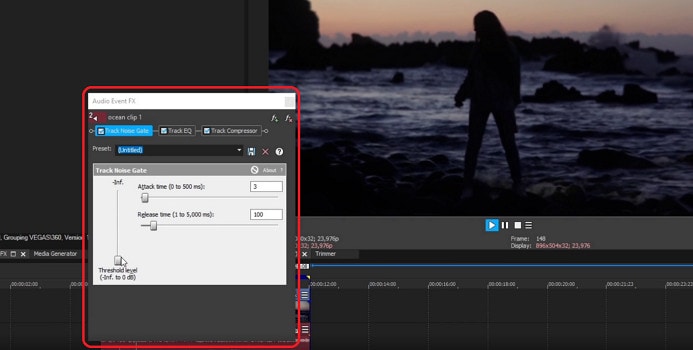
I suggest that you consider the Noise Gate if the background noise is a constant hiss. Noise Gate effectively suppresses sound below a specific volume, and background noise volume is lesser than the audio you want to include in your edit. As a result, using the Noise Gate is the best option.
To use the Noise Gate, go to the Track FX section of the interface and click the Audio FX button. Now select "Noise Gate." The choices for this are now visible. Raise the threshold level; this establishes the total volume quality threshold. The Noise Gate will remove all audio below the threshold.
Alternative Ways to Remove Background Noise from Video
The learning curve of Sony Vegas may be a bit too complicated for you; then, there is nothing to worry about because you are in the right place. In this article, I also prepared a few alternative ways that you can use to remove background noises from your video. Let's skip the talk and start learning:
#1: Wondershare Filmora – Overall Best
It is available on Windows and Mac.
Although there are many applications available for removing background noise, experts recommend Wondershare Filmora Video Editor. Let's get right to the point.
Aside from the standard audio editing tools, Filmora now includes better wavelengths, volume keyframing, peak detection, and audio fades, resulting in a higher-quality audio editing interface. Here are some of the trump cards of using Filmora to remove background audio noise:
- Waveform audio editing with adjustable track height
- Remove background noise with ONE click using the Denoise function.
- Adjust the Denoise level to Weak, Mid, or Strong for improved noise reduction outcomes.
Here's a guide on how to use Filmora to improve video footage, including how to eliminate background noise:
- In the Wondershare Filmora timeline panel, upload your clip. Trim and erase the video sections that you don't wish to keep.
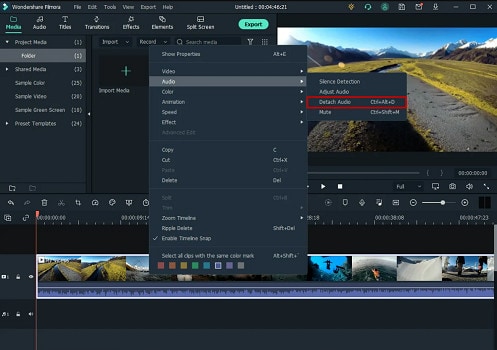
- Hover over the Audio option after right-clicking the clip in the timeline. The four choices available are silence detection, modification audio, removal audio, and mute. Select the "Audio Detach" feature to extract the audio from the video.
- Double-click on the audio file and select "Remove background noise" in the Edit Menu to eliminate the background noise instantly. You may also reach the Editing panel by double-clicking the video in the timeline without removing audio from the video and switching to the Audio page to edit audio and remove noise.
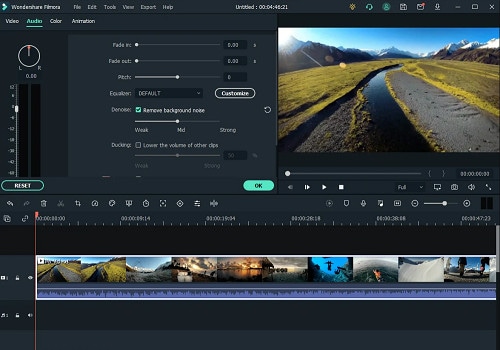
- You may also use the Equalizer tool to fine-tune the audio to make it seem more authentic. Simply tweak the music to fit the visual frame by frame if you want a better assessment. After analyzing the results, click Export to save the noise-reduced clip to your device or share it immediately to YouTube or Vimeo.
#2: Audacity
It is available on Windows, Mac, and Linux.
Audacity is a free, accessible, high-quality audio editing program that runs on Windows, Mac OS X, and Linux. You may use it to record live audio, modify it with capabilities like a cut, copy, and paste, and visualize advanced audio analysis using the Spectrogram view mode.You may also use it to eliminate background noise from your audio or video files for free.
The improved detailed instructions for removing background noise in Audacity in 2022 are listed below:
Step #1: Import Files to Audacity
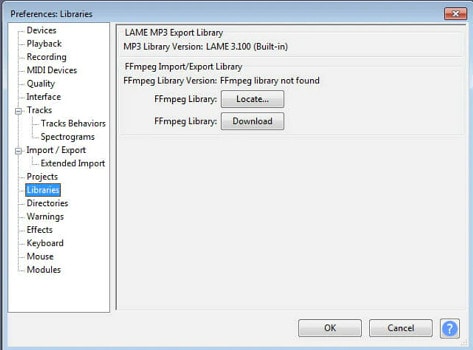
Move to the File menu and hit Open or Import after running the program to load the audio or video source into Audacity. Before editing, Audacity will prompt you to make a copy of the audio track. This impresses me as extremely thoughtful. If you want to import a video file into Audacity, you'll have to download and install FFmpeg Library beforehand. Otherwise, you'll need to separate the audio from the video or transcode the video to a suitable audio format.
Step #2: Detect the Noise Segment
Locate a portion with pure background noise by zooming in on the track or adjusting the Track Size under the View menu.
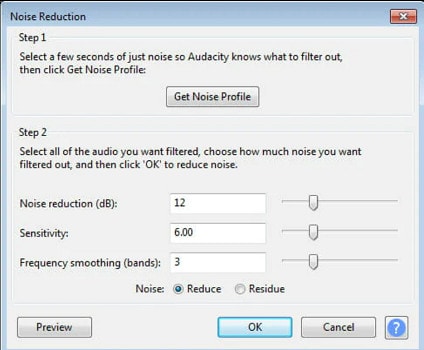
Choose "Noise Reduction" from the Effect tab, begin with the defaults, and then hit "Get Noise Profile" to have Audacity determine what to filter out based on the specified section.
Step #3: Eliminate Background Noise with Noise Profile
Next, select the entire audio track that requires noise reduction, return to the Noise Reduction panels, select how much noise you want to eliminate, and click OK to eliminate the noise. You may use the default settings. Audacity will automatically minimize the noise, and the outcome will be visible on the audio track right away.
Step #4: Calibrate the Settings
To address the white noise of your audio, go to Effect and Amplify. To see if the noise has been gone, click "Preview." Click "OK" and then export the denoised clip from Audacity to MP3, WAV, or other codecs.

#4: Remove the Entire Audio from Video Online Free
It is available on Windows, Mac, and Online.
You can use several online audio removers if you don't want to install apps to eliminate the background noise. For example, I discovered AudioRemover.com, a free online audio extractor. In just two actions, you may eradicate audio from video.
- Choose a video file first, then click the Upload Video button below. Depending on the size of the video, this could take some time.
- Click the download file to save it to your PC after it's finished.

On the other hand, this online audio remover will eliminate all of your audio, background noise, narration, music, and sound. A video file can only be 500MB in size. It can play MP4, AVI, MOV, and other video formats.
Frequently Asked Questions
What is the best way to remove background noise from a video?
I highly recommend using Wondershare Filmora video editor; all you have to do is activate the Denoise feature in the Audio editing window to eliminate the background noise from the video. Furthermore, it will instantly delete the background noise, such as the breeze.
Is it possible to eliminate background noise from a video online?
You certainly can. Background noise can be removed online using online video editors like Veed.
How do I get rid of the background noise in a YouTube video?
To eliminate background audio noise from YouTube videos, you may first have to download the video, then use the Filmora video editor to eliminate the noise with a single click.


 100% Security Verified | No Subscription Required | No Malware
