
 100% Security Verified | No Subscription Required | No Malware


 ChatGPT
 Perplexity
 Gemini
 Claude
 Grok
Grok
In this article
Adding a video shake effect is a simple yet powerful way to make your content feel more alive. It's perfect for building tension in action scenes, bringing drama to intense moments, or adding a playful twist to your clips.
The best part is that you don't need fancy equipment or complicated software to achieve this. With the right tools, you can add a shaking effect to a video in minutes, whether you're editing on a desktop, working on your phone, or trying out an online editor.
So, this guide will show you step-by-step how to get the exact look you're going for!

Part 1. Shake Up Your Video Like a Pro on Desktop
When it comes to video editing, nothing beats the power and flexibility of working on a desktop. The bigger screen lets you catch every detail, the timeline flows with precision, and rendering runs faster so your ideas don't lose momentum.
It's the perfect setup to craft a shaking video effect that feels intentional and powerful, whether you want to build suspense or add playful chaos. Even better, you have Wondershare Filmora, an all-in-one video editor that provides the kind of tools that turn a simple shake effect into a polished highlight that instantly grabs attention.
 secure download


Here's why you should turn to Filmora if you want to add a shake effect to your video creatively:
- Creative Shake Library: Filmora comes with a built-in library of video shaking effects that add instant energy to your clips. You can pick the one that fits your style and apply it in seconds.
- Customizable Presets: You can choose from multiple shake presets and fine-tune the intensity for just the right feel. It also lets you combine shake with other effects for more creative results.
- Simple Drag-and-Drop: Adding a shaking effect to a video is as easy as dragging the effect onto your clip. No complex steps or extra plugins are needed to get the look you want.
- Beginner-Friendly Interface: The layout is clear and simple, so even first-time editors can create a smooth shake video effect. At the same time, it offers enough depth to keep advanced users satisfied.
- Optimized Export Options: The editor ensures your shake effect stays crisp when you share it. With tailored export settings, your video looks great on any device or platform.
With everything packed inside, turning your clips into a polished shaking video effect feels more like play than work. So, let's get into the fun part and see how to add a shake effect to a video in Filmora using the simple guide below.
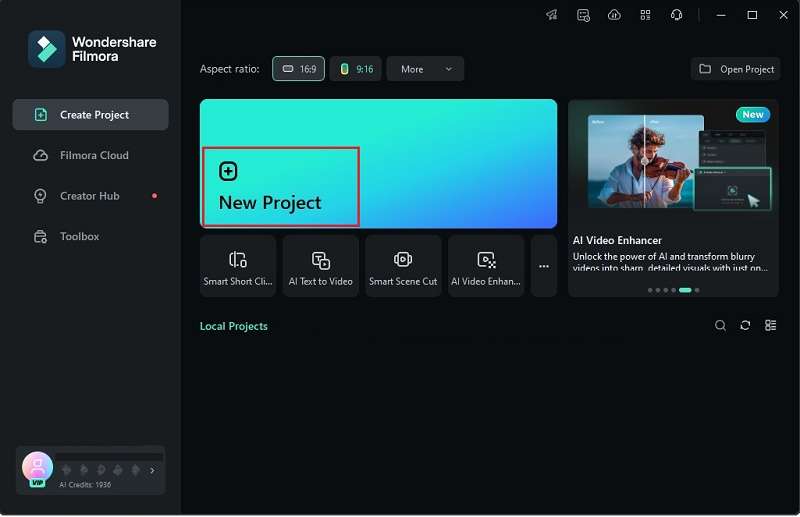
Step 1. Open Filmora and begin a new project
First things first, make sure you have the latest version of Filmora installed on your device. Then, launch the app and click “New Project” to begin editing on a clean workspace.
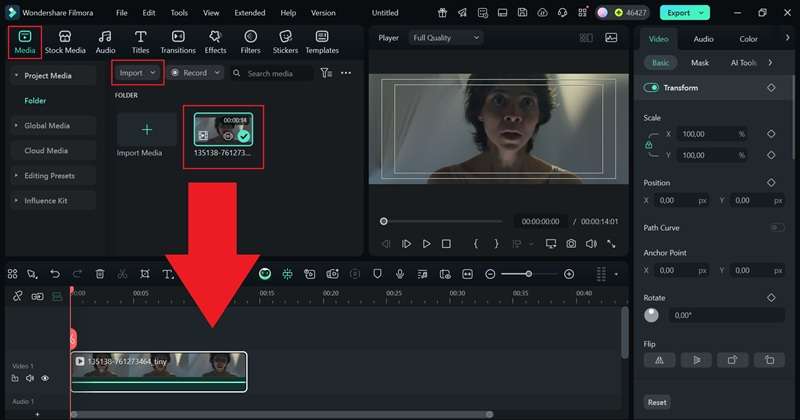
Step 2. Upload your video
When you enter the main editing workspace, head over to the "Media" tab and select "Import" to bring in the video you want to apply the shaking effect to. After the file is added, simply drag it down onto the timeline to begin editing.
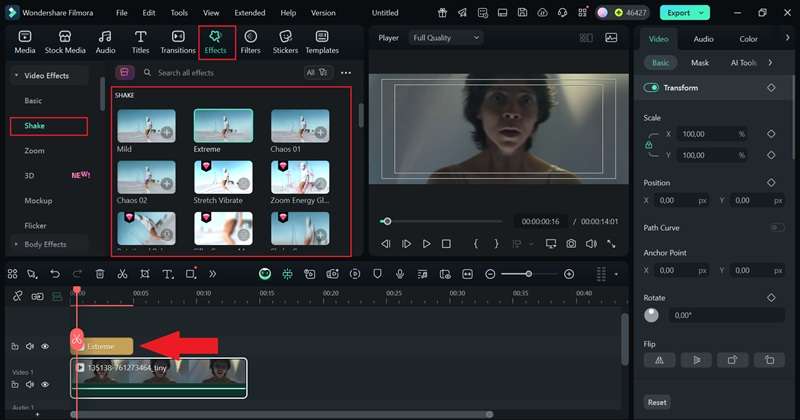
Step 3. Find and apply the shaking effect
Go to the “Effects” tab where you will see different categories. Select “Shake” and preview each option to see how it looks on your video. Choose the one that matches the mood of your clip, for example using the extreme shake works well for a horror scene where the protagonist touches something forbidden. Once you decide, drag the effect onto the timeline to apply it.
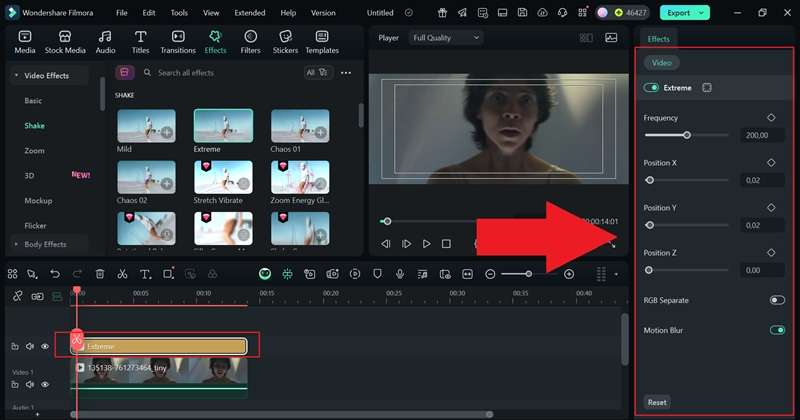
Step 4. Adjust the length and the intensity of the effect
Click the effect clip on the timeline to make changes. You can keep the shake effect on just certain parts of your video or stretch it to cover the entire clip. In the property panel on the right, adjust the intensity and other settings as needed. Move the sliders until the shaking effect looks exactly the way you want.
Step 5. Combine it with other effects
To make the shaking effect feel more natural, try adding other effects or filters alongside it. Since this clip is meant to highlight the climax of a horror scene, you can use the search bar to find horror effects that match the mood. Drag the chosen effect onto the timeline and adjust its intensity in the property panel until it blends well with your video.

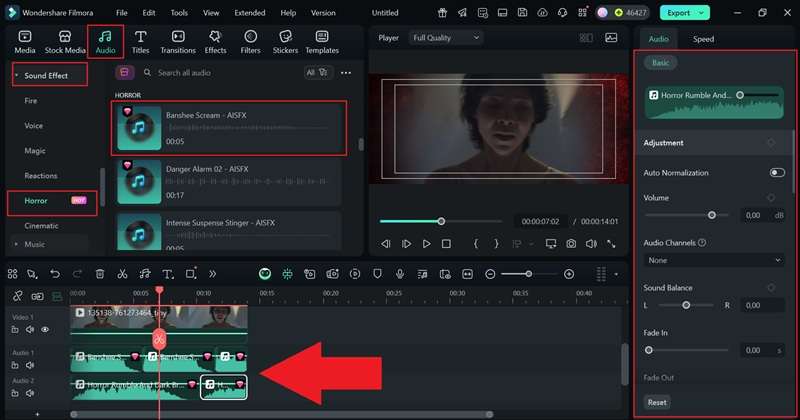
Step 6. Add sound effects
A good way to enhance the shaking effect is by adding the right audio. Go to the “Audio” tab and open the “Sound Effects” menu. From the available categories, select “Horror” and choose the sounds that fit your clip best. You can even layer multiple sounds together to make the scene more intense and immersive.
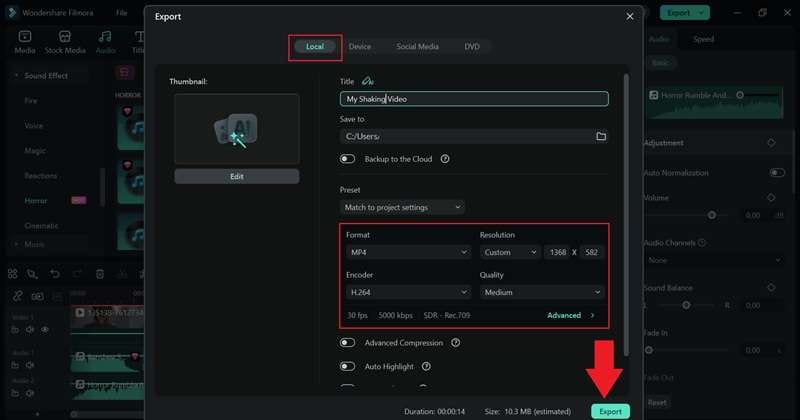
Step 7. Export and save your video
Once you're satisfied with your edit, click “Export”. Choose “Local” to save the file on your device or “Social Media” to upload it directly online. Add a title, pick the format and resolution, set the destination folder, and press “Export” again to finish.
And there you have it! Your edit is complete, so sit back and enjoy watching your final creation come to life.
Part 2. Create a Shaking Effect Video on Your Phone
As you can see, adding a shake effect to a video with Filmora is very easy, effective, and honestly a lot of fun. But the fun doesn't stop here, you can keep the same energy on your phone where editing feels quick, easy, and just as effective for sharing clips on the go.
With Filmora Mobile, you can create a shaking effect video anytime and anywhere, giving you the freedom to edit with style even when you're away from your desk. Here's why using Filmora Mobile to add a shake video effect is a smart choice for quick edits.

- Edit Anywhere: Filmora Mobile lets you create content anytime without a laptop or complex tools. Adding a shake effect to video on the go feels natural and efficient.
- Seamless Syncing: You can begin a project on a desktop and finish it on mobile without losing progress. This makes your video shake effect smooth and consistent no matter where you edit.
- Custom Control: You can adjust the strength, direction, and timing of the shake video effect to fit your vision. Whether you want subtle movement or bold energy, it's easy to achieve.
- Instant Social Sharing: Your shaking effect video can go from edit to live in just a tap. Filmora Mobile allows you to upload directly to TikTok, Instagram, or YouTube without leaving the app.
All these features are available on both Android and iOS, so you get the same flexibility no matter what device you use. Next up, let's learn how to add a shake effect to a video in Filmora Mobile through a smooth step-by-step guide below:
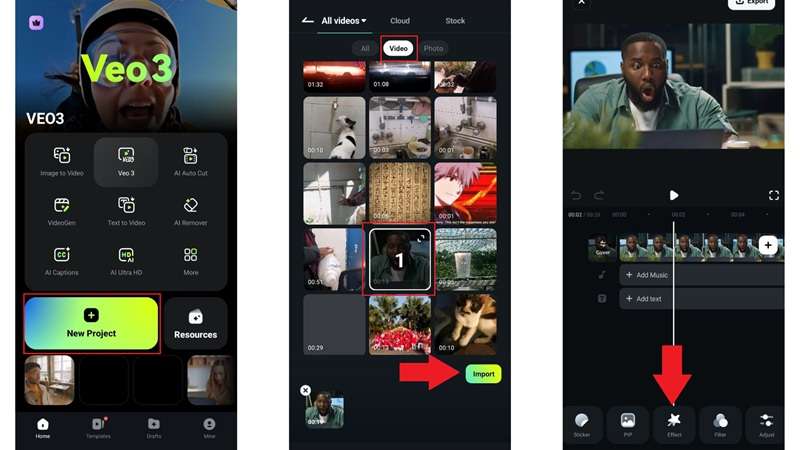
Step 1. Upload your video and find the effects menu
After installing Filmora Mobile on your phone, open the app and tap “New Project” to get started. In the next screen, select “Video” and upload the clip you want to edit, then tap “Import”. Once you're in the main workspace of Filmora Mobile, tap the “Effects” menu at the bottom to explore the available options.
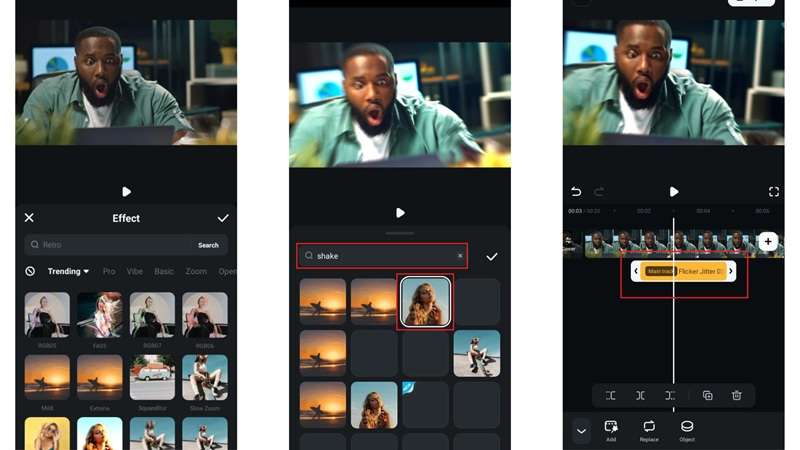
Step 2. Apply the shaking effect
In the effects menu, you'll notice plenty of creative categories to explore. To make it quicker, type “Shake” in the search bar and pick the one that matches your clip best. For example, if you're editing for social media, a trending shake with zoom in and out can work perfectly. Tap the checklist icon to apply it, then adjust the length so it flows naturally with your video.
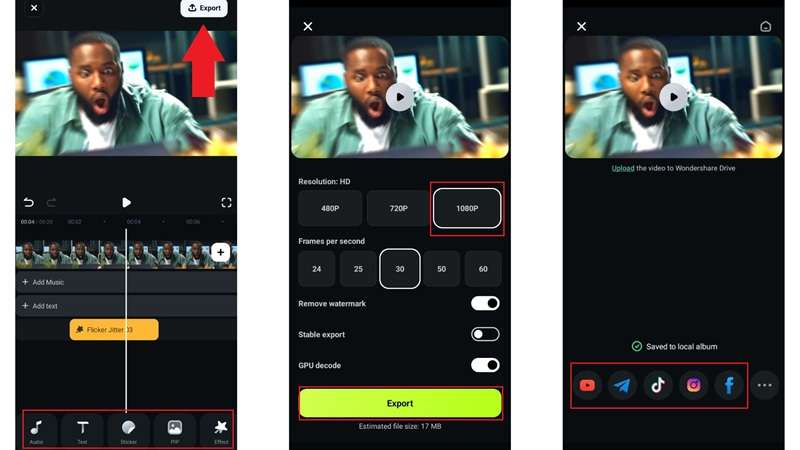
Step 3. Export it and share on social media
Just like in the desktop version, Filmora Mobile also has music, filters, stickers, and transitions you can add to make your clip more fun. When you're done editing, tap “Export” at the top, pick your resolution, and tap “Export” again. Once saved, hit any social media icon below to share your video right away.
Part 3. How To Add Shake Effect to Video Online
Using Filmora Mobile already shows how practical it is to edit on the go, and with both desktop and mobile options, Filmora gives you full flexibility to create a polished shaking video effect anywhere. Still, if you prefer not to install anything, there are plenty of browser-based editors that make it simple to add shake effects to video online.
Among the many options out there, Media.io is one tool worth trying since it works smoothly in your browser, supports many formats, and keeps the process fast. Scroll down to follow the process and turn any clip into a shaking effect video in minutes.
Step 1. Visit the tool's site and upload your video
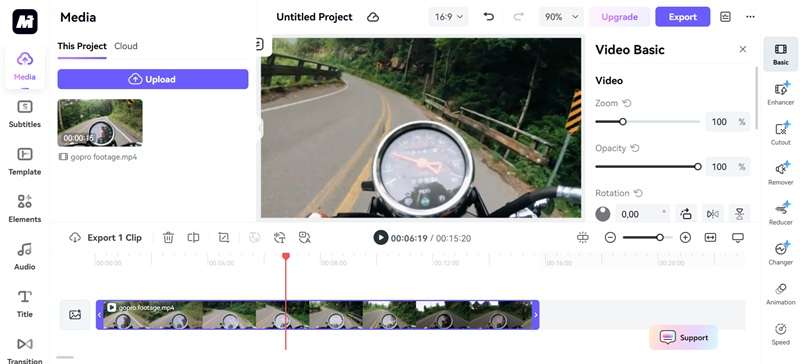
Go to the Media.io website to launch its online editor. Click the plus icon or “Upload” to bring in your video from your device.
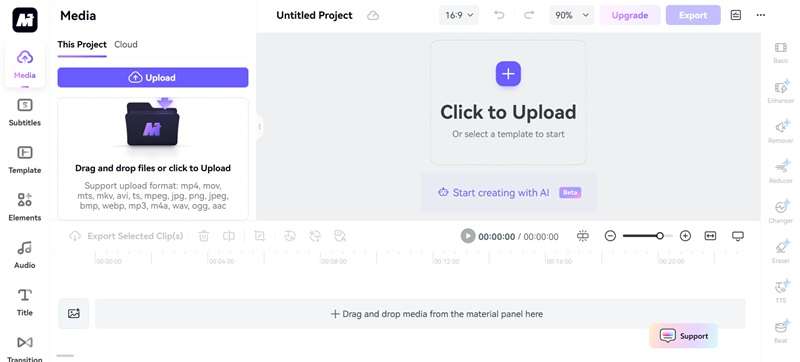
Once uploaded, the clip will appear on the timeline automatically, and you'll see a variety of settings you can start exploring in the workspace.
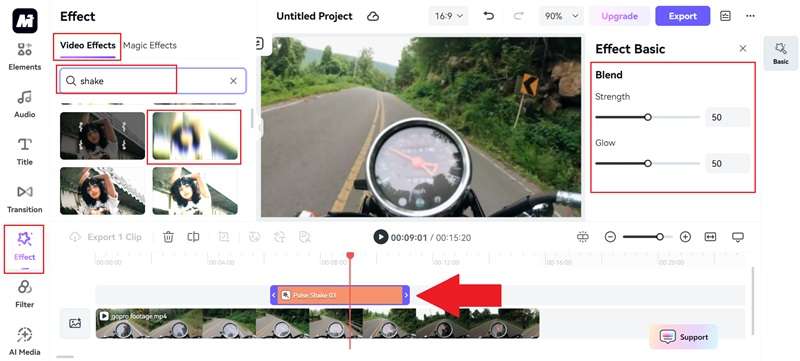
Step 2. Apply the shaking effect
From the menu on the left, click “Effects” and use the search bar to quickly find what you need. Preview the options and pick the one that matches your video's mood. For example, if the footage shows the seconds before an accident, a subtle shaking effect works best. Drag the chosen effect onto the timeline and place it exactly where it fits.
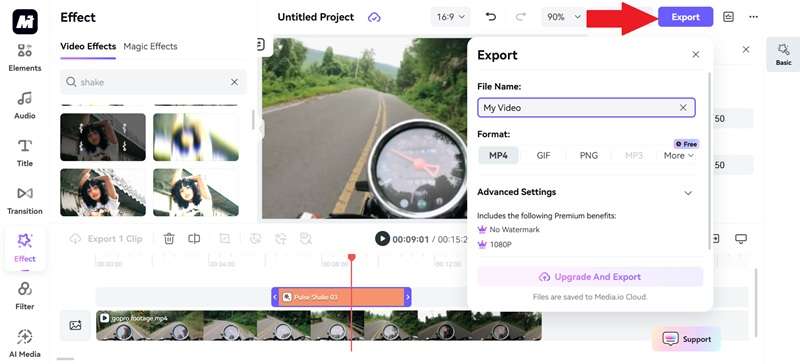
Step 3. Export the video
Preview your edit and once you're satisfied, click “Export” in the top right corner. Enter a file name and choose MP4 as the format since it's the only video option available. Keep in mind that exporting in 1080p without watermarks requires an upgrade to their paid plan, so if that works for you, confirm the settings and finish exporting.
Conclusion
Adding a shake effect to your content can instantly make it feel more dynamic and engaging. So, this guide showed how to add a shake effect to video online, on desktop, and on mobile. Online editors are convenient, but many come with limits and rely heavily on internet speed.
That's why using Filmora for your shaking video effect is a smarter choice. With Filmora, you get access to the latest shake effects along with popular creative options that give your edits more life. You can also make the shake effect look natural by combining it with Filmora's wide range of visual and sound effects.
Frequently Asked Questions
-
Can I control how strong the shake effect looks?
Yes, in Filmora, you can fine-tune the shake effect by adjusting its intensity and speed, giving you full control over how the video will turn out.Yes, in Filmora, you can fine-tune the shake effect by adjusting its intensity and speed, giving you full control over how the video will turn out.Does adding a shake effect lower video quality?Does adding a shake effect lower video quality? -
Does adding a shake effect lower video quality?
Filmora keeps your edits sharp so adding a shake effect will not reduce resolution. Your video stays clear and professional when exported.Filmora keeps your edits sharp so adding a shake effect will not reduce resolution. Your video stays clear and professional when exported.Can I add shake effects to just one part of a video?Can I add shake effects to just one part of a video? -
Can I add shake effects to just one part of a video?
Yes, with Filmora, you can apply the shaking effect only to a chosen section on the timeline. The rest of the clip stays smooth while the highlighted part gets the shake.Yes, with Filmora, you can apply the shaking effect only to a chosen section on the timeline. The rest of the clip stays smooth while the highlighted part gets the shake.What's the easiest tool for beginners to use?What's the easiest tool for beginners to use? -
What's the easiest tool for beginners to use?
Wondershare Filmora makes it simple to add shake effects to video with built-in presets. Its drag-and-drop design helps beginners create a polished video in minutes.Wondershare Filmora makes it simple to add shake effects to video with built-in presets. Its drag-and-drop design helps beginners create a polished video in minutes.Grammarly
