Transcript
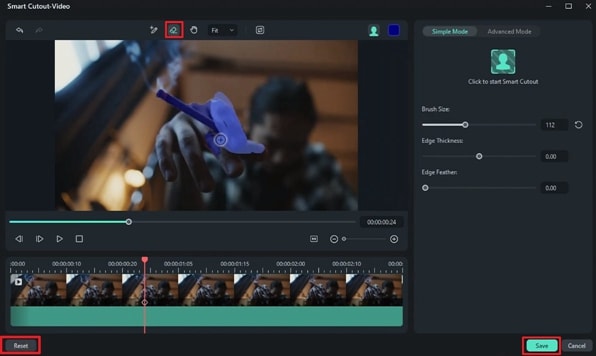
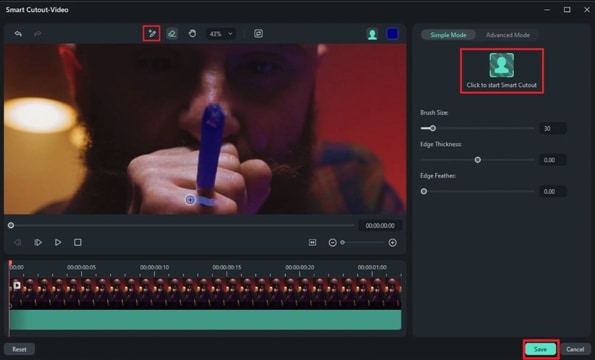
In this video, we will show you five smoking effects in Wondershare Filmora. First, drop two smoke footage on the same track. The first one keeps in 1 second and 15th frame. The second one keeps in 2 seconds, and the 10th frame. Then go to the "Video," choose "AI Tools," and turn on the "Smart Cutout" tool. "Brush" on the cigarette "Start Smart Cutout" track. Click on "Save".
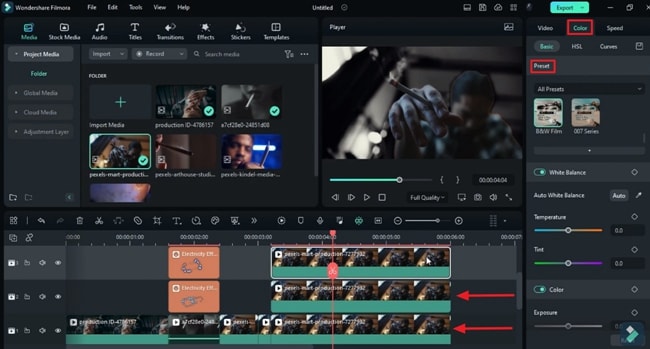
Duplicate this clip on track 4, select it, go to "Smart Cutout," and click "Invert Mask". Now, go to the "Stickers" under the "Electricity" effect, apply this "Effect" on track 2, and adjust its "Scale," "Position," and "Duration" to match the cigarette. Then drop another "Electricity" effect on track 3. This is the first smoke effect.
Let's move forward to second effect. Drop footage on track 1, and keep it till 6 seconds. Split it at 3 seconds and create a zoom-in and out effect for five frames. Split again after five frames, select the last part, turn on the "Smart Cutout," then use a "Brush" to cover the subject. Start "Tracking" and "Save."
Duplicate it on track 2 and track 3. Select the original clip for "Smart Cutout" again. "Invert Mask," then convert tracks 1 and 2 clip to "Black&White." Select the second duplicate clip for "Smart Cutout" and click on "Reset." Cover the cigarette head and remove the rest of the part using the "Eraser." Start for tracking and "Save."
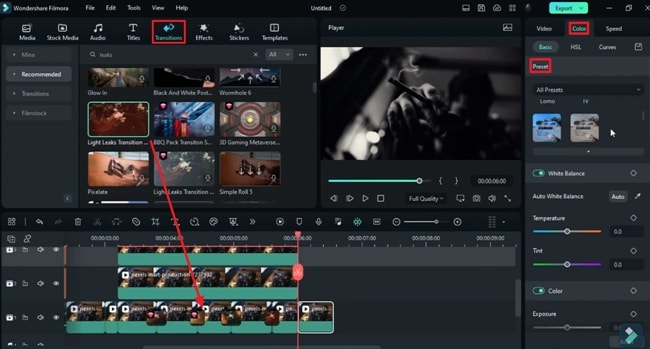
Now split the track 1 clip at random points, search for "Leak Light" transitions, and apply them on intersections. Keep "Transition" for 6th or 8th frames. Extend the last part by 14 frames and split it at 6 seconds. Turn off "Smart Cutout" and choose "None" in "Preset" under the "Color" section.
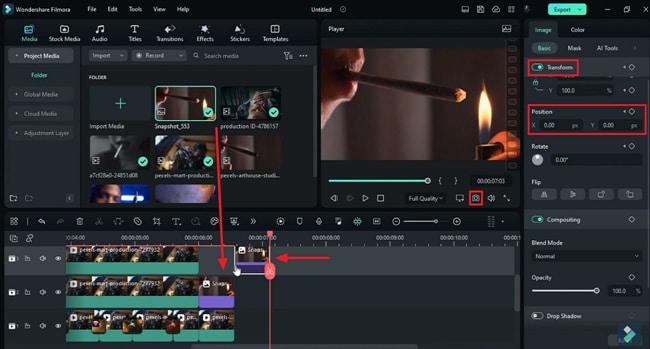
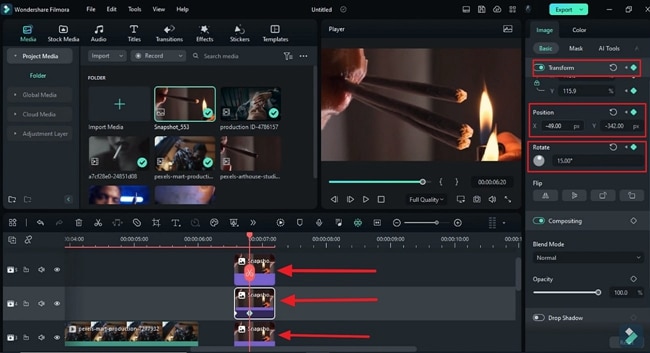
Now, moving forward to third effect. Select footage and take a “Snapshot” of the frame that you want to show at the beginning. Drag it on track 2, keep it for 14 frames, turn on the "Transform" keyframe, and place the snapshot in the lower left corner. Bring it back when the timeline goes in the middle, and add a keyframe at the end. Duplicate it on track 2 and remove all keyframes.
Then, go to the "Smart Cutout" tool and create a mask around the subject, lighter, and cigarette. Extend the duration of the snapshot to 7 seconds and 5th frame and put the cutout snapshot on track 3. Duplicate it till track 5.
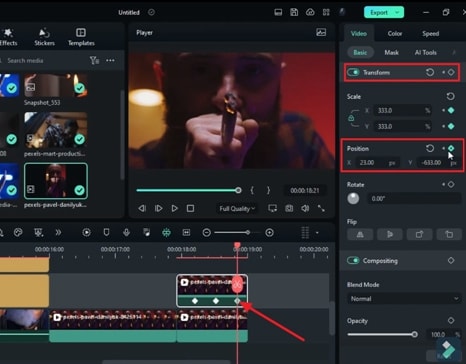
Select track 5 snapshot here, and turn on "Transform" keyframes. Go and "Rotate" it and set its "Position" and "Scale" in 5 frames further. Do the same with the rest of the snapshots. Now, we can get our effect. Place the playhead two frames before the end, and the rest transforms for every snapshot. Now drop the main footage on track 1 and match the starting point with other snapshots. Keep it till 9 seconds.
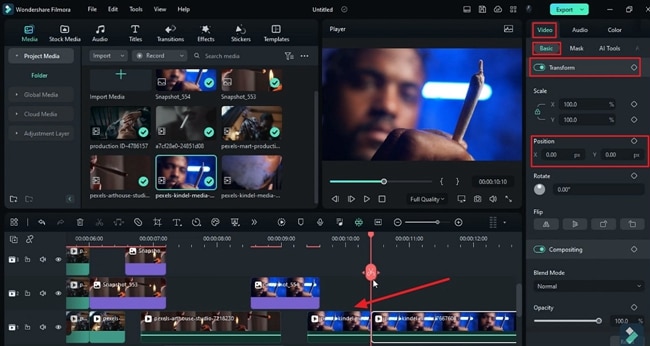
Now, let's create the fourth effect. Take a "Snapshot" of the first frame of this clip, drop it on track 2, and split snapshots at 9 seconds and 15 frames. Go to "AI Tools" and use the "Cutout" tool to cover the hand and cigarette. Now, with this snapshot, you can create many effects. You can "Rotate" it and move it to the right or left corner, then reset it at 9 seconds and 5th frame. This is how it looks.
You can reduce the duration by changing the keyframe "Position." Now drop original footage on track 1 at 9 seconds and 10th frame. Turn on the "Transform" keyframe and create a slide-down effect for 5 frames. Keep this footage till 10 seconds and the 10th frame.
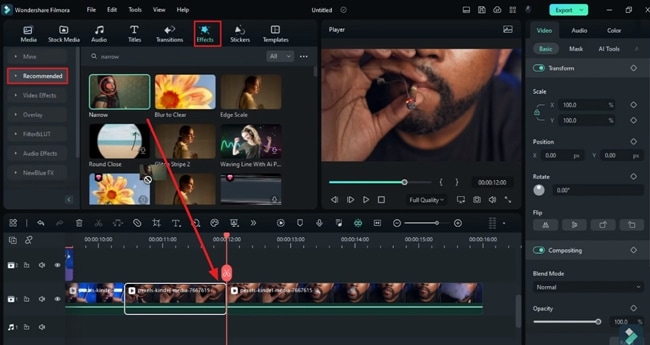
Now, moving forward to our 5th effect. Drop your footage at track 1, split it at 16 seconds, and then split it at 12 seconds. Select the first split part, go to the "Effect," search for "Narrow" effect and apply it. Place the playhead at 11 seconds and the 10th frame. Go to the "Effects" settings and change "Percentage" to 0. After 8 frames, set "Percentage" to 100, again set "Percentage" to 0 at the end.
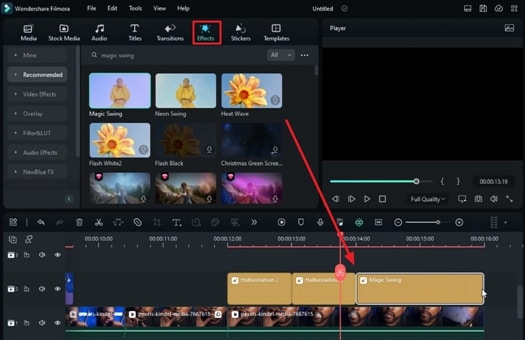
Next, go to the "Effects" and apply "Hallucination 2" on the second split part on track 2. Then, apply "Hallucination 1" right after "Hallucination 2". Then, search for the "Magic Swing" effect and apply it on track 2 to cover the leftover footage. Again, apply "Hallucination 1" on track 3.
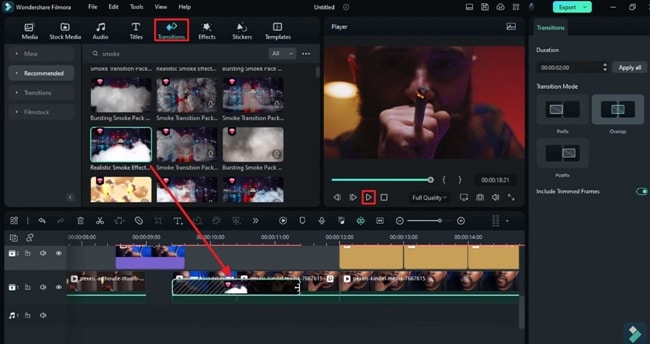
Last but not least, drop footage on track 1. Keep it till 9 seconds, and increase "Scale" to fit in the frame. Now split the clip at a point when the cigarette is about to light, duplicate on track 2. Now again, go to "AI Tools" for cutout, cover the cigarette, and click on "Start Cutout." Now create zoon out and, in effect, use keyframes on cigarettes for 7 frames each. Finally, go to "Transitions" and apply "Smoke Transition" on the intersection for the main clip. Check out the final.
Tutorial on Creating 5 Different Types of Smoke Effects in Wondershare Filmora
What you need to prepare:
- A computer (Windows or macOS)
- Your video materials.
- Filmora video editor
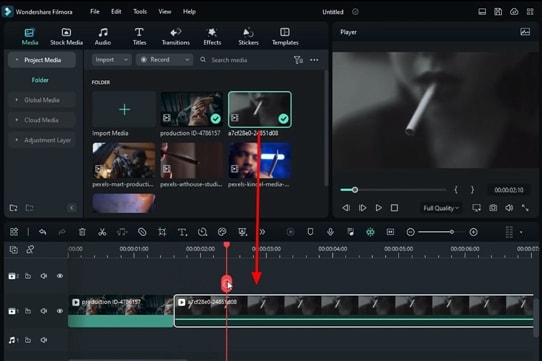
Import Media on Filmora’s Timeline
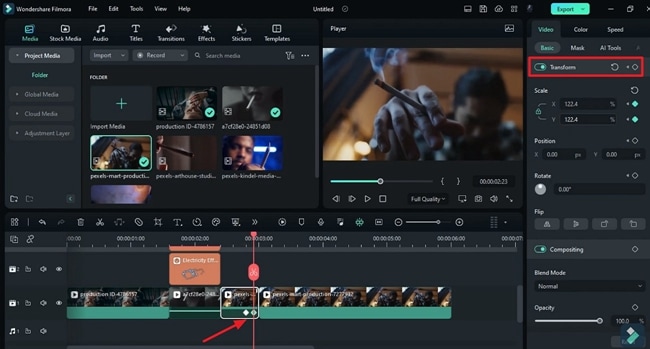
To edit the videos in Wondershare Filmora, start the new project by selecting the “New Project” button on the main interface of Filmora. As you enter the editing interface, “Import” your media in the “Media” tab. To create a smoke effect in a video, drag your videos from the media panel to the timeline and drop them on the first video track.
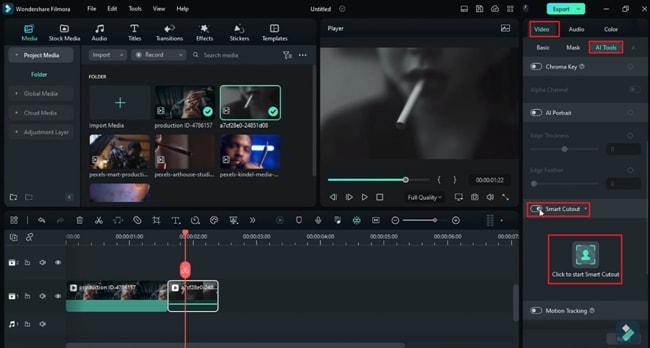
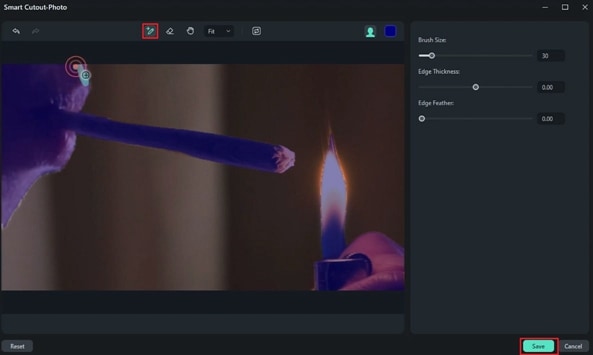
Smart Cutout for First Effect
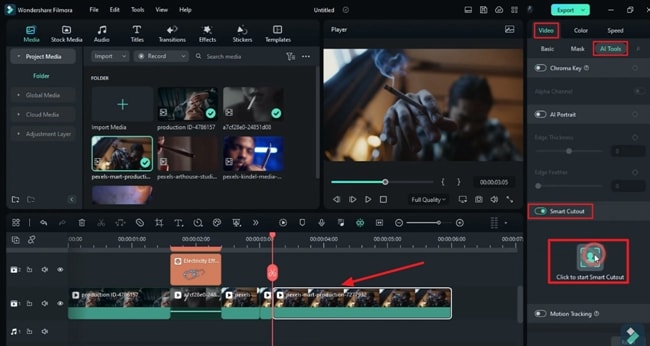
Select your media layer on the timeline and double-click to open the settings. From the right section, you can see the "Video" tab, where you need to propagate into the "AI Tools” section and find "Smart Cutout." Enable this option, and you will be entered in a new window.
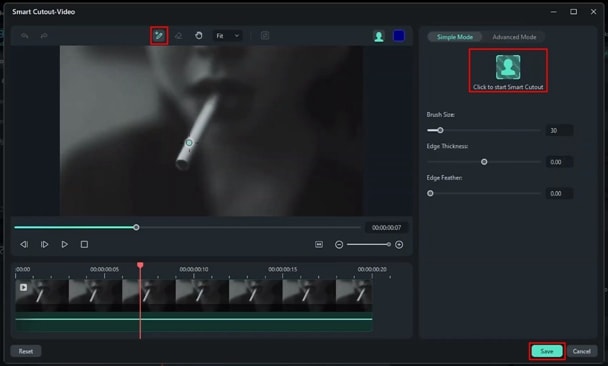
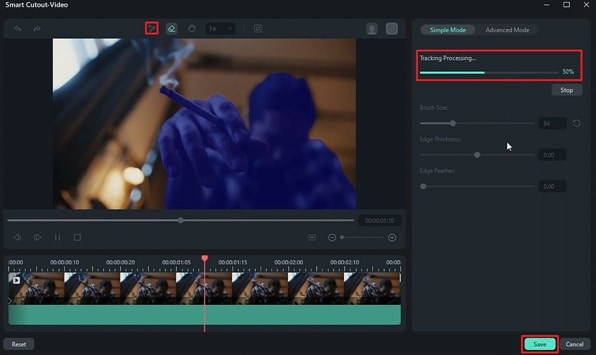
From the newly opened window, hit the “Smart Brush” tool from the top to draw the mask around your object. Choose the "Click to Start Smart Cutout" button from the right section. Wait until the processing is completed. Select the "Save" button from the bottom right corner to apply the settings.
Apply the First Effect on the Masked Area
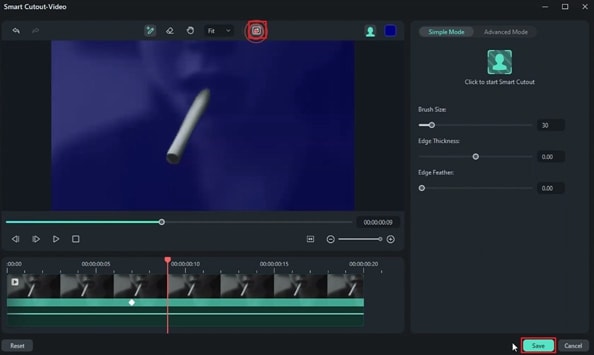
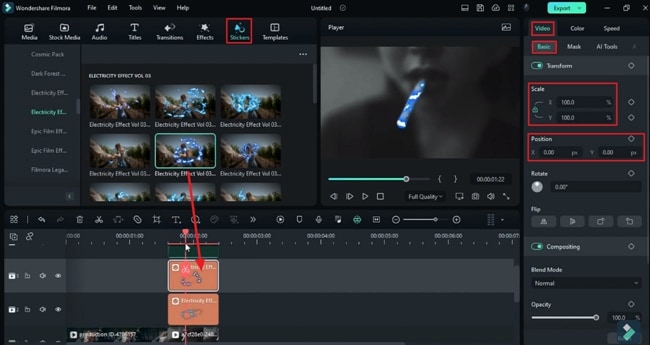
Duplicate the same media layer on another track and go to the "AI Tools" settings as mentioned above. Enter the "Smart Cutout" to enable the "Invert Mask" option from the top of the newly opened window and hit “Save.”
Further, navigate to the "Stickers" tab in the editing interface and select any two desired stickers from the “Electricity” section. Bring them on two separate tracks. To apply them on the masked area, go to the settings by selecting these effects one by one and adjust the "Scale" and "Position" on "X" and "Y." Now, playback to see the final results and the first effect will be created.
Start Creating the Second Effect
To apply another effect, drop another footage on the timeline and split this clip if required. Create the zoom-in and zoom-out effect from the bar available on the timeline's toolbar on the split part and lock the changes by adding "Transform" keyframes.
Select the last part of this clip on which you want to apply the effect and head to the "Video" tab. Then select the "AI Tools" section, find "Smart Cutout," and enable it as explained above.
From the new window, track the object with the "Smart Brush" tool and hit the start button for the "Tracking Processing." Wait until its completion. Head to the lower right corner of this window and hit the "Save" button. Now, duplicate the affected clip on the second and third video tracks. Select the original video track and enable the "Smart Cutout" and "Invert" the mask as you did for the first effect.
Color Adjustments in Effect
To create the effect, select the second and third video layers and go to the "Colors" tab from the settings window. Change these video layers into black and white.
Select the second layer and remove the masked area by selecting the "Eraser" tool. Keep the mask on the burning object. Hit “Save” and move to the timeline.
Select the first video layer, go to the "Transition" tab, and choose the desired transition on the split ends for smooth playback. To remove the effects at the end of the clip, place your playhead at the end, go to the "Effects" settings, and choose "None" from the "Preset" section.
Apply the First Effect on the Masked Area
Bring the footage to the timeline on the second track, select a point by placing the playhead, and take a snapshot of this point to apply the effect. Now, choose the clip and move the snapshot out of the screen by changing the "Position" on "X" and "Y" from the right panel. Add a keyframe at this point to lock the settings./p>
Keep the playhead at the point of the clip where you want to reveal the snapshot. Change the “Position” to bring it back. Again, add the keyframe at this point by moving to the right panel after turning on the “Transform” button.
Create the Effect with a Smart Cutout
Head to the next step, duplicate this clip on the above layer and delete the keyframes. Now go to the "AI Tools" under the "Video" tab and select "Smart Cutout." After entering the newly opened window, select the brush tool from the top toolbar to draw the mask around the subject and start the cutout.
Position Adjustment of Different Video Layers
Keep on creating the video layers for a few more tracks and adjust the "Position" of the subject in each layer from the settings by enabling the "Transform" keyframe at each position. Similarly, adjust the "Scale" of the subject for each video track. Don't forget to add a keyframe at each setting.
Remove all the video keyframes near the end of the clip. Drop the main clip at the first track and match the point of the first effect with the same point of the video. Playback and check the final results.
Adding The Fourth Effect
Place the snapshot of your clip on the second track and look for the "AI Tools" in the settings. Do the "Smart Cutout," as explained in the above steps, to track the object on which the effect will be applied. Add the "Transform" keyframe at the start, and you can change the "Position" and "Rotation" of the tracked subject to create the effect.

Add keyframes at each changing point after resetting it. Place your original footage on the below track to apply the created effect. Now, hit playback and check what you have created.
Work On The Fifth Effect
Furthermore, to create the fifth type of effect, place your footage on the timeline track and split it at the desired point into desired parts. Select the first split part and look for an effect in the "Effects" menu, select it, and drop it over that clip on the timeline.
Apply Multiple Effects
Select the clip and head to the "Effects" section from the right panel. Look for the "Percentage" and change it at different points by placing the playhead at those points. Keep the "Percentage" zero at the end and at the beginning. Additionally, apply more "Effects" on the above tracks and save them.
Implementing The Sixth Effect
After placing the footage on the timeline, select a point in the video, go to the settings, and enter the "AI Tools." Draw the mask on the desired area from the "Smart Cutout," as you did in the above effects. Track the object with a brush and "Save" the tracking.
Create a zoom-in and zoom-out effect for this object. To achieve this effect, go to the settings window and enter the "Basic" and "Video" settings. Adjust this object's "Position" and "Scale" and apply the keyframe at each adjusted point.
Apply the "Transitions" at each starting and end point of the clips to keep them in a single video. Playback to see the results of applied transitions.
Making someone stop and wonder how efficiently this work has been done is the real achievement you all need in your content creation. Adding multiple effects in a single video is difficult, but we have provided you with a guide to achieve this for your smoke effect videos. Different effects have been explained to make the video more captivating.


