If you’ve ever scrolled through TikTok, YouTube Shorts, or Instagram Reels, you’ve probably noticed that a ton of viral videos started as Twitch clips. It's not a surprise though, because this go-to streaming platform for content creators is packed with epic moments—from hilarious fails to jaw-dropping wins—that are just begging to be saved.
So, if you’re looking into downloading clips from Twitch to relive epic highlights or saving Twitch clips to share with friends on other platforms, you’ve come to the right place!
In this guide, we’ll show you easy and effective methods to download Twitch videos and clips, so you can preserve your favorite moments and share them across your social media feeds.
In this article
Part 1. Downloading Twitch Clips Directly with Online Tools
Without further ado, let's dive right away into the easiest and probably the quickest way to saving Twitch clips—using online tools. Online Twitch clip savers are designed to do one thing: help you grab your favorite clips in just a few clicks.
Platforms like Clipr, Stream Charts, Clipsey, and Untwitch make it super simple to download Twitch clips directly. All you need is the link to the clip you want, and you’re good to go! To give you an idea of how these tools work, let’s use Clipr as an example and break down the steps for downloading clips from Twitch. Follow this simple guide to get started:
Step 1. Copy the clip link
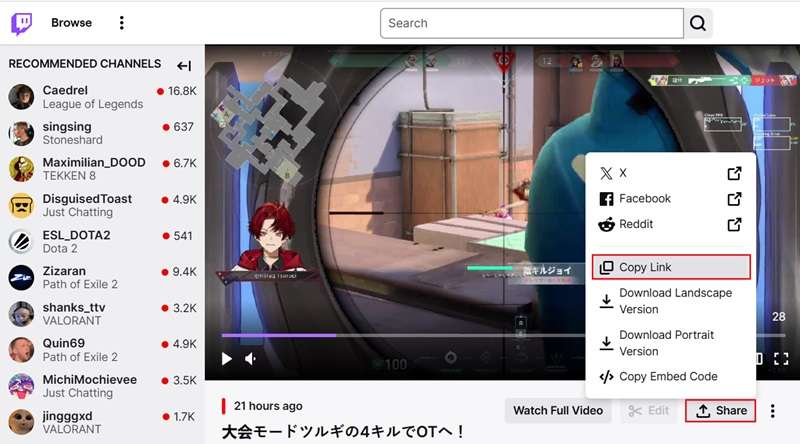
First, head over to Twitch and find the clip you want to download. Once you’ve got it, click the Share button (usually a little arrow icon) below the video. A popup will appear—click “Copy Link” to grab the clip's URL.
Step 2. Visit Clipr and paste the link
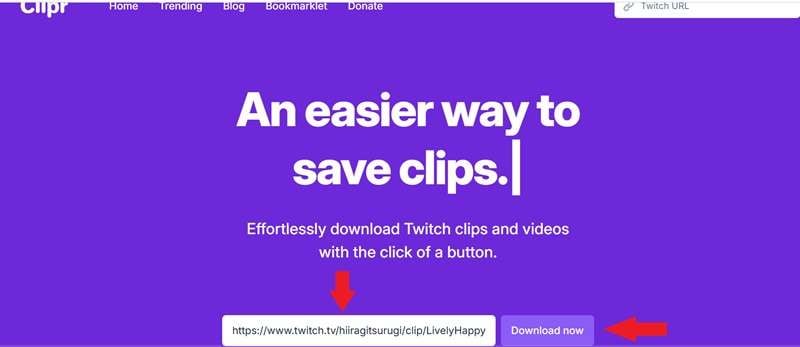
Open your web browser and go to Clipr. On the Clipr homepage, you’ll see a big text box. Paste the Twitch clip URL you copied earlier into this box and click the "Download Now" button.
Step 3. Choose your download option
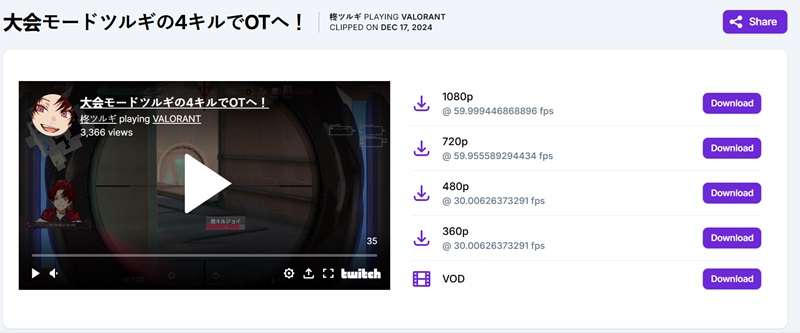
After processing, Clipr will display different download options, like video quality or file size. Pick the one that works best for you.
Step 4. Download clips
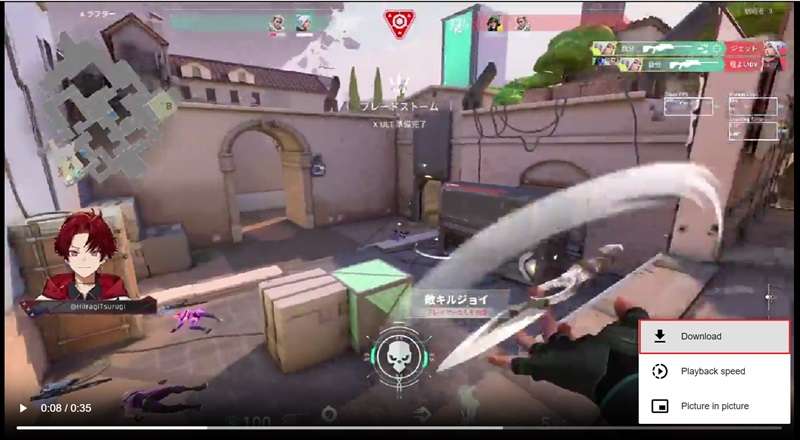
If you click the Download button, you will see the preview of the video quality that you choose. Then, click the triple dot on the bottom-right of your screen to see more options. Click “Download” once again and the clip will save to your device. From here, you can watch, share, or edit it however you like!
Part 2. Using Browser Extensions to Download Twitch Videos
As you can see, downloading videos from Twitch with online tools is quick, free, and super easy. But if that’s not your style, don’t worry! Another simple option is using browser extensions. These tools work right in your web browser, making it even easier to save Twitch clips.
One of the most popular options is Video DownloadHelper, available for both Chrome and Firefox. This extension is perfect for downloading not just Twitch clips but videos from other platforms too. It’s like having a built-in downloader right at your fingertips! To learn how to download clips from Twitch using this browser extension, follow this step-by-step guide:
Step 1. Install the extension
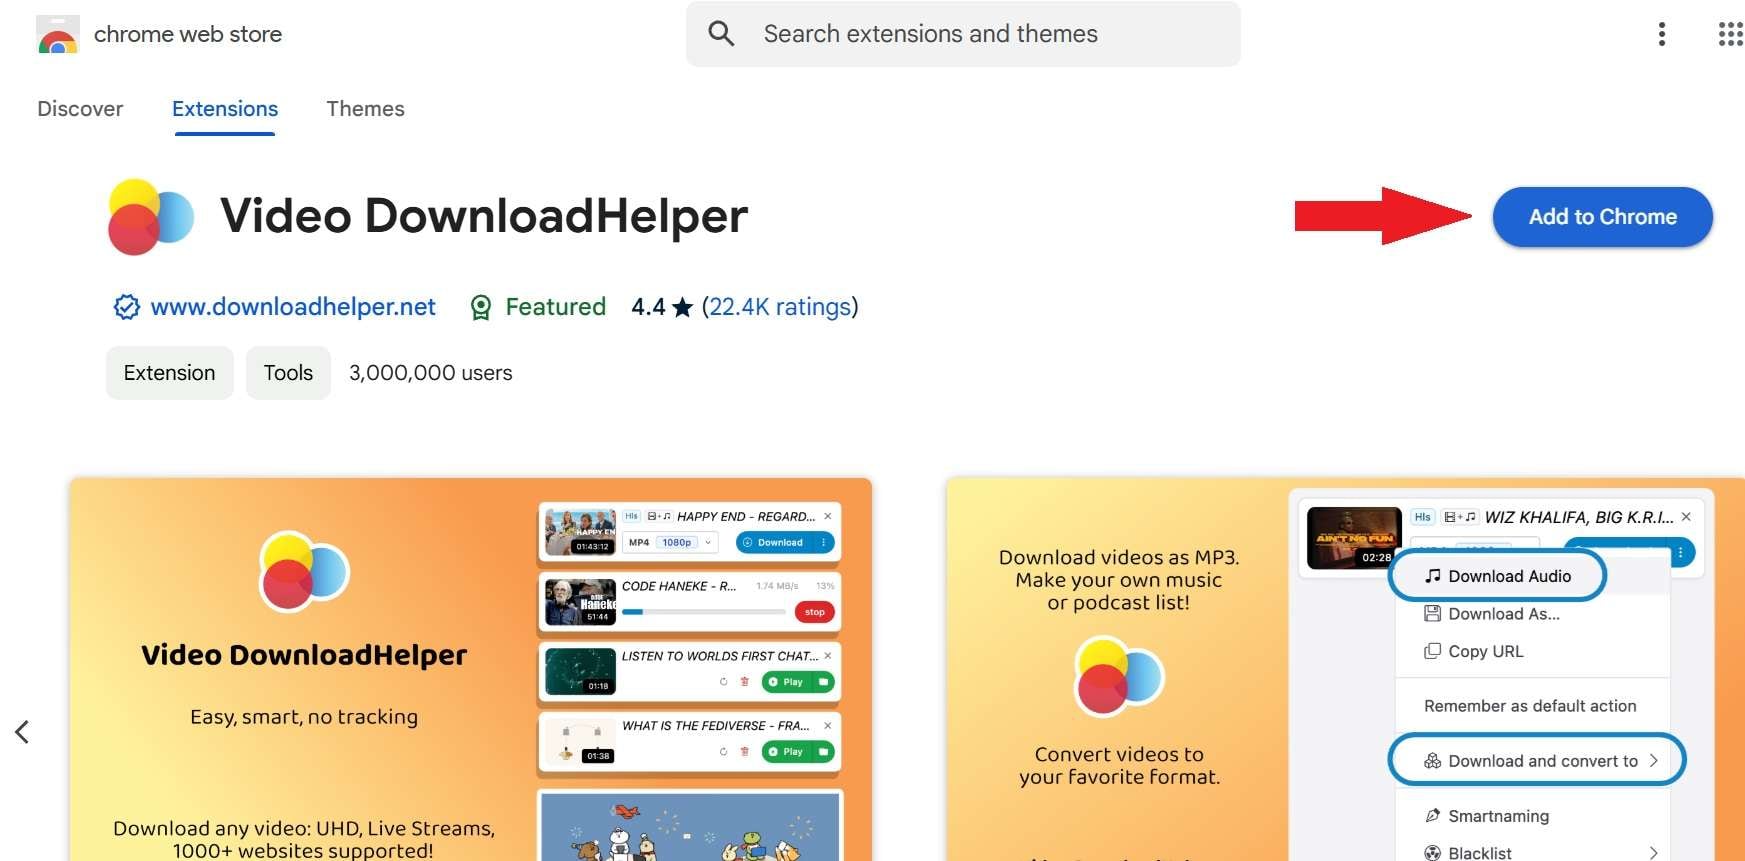
First, you need to add the Video DownloadHelper extension to your browser.
- If you’re using Chrome, find the Video Downloadhelper on the Chrome Web Store.
- If you’re using Firefox, find the Video Downloadhelper on the Firefox Add-ons page.
Click the “Add to Chrome” or “Add to Firefox” button and follow the prompts to install it. Once the installation is complete, you’ll see the DownloadHelper icon (three circles) in your browser toolbar.
Step 2. Play the Twitch clip and use Video DownloadHelper
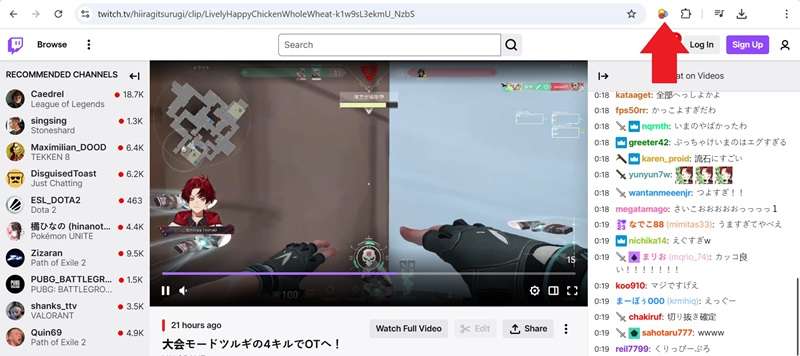
Go to Twitch and find the clip you want to download. Play the clip so the extension can detect it. Then, click on the Video DownloadHelper icon in your browser toolbar. It will show a list of videos it detects on the page.
Step 3. Download the clip
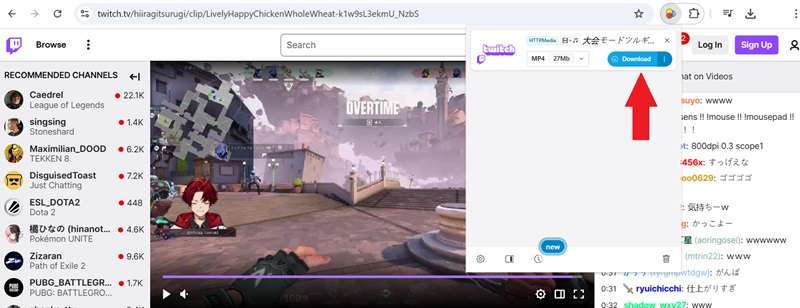
Select the Twitch clip from the list, choose your preferred quality, and hit “Download”. The clip will save to your computer, ready to be shared or watched later!
Part 3. Enhance Your Saved Twitch Clips with a Powerful Video Editor
Alright, so you’ve saved your Twitch clips—great start! But if you really want to impress people and boost your chances of going viral, editing is where the magic happens. A little polish can make your clips more fun, engaging, and totally share-worthy.
For this, you need a reliable video editor that's easy to use but still packed with features, and Wondershare Filmora is the perfect choice! You don’t need to be a pro to use it. Filmora makes editing simple and fun for everyone.
Here’s why Filmora stands out:
- Advanced AI Features: Filmora uses AI to make editing faster and smarter. From auto-cropping to AI-driven effects, it takes the hard work out of editing.
- Complete Editing Toolkit: From trimming and cutting to adding transitions, filters, and effects, Filmora has everything you need to create eye-catching clips.
- Perfect for Short-form Content: Filmora’s Smart Short Clips feature is designed to create attention-grabbing content for TikTok, Instagram Reels, or YouTube Shorts.
- Caption and Translation Tools: Add captions effortlessly with Automatic Caption and even translate them instantly using the AI Translation feature.
- Easy Sharing: When you’re done, you can share your edited clips directly to platforms like YouTube, TikTok, or Vimeo without any extra steps.
On top of that, Filmora offers all these amazing features at a price that won’t break the bank! With flexible pricing plans and even a free trial, you can test it out before deciding to buy or subscribe.
So, what are you waiting for? Let’s start editing your downloaded Twitch clips with Filmora today! Follow this simple guide to get started:
Step 1. Open Filmora and access the Smart Short Clips feature
Make sure you have the latest version of Filmora installed. If you haven’t already, download and set it up. Once you open Filmora, look under "New Project" in the feature list, and you’ll find the Smart Short Clips option.
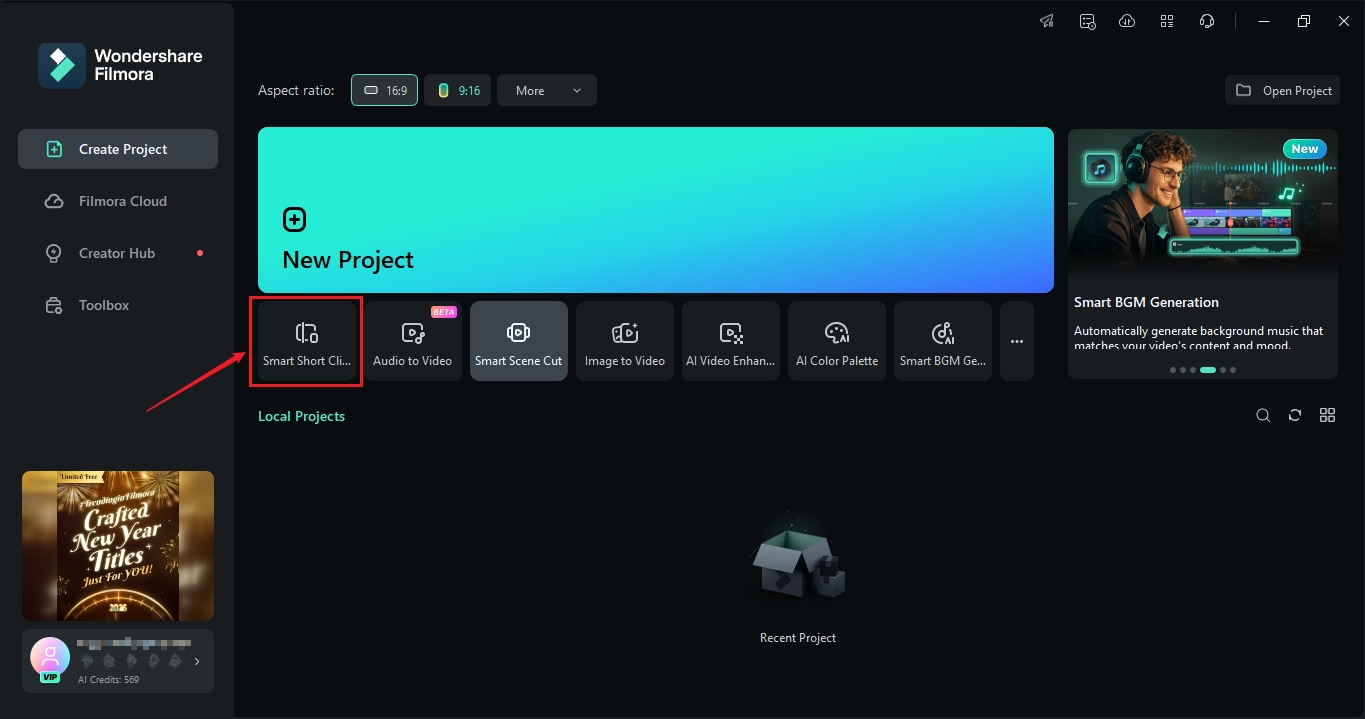
Step 2. Upload your video
Next, import your downloaded Twitch clips by clicking the Filmora icon.
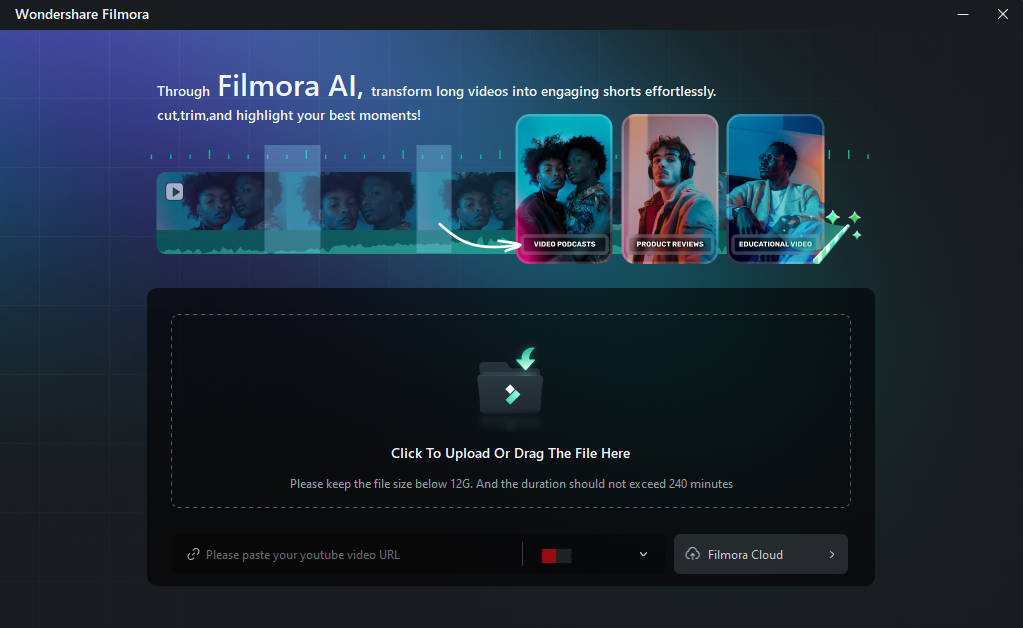
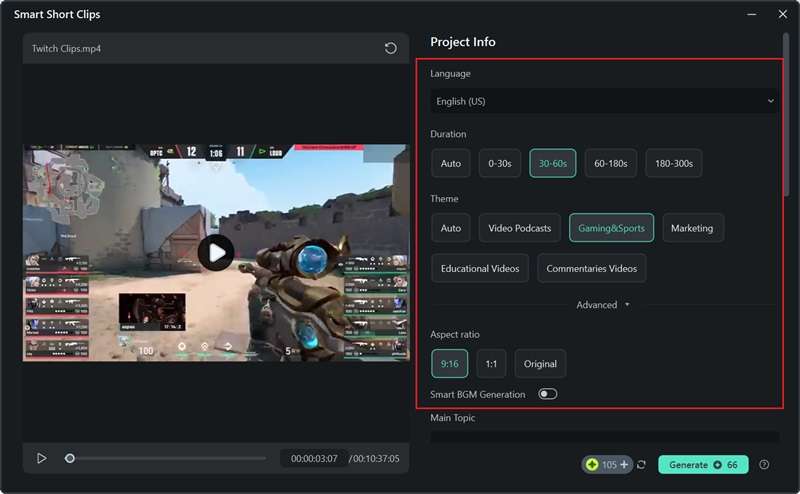
Step 3. Change parameter settings and generate a short video
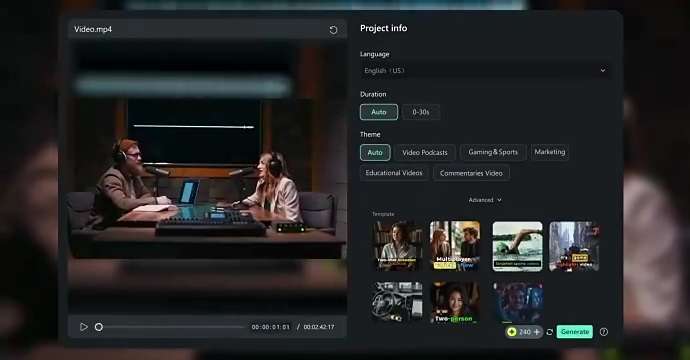
Then, pick the original language of your clip. If you’re not cool with the default settings, you can tweak the Duration and Themes to match your style. You can also select your preferred aspect ratio and turn on Smart BGM Generation to automatically add music that perfectly fits your content.
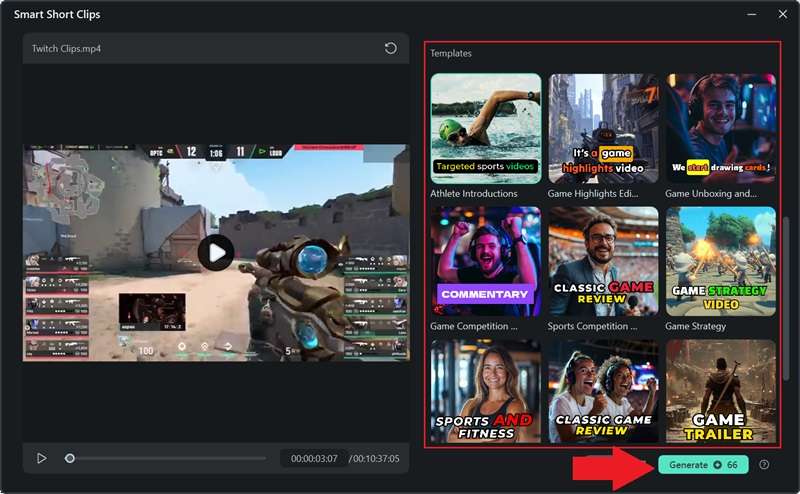
Scroll down to explore a variety of high-quality short video templates. Once everything fits your criteria, click "Generate" to continue.
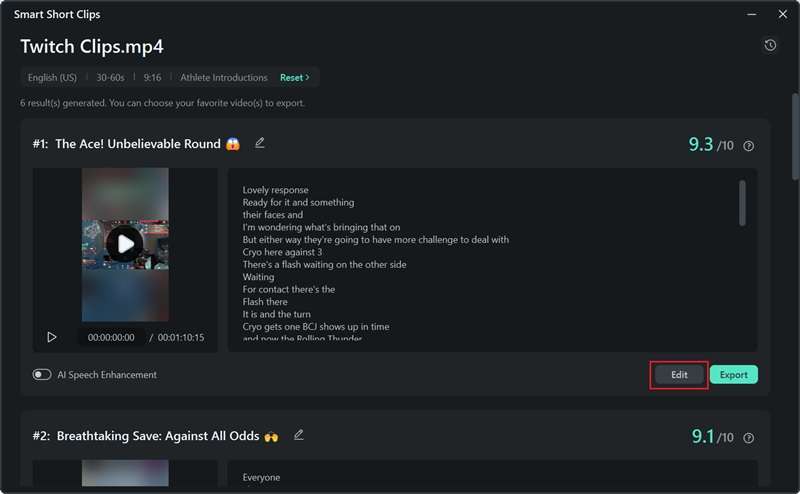
Using your uploaded video and selected settings, the system will create a few options and even rate them based on platform guidelines. Pick your favorite clip and hit "Edit" if you want to make more tweaks!
Step 4. Edit caption
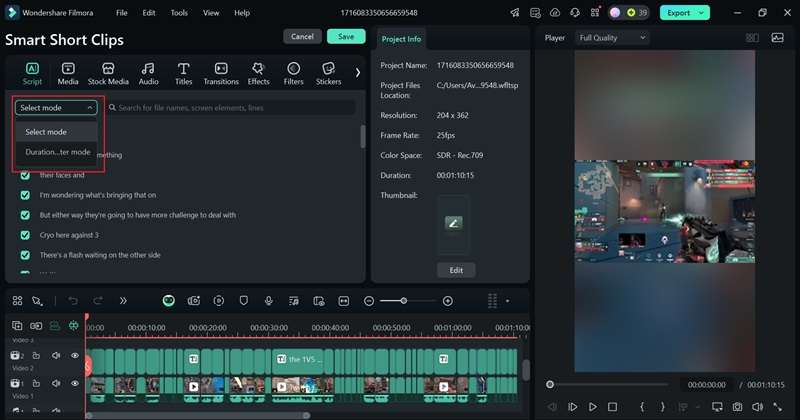
Now you're in the editing panel for Smart Short Clips. In this panel, you can customize captions by showing or hiding them in “Select Mode”, or view and edit the script by timecode in “Duration Filter Mode” for more precise control.
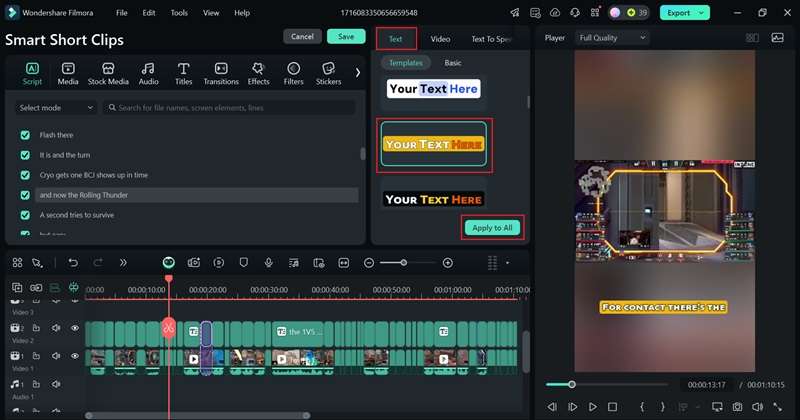
To match the text to your video’s theme, navigate to the Text tab, choose a font style, and apply it to the entire video by clicking "Apply to All".
Step 5. Enhanced your clips
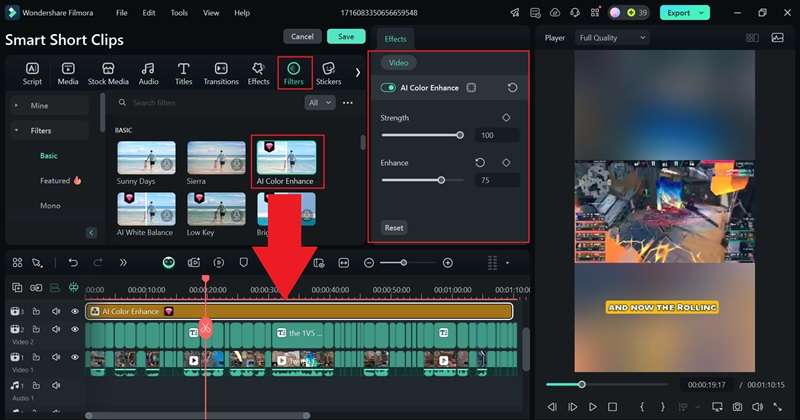
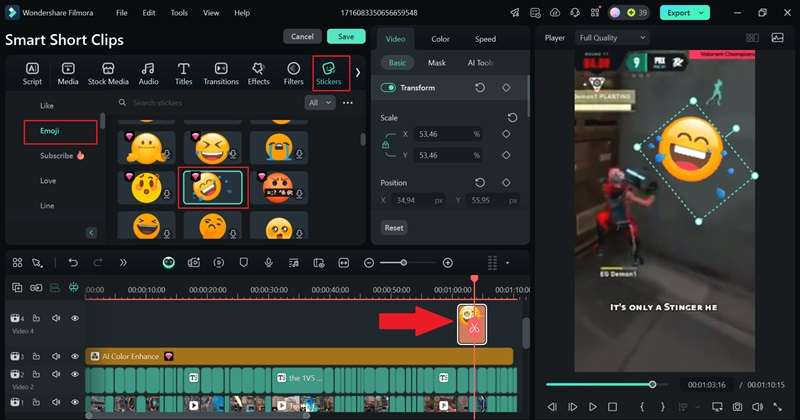
Make your clips look more interesting by adding filters and animated stickers. To add a filter, head over to the "Filters" tab, pick an effect you like, and drag it onto the timeline to apply it to your entire video. You can also use the strength of the filter in the property panel on the right.
You can also use animated stickers to highlight key moments in your clips, like a funny scene or an epic moment. Just go to the "Stickers" tab, find a sticker that matches the vibe of the moment, and drag it onto the timeline. Then, adjust its position so it blends naturally with the video.
Step 6. Save and share your clips
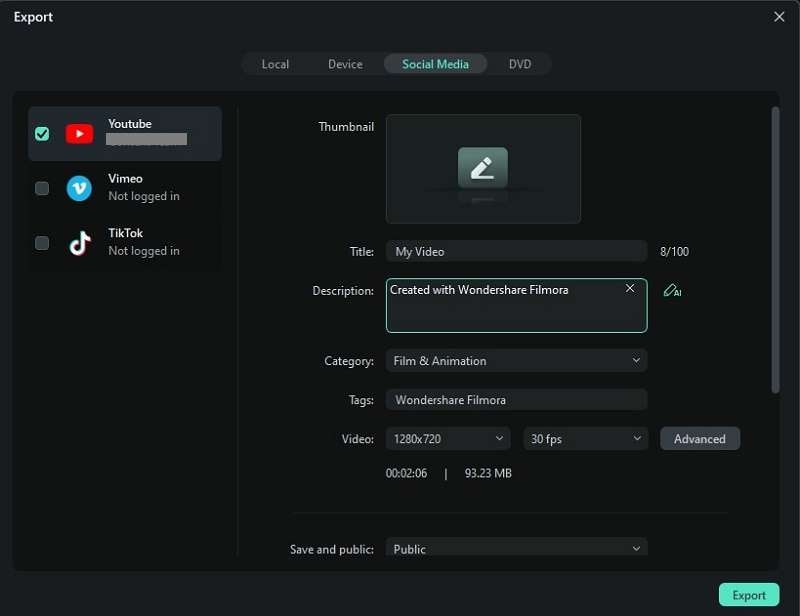
Once you’re happy with your video, open the “Export” window. Select “Social Media” and choose the platform you want to upload to, like YouTube, Vimeo, or TikTok, and customize the settings. You can update the title, description, category, resolution, and more to get it ready for sharing.
Conclusion
Since many viral videos begin as Twitch clips, learning how to download and save these moments is a must for content creators. So, this guide covers two simple methods: using online tools and browser extensions to save Twitch clips.
But downloading clips from Twitch is just the first step. To boost their chances of going viral, it’s important to edit them using a reliable video editor like Wondershare Filmora. With its AI Smart Short Clips feature, Filmora automatically shortens your Twitch clips by highlighting the best parts and even adds captions for you.
Plus, with its wide range of powerful editing tools, you can fine-tune your clips to make them perfect for sharing on TikTok, Instagram Reels, or YouTube Shorts.


 100% Security Verified | No Subscription Required | No Malware

