Suppose that you have just ended a Zoom meeting, webinar, or online class, and the recording is saved on your computer. Before you share these, you may want to edit out unwanted segments, awkward silences, or prep the audio and video for a more enjoyable viewing process. The problem is that Zoom does not include editing features and only provides the option of recording sessions.
To polish your recordings, you will need to use third-party software that will simplify the recording or editing process. In this paper, we will discuss some of the most convenient suggestions of how to edit a Zoom recording.
In this article
Part 1. How to Record on Zoom?
Zoom allows recording conversations easily to store them, as it comes with an in-built recording feature for meetings. Using this feature, you can record audio and video at the same time. The facility comes in handy in recapping on the meeting contents afterward or sharing the sessions with others who had not attended the meeting. The steps below will help you learn how to record a Zoom meeting before you learn how to edit a Zoom recording:
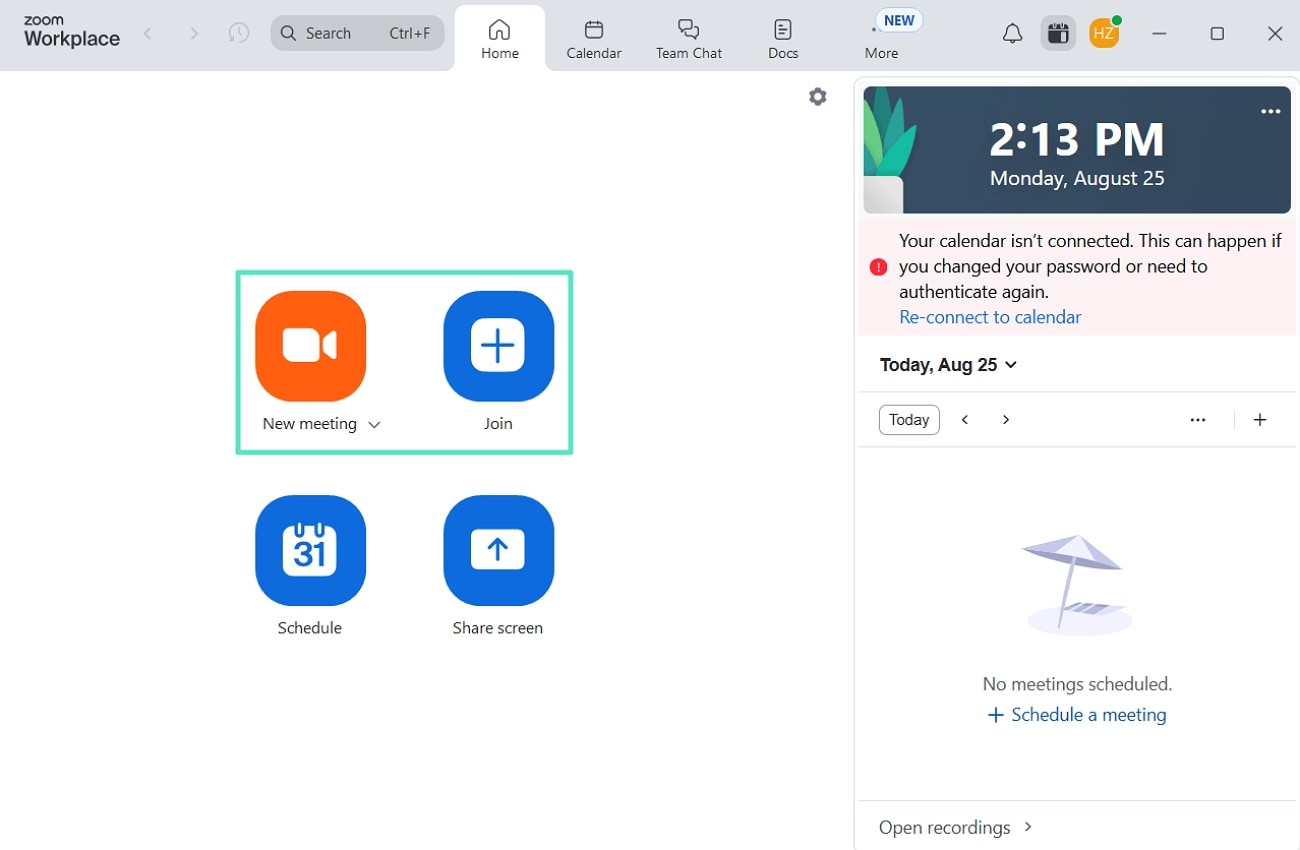
- Step 1. Start by clicking "New meeting" or "Join" to get into a meeting on Zoom.
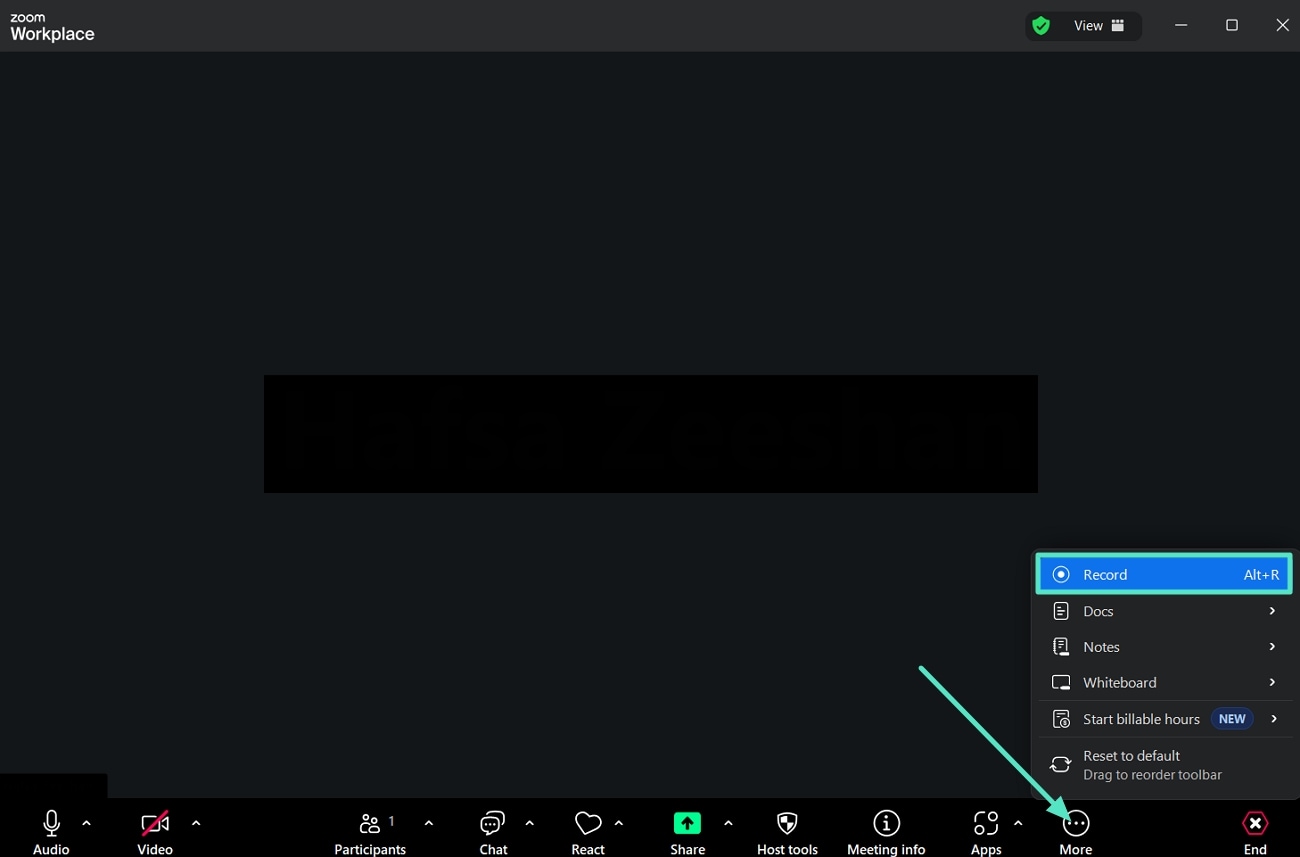
- Step 2. Select the "More" option and hit the "Record" button to start recording the ongoing meeting on Zoom.
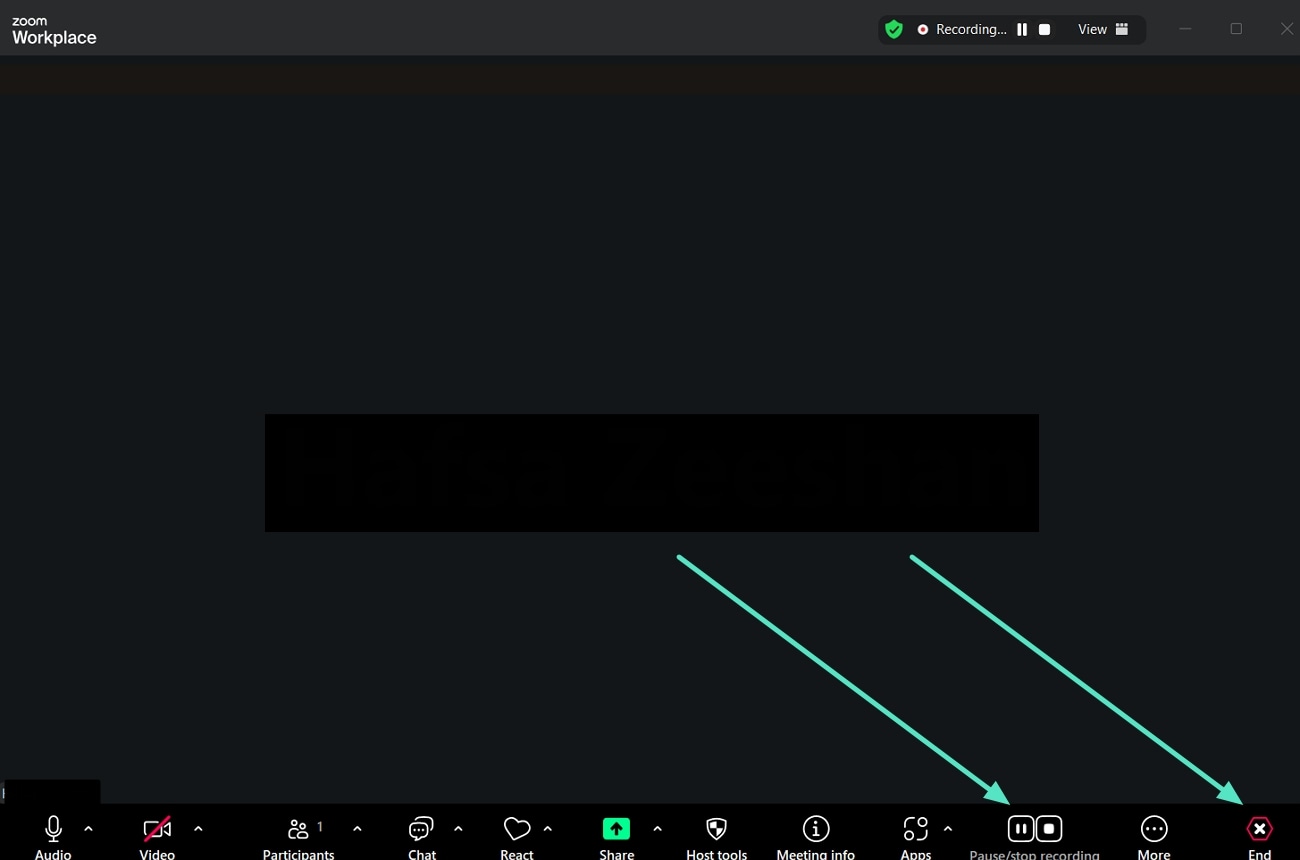
- Step 3. Hit the "Pause/Stop Recording" option to stop recording the meeting, and proceed to hit the "End" button.
- Step 4. Select the "End Meeting for All" option to leave the meeting and allow Zoom to start converting the MP3 and MP4 recorded data automatically.
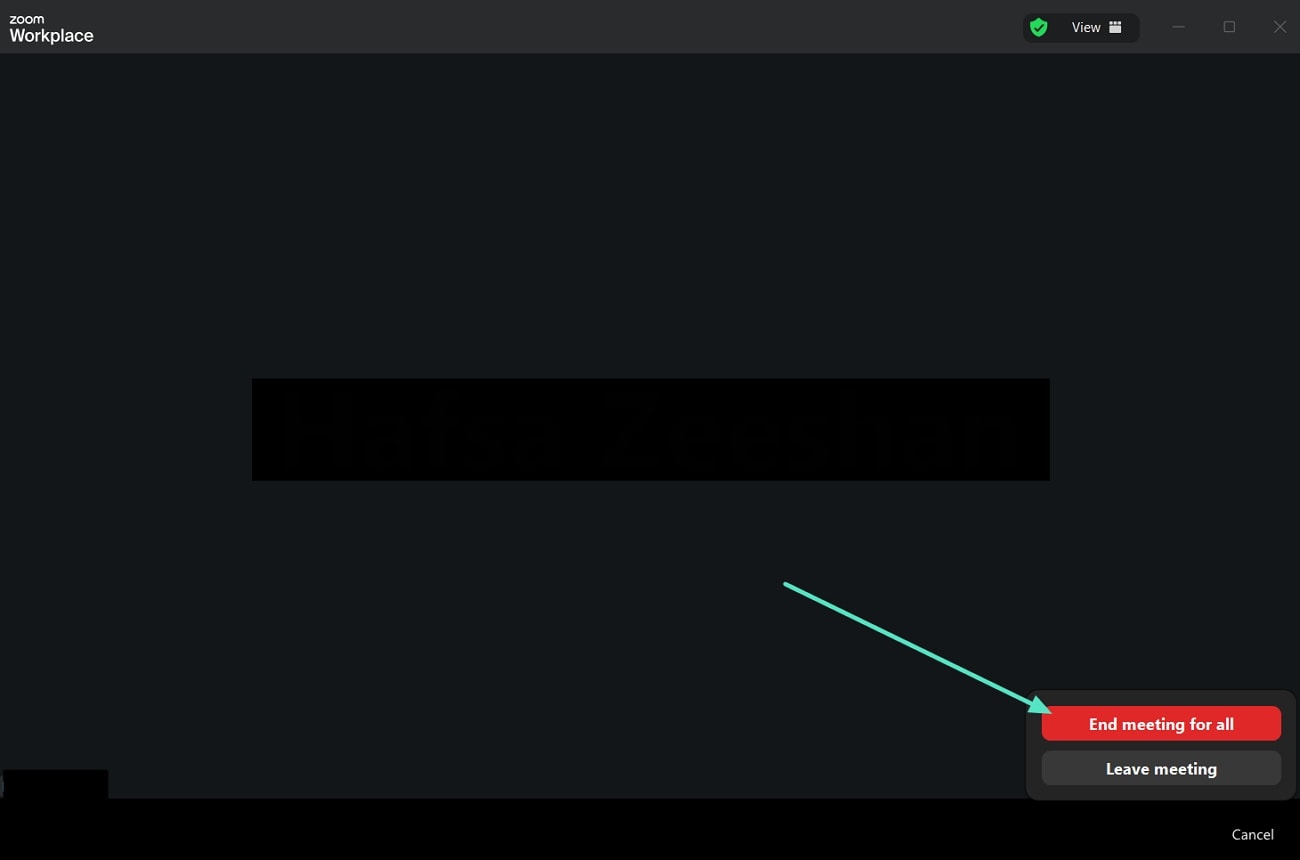
- Step 5. Finally, access your File Explorer to locate the saved audio and video files of the meeting recorded through Zoom.

Part 2. Tips on How to Edit a Zoom Recording
Before you jump into learning the ways to edit Zoom recordings, it is important that you be aware of some of the tips to keep in mind as you edit those videos. The tips mentioned below will help you make sure you edit the Zoom meeting in an accurate way, which leaves you with professional results:
- Delete Unnecessary Sections: Eliminate the uncomfortable silences, delays, or any extra conversations and segments to make the video more entertaining. This will ensure the attention of your audience is exactly where it should be.
- Improve Sound: You should make sure the recording has a clean background and reduce any noise. Good sound guarantees that the audience does not have to struggle to understand the conversation.
- Add Headings or Subtitles: You may also be able to make your content more accessible to those with hearing loss or non-native speakers. It is better as it allows you to engage the viewers even without adding any sound.
- Blur Sensitive Information: When your meetings include sensitive information shared on screen, you must make sure that you blur it out. This guarantees privacy and ensures you can share your content.
- Improve Video Quality: You will have to change the brightness, contrast, and sharpness to enhance the visuals. When you edit a Zoom recording, it is preferable to see it clear and clean as opposed to appearing more professional.
- Export in the Appropriate Format: Select a correct file type with proper resolution, depending on where you will be uploading them. An optimized export format allows more fluent playback on any device and platform.
Part 3. Best Third-Party Tool to Record and Edit Zoom Video - Wondershare Filmora
Suppose that you have completed a Zoom meeting, which you have to share with the other members of the meeting. You realize that the recording has a few issues that need to be amended. The issue, as addressed above, is the lack of editing options, resulting in a time-consuming process to switch between applications for recording and editing. This is where Wondershare Filmora will act as the best all-in-one package.
You can merge or split your camera screen according to your ease and also utilize the aspect ratio presets suitable for the platform you are recording on. It allows you to create dynamic captions in various languages, which will help make your Zoom recordings more inclusive and professional.
Walkthrough Guide on How to Record Zoom Meeting using Filmora Desktop
Here are the steps you need to follow to get a better understanding of how Filmora allows you to record and then edit Zoom recordings:
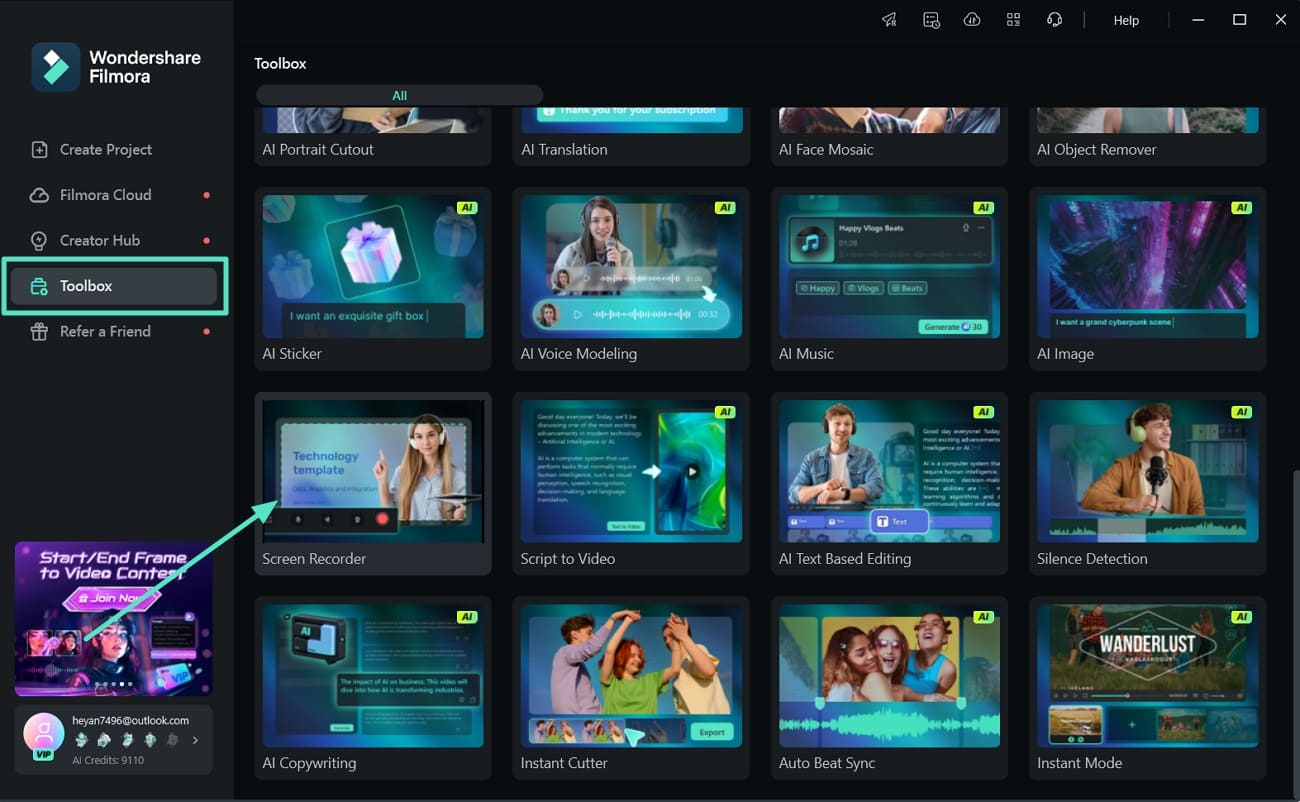
- Step 1. Access Filmora More Tools to Pick Screen Recorder. Open the latest version of Wondershare Filmora to begin the process. Then, navigate to the "Toolbox" tab and pick the "Screen Recorder" tool.
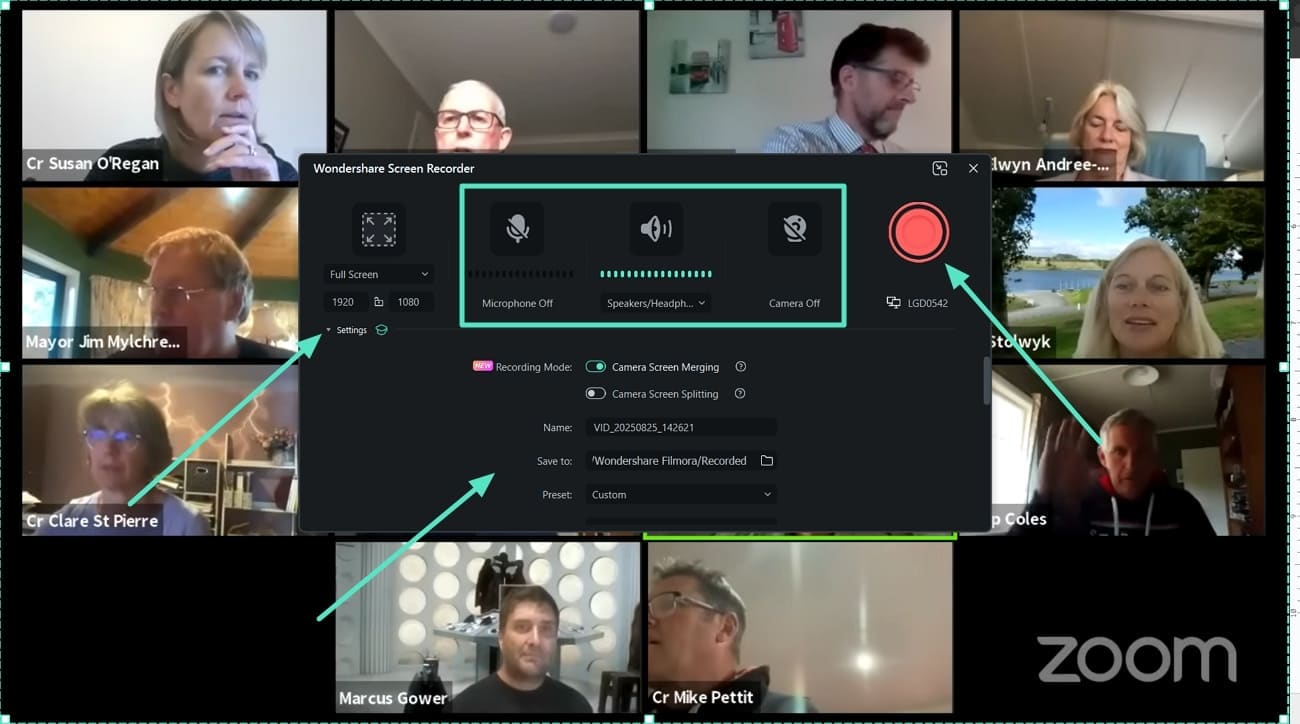
- Step 2. Adjust Settings and Start Recording Zoom Meeting. Move to your Zoom meeting, and the Filmora Screen Recorder pop-up will appear. On this tab, define the "Settings" and turn on or off the "Microphone," "Speakers," and "Camera" icons to start recording using the "Red" button.
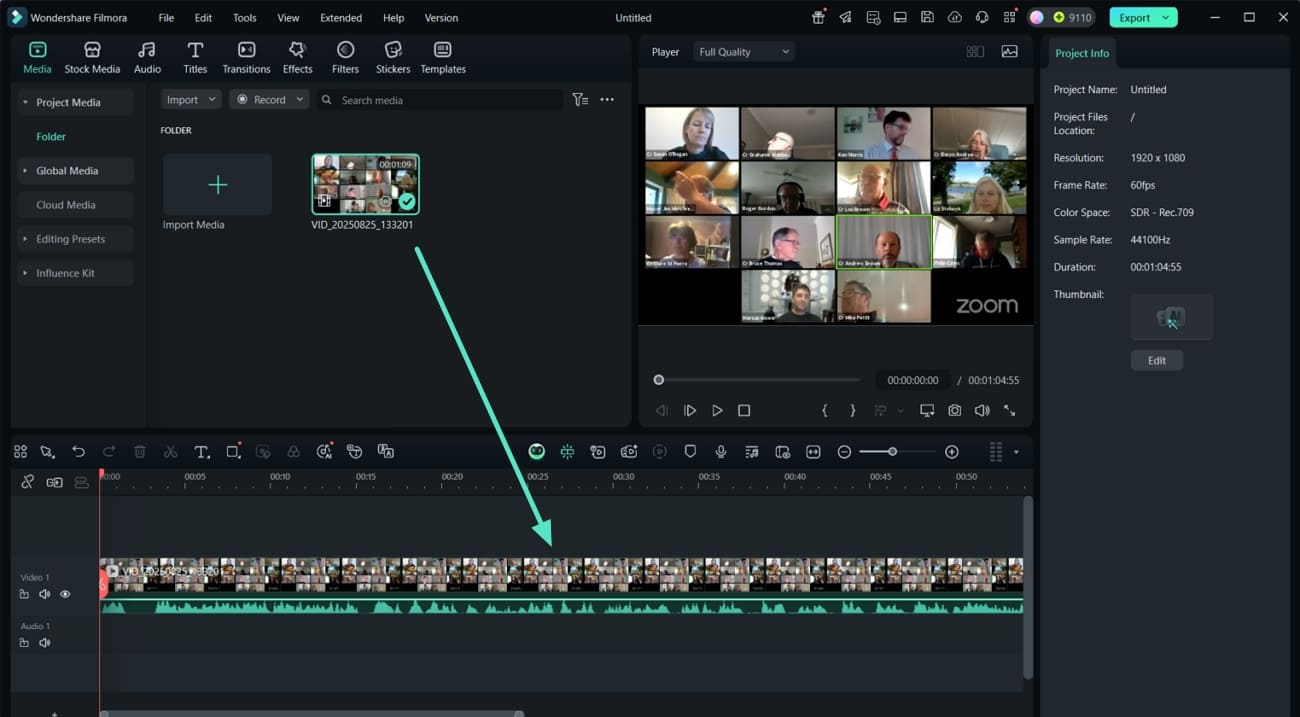
- Step 3. Add Recorded Video to the Editing Interface Timeline. Once the recording is complete, you are shifted to the editing interface where you need to drag the recording to the timeline.
Stepwise Guide on How to Edit a Recorded Zoom Meeting Through Filmora Desktop
Now that you are aware of how to record a Zoom meeting, here are the steps you need to carry out to learn how to edit a Zoom recording:
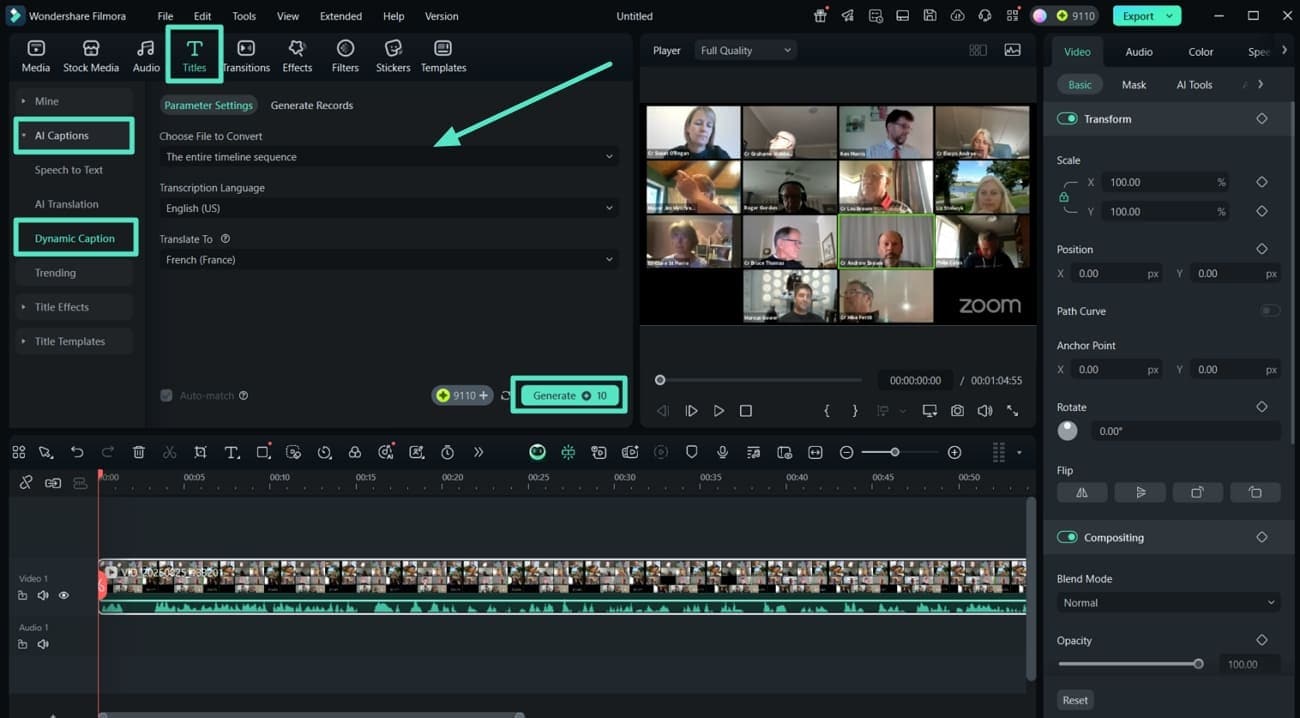
- Step 1. Generate Dynamic Captions for the Zoom Meeting. Access the "Titles" section from the top menu and locate the "Dynamic Captions" from the "AI Captions" tab. Now, pick your language preferences and hit the "Generate" button to create automated captions for the Zoom meeting.
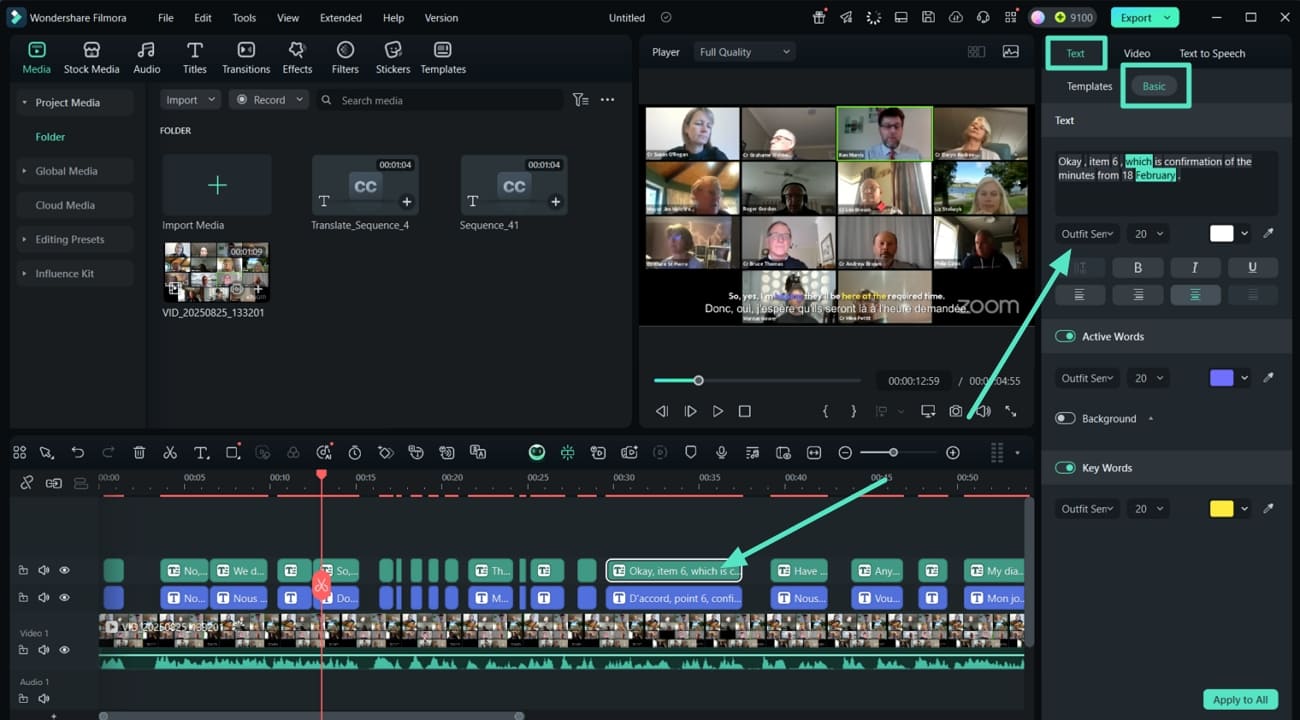
- Step 2. Edit the Zoom Meeting Dynamic Captions Properties. After the captions are generated, locate the "Text" tab by clicking on the captions in the timeline. You can edit the properties of the text to make sure they are visible and readable.
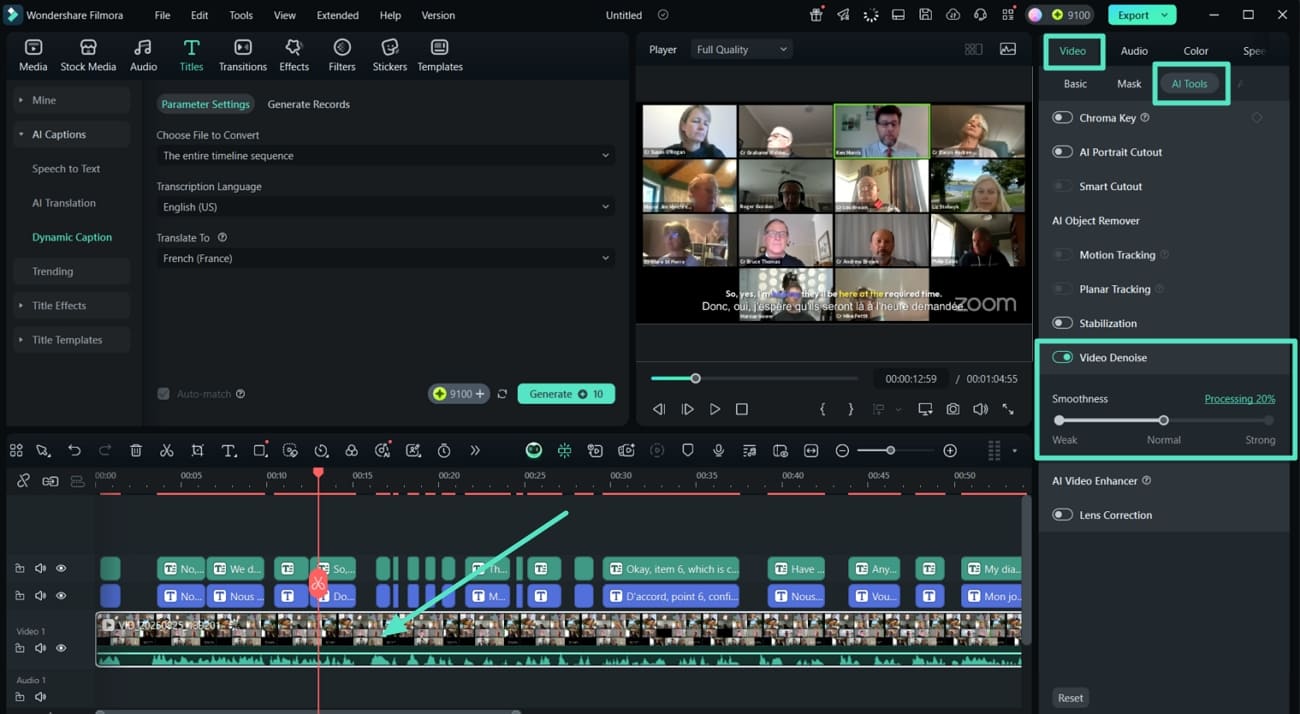
- Step 3. Enable Video Denoise Function on the Meeting Recording. Click on the video in the timeline and jump to the "Video" and "AI Tools" panel on the right side. Here locate the "Video Denoise" tab to turn on the toggle.
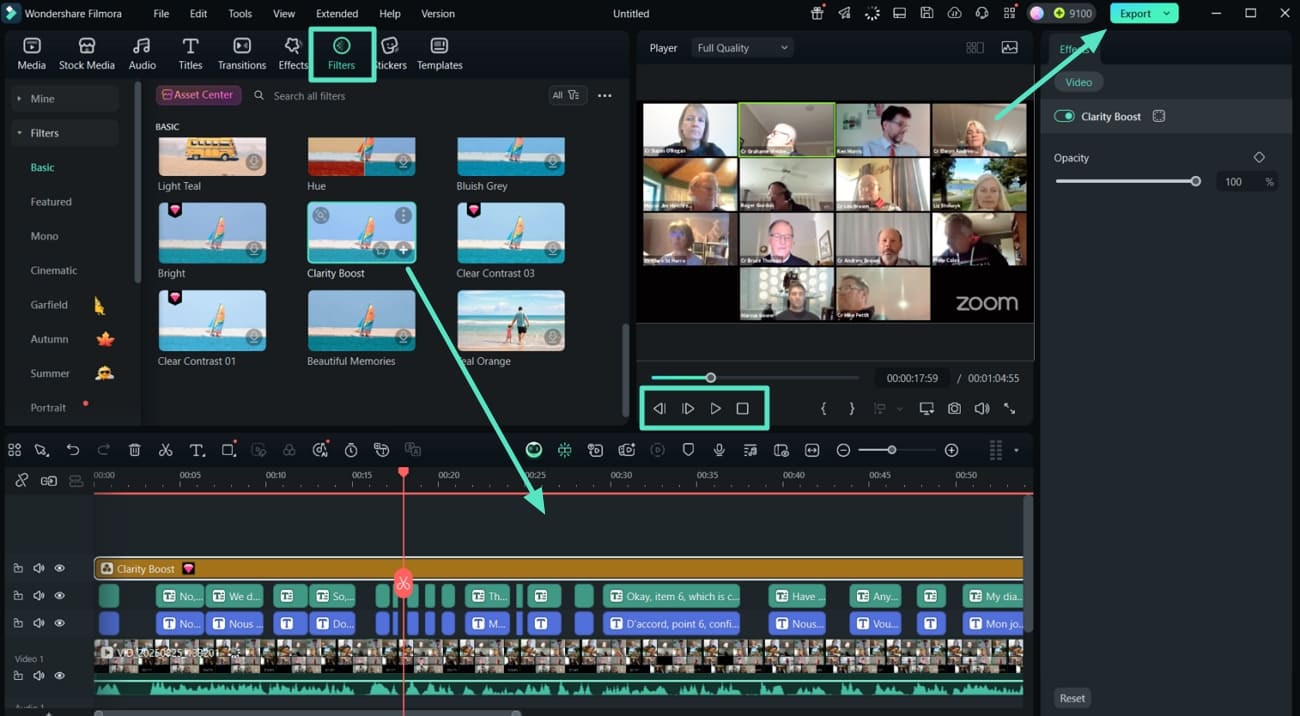
- Step 4. Apply Filters and Preview Final Results of the Recorded Zoom Meeting. Moving towards the end, apply "Filters" like "Clarity Boost" to improve the overall visual of the video. Then, "Preview" the results and hit the "Export" tab to save your video project.
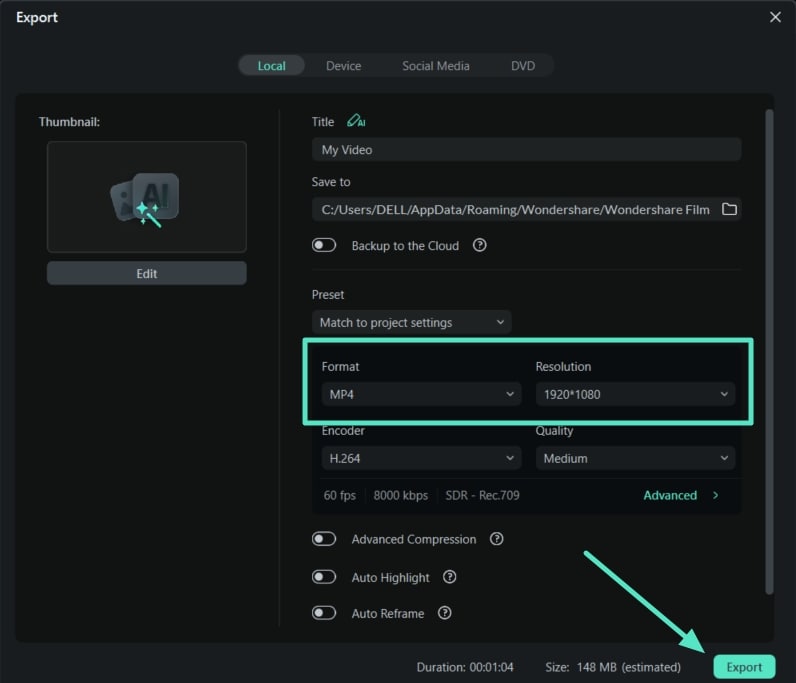
- Step 6. Set File Format and Resolution to Export Recorded Meeting. Finally, choose your "Format" and "Resolution" presets and hit the "Export" button to download the results.
Conclusion
As a final message, this article has looked into the steps of recording a Zoom meeting. We then discussed the tips you need to keep in mind as you start recording a meeting. Moreover, we have introduced you to an AI-powered third-party video editor, Wondershare Filmora, that allows you to record and edit a Zoom meeting under a single platform. By now, you've surely understood how to edit a Zoom recording with its exceptional features.


 100% Security Verified | No Subscription Required | No Malware


