How to Enhance Video Editing Performance in Filmora – 7 Secrets You Must Know About

Jul 28, 2026• Proven solutions
 TL;DR:
You can resolve timeline lag when editing demanding 2K or 4K footage in Filmora by activating GPU hardware acceleration, generating proxy files, pre-rendering effects, and lowering the playback preview resolution.
● Enabling hardware acceleration for video rendering, playback, and decoding requires a software restart to take effect and is vital if your computer lacks a recent-generation Intel i3 processor.
● Lowering playback quality between 1/2 and 1/16 resolution or generating proxy files temporarily downgrades the timeline visual quality to ensure smooth scrubbing without reducing the resolution of your final exported video.
● The Generative Enhance AI tool automatically reconstructs missing textures in compressed media or phone footage directly on the timeline, but this specific feature is optimized only for videos under three minutes in length.
Ask AI for a summary
 ChatGPT
 Perplexity
 Gemini
 Claude
 Grok
Grok
High-resolution footage like 4K can often lag if the computer you are using for editing doesn’t have enough processing power.
That’s why you should strive to eliminate all factors that can slow you down potentially and do everything in your power to complete a project quickly and smoothly. In this article, we are going to share with you some tips and tricks that are going to enable you to enhance video editing performance in Filmora.
Unlocking the Secrets of Enhancing Video Editing Performance in Filmora

 secure download

Mastering all the video editing tricks you can use to improve the quality of the videos you create in Filmora takes time and practice. Even though learning different video editing techniques is a time-consuming task, improving video editing performance in Filmora is a routine job. Here are a few tips and tricks you can use to ensure fast and efficient workflow in Filmora.
- Secret 1: Activate the GPU Acceleration option
- Secret 2: Adjust the playback quality of video clips
- Secret 3: Create Render Previews
- Secret 4: Generate Proxy Files
- Secret 5: Shared Media Folder
- Secret 6: Copy and Paste Effects
- Secret 7: Mark Clip with Color Marks and Group
- Secret 8: Supercharge Quality with AI Video Enhancer (New)
Secret 1: Activate the GPU Acceleration option
Computer components like the processor or the graphics card determine how smooth the playback of your videos is going to be. In case the computer you are using to edit your footage doesn’t have an Intel i3 processor of the latest generation, you should enable Filmora’s hardware acceleration mode that reduces lagging during video playback to the minimum.
How to enable GPU Acceleration in Filmora?
After you create a new project, you should click on the File menu and select the Preferences option. Alternatively, you can use the Ctrl+Shift+, keyboard shortcut to bring up the Preferences window.
Afterward, you should click on the Performance tab, and then make sure that the checkbox next to the Enable Hardware Acceleration for video rendering and playback is marked.
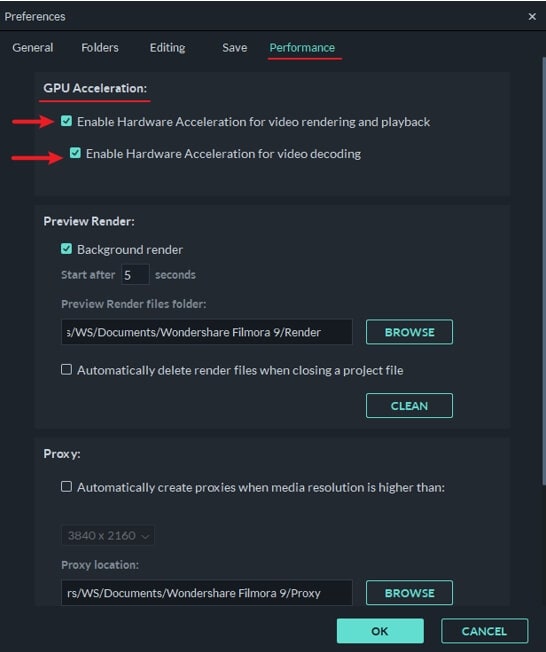
Below this option, you will also see the Enable Hardware Acceleration for video decoding setting, so just click on the checkbox next to it to activate it. These two features speed up the video rendering process, reduce the amount of time Filmora needs to decode a video and ensure smooth playback of high-resolution video files.
After you checked these two checkboxes, you should click on the OK button at the bottom of the Preferences window and proceed to restart Filmora to complete the process of enabling GPU Acceleration.
What is GPU, and Why GPU acceleration is important in video editing?
Graphics Processing Unit or GPU is a programmable logic processor that is specialized for display functions. Most inexperienced video editors fail to understand how important a graphics card is during the video editing process since it is a widely accepted opinion that CPU does all the heavy lifting.
While this is true to some degree, GPU is vital on projects that involve editing of 2K and 4K footage, as video editing software utilizes GPU to achieve better video playback performances.
GPU Acceleration is a technique that allows a computer’s GPU to reduce the strain that demanding video editing applications put on CPU and improves the speed and efficiency of these applications. The GPU Acceleration technique is frequently used in video editing, as it reduces the amount of time that is required to render high-resolution footage. That is why it is so important to add a powerful GPU to your computer’s CPU if you are planning to edit 2K or 4K videos in Filmora frequently.
You may also like: Best Graphic Card for 4K Gaming
Secret 2: Adjust the playback quality of video clips
Even though Filmora allows you to set the resolutions of your projects to 4K and manipulate the videos captured in these resolutions, its preview window can’t display all the information these files contain. Reducing the quality of the videos shown in the preview window makes their playback smoother and increases your efficiency during the video editing process.
How to Change Playback Quality in Filmora?
Altering the playback quality of a video clip in Filmora is simple since you just need to click on the Preview quality and display settings icon located below the preview window. After you click on this icon that looks like a computer monitor, you should expand the Playback Quality menu.
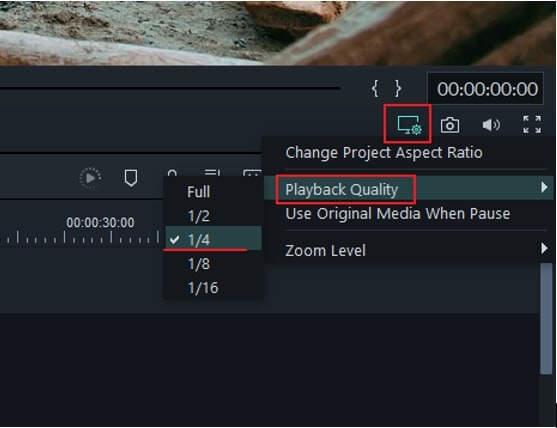
The Full option is going to be selected by default, which means that Filmora displays all video clips you place on the timeline in their full resolutions. So, if you are editing the 1080p footage, the editor is going to display the videos in 1920x1080 resolution.
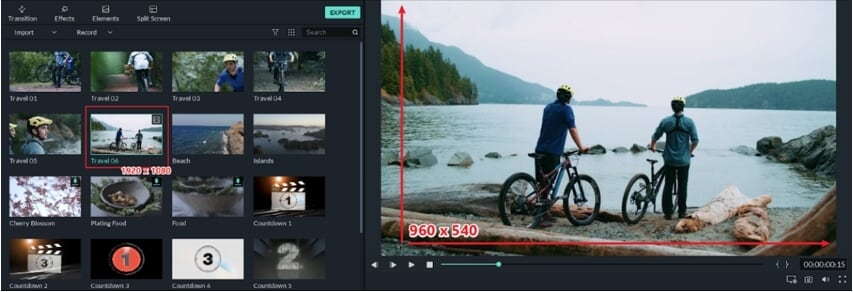
Selecting ½ option from the Playback Quality menu will reduce the resolution in which videos are displayed by half, and the image you will see on the screen is going to be in 960x540 resolution. Selecting the ¼ option will bring down the resolution of a 1080p video to 480x270 pixels, while the 1/8 option shrinks the resolution of that video clip to 240x135 pixels.
Choosing the 1/16 option from the Playback Quality menu can be useful if you are working with DCI 4K footage and you want to reduce their resolution from 4096x2160 to 256x136 pixels.
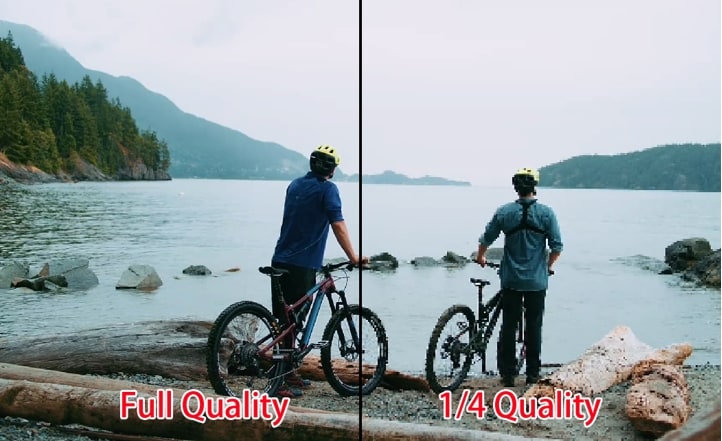
These changes only affect the resolution of the videos displayed in Filmora’s preview window and they do not impact the resolution of the video file you export from the editor.
Check out more details about How to change video resolution.
Secret 3: Create Render Previews
Applying transitions or visual effects to a video clip can produce lagging during playback or freeze the clip entirely. The Render Preview option resolves this issue by creating previews of frames in a video and ensuring a smooth playback.
In case you are experiencing such difficulties you should select a video clip and click on the Render Preview icon located on the right side of Filmora’s toolbar. Optionally you can choose a clip to which you applied a transition or a visual effect and press Enter on your keyboard to start creating render previews.
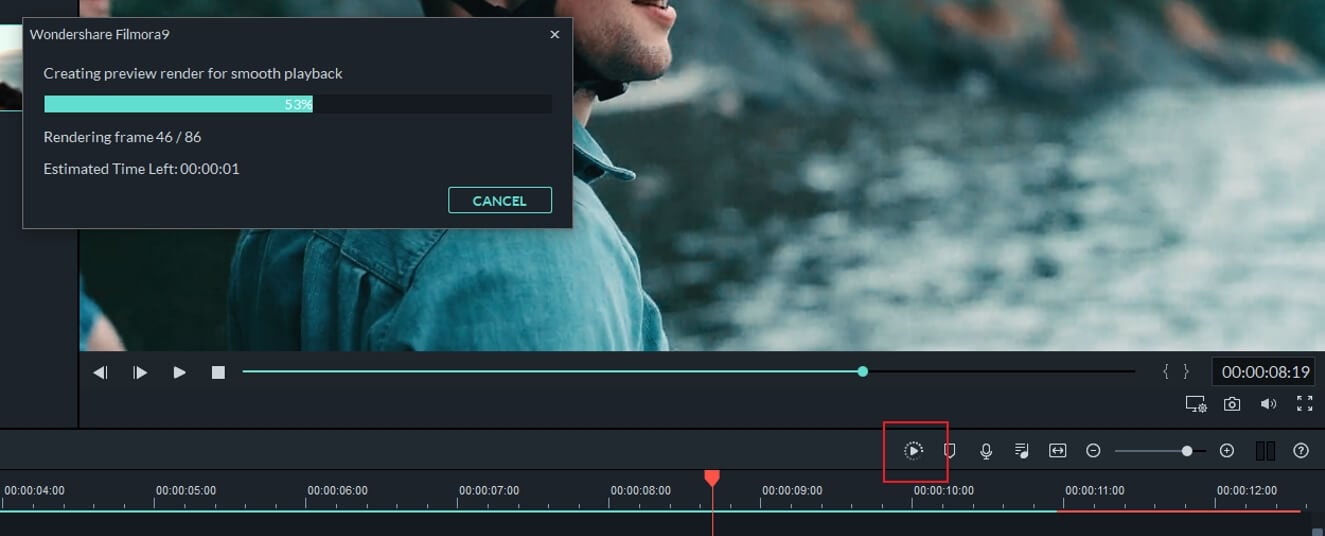
Filmora can also create render previews automatically when no other action is performed for a specified duration of time. By default, Filmora is going to wait for five seconds before it starts to generate render previews.
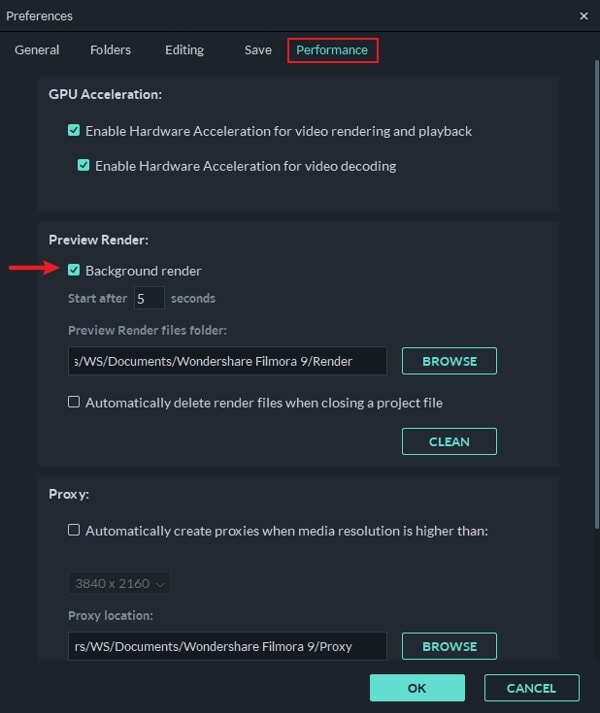
Use the Ctrl+Shift+, keyboard shortcut to gain access to the Preferences window, and then click on the Performance tab. Click on the Background Render checkbox that is located directly below the Preview Render option and proceed to specify the amount of time after which the background renders should start. You can also choose the folder in which preview render files are going to be stored or decide to delete all preview render files every time you close a project.
Secret 4: Generate Proxy Files
One of the most common ways to ensure that high-resolution video files are going to be displayed without lagging is to create proxy files. After you add a video clip to Filmora’s Media Panel, you should right-click on it and select the Create Proxy file option.
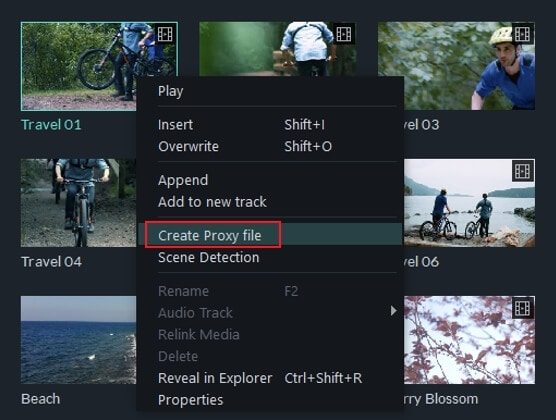
The software will then create a low-resolution proxy that won’t slow down your workflow, although how long this process is going to take depends on the size of the original video file.
Generating proxies may be a lengthy process depending on your original video, which is why it is essential to go through it before you perform any other video editing task.
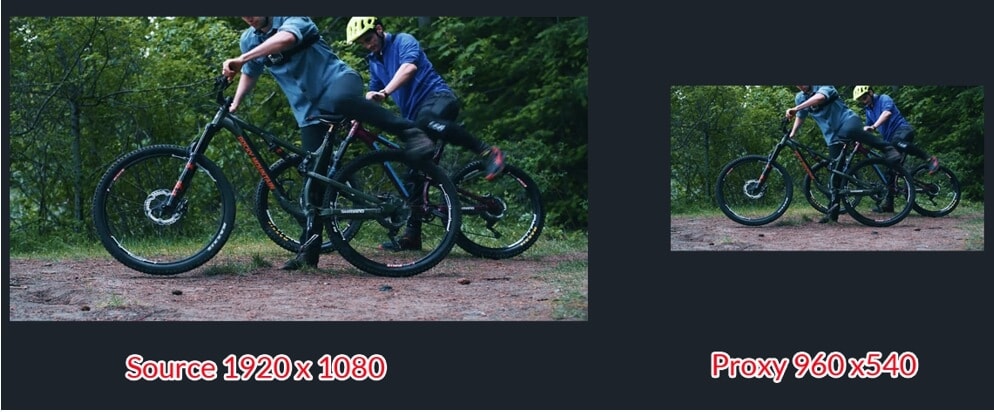
The created low-quality proxy file is used for improving the smoothness of the editing process only. Proxies do not affect the quality of the source footage nor the exported video. So once you complete editing, you can export it the same way you would export a project if you were working with original video files.
Check out more video editing apps for creating and editing 4k proxy videos.
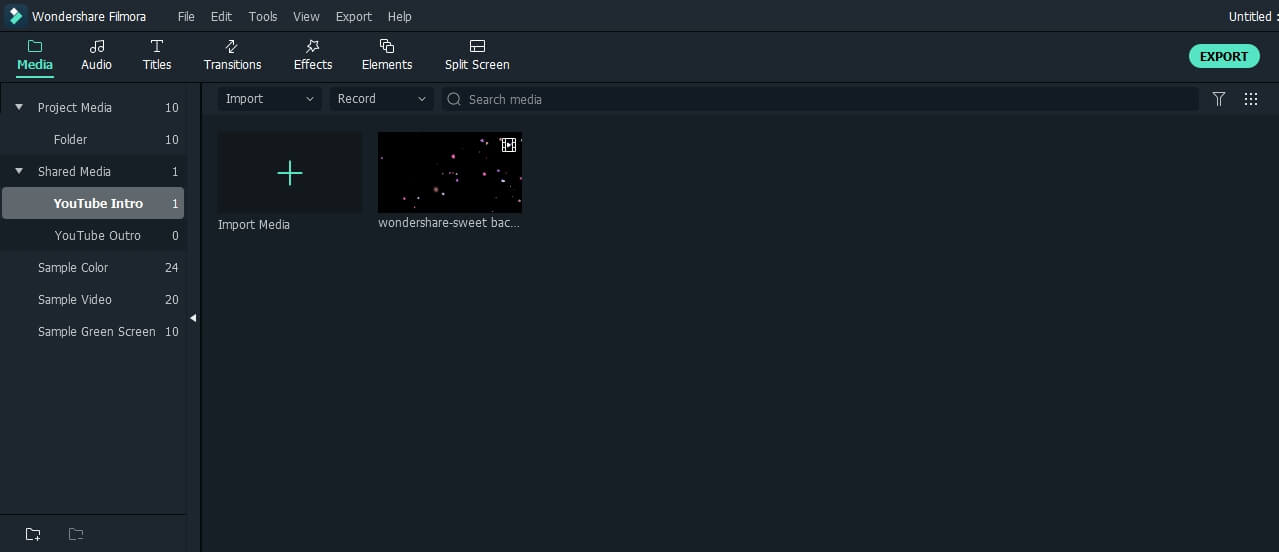
Secret 5: Shared Media Folder
If you have a YouTube channel, you may need to use some same intro or outro frames in your YouTube video. It’s annoying if you have imported them every time you create a video project. While, the Shared Media feature in Filmora can store video and audio that you've imported for future projects, which means that you don't have to keep re-importing your media for future videos. Here is how to use the Shared Media folder in Filmora to improve the video editing efficiency.
Go to the media panel, click the Share Media folder, then click Import Media or drag and drop your footage or audio you want to use for future projects. you can also create new folders in the Share Media folder to help you organize your media files.
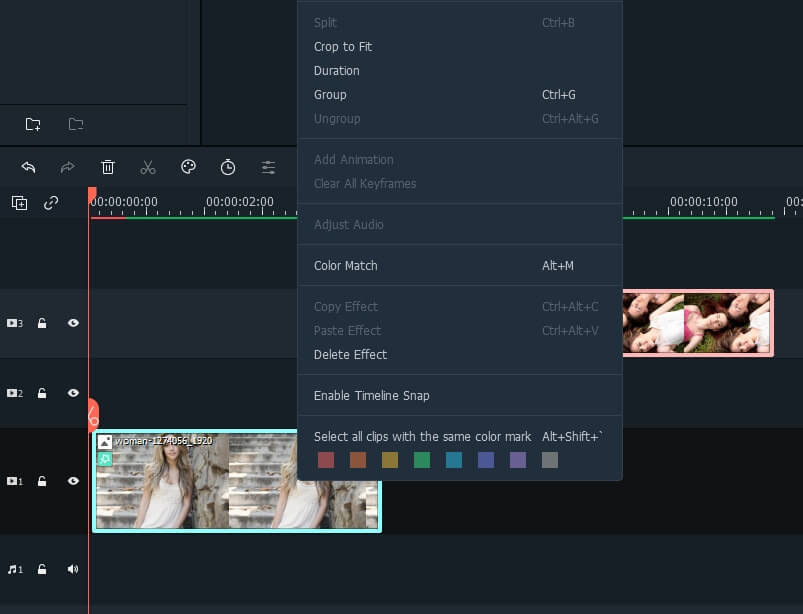
Secret 6: Copy and Paste Effects
Sometimes you may need to add the same effects to another clip in the video project. Previously, you may need to add effects to each clip one by one, but now, Filmora allows you to copy and paste effects from one clip to another directly.
Once you're done adding effects to one clip, right click and click Copy Effects; then select the clip you want to paste the effect to, right click the clip and click Paste Effect.
Secret 7: Mark Clip with Color Marks and Group
When editing footage from multiple cameras, you might want to organize which media is from which source in the timeline. Or, you want to recognize certain scenes from multiple clips, you can use the color marks in Filmora to do that.
Select the clips you want to color mark in the timeline, right click and then choose from the colors available. Repeat the steps to color mark other clips. Once you've color-marked all your clips, you can right-click on the clip again and click Select all clips from the same color mark option, and all the clips
marked with that color will be selected, so you can move a lot of clips at once in the timeline.
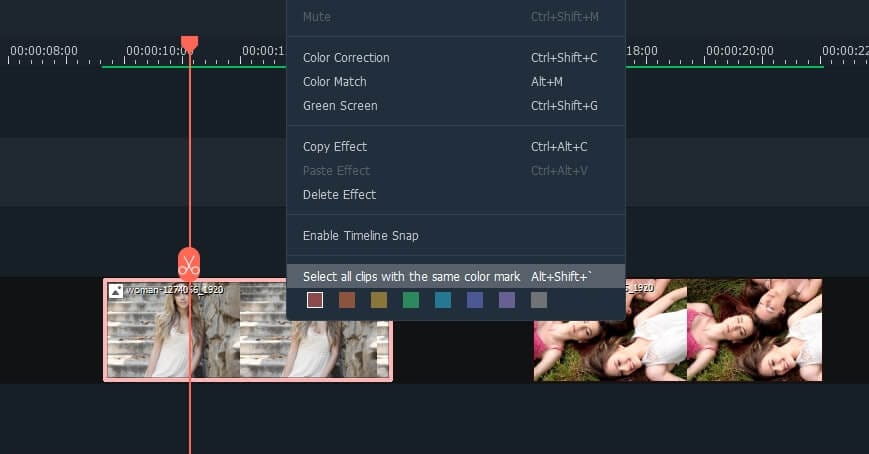
You can group all the clips with the same color marks together so you can sync the video and audio. Or, you can select all clips you want to group, right click and then select Group to group clips together without marking color.
Secret 8: Supercharge Quality with AI Video Enhancer (New)
Editing is only half the battle; bringing the ultimate visual clarity to your viewers is the real game-changer. Filmora's latest release introduces a highly anticipated, industry-grade AI Video Enhancer. Now, you can transform low-resolution, blurred, or noisy clips into crisp, professional-grade videos directly on your timeline.
🚀 Core Breakthroughs of Filmora's AI Video Enhancer
- 1. Topaz Starlight Integration (AI Deep Super-Resolution)
Powered by industry-leading deep super-resolution models, this integration reconstructs authentic details. Unlike traditional scaling or basic NLE interpolations, Topaz Starlight delivers unmatched edge sharpness and precision noise control. Perfect for high-res outputs targeting commercial platforms, ensuring a seamless workflow without leaving Filmora.
- 2. Generative Enhance (Smart Detail Reconstruction)
Stop just enlarging pixels—generate natural clarity! Generative Enhance reads the context of your footage to fill in missing textures. Specially optimized for short videos under 3 minutes, it easily repairs phone footage, compressed files, and AI-generated clips. With one click, Filmora automatically processes and replaces the original file directly back into the timeline.
- 3. AI Night View Model (Stunning Night & Low-Light Footage)
Say goodbye to grainy, unusable nighttime shots. The AI Night View mode tackles low-light issues like severe noise, flat shadows, and muddy colors. It restores natural lighting vibes, boosts shadow details without blowing out highlights, and sharpens outlines across night vlogs, travel clips, and drone footage.
Conclusion
Using these tips and tricks can enhance Filmora’s video editing performance significantly, especially if your computer doesn’t have a powerful graphics card or a fast processor. Did we fail to mention secrets that can improve video editing efficiency in Filmora? Leave a comment below and let us know.
secure download
FAQs on Enhancing Video Editing Performance in Filmora
-
How can I improve video playback smoothness in Filmora?
You can significantly improve video playback smoothness in Filmora by activating GPU acceleration in the preferences, adjusting the playback quality of video clips to a lower resolution (e.g., ½ or ¼), or creating render previews for segments with effects. -
What are proxy files and why are they useful for editing high-resolution footage?
Proxy files are low-resolution versions of your original high-resolution video clips (like 2K or 4K). They are useful because they allow you to edit demanding footage without lagging, as Filmora uses these smaller files for the editing process. The final export will still use your original high-quality files, so your exported video quality is not affected. -
How does Filmora's AI Video Enhancer improve video quality?
Filmora's AI Video Enhancer uses deep super-resolution via Topaz Starlight and Generative Enhance to reconstruct authentic textures and details on low-res/compressed footage. Additionally, its AI Night View model optimizes low-light scenes by recovering lost color, boosting shadow details, and drastically reducing grain.
In fact, iPhones and iPads are equipped with microphones that are capable of capturing high-quality audio.In this article, we combed through the Internet in search of the best voice recorder apps for iphone.
by Liza Brown Jul 28, 2026 10:40 AM
Liza Brown
chief Editor
