How to Make an Annoying Orange Face With Filmora Easily
Nov 18, 2025• Proven solutions
Have you ever seen annoying orange videos on the Internet and different entertainment channels? You might be wondering that how people make different fruits and vegetables have a face, and talk with each other. The answer to this question is quite simple. They use different video editors to create such animation effects. The effect is known as the "Annoying orange effect." The concept of the annoying orange effect is basically derived from an American Action Comedy web series known as "Annoying Orange."
The web series features an annoying orange who annoys other fruits and vegetables using jokes and puns. The character looks like an orange which has eyes and a mouth, and it feels like actually orange is talking.
The Orange effect videos went viral on the Internet, and a lot of people actually want to know how they can create their orange effect videos. Making annoying orange videos is quite an easy task, and you can easily create your own annoying orange effects using the Fimlmora X video editor. This article will serve as a guide for creating orange effect videos in which you will be provided with step-by-step instructions.
Part 1: Recoding Video For Orange Effect.
Part 2: Step By Step Editing Guide For Annoying Orange Face Video.
Can't be bothered to make it yourself? Check this out: Top 3 Orange Face Online Maker.

Part 1: Recoding Video For Orange Effect
The first step in making an annoying orange face is to record your own video. There are a few things that you have to keep in mind.
- Take Close Up of Face: When you are recording a video for the orange face effect, make sure that you are taking a close-up shot of your face. It is mandatory because we only need your face to create an orange face, so your face details should be clear in the video.
- Take Steady Shot: The most important thing when recording a video for orange face is, you have to keep yourself steady, and your video should also be stable. Make sure to use a tripod for capturing video so that there are no shakes and distortions. Also, keep yourself as steady as possible when recording video otherwise, it will be a blur in the final result.
- Use Some Direct Lighting on Your Face: When you are recording a close-up shot for the orange face effect, use some direct lighting on your face. Either you can use a ring light when recording video, or you can sit in front of direct light. By doing this, the features of your face will be more clearly visible.
These are the things that you need when recording your video. You can speak anything that you like, and the video could be any length. The real trick of making annoying orange face effects lies here. You should be dead steady; otherwise, you won't get the desired results.
Part 2: Step By Step Editing Guide For Annoying Orange Face Video
We are going to use Filmora X video editor for editing and creating an orange face. The first step you have to do is, download the Filmora X video editor from their official website and install it in your system. If it is already downloaded in your system, then run the program and follow the steps described below:
Step1:
First of all, download a picture of orange from the Internet. You will easily find plenty of images. Just choose the one you find most suitable.
Step2:
Now go to the file, and click on import. Then select import media and choose the video and orange picture that you want to use for creating orange face animation.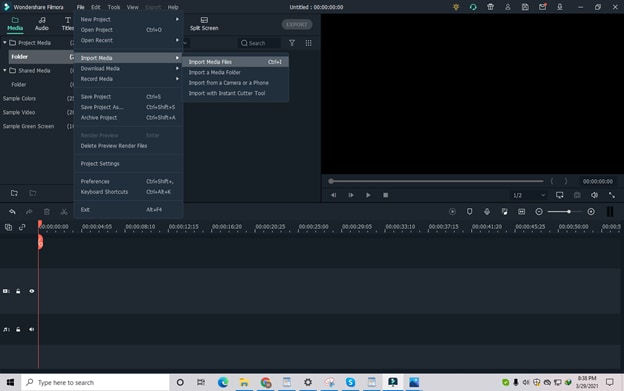
Step3:
Now import both the orange pictures and your recorded video. First, drag the video and drop it in the first track. Then drag the orange picture and place it on the track above.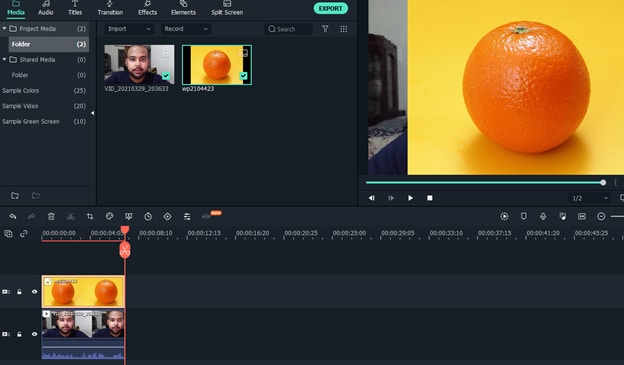
Step4:
Now adjust the orange according to your face so that it exactly fits. Your face should be in the center of the orange. You can lock the orange track so that it remains fixed and then drag the background to adjust your face in the orange.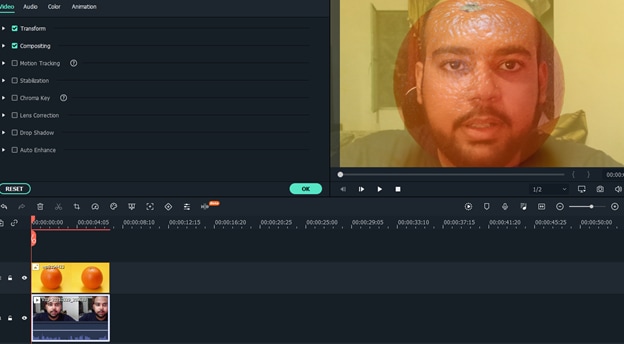
Step 5:
Now, unlock the orange track, click on the effects, and from there, choose utility.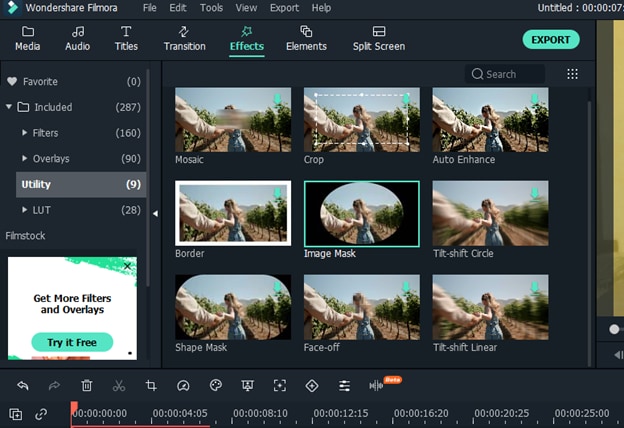
Step 6:
Now, click on the image mask and drag it over the orange picture in the track. Then do double left click on the orange track, and it will open the effect settings.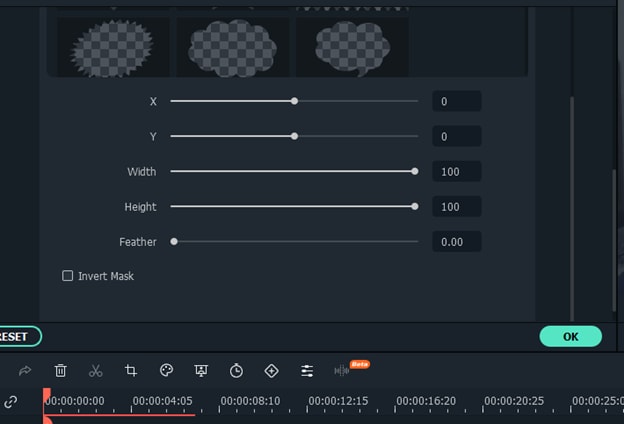
Step 7:
Click on the invert mask and select any shape from the menu. A rectangle would be suitable because we will adjust the shape according to your eye.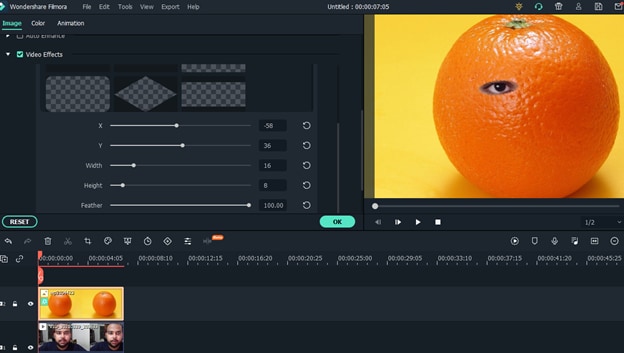
Step 8:
Adjust the shape and place it on your eye using the X, Y, Height, and Width settings displayed on the image mask settings.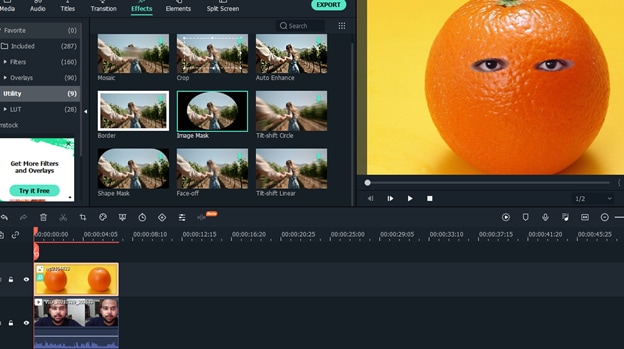
Step 9:
Now click on effects once again, and add another mask on the orange face. Repeat all the steps for the second eye. You can add as many masks as you want to the image.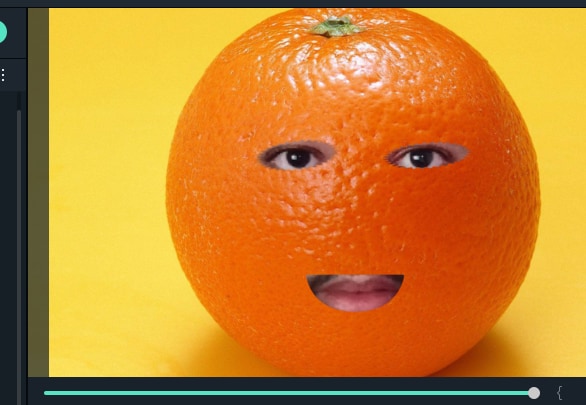
Step 10:
Repeat all the steps another time and add another mask for the selection of your mouth.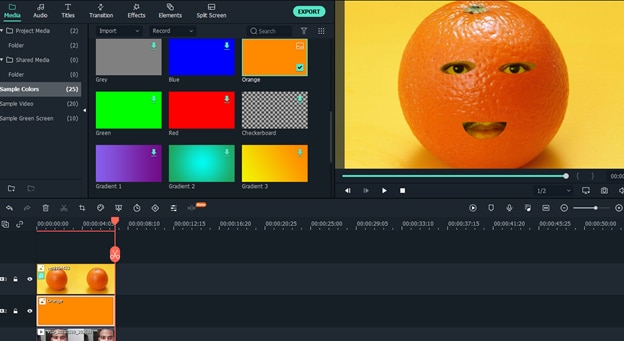
Step 11:
If you want your eyes and face to blend in better with the orange then take the orange track one step above. Go to sample colors, drag and drop orange color between the orange and video track. Do a double left click to open the layer settings and reduce the opacity until the eyes and face blends in with orange.
Result: Once you are done with the adjustments and applying masks, your orange animation video is ready. Just click on export and select your desired video format. It will take some time, and your video is ready to be shared with your friends. I grant you a full-of-fun journey making annoying orange face yourself.
Here we are using Filmora X video editor for creating our video because it is one of the best and easiest video editors out there. It has quite a simple interface, and even a newbie can make his videos following the tutorial. You download it from the official website of Filmora and start using it instantly.
Learn how to create compelling whiteboard animation videos step-by-step. Discover the best whiteboard video software and use Filmora to make your video easily!
by Ollie Mattison Nov 18, 2025 11:11 AM
Master the Glitch Effect! Learn how to create glitch effect videos and distort video easily in Filmora. Step-by-step guide for VHS, Wave, & Chromatic effects.
by Ollie Mattison Nov 17, 2025 15:16 PM
Learn how to remove watermarks from video on PC/Online (Free) using Filmora, Media.io, 123apps, and more. Compare the best video watermark remover tools now.
by Ollie Mattison Nov 18, 2025 10:23 AM


