The border is really important as it frames up all the video. It makes the video eye-catching and gives a vivid effect. It also fixes the automated cropping issues, especially on Instagram. Along with this, it helps the viewers to watch the video as you can add effects about fun, travel, guides and etc. accordingly. Adding a border is super easy and it’s not more than fun!
So let’s start…
How to Add Borders to Videos in Premiere Pro
Today we are going to discuss how to add borders to the video clips or images in premiere pro. It’s pretty simple to make borders of different colors and sizes for your video clips.
So, here are the two different ways we can use to add borders to our videos or images.
- Adding a border to the video using a grid effect
- Adding a border to the video using the essential graphics panel
Way 1. Using a Grid Effect
While working on the project, make sure the aspect ratio of the video is 16:9, and project settings are HD (1080P) and UHD 4K in premiere pro.
Let’s start step by step.
- Drag all the video clips by stacking them on video tracks in the timeline.
- Hit the Effects tab and write the grid in the search panel.
- Simply drag the grid option into the timeline of the videos.
- Select the anchor value to 0 for the x and y.
- Change the size to width and height slider.
- Change the width to 1920 and height to 1080.
Now we have borders added as you can see below.
You can also change the width of the borders.
- Change the width to 30.
You have the option to change the color of the border.
- Select the blending mode to normal.
- Select the color picker tool and change the color of your desire.
Way 2. Using the Essential Graphics Panel
First of all, you wanna be in your premium pro graphics workspace. This will pull off your graphics panel on your right. The good thing about the essential graphics panel is, that it is vector-based. So the different video clips with different resolutions will not pixelate.
Let’s dive in…
Now, to use the graphics panel you need to perform the following steps.
- Import the videos and drag them into the timeline.
- Select the effects
- Find “alpha adjust” and drag it into the effects control.
- Create a 4-point polygon mask.
A rectangular mask will be created. You can edit it according to the frame requirement.
- Go to the corner of the mask border and press the shift key. Drag the border to resize and scale it proportionally.
- Again go to effect controls, under opacity hit invert alpha.
- Under mask hit inverted.
- Go to motion settings, change the position, and
- Go to Alpha adjust and set the mask feathering to 0.
- Now go back to the effects panel and search the paint bucket.
- Under effects controls, hit the alpha channel under the fill selector
- Then hit stroke under the stroke
- You can turn up the stroke width to make it a bit thicker.
- Hit the color tab to change the color of the border as desired.
An Easier Way to Add Borders to Videos on Computer
Filmora Video Editor is one of the best and most efficient video editing applications. It is not only very easy to use but it provides a professional interface for users to make the videos stand out. It can be used for both Windows and Mac.
For Win 7 or later (64-bit)
For macOS 10.14 or later
Let’s learn three different ways to add borders to the video/image using Wondershare Filmora 11.
- Using the Borders Preset
- Using overlay preset
- Using Human Border
1. Using the Borders Preset
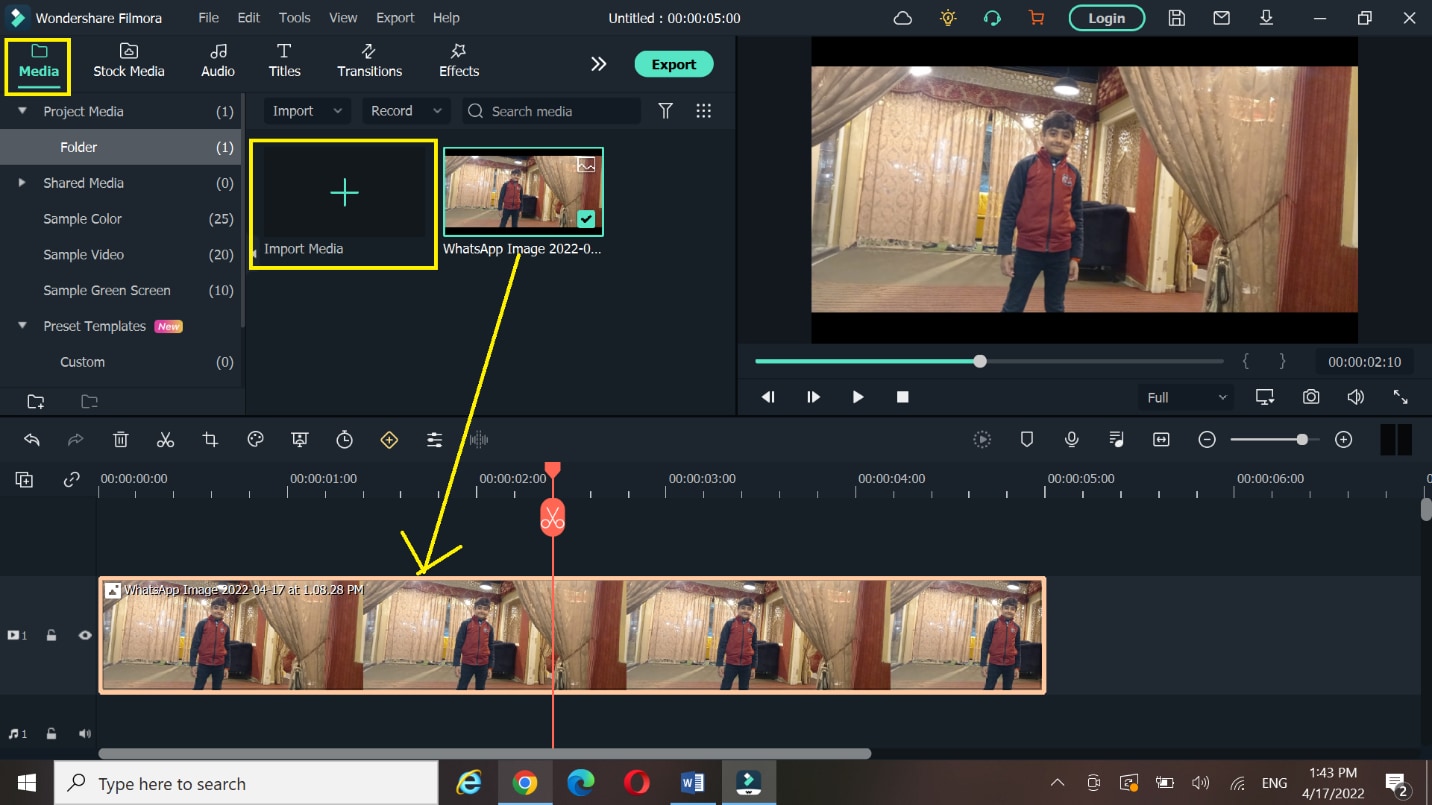
- Download Wonder Share Filmora 11 on your device.
- Open the software and hit the import media under the media
- Select the desired media from the storage of your device.
- Drag and drop the selected video/image into the timeline.
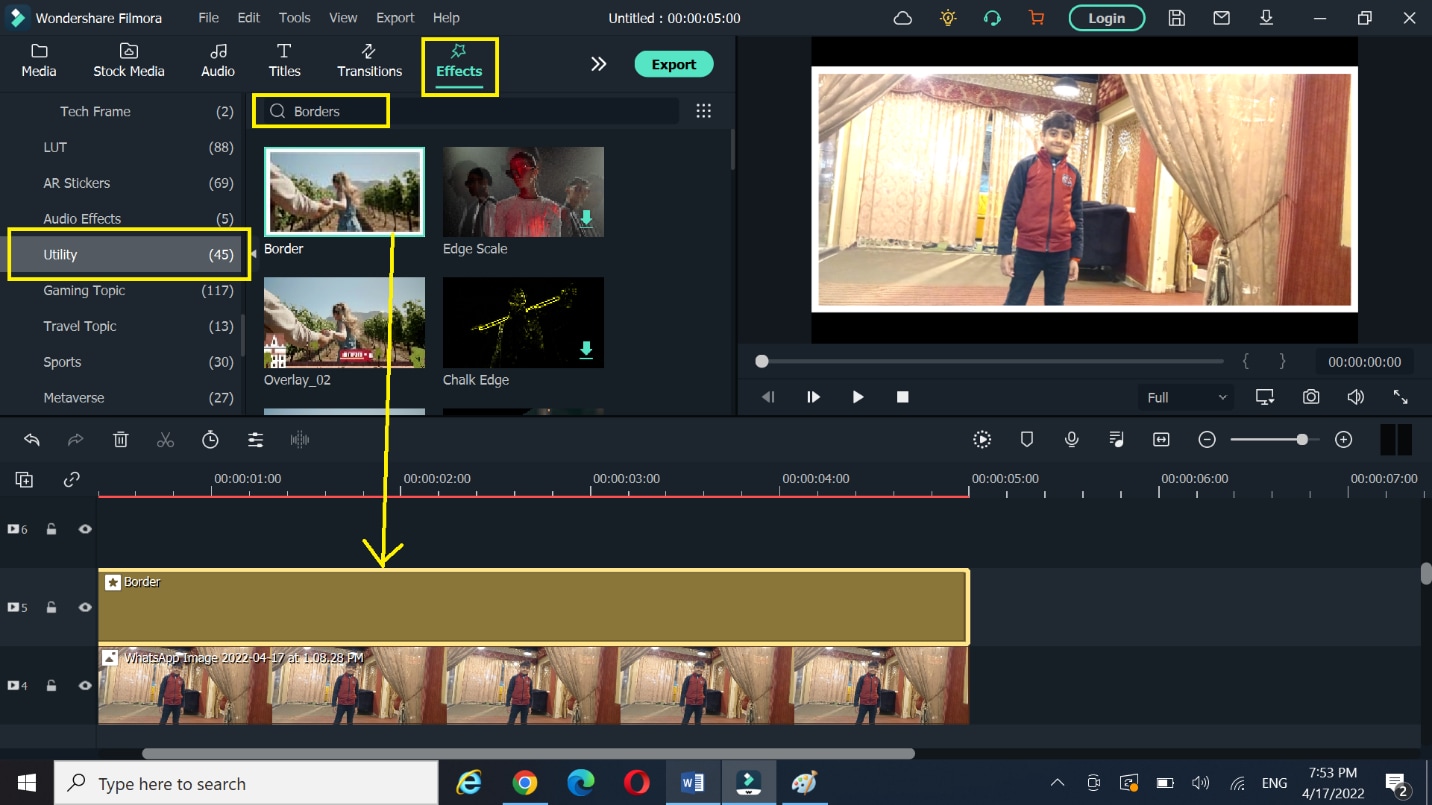
- Select the effects tab and hit the utility
- You can search the borders in the search engine and use a border of your choice given in the panel.
- Select the border and hit the + button on the bottom right corner of the border.
- You can drag and drop the border into the timeline.
- You can see the border below.
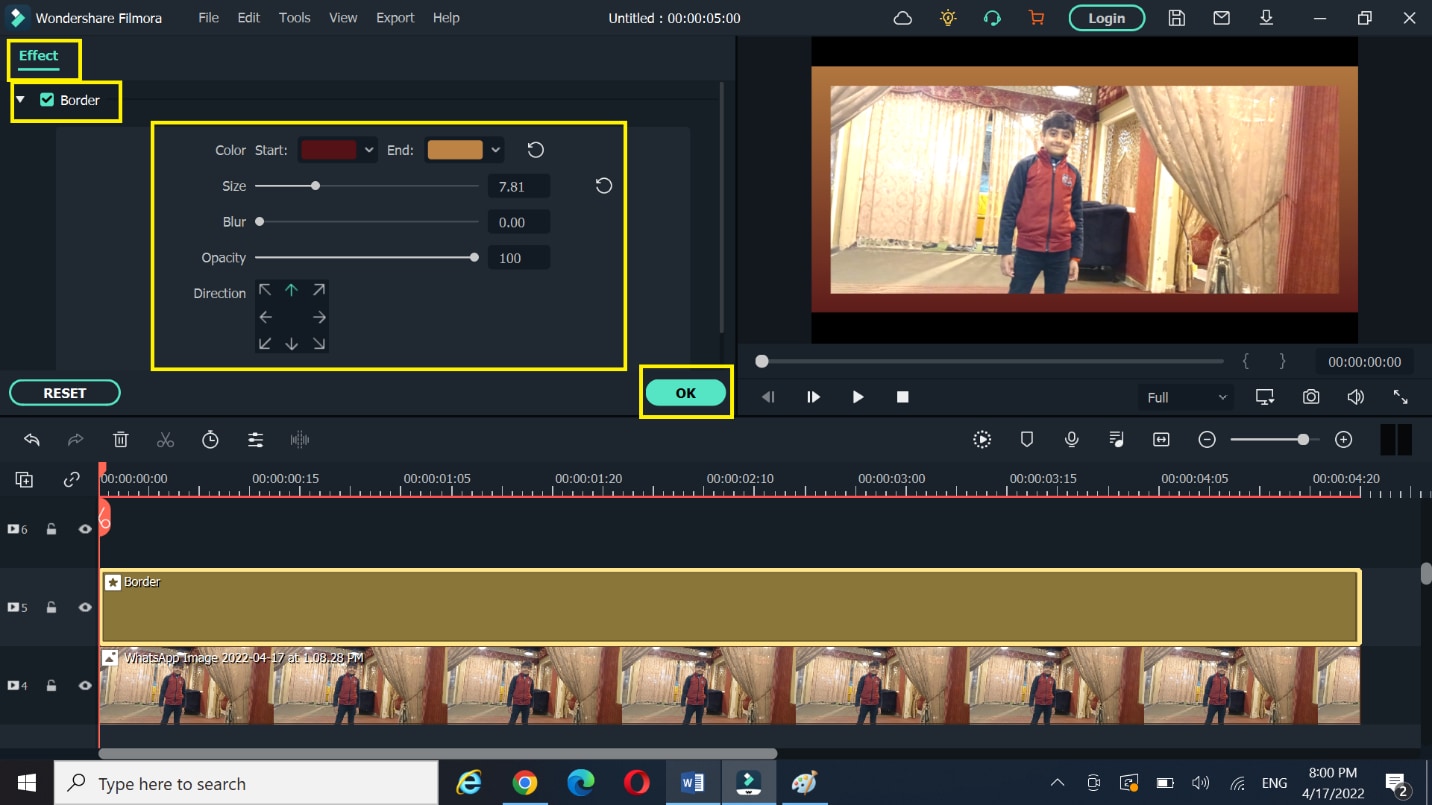
- You can edit the border by double-clicking the border layer or directly clicking on the border in the preview area.
- The Effects controls will be opened.
- You can change the size, color and opacity of the border, by moving the slider.
- Hit OK
2. Using overlay preset
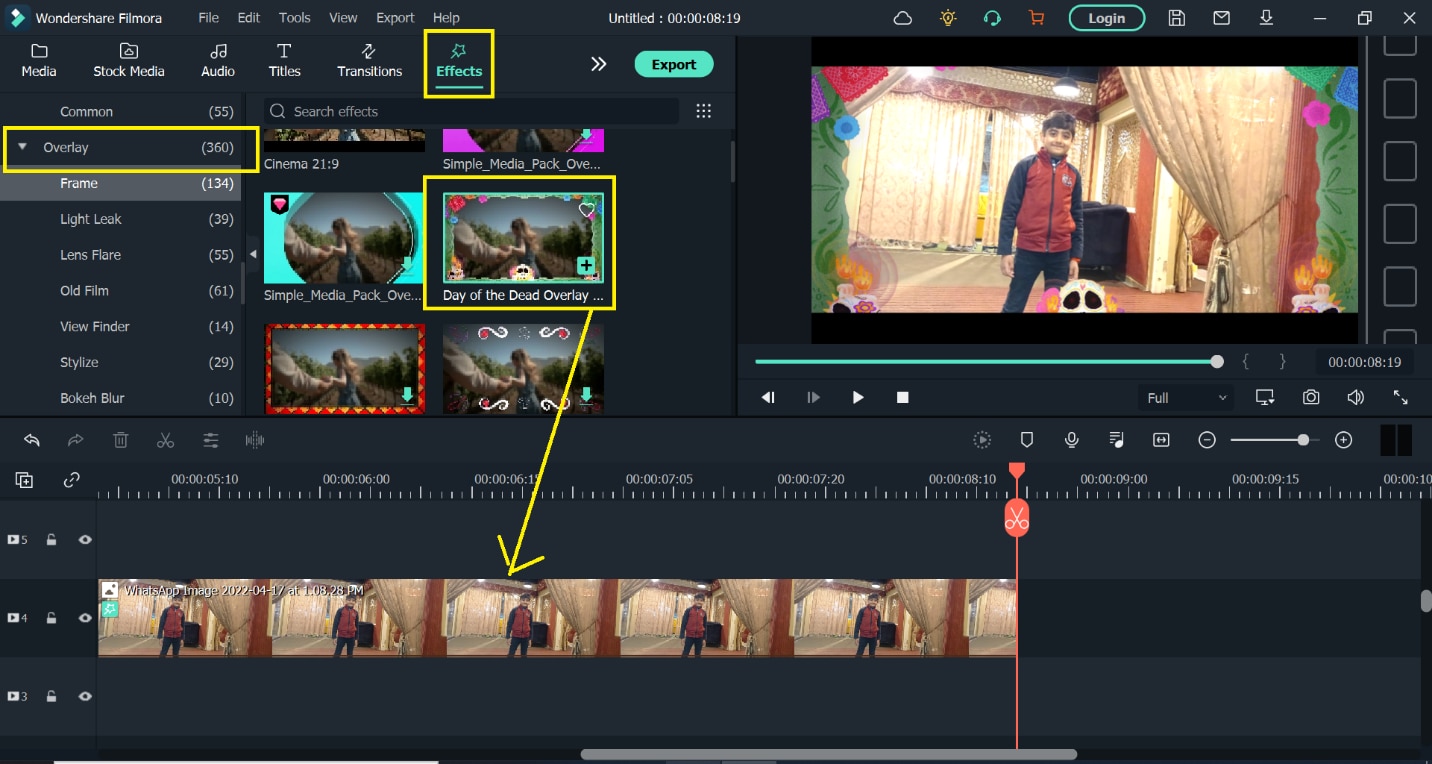
- Select the video/image layer and hit the effects
- Select overlay from the panel on the left side by scrolling down.
- You can choose the overlay of your choice by clicking on the + tab or simply dragging and dropping it into the timeline.
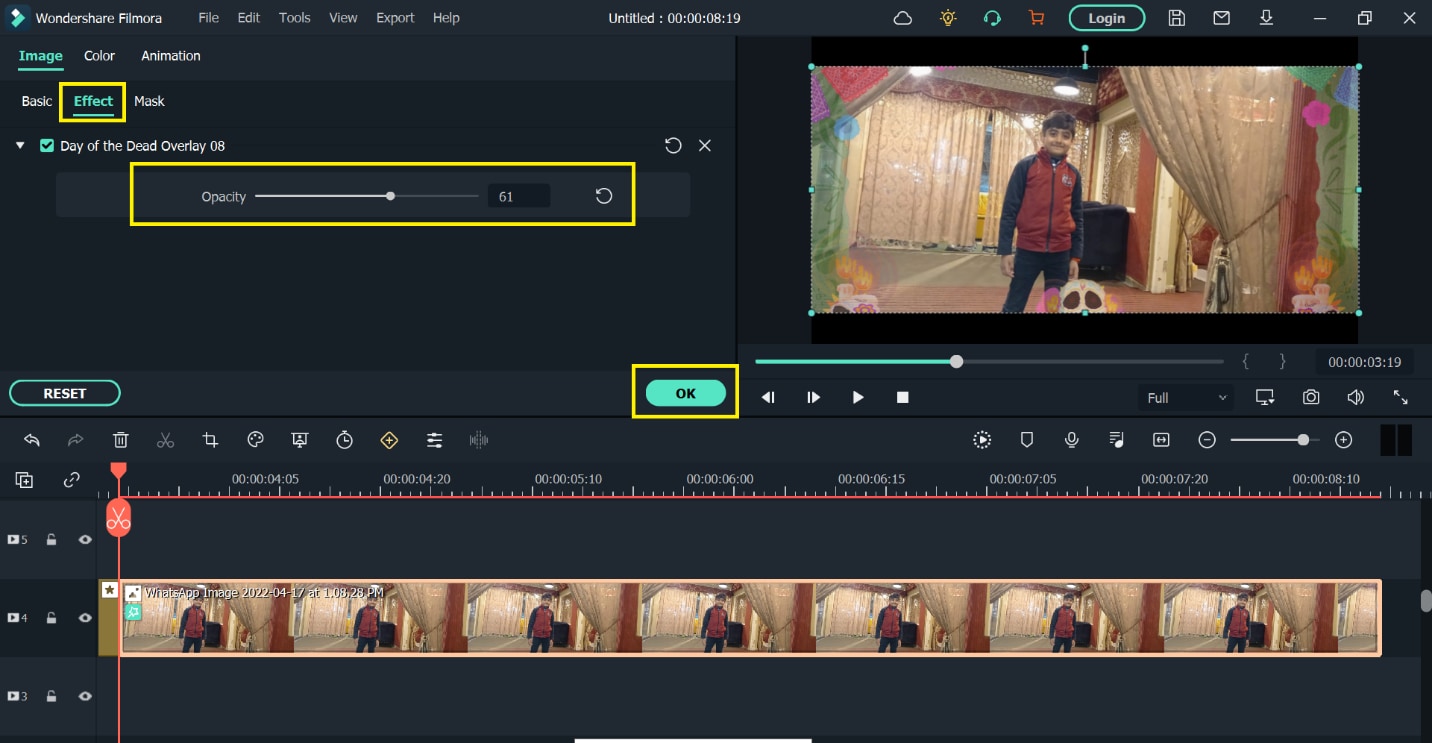
- Double click on the image/video with overlay effect.
- Select the effects tab under the image
- You can adjust the shadow of overlay by moving the slider of opacity.
- Hit Ok
3. Using Human Border
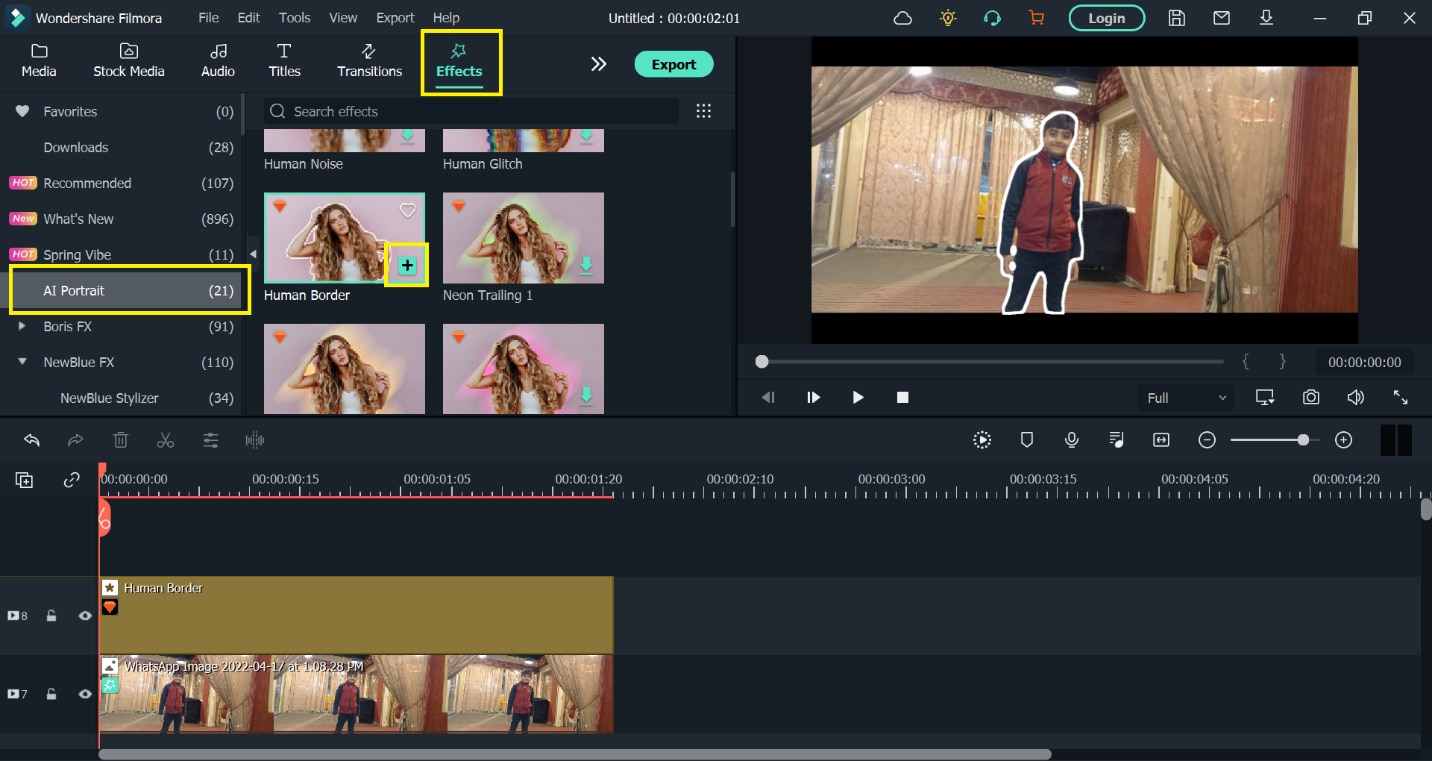
- Select the video/image and hit the effects
- Select AI Portrait from the panel.
- Select the desired human border.
- Hit the + tab or you can drag and drop into the timeline.
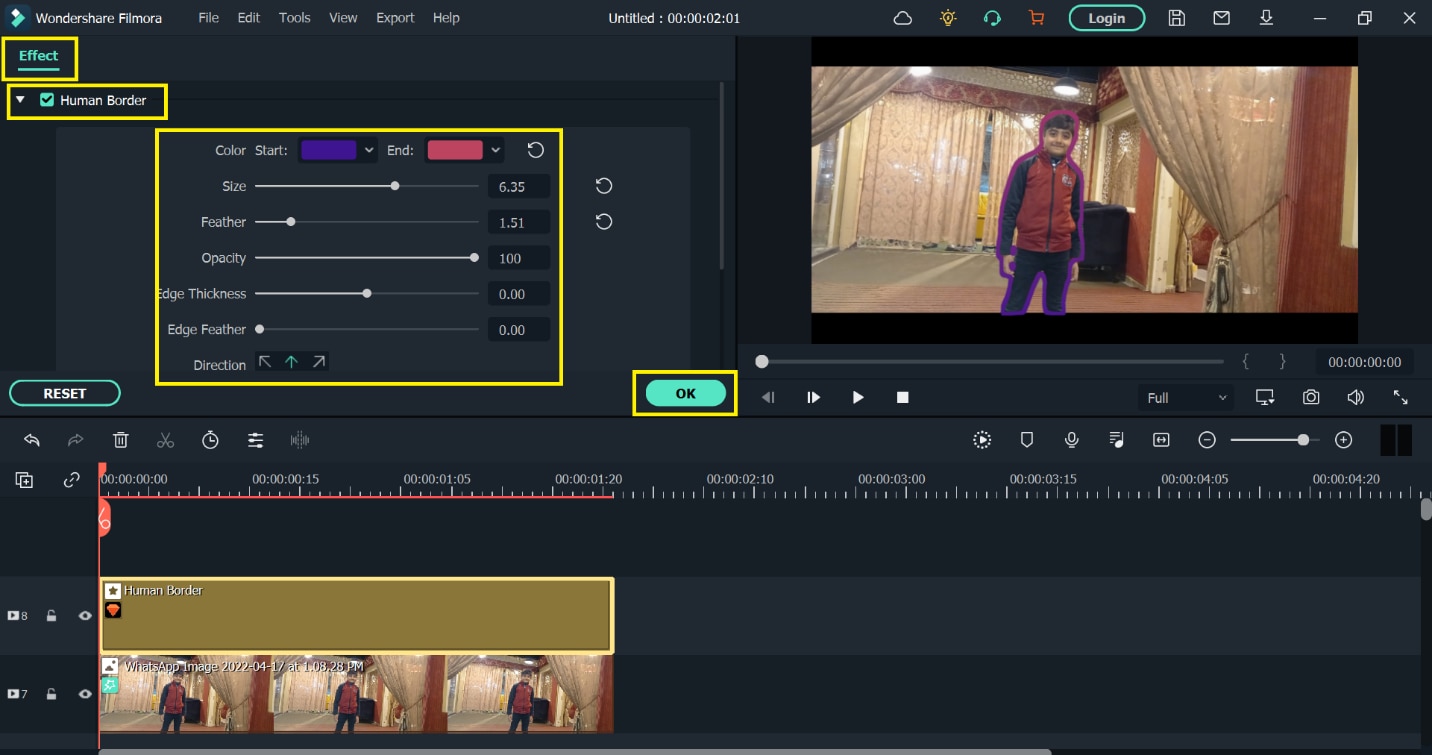
- Double-click on the human border layer, expand the human border controls panel under the effects
- You can change the color, size, thickness, opacity, etc.
- Hit Ok
How to Add a Border to the Video Online
You can also add borders to your videos/images online. All you need is, have a good internet connection and a browser.
Here is a guide for you to add frames to your video online.
Using Kapwing
- Open the browser and write the “Kapwing video maker”.
- You need to sign in the Kapwing to make an account
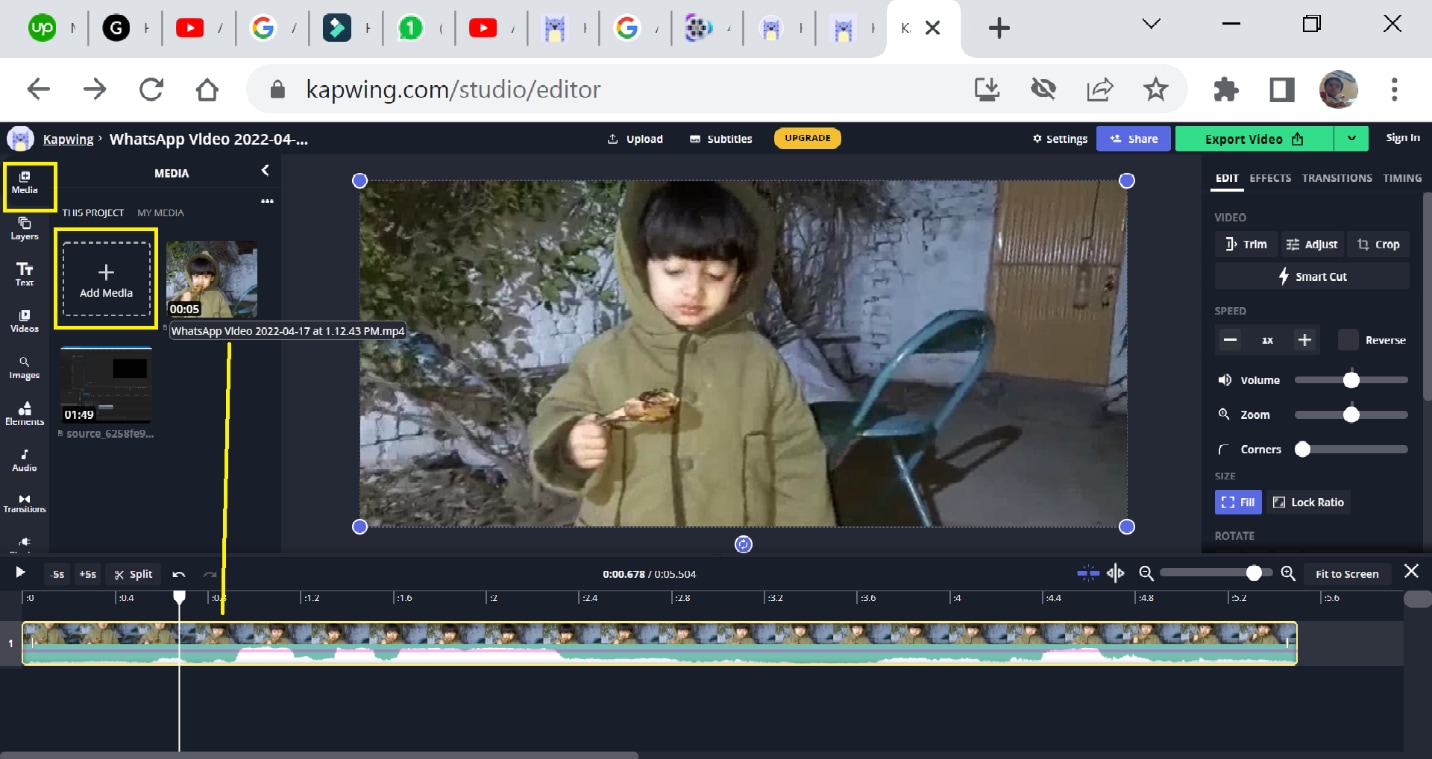
- An editing interphase will be opened as below.
- Hit on media and import media by clicking on +
- Drag and drop the video into the timeline.
1st Method
- Double click on the video in the preview window.
- 4 dots will appear on the corner of the video.
- You can drag the blue dots to make a frame and resize the image/video.
- Hit on lock ratio tab to maintain the pixels of the video.
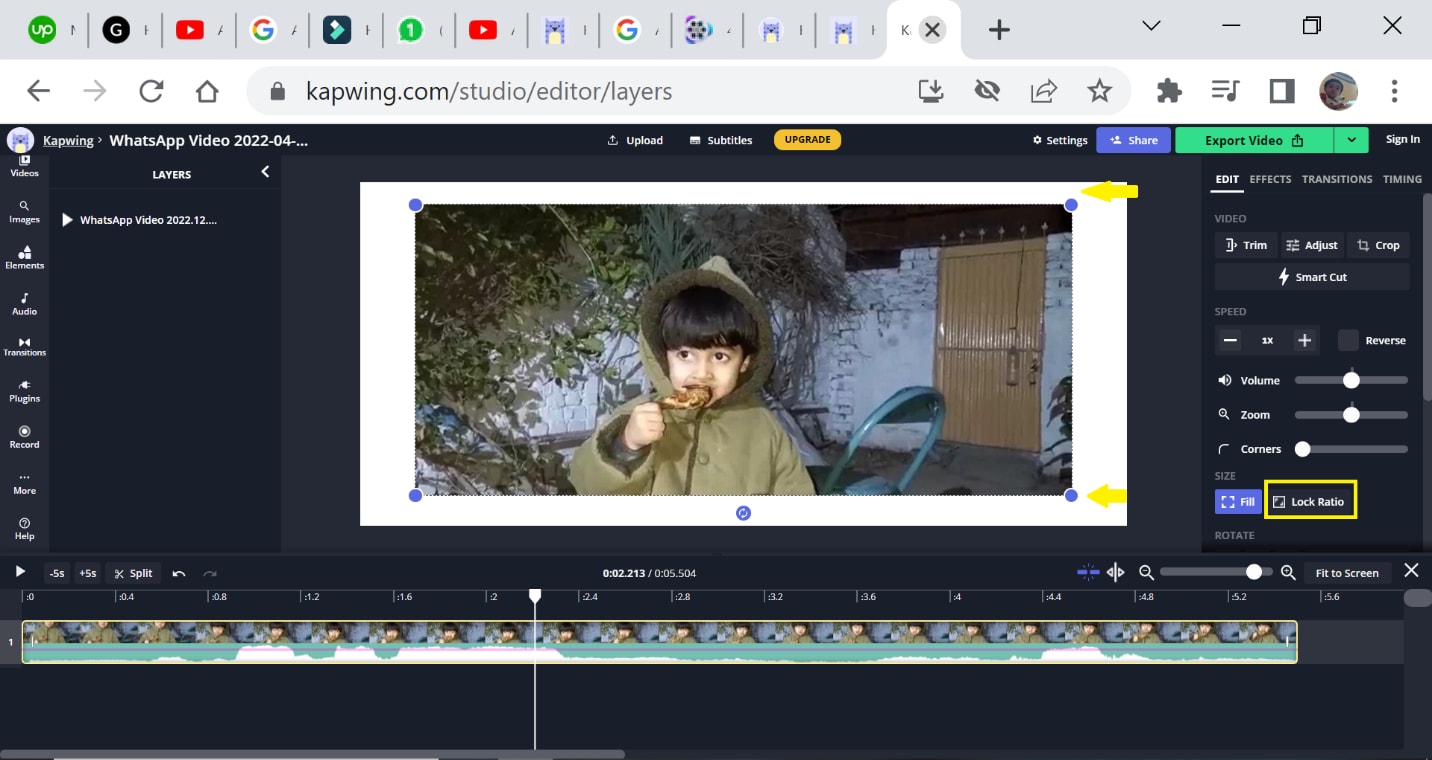
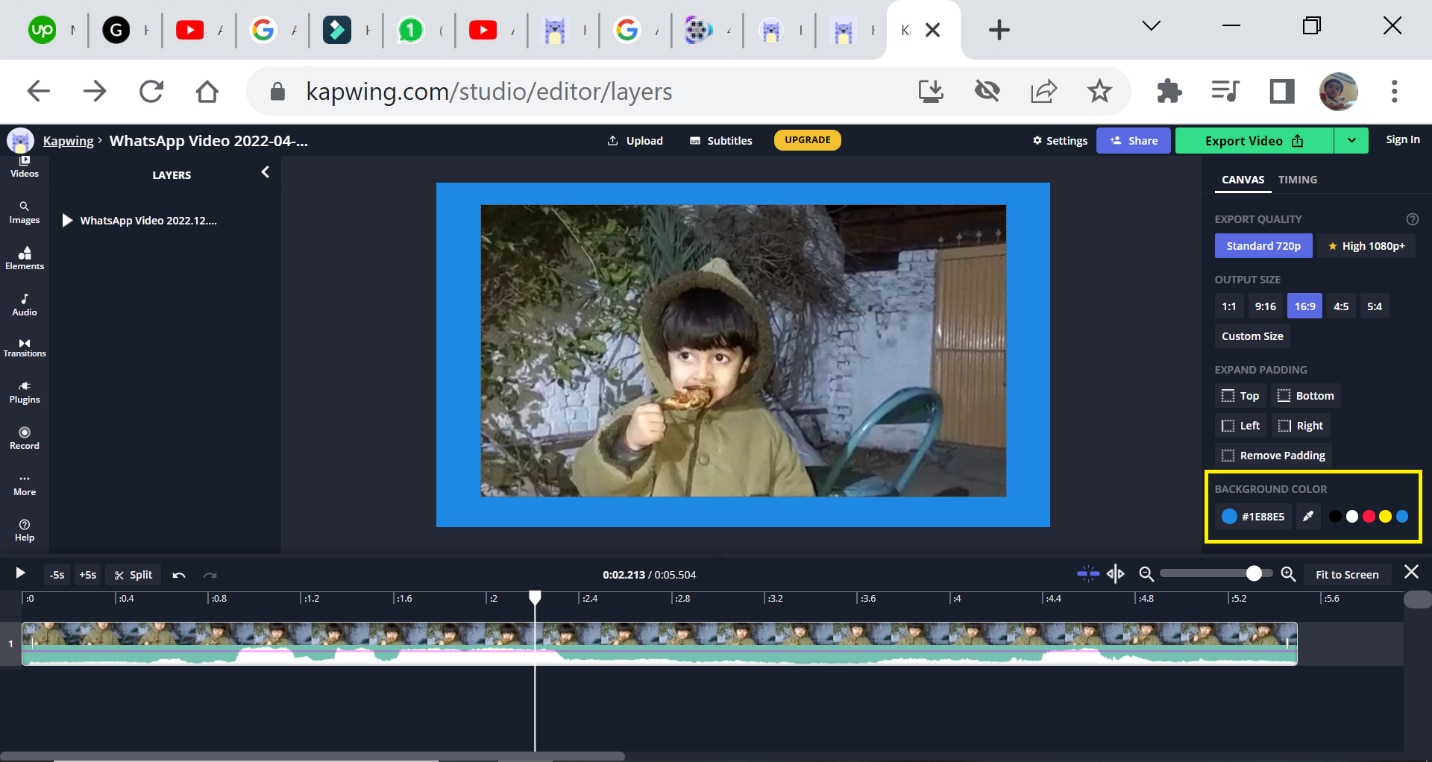
- Double-click on the border area.
- You can change the color of the border.
- You can also resize the length and width of the border.
2nd Method
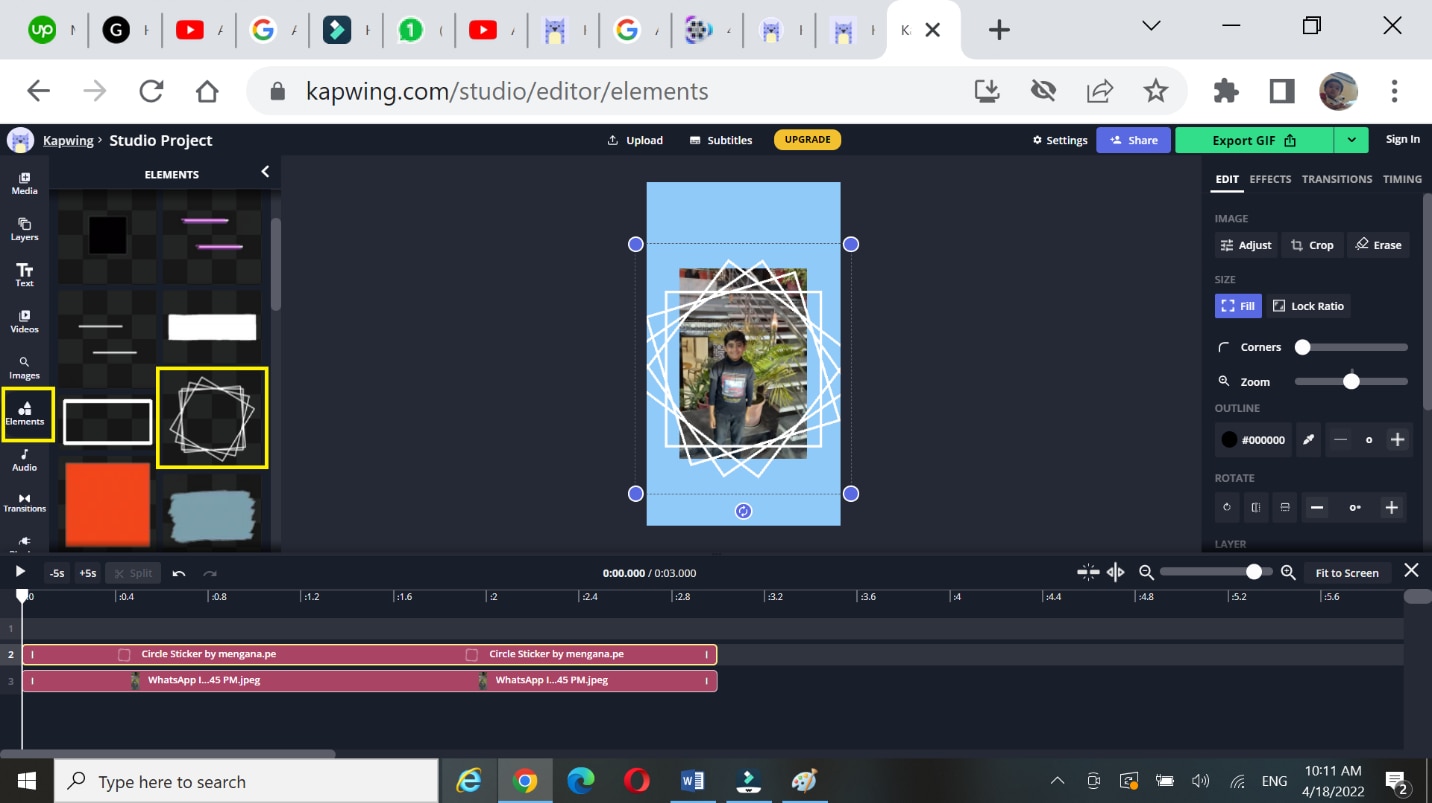
- Hit the elements and select the frames from the panel.
Here you can take square frames, circle frames, shapes, emoji’s and a lot of more frames.
3rd Method
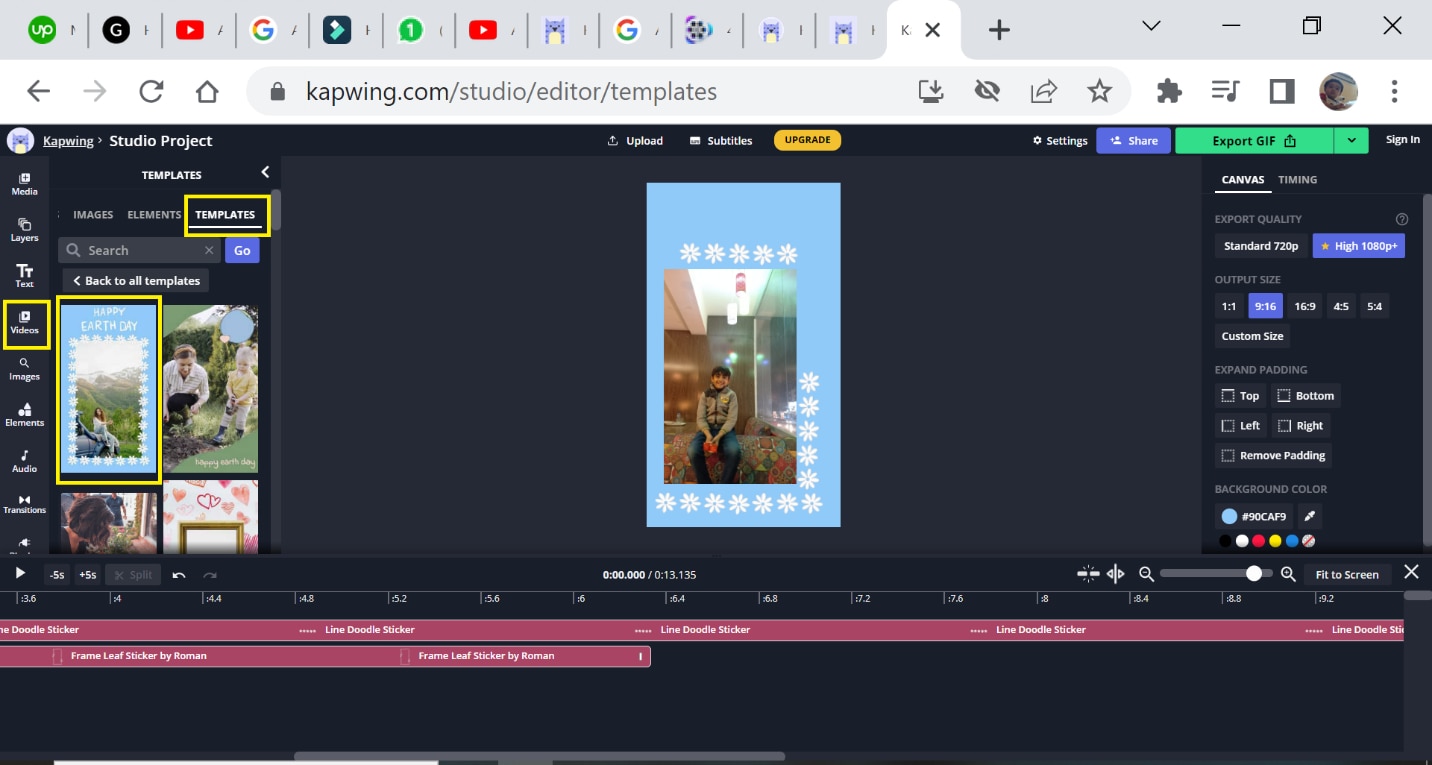
- Hit the videos
- Select templates, a list of templates will be shown in this panel.
- Select the desired template and drag it into the timeline.
Conclusion
We have discussed different software to add borders. All the software and tools are free to use. Similarly, they can be used on both Mac as well as Windows. They are user-friendly and provide full control over borders. You can use any one of them to make your borders and can easily engage viewers in your videos.
In all of the above applications, I recommend you to use Wondershare filmora 11. It is the most professional software and makes your video stand out.


 100% Security Verified | No Subscription Required | No Malware

