


 100% Security Verified | No Subscription Required | No Malware


 ChatGPT
 Perplexity
 Gemini
 Claude
 Grok
Grok
If you're hunting for a free, powerful video editor that’s also easy to use, Kdenlive software might just be your new best friend. Kdenlive video editor has gained a lot of fans for its versatility—handling everything from basic edits like cutting and cropping to advanced features like green screen effects and slow motion.
But it’s totally normal to wonder if it’s really the best choice for you. You’d want to know the ins and outs before downloading it to your device, right?
That’s where this article comes in! We’ll cover everything you need to know about Kdenlive, from its features to its pros and cons, and even recommend a powerful alternative if it doesn’t tick all your boxes. Let’s dive in!
In this article
Part 1. Overview of Kdenlive Video Editor
For those who are still new to this software, Kdenlive (short for KDE Non-Linear Video Editor) is a free, open-source video editor. That means you can download Kdenlive and use it without any costs, hidden fees, or subscriptions.

Kdenlive software has flexible operating systems and works on multiple platforms, including GNU/Linux, Windows, macOS, and BSD. That being said, Kdenlive Linux is more popular since it’s optimized for that system, but Windows users can get on board just as easily. Kdenlive on macOS though, it’s a bit trickier since it only supports x86-64 systems. Also, Kdenlive Android or other mobile apps still not available yet, so you can only use it on laptop or computer devices.
As a video editor, Kdenlive is loaded with features to help you create everything from simple edits to intermediate projects. And because of that, you can use Kdenlive to create all sorts of videos, including:
- Social media videos for platforms like YouTube, Instagram, or Facebook.
- Educational content like tutorials, lectures, or informative videos.
- Promotional videos for a product, event, or service.
- Music videos to your latest track.
- Short films or documentaries for more professional content.
Target Audience for Kdenlive Video Editor
Kdenlive is a great choice for anyone looking to do basic video edits. With its flexibility, you can use Kdenlive to crop video, cut video, speed up clips, add slow-motion effects, and more. This makes it an excellent pick for beginners and casual creators who are just starting out in video editing.
Part 2. Key Features of Kdenlive Video Editor
Now that you know a little bit more about what Kdenlive video editor is and the kinds of videos you can create with it, let’s get into what truly makes this editor stand out. Kdenlive brings some impressive features that simplify video editing and are worth checking out, especially for casual creators.
Here’s a closer look at the key features that make it unique:
Multi-Track Video Editing
Kdenlive allows you to use multiple video and audio tracks simultaneously, and you can easily lock or mute each track as needed. This flexibility is great for mixing different clips, sound effects, and music all in one project, making your editing process a lot easier!

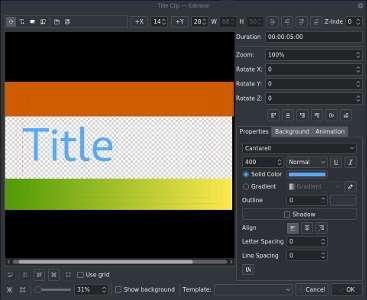
2D Titles
You can easily add custom 2D titles to your videos, which is great for intro screens, credits, or any text you want to overlay on your video. It even has options for different fonts, colors, and animations.
Various Effects
Kdenlive effects range from color correction to audio adjustments that you can apply to give your video a unique look. It also has all the standard transform options and covers everything from basic filters to more creative effects. If you want to check out Kdenlive's wide range of effects and filters, you can check out their Manual Page.

Keyframeable Effects
You can control those Kdenlive effects over time with keyframes, so you can gradually adjust effects like zoom, opacity, or position. This is super useful if you want to add smooth transitions or animation to your clips. However, working with keyframes can be a bit tricky. To learn more in-depth about this feature, you can visit Kdenlive(dot)org, go to their manual tutorial for users.

Chroma Key
Kdenlive green screen feature allows you to change backgrounds or add special effects by removing a single color. It is perfect if you want to add yourself into a different setting or create some cool visual effects. If you want to learn how to use this feature, you can check out their Tutorial page.

Part 3. Strength and Weakness of Kdenlive Video Editor
While all these awesome features make this software sound like a solid choice, but, like any video editor, Kdenlive has its pros and cons you should know about before diving in and installing it into your device. It is indeed packed with tools that make editing easy and accessible, but there are a few things to keep in mind depending on your needs.
So, let's take a closer look at what Kdenlive does best—and where it has room to improve.
Part 4.More Feature-Packed Video Editor Solution: Wondershare Filmora
As you can see, while Kdenlive video editor is a solid choice for basic to intermediate projects, the lack of AI-powered tools and advanced features can be a dealbreaker for those looking to tackle more advanced and professional projects. In that case, it's important to explore other video editor options.
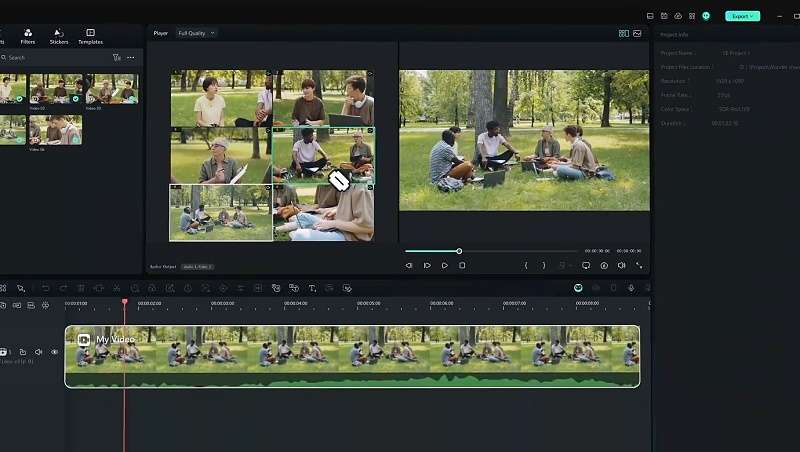
Thankfully, Wondershare Filmora comes to the rescue! Unlike Kdenlive software, Filmora isn’t just for casual users—it’s also a great choice for professional editors who take their editing seriously and need more powerful features or AI tools to enhance their edits. Whether you’re working on a short film, a YouTube video, or anything in between, Filmora provides the tools you need to take your projects to the next level.

Here’s why it’s worth a try:
More Advanced Features
Filmora really shines with advanced features that you won't find in Kdenlive, like Multi-Camera Editing, Panel Tracker, Split Screen, AI Smart Cutout, and many more! These tools give you more control over your edits, making it easier to produce professional-quality videos without all the fuss.
AI Assistance
Filmora comes loaded with a bunch of AI tools that seriously boost your editing experience. For visuals, you’ve got handy tools like the AI Video Enhancer, AI Video Denoiser, and AI Color Palette to make your footage look its best.

When it comes to audio, there’s an AI Music Generator, AI Voice Cloning, and AI Audio Denoise to help you perfect your sound. You can even kick off your video from scratch with AI Copywriting and AI Text-To-Video, or get extra support during the editing process with AI Copilot Editing.

Ideal for Short-Form Content
These days, short-form content gains more traffic across social media. If you’re focusing on short videos, Filmora has a feature called Smart Short Clips that makes it easy to create engaging content for platforms like TikTok and Instagram. This tool helps you quickly edit down longer videos into bite-sized pieces that grab attention.

Translation Supports
If you want to reach a larger audience, Filmora has some great built-in tools to help such as Speech-to-Text, AI Video Translation, and Automatic Captions. These features allow you to easily transcribe spoken dialogue, translate it into various languages, and automatically create captions for your videos. These tools are especially useful for content creators who want to connect with viewers from around the world.

Built-in Filmora’s Library
Unlike Kdenlive software, Filmora offers more than just effects; it comes with a huge library of ready-made video templates. This means you can kick off your projects with a professional look right from the start. These templates save you time and give your videos a polished touch without making you start from scratch.

Plus, Filmora has a massive selection of video footage, images, effects, transitions, stickers, and sound effects that you can easily download and use in your projects. So, you won't have to search for extra resources—everything you need to make your videos better is right there in the software!

Conclusion
Kdenlive software is one of the most popular video editors out there, and this article gives you a closer look by breaking down its main features, strengths, and weaknesses. While Kdenlive video editor is free and works well for casual to intermediate projects, it can feel a bit limited for more complex edits, especially if you need AI-powered tools.
For those wanting something more advanced, Wondershare Filmora is a solid option. It offers powerful tools like AI Translations, AI Color Palette, AI Smart Cutout, and other AI-driven features that can really level up your videos.
After looking at what both software brings to the table, it’s clear that Filmora has a lot more to offer. It’s not only great for casual users but also a strong choice for professionals looking to take their editing skills to the next level.
