Create High-Quality Video - Wondershare Filmora
An easy and powerful YouTube video editor
Numerous video and audio effects to choose from
Detailed tutorials provided by the official channel
You have to trim videos to capture your viewer's attention because the average attention span of human beings is eight seconds. As such, viewers will click away or keep on scrolling if the first few seconds of your video are in complete silence or a blank screen. Luckily, there is a simple way that Mac users can use to trim videos: QuickTime Player. This guide will give you the low-down on how to trim video in Quicktime to remove unwanted portions.
In this article
What Is QuickTime Player?
Developed by Apple, QuickTime Player is a software application designed to play, edit, record, and share video and audio files on your Mac. It was created in 1991, and QuickTime X is the latest Mac version available for users of Mac OS X Snow Leopard to macOS Mojave.
QuickTime Player is supported by MovieWorks, PowerPoint, HyperCard, Director, and other standard multimedia authoring apps. One of the exciting features that QuickTime brings to the internet is that it enables video streaming over networks.
In 2016, Apple ended support for the QuickTime Windows version. In 12018, they ceased support for QuickTime 7 version on macOS.
When it comes to OS X Lion, QTKit (the underlying QuickTime media) was deplored in favor of AVFoundation, which was the newer graphics framework and discontinued as of macOS Catalina.
How to Trim a Video in Quicktime Player
Trimming video is a breeze when you are using QuickTime. Follow the steps below to learn how to trim Quicktime video clips.
- Launch QuickTime Player on your Mac. You can find this application by using a Spotlight search. Alternatively, open the Finder app in your Dock and choose the Applications option from the left-hand side menu. You'll then find QuickTime in the right-hand side menu.
- Once QuickTime has launched, hit the File tab, then click Open File.

- Select the video you would to trim.
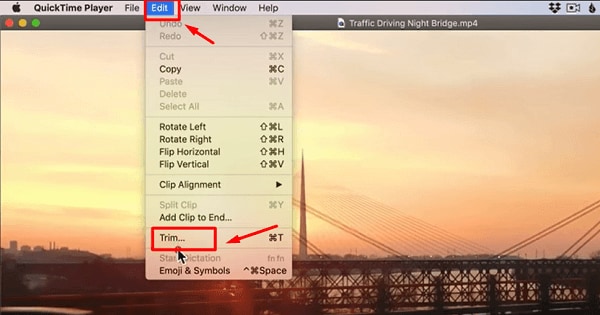
- Navigate to the Edit tab on the top menu with your video open.
- Select Trim in the dropdown menu. Alternatively, use the keyboard shortcut command + T.

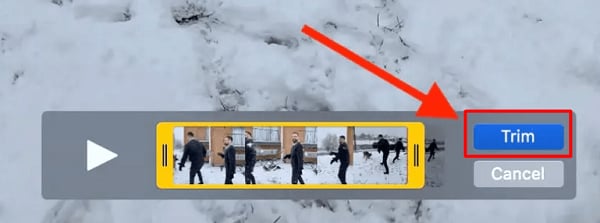
- You'll see a yellow trimming bar around the length of the video at the bottom.

- To QuickTime trim video, drag the handles, and the app will remove everything outside the yellow bars.
- Once you have trimmed your video, click the Trim option on the right side of your screen.
- The play icon allows you to preview your video anytime you want during the editing process.
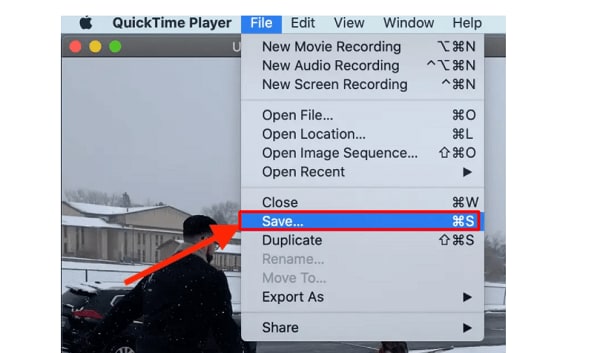
- Click File then Save to save your trimmed video.

- Name your trimmed video, and then select the location you want to save it. Click Save to complete this action.
Tips & Tricks to Use QuickTime Player
Now that you know how to QuickTime trim video, we have provided some helpful tips and tricks for those using this application.
How to Split and Combine Videos
QuickTime player allows you to split and combine two or more video clips. Follow the steps below to learn how to split and combine your videos.
- Open your file.
- Then, press Command-E or select View > Show Clips.
- Drag the Playhead to the area where you would like the video to split.
- Press Command-Y or select Edit > Split Clip. Both clips will be highlighted yellow.
- You can now insert another video clip or re-arrange the video clips by dragging them to the right or left.
- If you split the video clips thrice, you can select the one in the middle, where a yellow outline will appear around it, and then zap it by hitting Delete on your keyboard.

- To combine your video clips, open one of the clips and select Edit > Add Clip to End.
- Double click the video clip you would like to tack on in the Open dialog box.
- You can also drag the icons of video clips from the Finder and drop them into a video window. The application will add the clips to the end of your existing video. Repeat this process to combine several video clips.
- The second video can appear in the middle of your first one. All you have to do is split the video clip, then click on the clip that will appear before the area where the new video is supposed to go.
- Now, select Edit > Insert Clip After Selection.
- A dialog box will appear; double-click the video file you would like to bring in.
- Alternatively, drag a video from the Finder and take it into the gap between the two clips.

How to Record Audio and Videos
You can record a video using a USB webcam or Mac's built-in camera. What's more? You can record audio with the built-in microphone on your Mac, a musical instrument connected via a USB cable, or an external mic. Or maybe you would like to record something that's happening on your screen, QuickTime Player can also do this. Follow the steps below to record audio and video with QuickTime.
- Select File > New Screen Recording, New Audio Recording, or New Movie Recording.
- The last two options need you to choose quality and an input source. You'll then have to hit the red Record Button. The first option will summon a pane that features the record button and some audio options.
- Drag to specify an area you want to record or click once to record the whole screen.
- Once you have finished, hit the Record button again. A black screen will appear in your menu bar when you're recording your screen.
- The file will open in QuickTime Player when you stop recording.
- To save it, choose File > Save.
How to Export and Share Videos
QuickTime allows you to export optimized content so that you can view it on other Apple devices, including Apple TV, iPod Touch, and iPhone. With that in mind, let's look at how you can export and share your video once you have finished editing it.
- Select File > Export; you'll get a roundup of resolution options (1080p, 720p, and 480p), settings for Apple TV and iOS devices, and an option for only exporting audio.
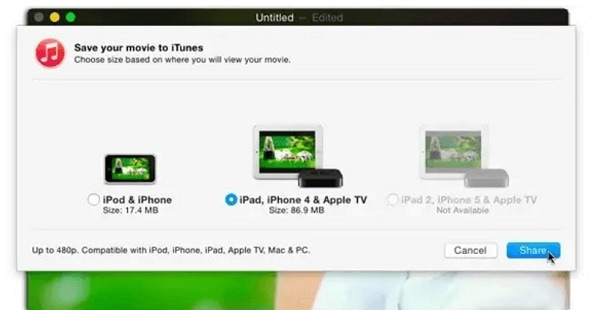
- If you go with the iTunes option, you'll see the same Apple TV and iOS devices optimized settings; however, the video file will be sent to your iTunes library.

- • To export your video and share with other users, select File > Share, and the resulting menu will include AirDrop, Messages, Mail, and the social media sharing platforms YouTube, Flickr, Facebook, and Vimeo.

- Choose the option you want, and QuickTime will optimize your video for the service or program you have selected.
- To save the changes you have made to your video file, select File > Close. Name your edited video in the box that will appear, then click Save.
Flip or Rotate a Clip
QuickTime Player also allows you to rotate or flip clips and videos with a single click. Following these step to flip or rotate your video clip.
- Navigate to the Edit tab.
- Select the direction that you want your video to turn. The available options are Flip Vertical, Flip Horizontal, Rotate Right and Rotate Left.
You can apply the changes to your entire video or one of the clips if you had divided the video file.
Present or Record your iPad or iPhone Screen
QuickTime can record or show a live view of what is happening on your iPhone or iPad. If you are using Mac for a presentation, you can show the screen of your iOS devices centered within your Mac’s screen. You only need to follow the steps below:
- Use a USB cable to attach either your iPad or iPhone to your Mac.
- Open QuickTime, then click File > New Movie Recording.
- Now, you need to point the cursor at the QuickTime Player window for the record button to appear.
- Go to the menu next to the record button and pick your iOS device from the list of cameras.
- You're now ready to enjoy the largest version of your iPhone or iPad with your audience.
- Click Record to record the action.
Conclusion:
● Video editing is an essential part of creating video content that attracts viewers. QuickTime trim video allows you to remove unwanted scenes to make it engaging. Your viewers will get hooked on your videos if you trim boring sections, blank screens, and areas with silence. Once you master the art of cutting, your viewer retention and engagement will sky-rocket.
● Don't forget to use the tips and tricks we have provided to get the most out of this application. You can export videos to various formats, such as FLC animations and image sequences, as well as AVI and DV Streams. You can also split and combine videos, present or record your iOS device screen, record audio and video, and much more.


 100% Security Verified | No Subscription Required | No Malware

