
 100% Security Verified | No Subscription Required | No Malware

Creating 3D gold text effects is an editing element that makes any design incredible. Whether you're creating a logo or promotional graphic or simply want to experiment with different styles for your content, mastering this effect is a valuable skill for any editor.
In this blog, you will learn how to create 3D gold text like a pro! We will explore various methods with their step-by-step guides.
So, let’s get started!
In this article
Create 3D Gold Text Effects for Videos
There are various video editing tools available in the market, but Wondershare Filmora ticks all the boxes. It is one of the most reliable and user-friendly editing software.
Filmora has almost every feature that a video editor could need. You can easily create 3D gold text effects in it and make your videos stand out.
That’s not all! You know what is the best part? No matter if you are a beginner or an expert video editor, you can easily use this tool.


Features of Filmora 3D Gold Text Effects
Take a look at some 3D Gold text features of Filmora, such as:
- Advanced text effects such as shadows and highlights
- Textures and overlays
- Color and brightness adjustment
- Lighting effects to create reflection
- Full control of the movement, scaling, and rotation of the text
- Custom 3D gold text with a wide range of fonts
- Blending modes to achieve different levels of shine and reflective qualities
There are two ways to use Filmora to create 3D golden text effects. We will explore them both. First, download and install the Wondershare Filmora video editor on your desktop or laptop. Then, follow the instructions given below:
Approach 1: Create Gold Text Effects Using Presets/Title Templates;
Step 1: Launch the Filmora software on your system. Click ""New Project"" and import the video in which you want to add 3D gold text effects. Then drag and drop it onto the Fimora timeline.
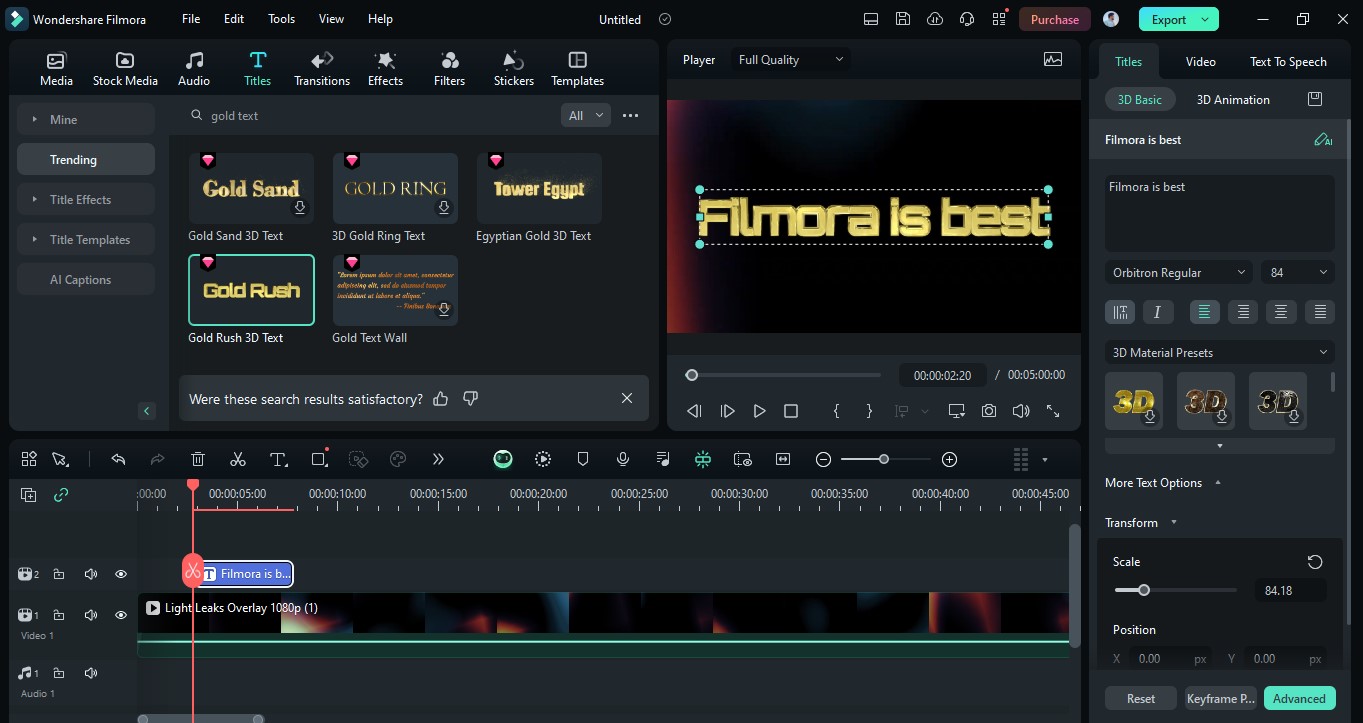
Step 2: Now, click the " "Title"" button on the top menu. Click the search bar and search for "3D gold text." Filmora will offer you plenty of options.

Step 3: Select the golden effect title that you like and drag it onto the timeline. It will automatically appear on your video. Edit the text from the right-side menu. You can also change its size, fonts, and more.
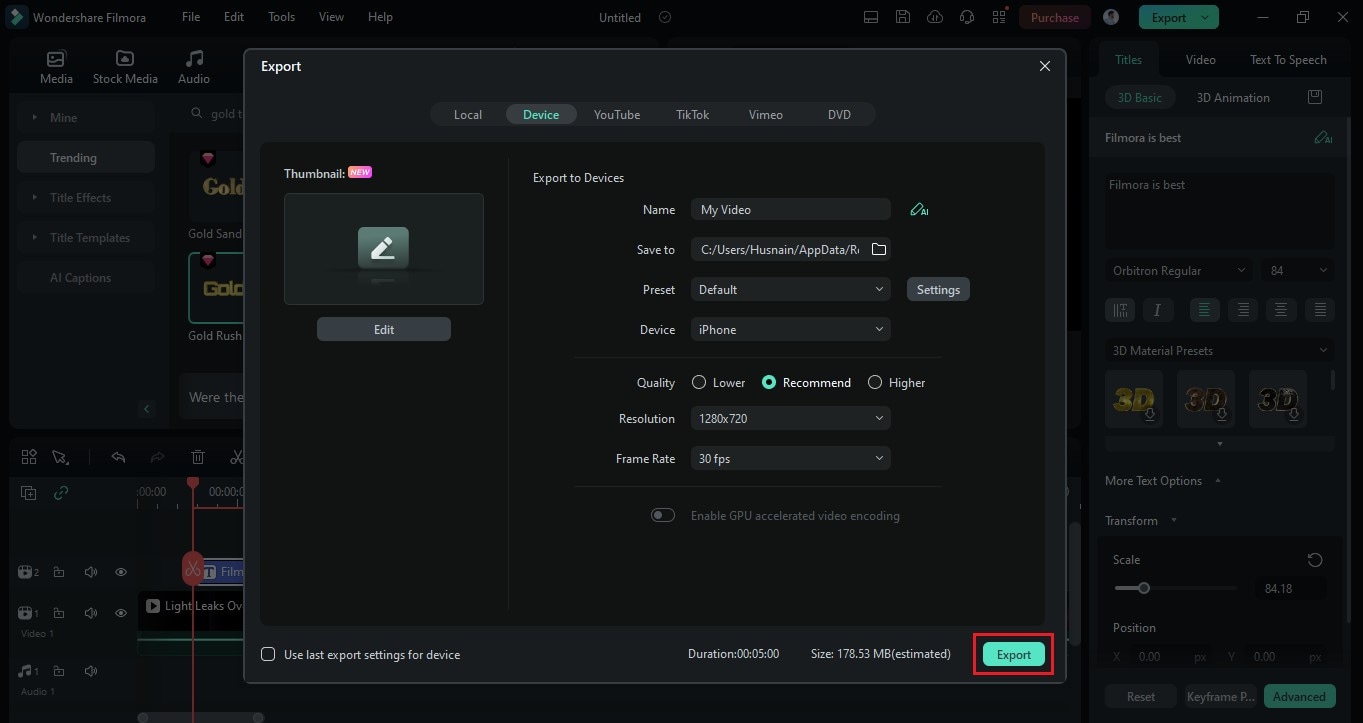
Step 4: Once you are satisfied with the editing, you need to save and export the video on your device. To do that, click the ""Export"" button, then select the file size and frame rate you want and click Export again to save it.
So this was the first approach to 3D gold text effects using Filmora. Let's explore the alternative approach that we can use.
Approach 2: Create 3D Gold Text Manually
If you don't like any of the 3D gold text templates, you can create your own as per your requirements and needs. The good thing is that it is also very simple in Filmora. However, you need two elements to achieve this effect.
- A black color image
- A golder strip (Click here to download it)
Here is how you can create your own 3D gold text manually using Filmora:
Step 1. Open the Filmora software and start a new project. If you haven’t downloaded it yet, download and install it first.

Step 2.Click on the " "Titles"" tab at the top, then drag one of the default titles onto the timeline. Edit the title in the right-side menu. You can also change the font to your liking.
Step 3. Navigate to the ""Media"" section at the top and import the black color image. Then, drag it onto the track directly beneath the title in the timeline. Click the ""camera"" icon next to the playhead to take a snapshot of the image.
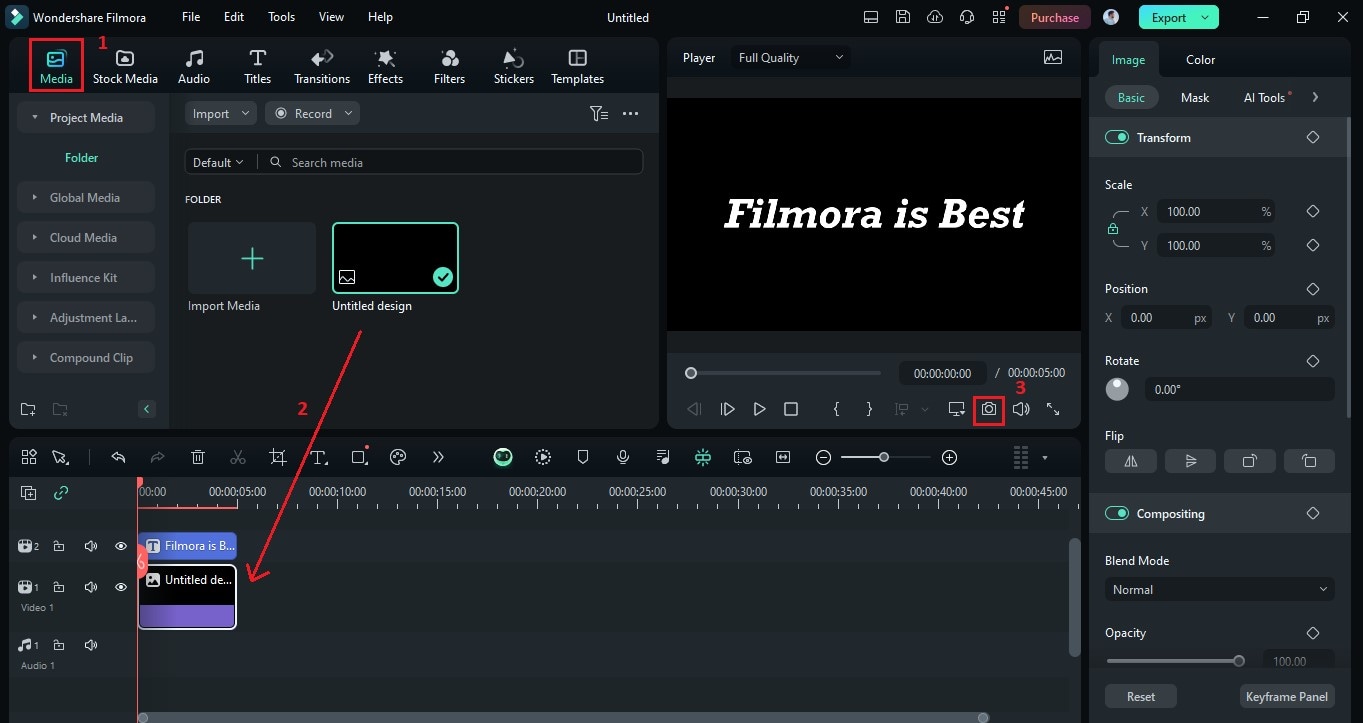
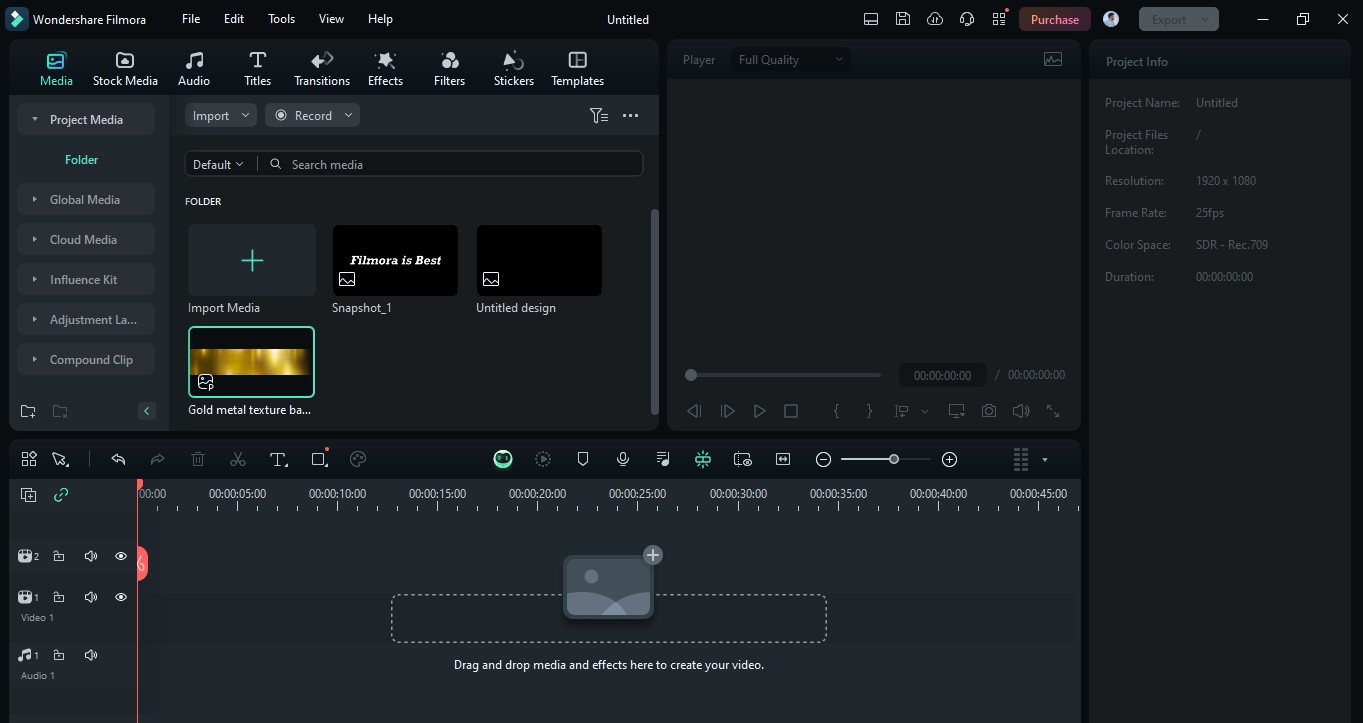
Step 4. After taking the screenshot, import the golden strip to Filomra. Then, delete all the tracks from the timeline.
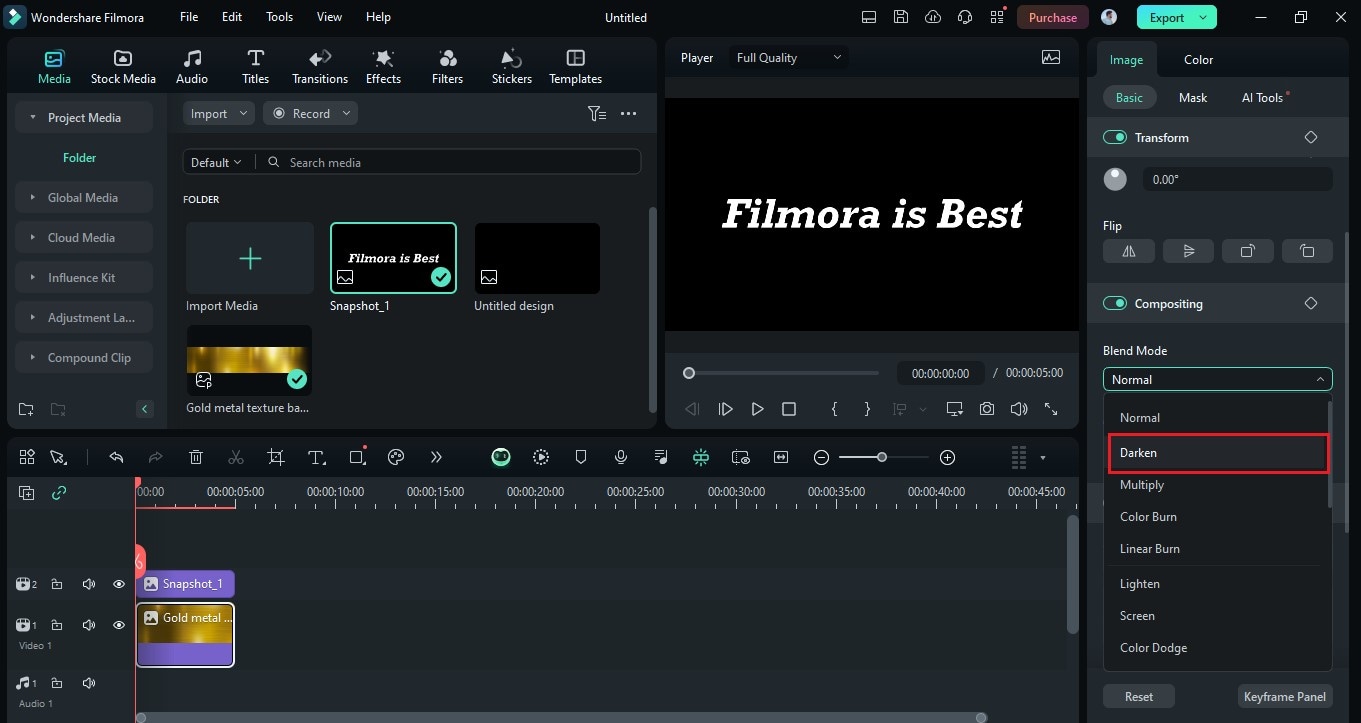
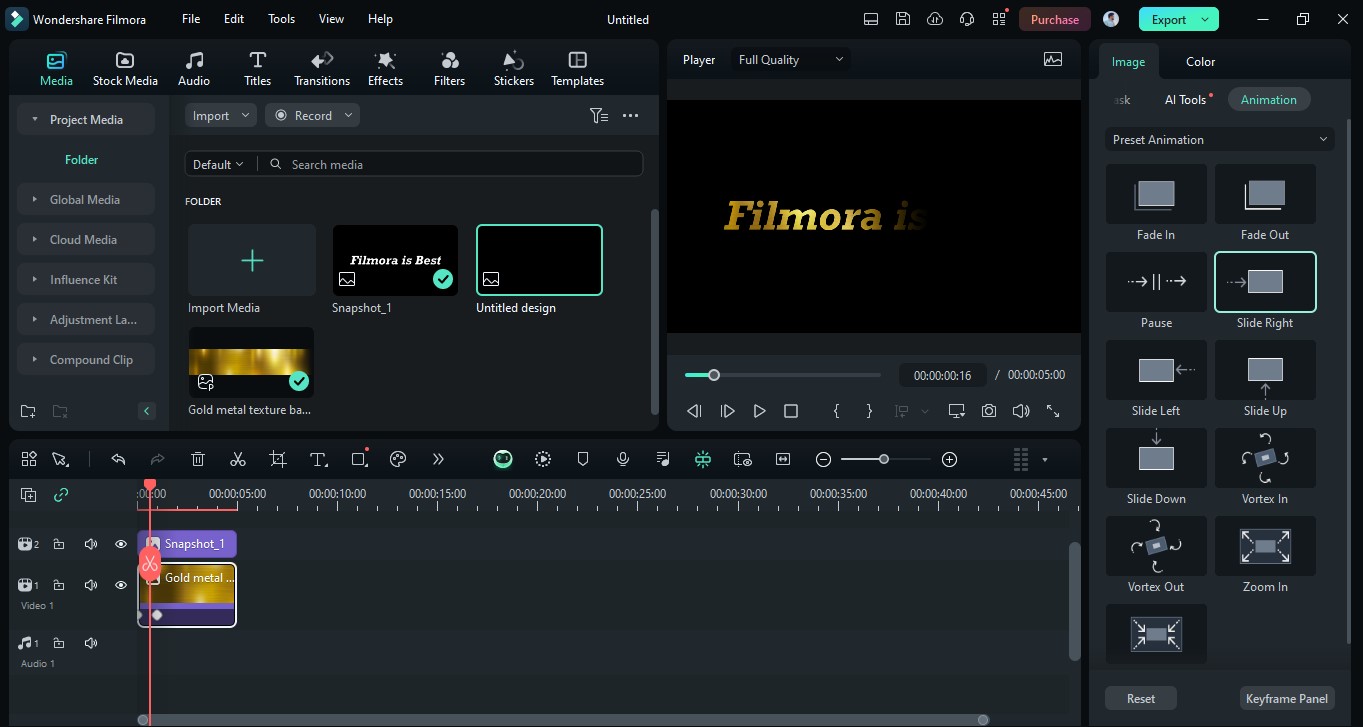
Step 5. Now, drag and drop the golden strip below the timeline and drop the snapshot above the golden strip. Then, double-click the snapshot track and select " "Darken" " from the drop list of Blend mode.
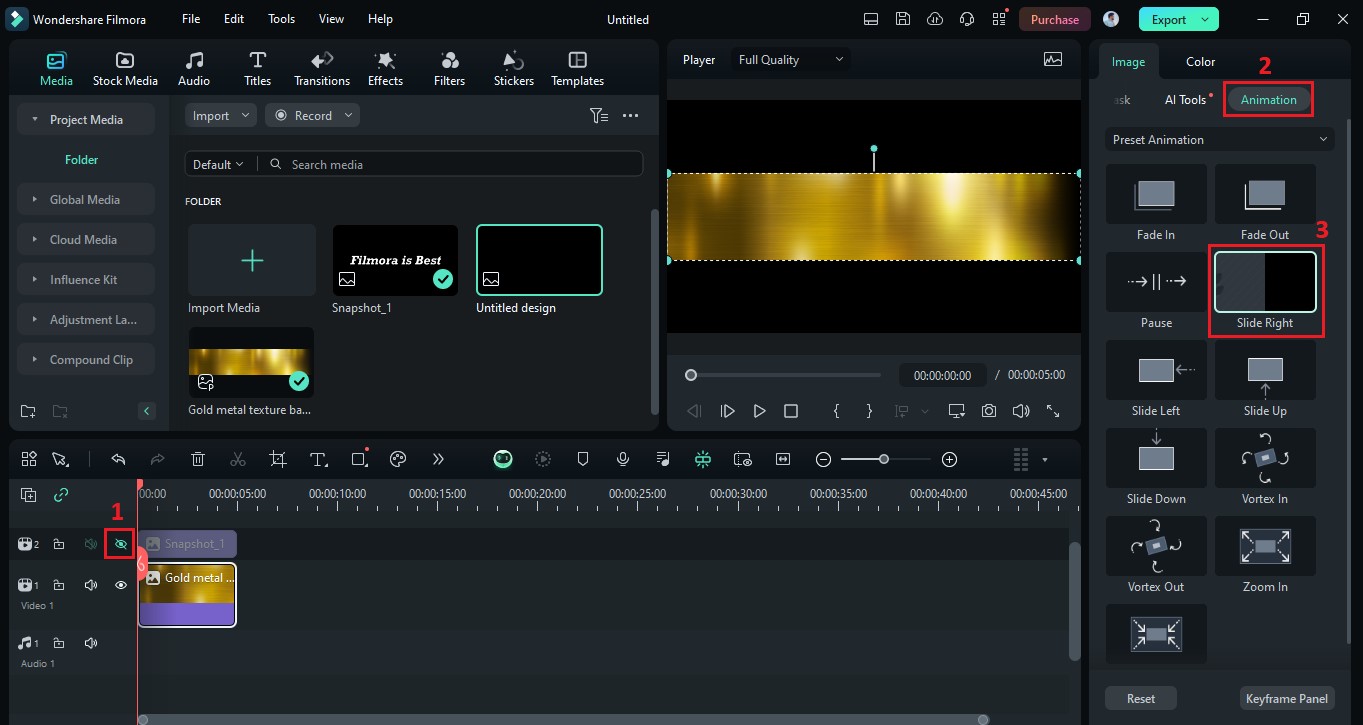
Step 6. Next, hide the snapshot track and double-click the golden strip track. Go to ""Animation"" from the right menu and select ""Slide Right"" animation effect.
Step 7. Unhide the snapshot track and play the video to see if you achieve the desirable effect. If you are satisfied with the 3D gold text, click the ""Export"" button and save it to your device.
Although Filmora can create 3D golden text effects, it may lack advanced features that Photoshop may have. But even then, it fulfills the purpose. If you want to know how to create this effect using Photoshop, you can read the next section.
Create a 3D Gold Text Effect for Still Images with Photoshop Layer Styles
You can make regular text look amazing by applying layer styles like inner glow, bevel & emboss, and gradient overlay offered by Photoshop. Styling different layers separately in Photoshop is an ideal method for creating a refined effect in text.
Here are the steps to create a 3D gold text effect in Photoshop.
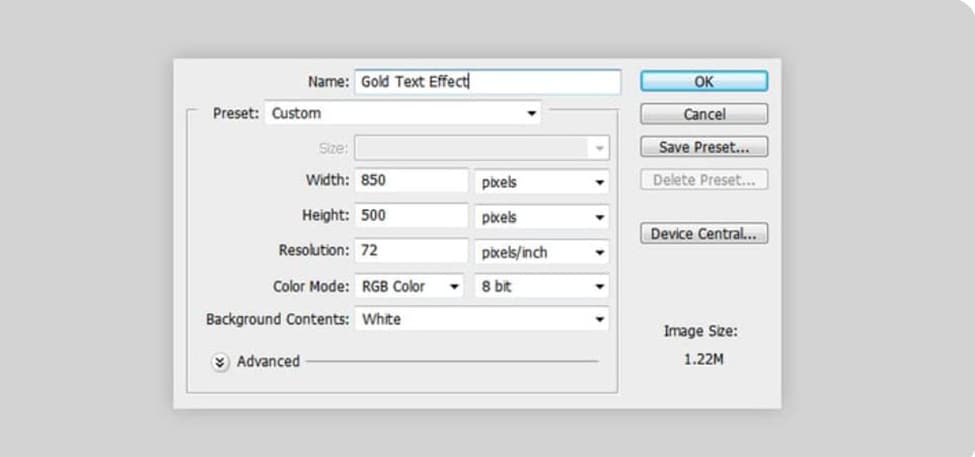
Step 1. We'll start by creating a contrasting background for our gold text.
To start a new document in Photoshop, select ""File"" > ""New"" and enter the dimensions of the image you want.
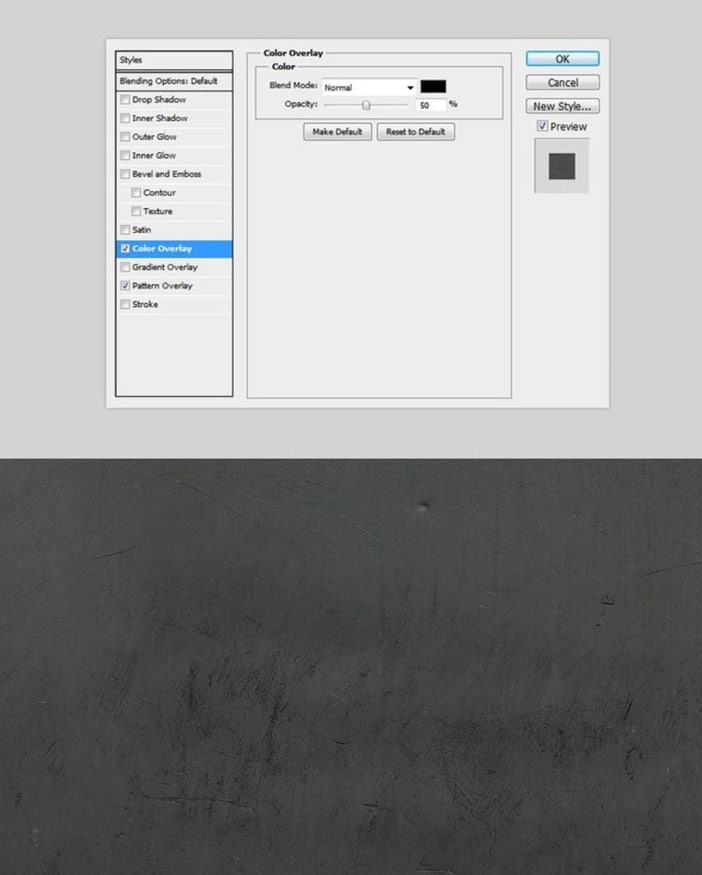
Step 2. Duplicate the background (go to ""Layer"" > ""Duplicate Layer"" > " "OK"") and rename the new layer ""Background Pattern.""

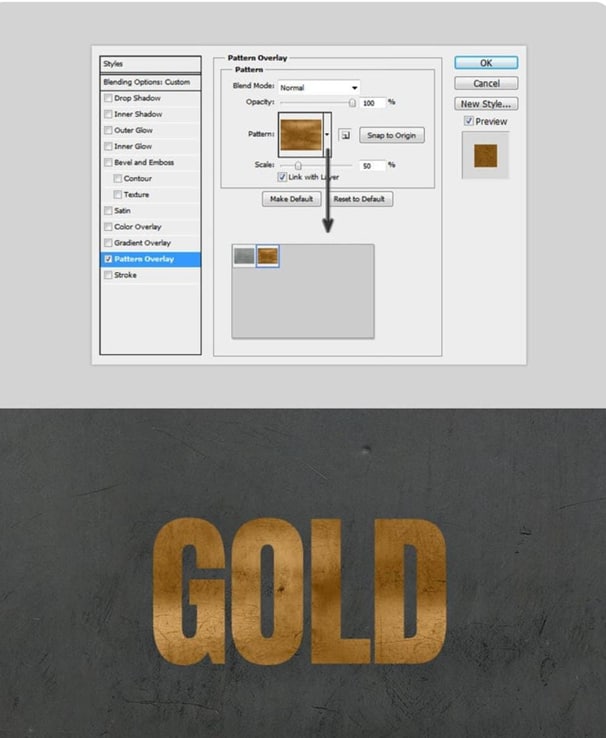
Step 3. Now, add a texture to the background layer. Double-click the ""Background Pattern" " layer to open Photoshop’s layer-style window. Go to ""Pattern Overlay,"" click the pattern box, and Click ""OK.""

Step 4. Add a black Color Overlay layer with 50% opacity. Double-click on the Background Pattern layer, and once the layer style window appears, set the values in the Color Overlay section.
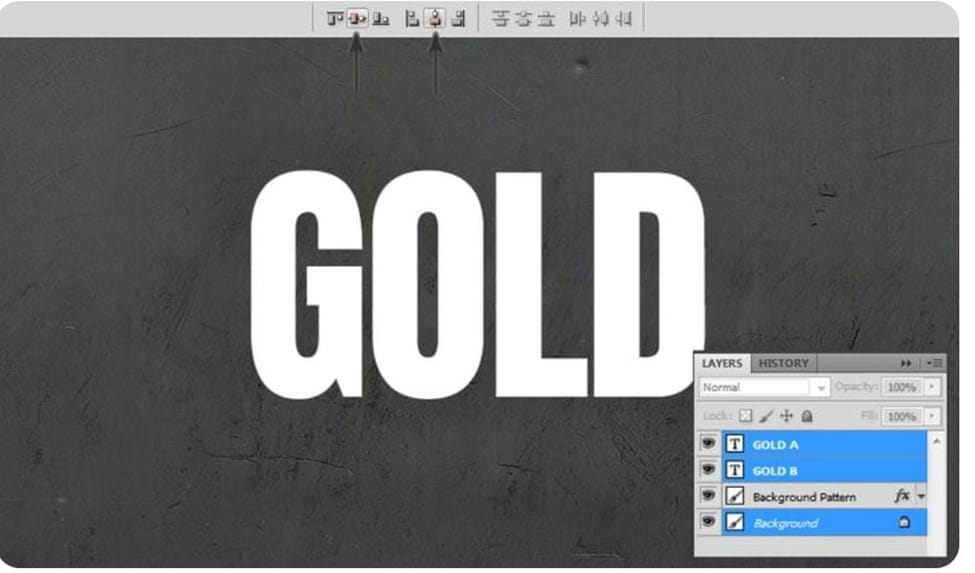
Step 5. Now, we have to create the Text and Align It. Type "GOLD". Duplicate the GOLD text layer and name the top and bottom layers you choose. Using the Move Tool, select both text layers, then click the align commands on the top menu to center the text.
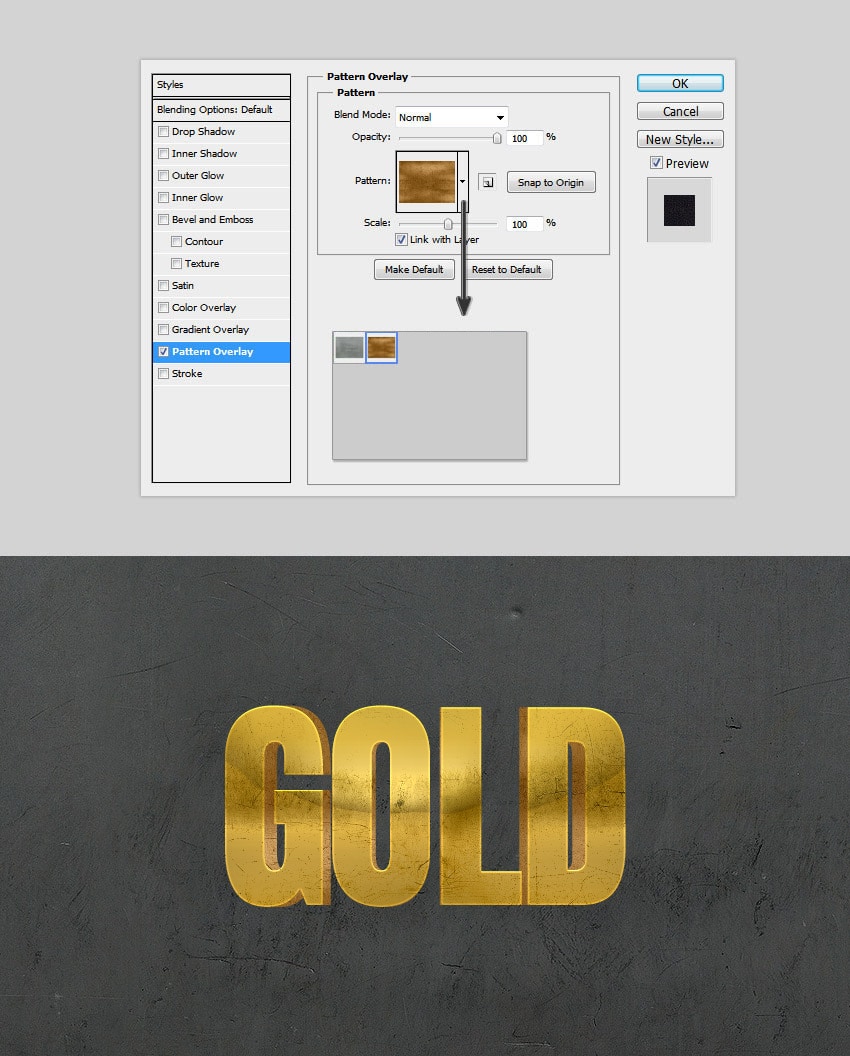
Step 6. Go to Layer Style > Pattern Overlay, and select Pattern02 as the base texture.
Then, go to Bevel & Emboss and set

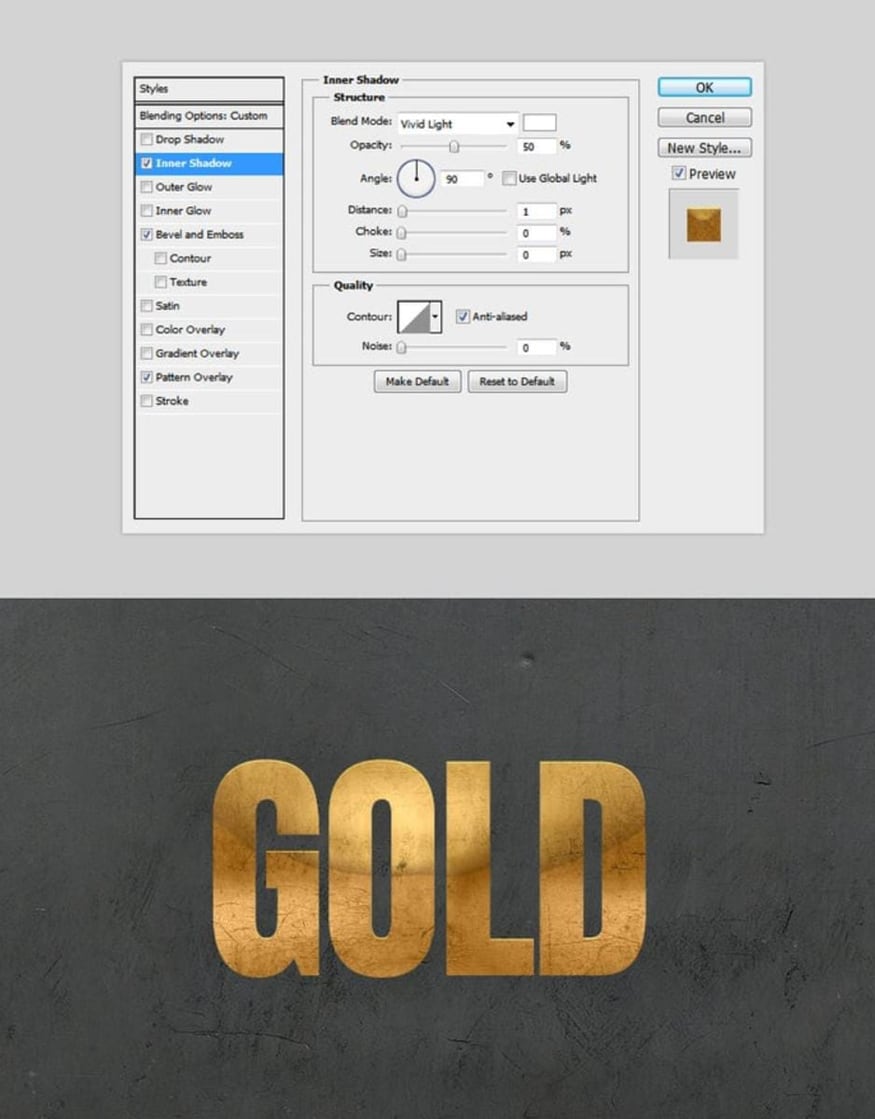
Step 7. To enhance the layer with a brighter, softer gold effect, Open the inner Shadow and adjust the settings to brighten the edges.
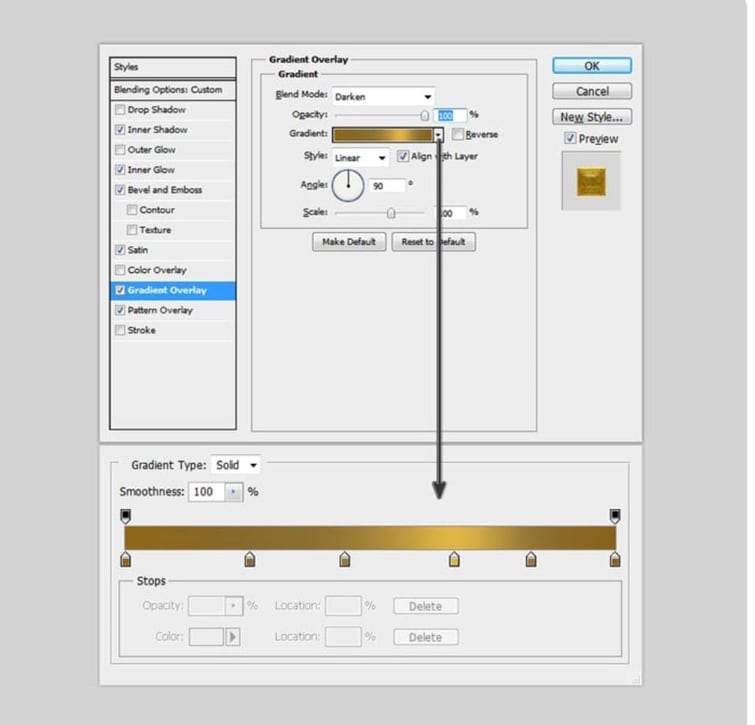
Gradient Overlay: Modify the gradient to create a softer gold effect.
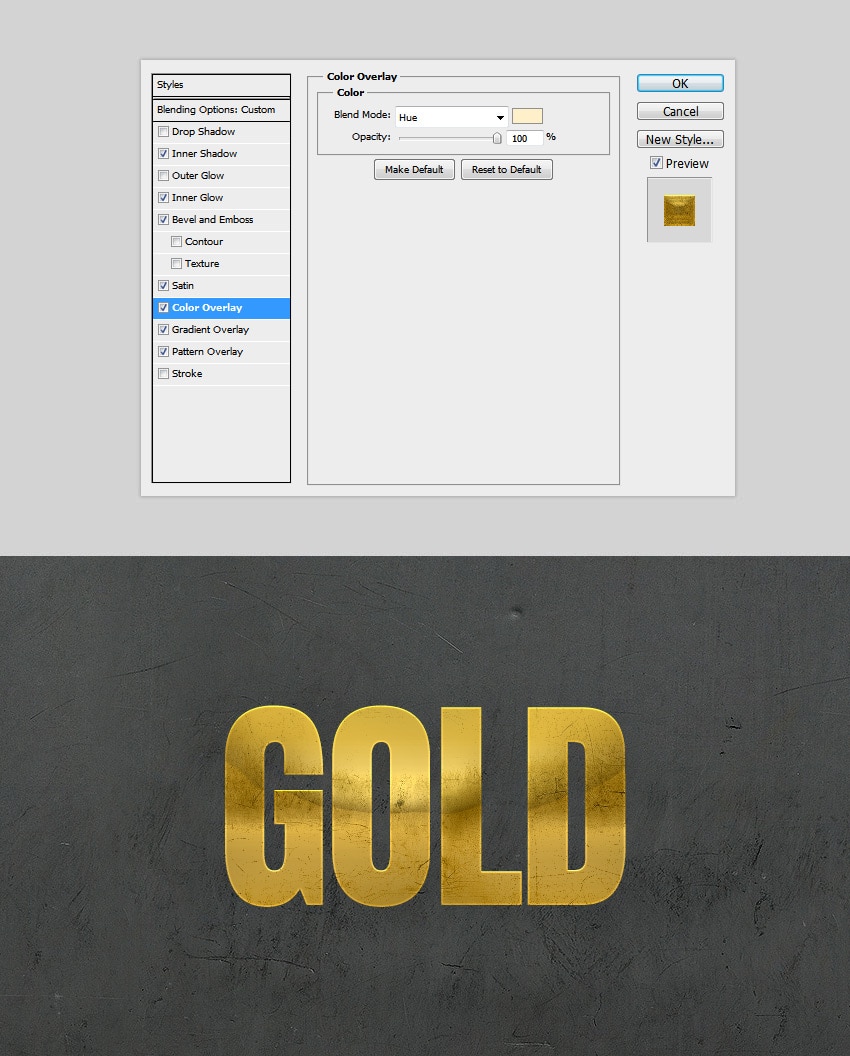
Color Overlay: Set Blend Mode to Hue, use the color #fff0c9, and set Opacity to 100%.
Step 8. Styling of B layer: Select the GOLD B Layer and press Control-T to transform it. Set the Horizontal Scale to 92% and press Enter.
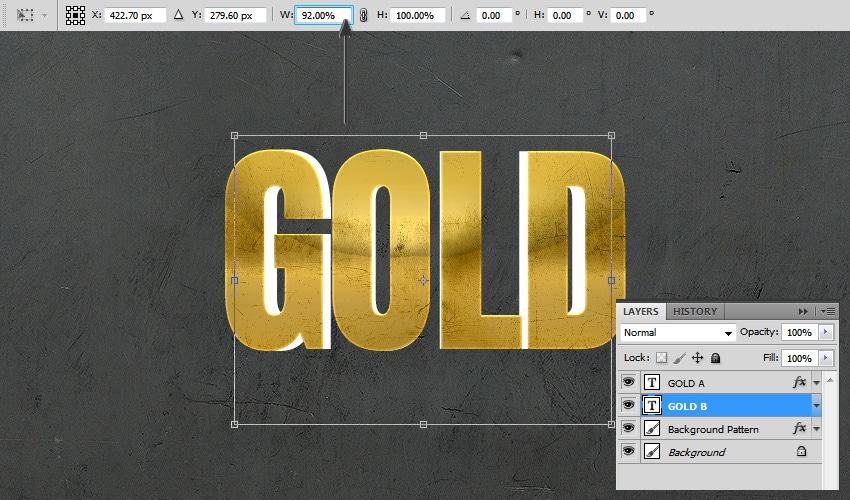
Apply Pattern Overlay by going to Layer Style, selecting Pattern Overlay, and choosing Pattern02 to match the texture and color.
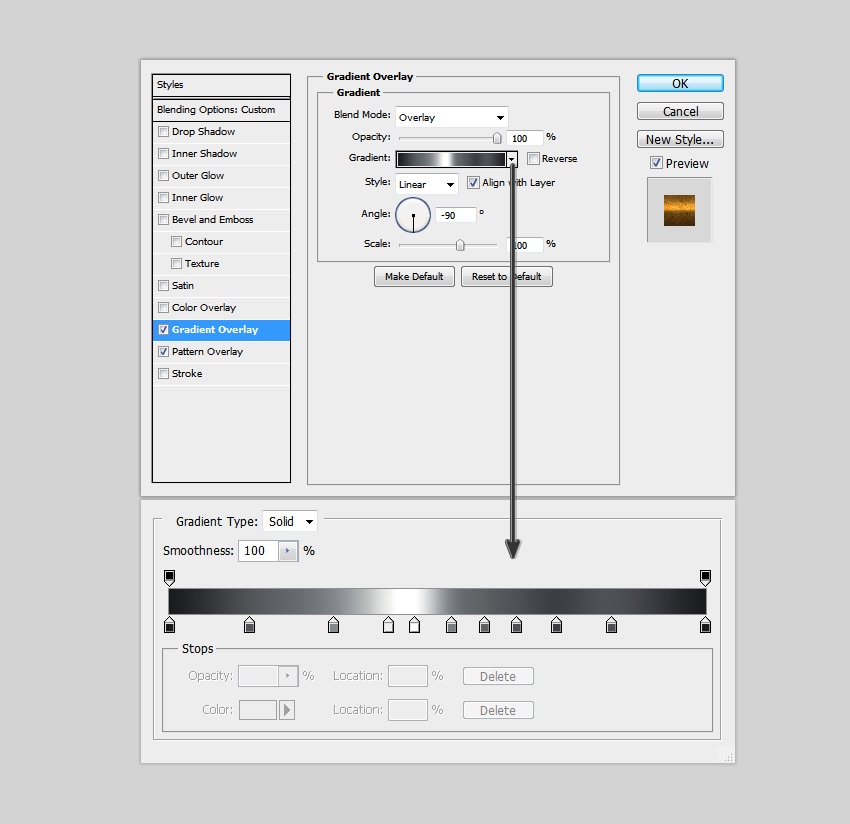
Step 9. Gradient Overlay: Set Blend Mode to Overlay, Opacity to 100%, Style to Linear, Angle to 90º, and Scale to 100%.
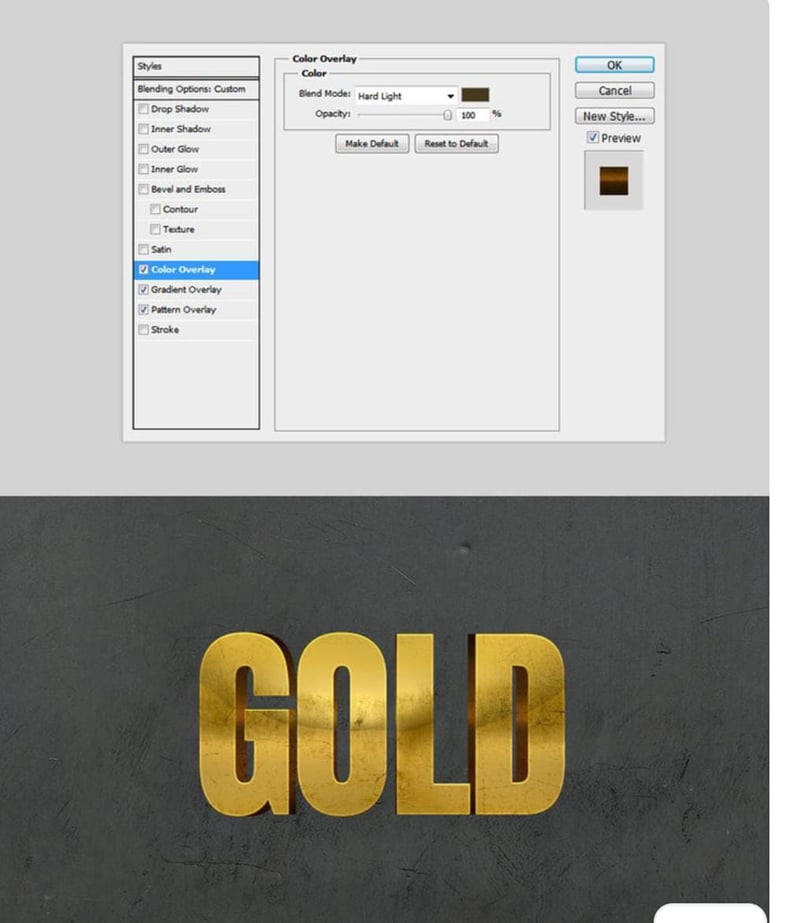
Step 10. Color Overlay: Set Blend Mode to Hard Light, use the color #443a1d, and set Opacity to 100%.
This is how to create golden text font in Photoshop. However, this method could be complex for beginners because it involves a lot of steps.
Elevate your designs with added dimension and depth using these expertly crafted golden 3d text PSD free downloads.
Free 3D Gold Text Effect PSD Files
- Use gold text effects PSD files provided by freepik.
- PS Files also offer free metallic text and logo effects
- Vecteezy is another platform to get free gold text effect
Limitations of using Photoshop to create 3D Golden Fonts
Photoshop has limitations even if it's an effective tool for making 3D golden fonts:
- Limited 3D Capabilities: Photoshop's primary method of modeling 3D is through 2D layer styles and effects, which might not be as realistic or deep as 3D applications explicitly designed for that purpose.
- Complex Workflow: It can take several layers and changes to create a believable 3D gold text effect, which can be difficult and time-consuming for beginners.
- Performance Problems: Photoshop can become slow when working with high-resolution photos and intricate layer styles, especially on less powerful computers.
- Lack of Flexibility: Changing the text after the effects are applied can be difficult because it requires reapplying or adjusting several layer styles.
Use Online 3D Gold Text Generators
You may have heard about Canva, as it is one of the most advanced software editors and designers use. Adding a touch of luxury to your designs is possible by choosing an outstanding software such as Canva.
Follow these simple steps to achieve a stunning golden text effect:
Step 1: Add Letter Frames to the Canvas
- Open Canva and start a new project.
- Navigate to the ""Elements"" tab on the left side panel.
- Scroll down to find ""Frames"" and click " "See all.""
- In the search bar within the frames section, type ""letter" " to find the letter frames you choose.

Step 2: Find a Gold Image
- Go to the ""Photos"" tab on the left side panel.
- Use the search bar to find a gold image by typing keywords like "gold foil," "gold metal," or ""shiny gold.""
- Browse through the results to select the most suitable gold image.

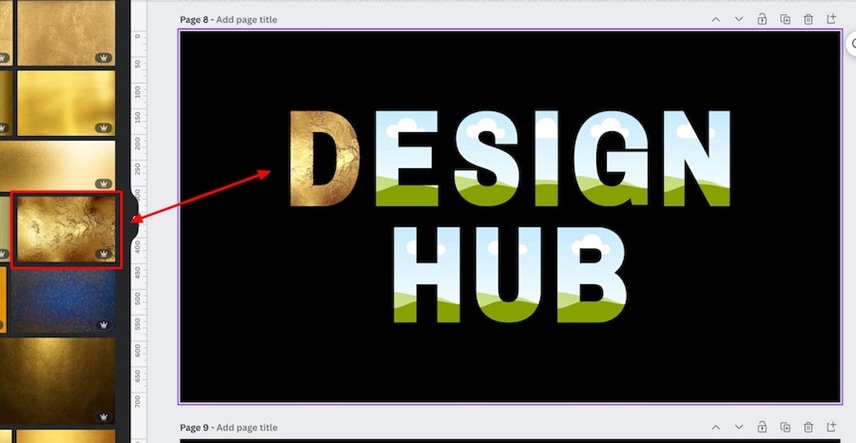
Step 3: Add the Photos to Your Letter Frames
- Drag your chosen gold image from the left side panel.
- If you're working with multiple letters, you can streamline the process:
Add the gold image to one letter frame.
Select that letter frame and click " "Copy style"" in the top right of the editor.
Drag your cursor over the other letter frames to apply the style to all of them simultaneously.
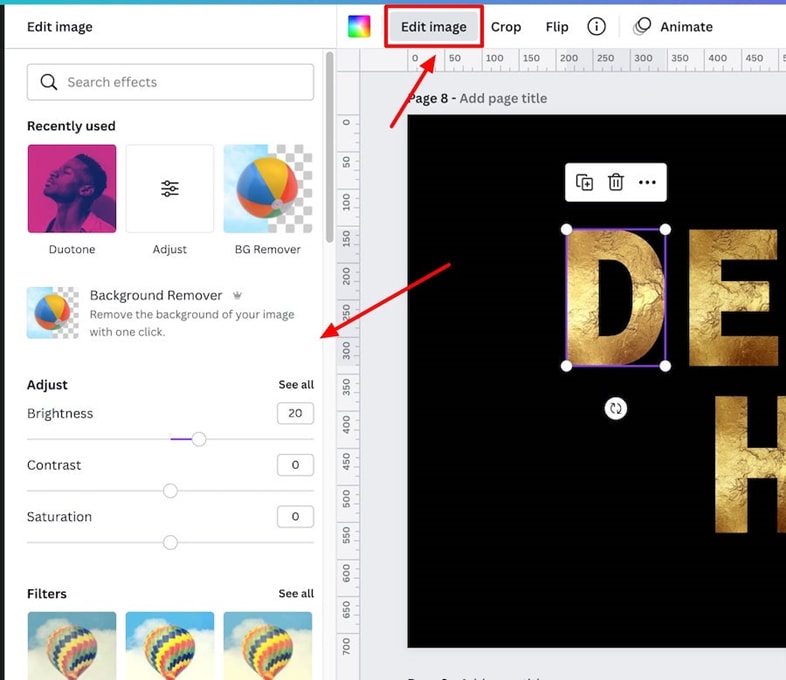
Step 4: Adjust the Photos in the Frames
For further customization, click ""Edit image,"" It will help you make other enhancements.
Limitations of Canva Editor
- Basic Text Effects: Compared to Photoshop and other programs, Canvas text effects do not offer as many customization choices. Realistic 3D gold effects require bevels and embosses, which are challenging to design.
- Limited Customization: You can make a gold text effect by using gold images and letter frames, but there's little room to adjust these details.
- Output Quality: Because Canva is a web-based platform, the quality of your design may be lower than it would be if you were using desktop software.
- Limited Resources Available: The Canvas library has gold textures and photos, which are your only options. Even while you can upload your photos, Canva might not have all the tools to produce a 3D effect.
Why Are 3D Gold Effects Beneficial for Editors?
Editors benefit from 3D gold text because it makes their work visually attractive and unique. This appearance improves a project's quality, making essential components like titles and logos stand out and draw attention.
3D gold effects are adaptable, allowing for their application in various media, including print and digital. Ultimately, these effects enhance a design's credibility and increase audience impact and engagement.
Pros and Cons of using 3D gold effects in logo and designing
3D gold effects in logo and design have several pros and cons. You can find a few of them below
Final Words
Mastering the creation of 3D gold text effects in 2024 can significantly enhance your design projects. It allows you to create visually stunning and sophisticated text that captivates your audience.
By utilizing tools like Wondershare Filmora, you can easily apply techniques such as achieving a luxurious appearance. If you can create 3D gold text, your designs will be recalled, whether for personal projects, branding, or marketing.
Keep learning and playing with these methods to improve your abilities and maintain your competitive edge in the ever-changing design field.
