Time lapse videos condense hours of footage into just a few seconds. It creates captivating visual narratives of processes that unfold over time. However, when the speed feels too rushed, slowing down a time lapse can add depth and detail to your footage. This process requires careful adjustments to maintain the video’s quality and preserve its intended effect.
In this guide, we’ll guide you through how to slow down a time lapse video while preserving or even enhancing its visual appeal. This guide will cover step-by-step guidance from using Wondershare Filmora’s basic method to its advanced features. Let’s dive in and explore how to achieve the perfect pace for your time lapse videos.

In this article
Part 1. What is a Time Lapse Video?
Time lapse videos are a type of video that compresses long durations of real-time footage into a brief, captivating sequence. Unlike regular videos that capture everything in real-time, time lapse videos take photos at set intervals over a long period and then play them back quickly.
Time lapse is great for showing slow events that are difficult to notice in real-time. For instance, a time lapse of a flower blooming or a sunset transitioning across the sky. By recording these events with time lapse effects, we can reveal details and patterns that might be missed otherwise.
But sometimes, time lapse videos can move too quickly, and slowing them down might be beneficial. Slowing the footage can highlight specific moments, offer a more detailed view of particular scenes, or create a different mood. It also helps viewers focus on details and makes the video feel more dramatic and engaging.
By adjusting the speed of your time lapse video, you can make it more digestible and captivating for your audience. This guide will help you answer the question of how do I slow down a time lapse video with ease and achieve the ideal pacing without being too fast to follow.
Part 2. Preparing to Slow Down Your Time Lapse Video
Before diving into how to slow down a time lapse video, it’s essential to prepare properly to ensure the best results. Here’s what you need to do:
- Assessing Your Source Footage
Start by evaluating the quality of your original footage. Check the frame rate and resolution to ensure they are sufficient for slowing down without losing clarity. Higher frame rates and resolutions yield better results when slowed down. Poor-quality footage may not perform well.
- Choosing the Right Software
Selecting the right video editing software is key to a smooth editing experience. Look for tools that offer reliable speed adjustment features. Wondershare Filmora is a great choice due to its user-friendly interface and advanced capabilities. Other popular software to consider include Adobe Premiere Pro or Final Cut Pro also provide robust features.
- Backup and Workflow Planning
Always backup your original footage before starting the editing process. This precaution helps you avoid losing the original quality in case of errors during the editing process. Plan your editing workflow, organize files, and note adjustments to maintain consistency and prevent errors.
By carefully preparing your footage and choosing the right tools, you can effectively slow down your time lapse video while preserving its visual quality and impact. Now, let's go to the steps on how to slow down time lapse videos.
Part 3. How to Slow Down a Timelapse Video with Wondershare Filmora
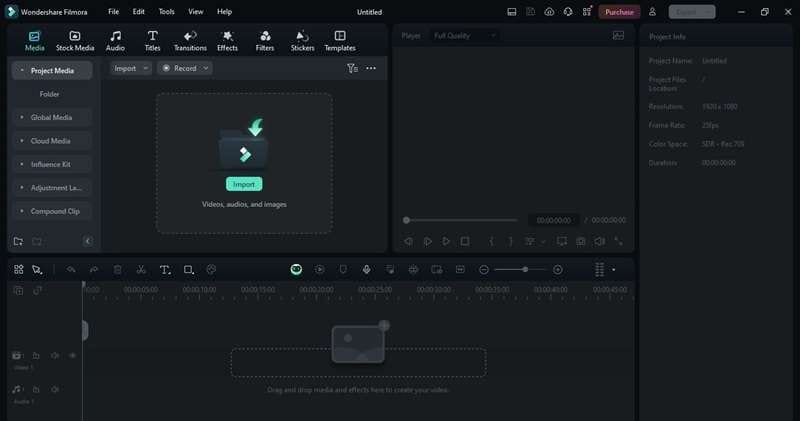
Wondershare Filmora is a powerful yet user-friendly video editing software. It is an excellent choice for slowing down time lapse videos. With its intuitive interface and advanced features, Filmora offers basic and advanced methods to help you achieve the perfect pace for your footage.

Key Features
- Uniform Speed Control
Provides precise adjustment of the entire video’s speed, allowing for smooth slow-motion effects.
Enables you to apply multiple speed variations within the same clip. You can use either preset speed curves or custom settings.
- AI Frame Interpolation
Use an optical flow method to ensure the smoothest slow-motion effects when altering video speed.
- Keyframing
Allows you to add marker points and tweak their parameters to create dynamic speed changes and other effects between points.
- Real-time Preview
Offers instant feedback on your adjustments, enabling you to fine-tune slow-motion effects to achieve the desired result.
Method 1. Using Basic Speed Adjustment
Filmora’s Uniform Speed feature is ideal for simple projects where you want to slow down your time lapse with minimal effort. Here’s how to slow down a time lapse video using this feature:
Step 1. Open the Uniform Speed Tool
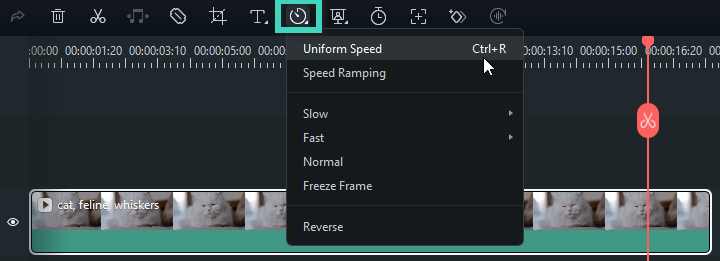
After placing your video on the timeline, click on it to select. In the toolbar above the timeline, click on the Speed icon > Uniform Speed. Alternatively, right-click the video clip, navigate to the Speed option, and select Uniform Speed from the dropdown menu.

Step 2. Adjust the Speed
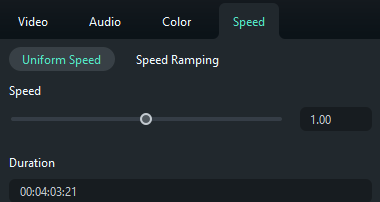
Move the Speed slider to the left to decrease the video’s speed. The number displayed beside the slider will show the speed adjustment level. Adjust it according to your desired effect.

Step 3. Preview and Save
To check your changes, press the Play button in the Preview window or hit the Spacebar key. Once you’re happy with the result, proceed to save your video.
Method 2. Using AI Frame Interpolation
For more complex projects or when higher quality is needed, Filmora’s AI Frame Interpolation tool offers a more advanced option. This method uses AI to generate additional frames, ensuring smoother slow-motion results. Here’s how to slow down time lapse videos using this feature:
Step 1. Select the time lapse video clip on your timeline that you want to slow down.
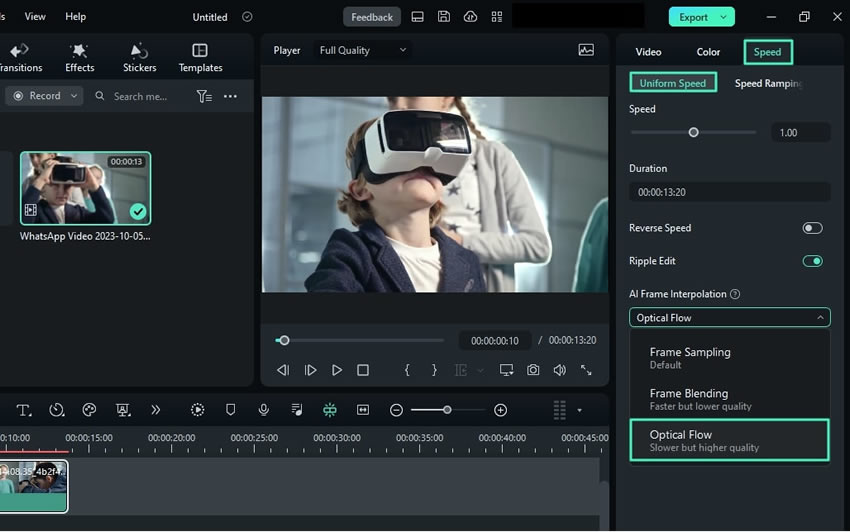
Step 2. Right-click on the selected clip, then go to Speed > Uniform Speed.
Step 3. Slow down the video by dragging the Speed slider to the left. Under the AI Frame Interpolation, choose the Optical Flow option.

Step 4. To preview your changes, click Render Preview in the timeline toolbar. You can also export the video to review the final outcome.
By using these features, Filmora makes it easy to slow down time lapse videos while maintaining or even enhancing their visual appeal.
Part 4. Tips for Achieving the Best Results
Slowing down a time lapse video requires more than just adjusting the speed; it's about enhancing the footage to make the most of the slower pace. Here are some tips to help you achieve the best results:
- Post-Processing Tips
Once you’ve slowed down your time lapse, focus on post-processing to enhance its visual appeal. Begin with color correction and grading to ensure colors remain vibrant and true to the scene, even at a slower pace. Consider adding music or sound effects that match the new tempo of your footage to set the right mood.
- Using Stabilization
Slowing down a time lapse can sometimes exaggerate any instability in the original footage, leading to jittery or shaky results. Use Filmora stabilization features to keep your footage smooth and steady.
- Adding Subtle Effects
To further enhance your slowed-down footage, consider adding subtle effects like gentle zooms or slow panning. These effects can draw attention to specific details or add a dynamic element to the scene without overwhelming the viewer.
Part 5. Troubleshooting Common Issues
When slowing down a time lapse video, several issues might arise. Here’s how to address common problems:
- Dealing with Choppy Footage
Choppy footage can occur when slowing down videos. Address this by increasing the frame rate during recording or using Filmora’s Optical Flow feature. Optical Flow generates intermediate frames, smoothing out motion and reducing stutter.
- Maintaining Consistent Quality
Ensure high resolution and frame rates to maintain video quality after speed adjustments. Use Filmora’s frame interpolation to avoid ghosting and blurriness, keeping your footage clear and sharp.
- Avoiding Common Issues
Watch for ghosting and blurriness in slowed footage. Adjust speed settings gradually and use Filmora’s real-time preview to identify and correct problems early, ensuring a smooth and clear final result.
Conclusion
Slowing down time lapse videos adds a new dimension to your visual storytelling by emphasizing details and enhancing viewer engagement. Learning how to slow down a time lapse with Wondershare Filmora allows you to adjust the speed while maintaining the quality.
Remember to prepare your footage properly, choose the right tools, and fine-tune your edits with post-processing and stabilization. With these techniques and tips, you’ll master how to slow down time lapse videos effectively. Explore the potential of your footage and achieve the perfect pace for a more immersive viewing experience.


 100% Security Verified | No Subscription Required | No Malware

