

When learning 3D modeling and animation in Blender, mastering camera movement is essential for presenting your projects. Animating the camera movement around your project can help you show off your creation in a more immersive way, transforming a single still image into a full, dynamic view.
There are a few ways to animate camera movement in Blender. This step-by-step guide will walk you through the two easiest and most effective methods for beginners: keyframing and animating along a path.
Part 1. Keyframe Animation - The Basic Way to Move Your Blender Camera
The most basic way to animate camera movement in Blender is to keyframe the camera. We will break this method into two parts:
- Set up and record the camera movement
- Smooth the keyframe to make the motion look seamless
Note: for this Blender camera animation tutorial, we are using Blender 4.5. If you're on an older version, some menu names, shortcuts, or options may differ. You can check the video above for an older version.
1. Set up and Record the Camera Movement in Blender
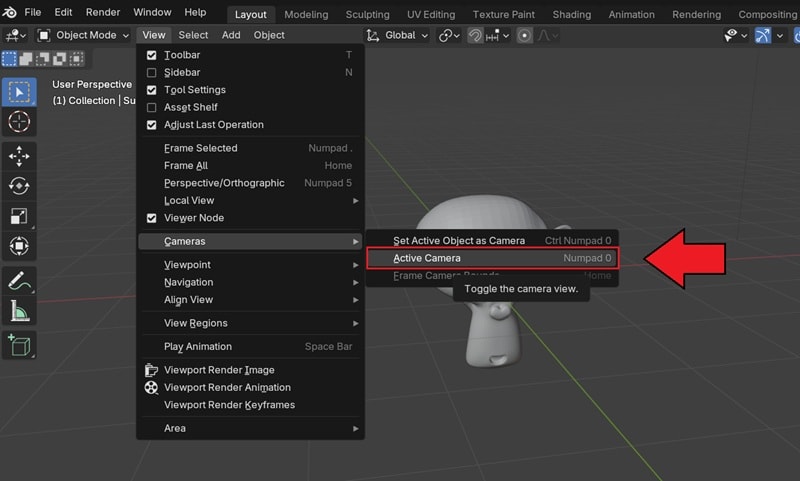
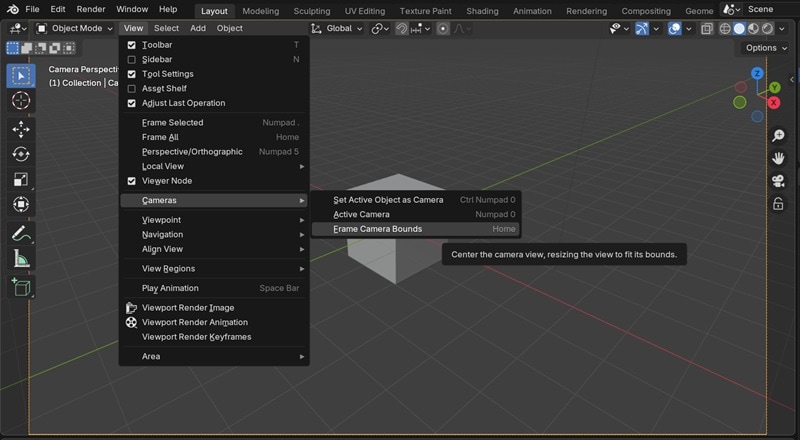
Go to View > Cameras > Activate Camera (or press Numpad 0) to look through the camera.
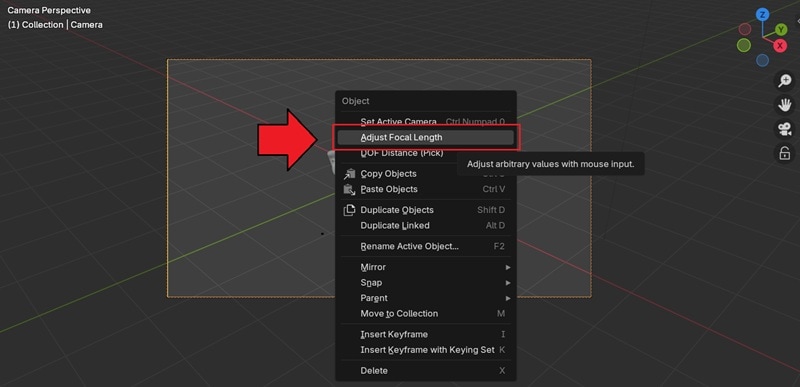
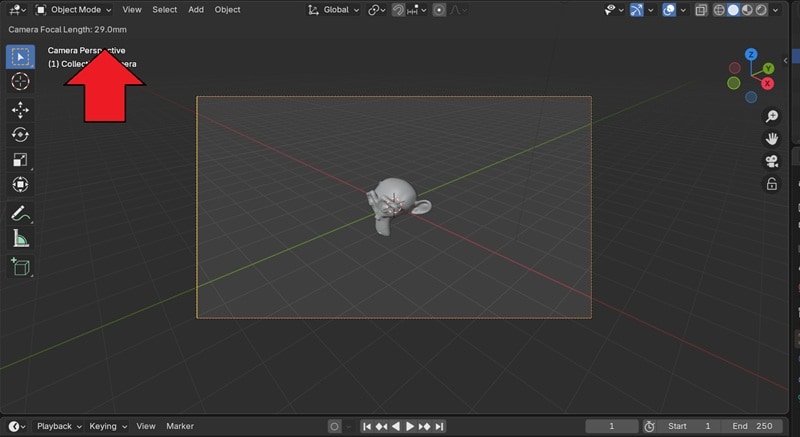
Select the camera, right-click to open the context menu, and select Adjust Focal Length in the Camera Properties.
Hover over the Focal Length field until it's set to about 18–24 mm for a wide shot. Press Enter or click to confirm.
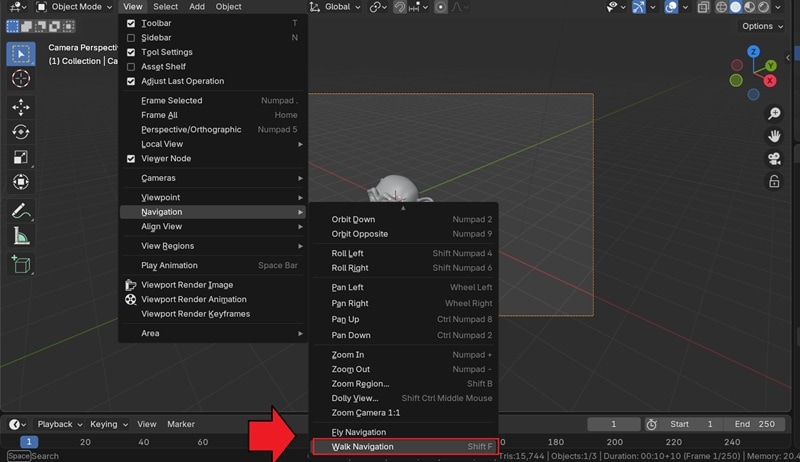
Next, use Walk Navigation to move like a first-person game with your keyboard. Head to View > Navigation > Walk Navigation.
After that, you will get to move around using your keys:
- W A S D: Move forward, left, back, right
- Mouse: Look around
- E / Q: Move up / down
- Shift: Speed up, Ctrl: Slow down
- Tab or G: Toggle gravity or floor snapping
- Right-click or Esc to cancel
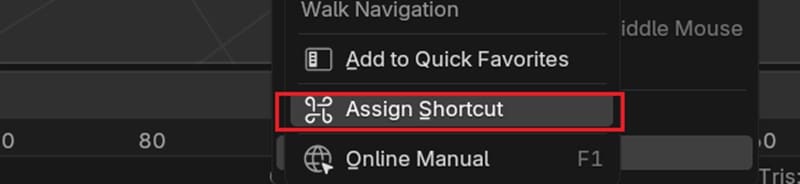
Tip: You can create a custom shortcut for navigation by selecting View > Navigation, then right-click Walk Navigation and choose "Assign Shortcut." Press the keys you want (e.g., Shift+F) to bind it.
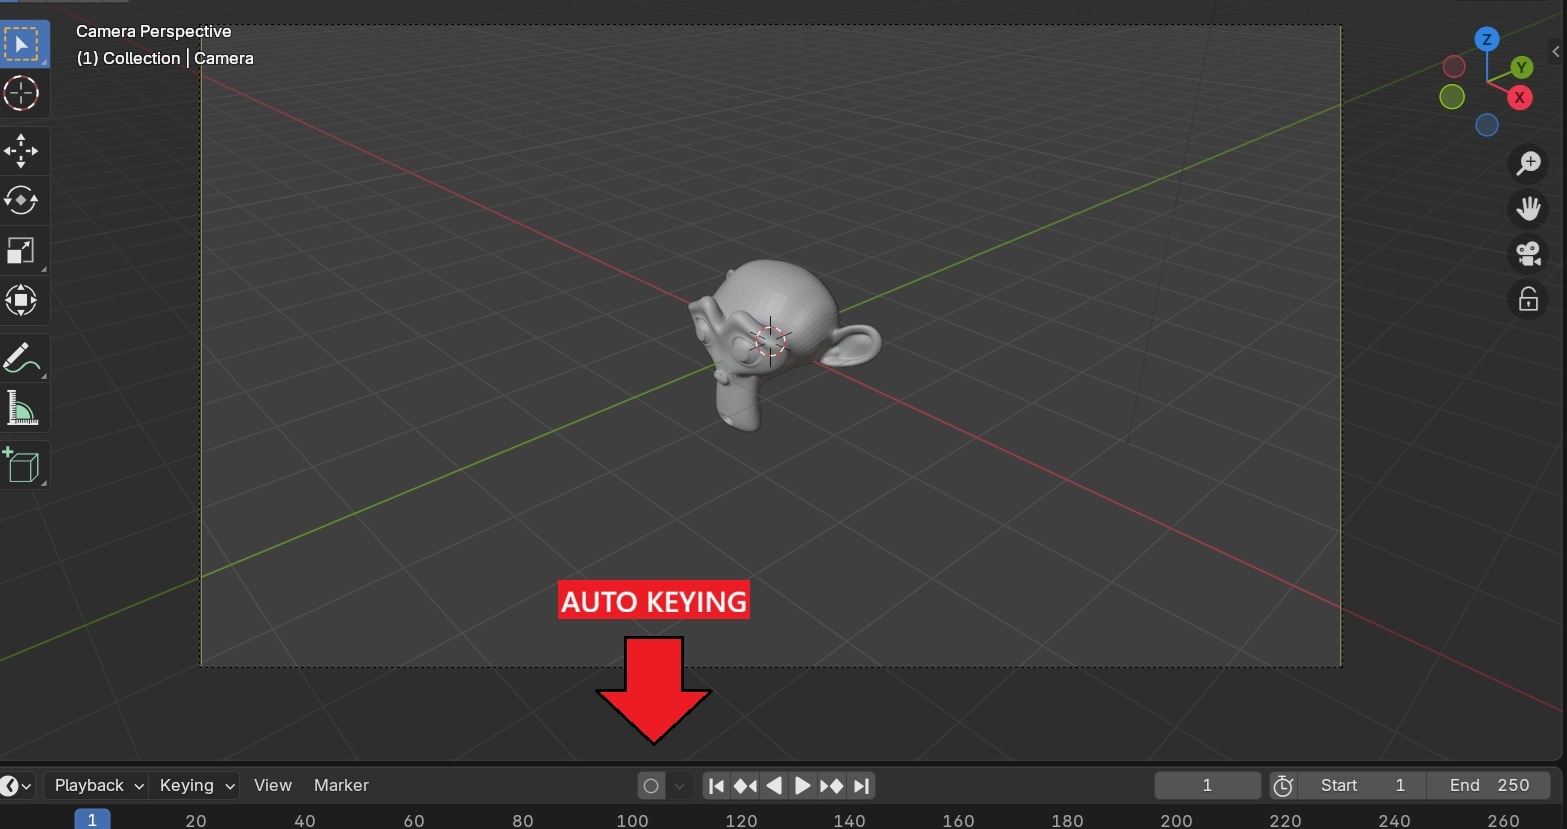
Turn on Auto Keying, press Space to start playback, then launch Walk Navigation with your shortcut before (Shift+F). Move the camera, and Blender will add keyframes automatically. Press Space again to stop.
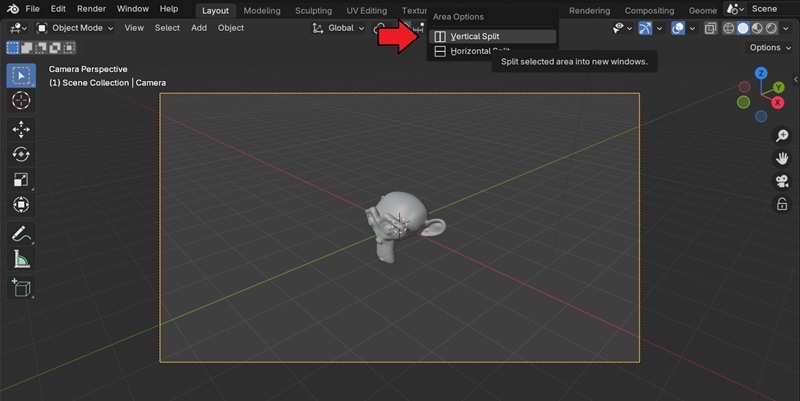
Review your keyframes in the Graph Editor by splitting the workspace first. To do it, right-click the line between the header and choose Split Vertical (or horizontal, if you prefer).
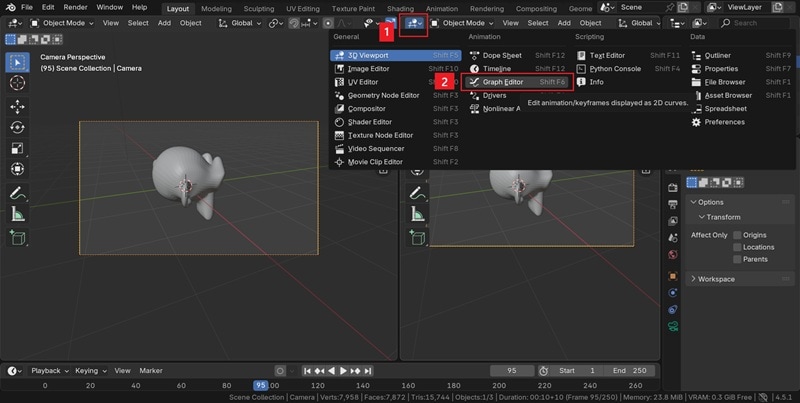
In the new panel, click the Editor Type menu (top-left) and select Graph Editor (Shift+F6).
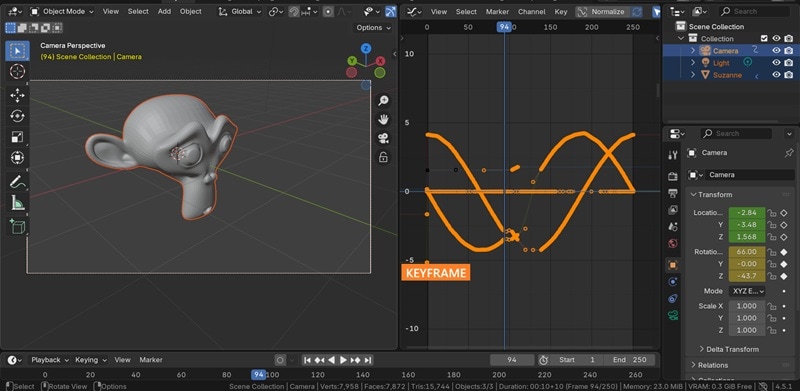
Now, play the walking navigation you just did before. You will see the keyframe you just recorded.
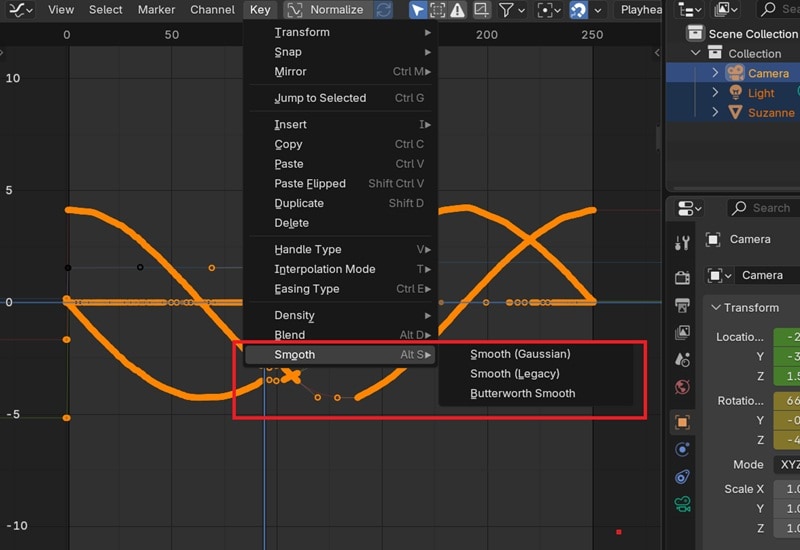
2. Smooth the Keyframes
To soften the motion, go to Key > Smooth in the Graph Editor and select the effect you want, which includes:
- Gaussian: softens the curve with a Gaussian blur for natural motion
- Legacy: classic smoother that reduces small bumps quickly
- Butterworth Smooth: smooths while keeping the overall shape stable
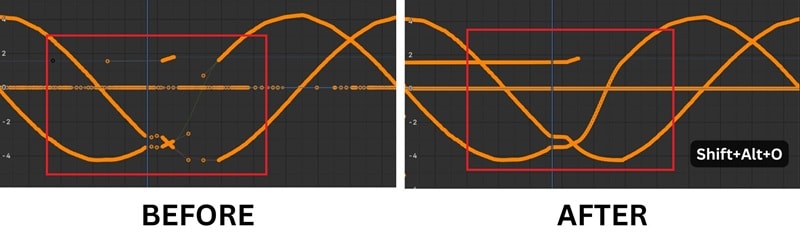
If some parts feel sparse, press Shift+Alt+O to run Sample Keyframes so it fills the gaps. For fewer bumps, press V and choose Auto Clamped, then use Key > Density > Clean Keyframes to remove tiny extras.
Part 2: Follow a Path - Creating Smooth & Consistent Camera Moves in Blender
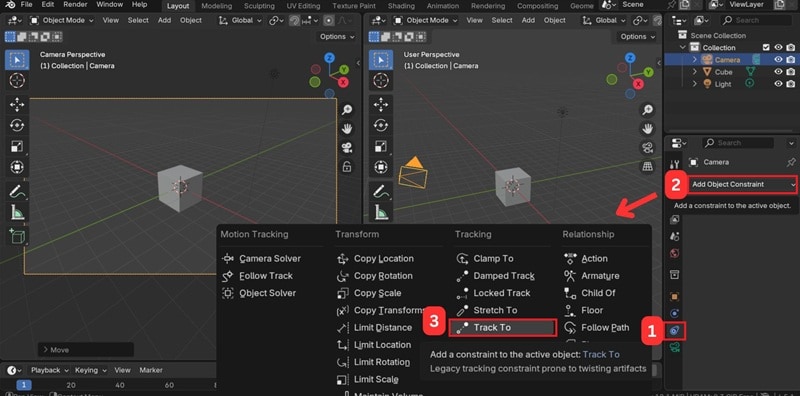
For the second method for creating Blender camera movement animation, you can drive the camera along a curve using Follow Path and keep it aimed with Track To. The steps are a bit more complex compared to keyframing, yet it's perfect if you want to create consistent moves like dolly and orbit.
1. Set Up the Camera
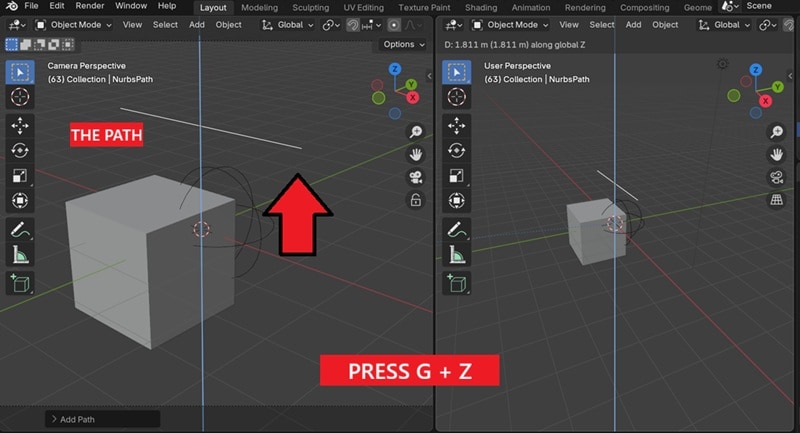
Note: To see the changes more clearly, we will split the viewport vertically again.
- Press G to grab and move the camera. Watch the left-side viewport readouts to understand how the position changes.
- Press Z while moving to slide the camera on the Z axis.
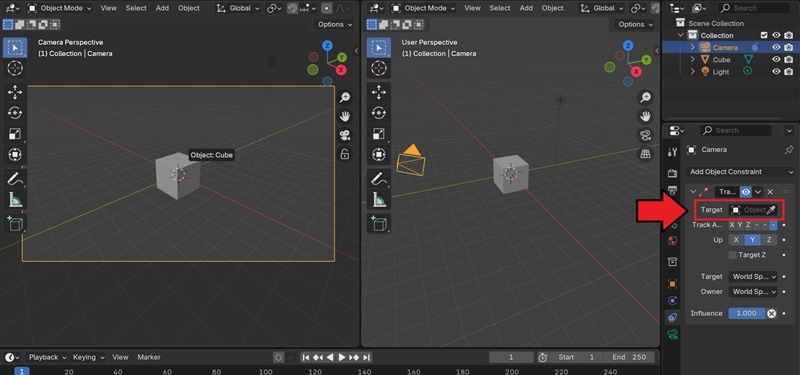
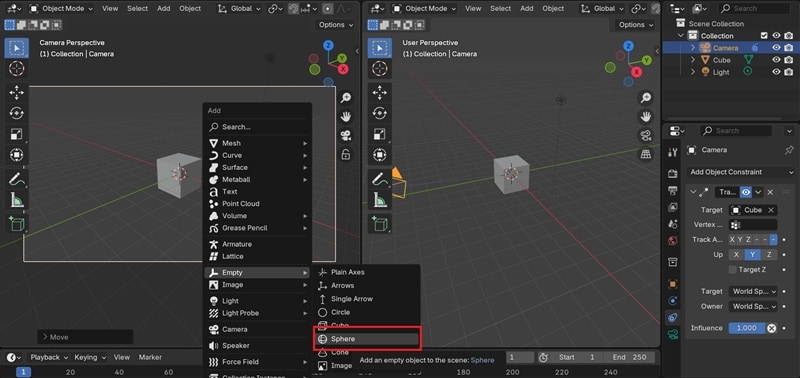
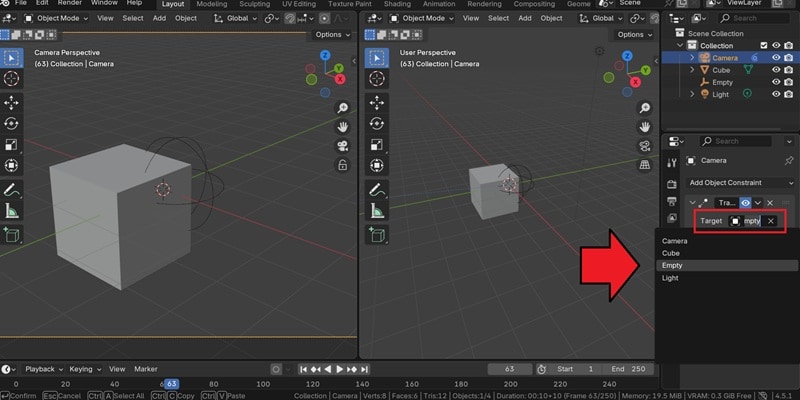
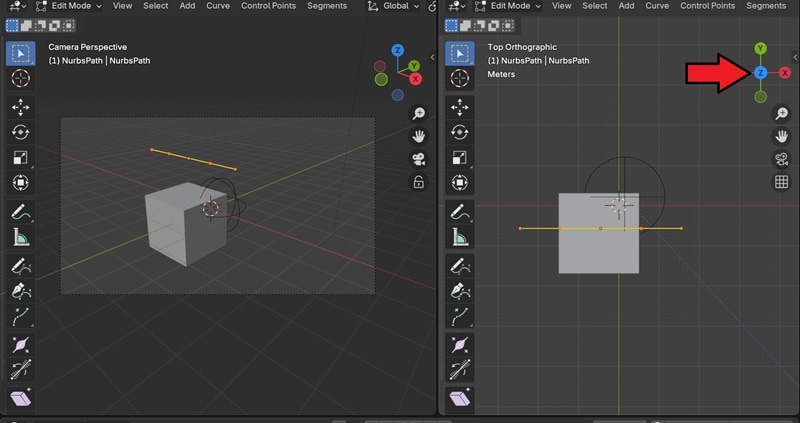
2. Make the Camera Look at a Target
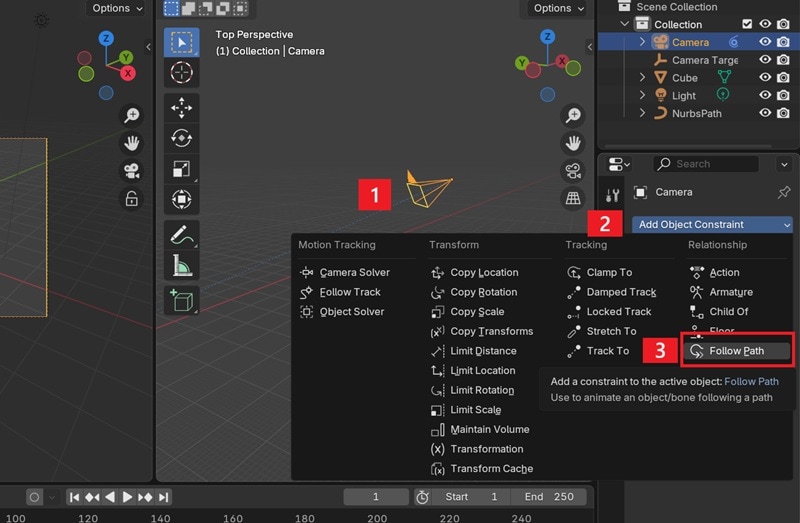
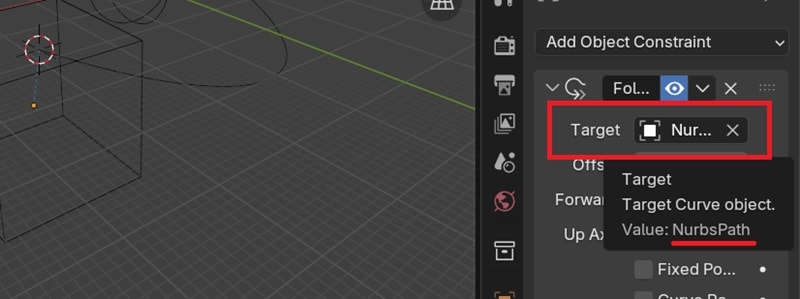
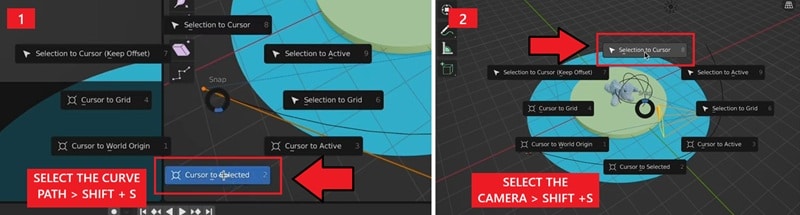
3. Make the Camera Follow the Route
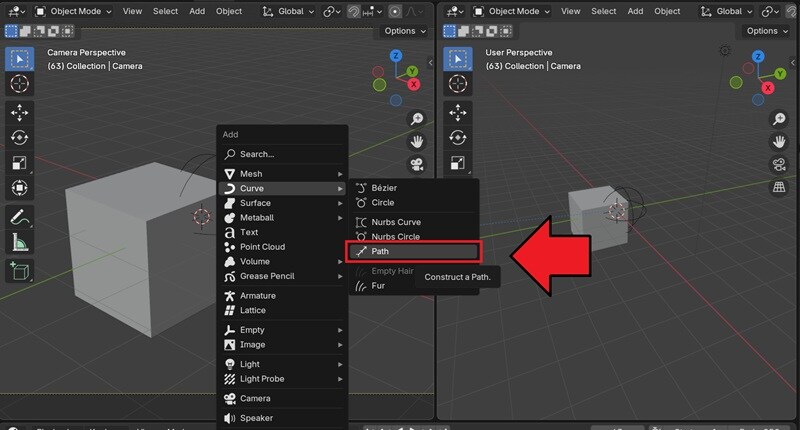

- Select the curve, press Shift + S, and select Cursor to Selected.
- Then, go to Object Mode, click the Camera, and press Shift + S, select Selection to Cursor.
Part 3. Popular Camera Moves in Blender
By now, you have a better understanding of how to animate the camera movement in Blender. To help you practice and hone your skills, you can try different camera moves that you can make in the software.
Orbit: The camera moves in a circle around your subject
How to do it:
- Create a circular path around your object.
- Add a Follow Path constraint for the camera and a Track To constraint to keep the subject centered.
Dolly: The camera moves straight toward or away from the subject
How to do it:
- Select the camera.
- Press G + Z + Z to lock movement to the local Z-axis.
- Push forward or backward.
Truck: Slides the camera sideways across the scene
How to do it:
- Select the camera.
- Press G + X + X to lock movement to the local X-axis.
- Slide over left and right.
Pan: Rotates the camera left or right from a fixed spot
How to do it:
- Place the camera where you want it and select it.
- Press R + Z and rotate along the Z-axis to sweep across the scene.
Roll: The camera spins around the view
How to do it:
- Select the camera.
- Press R + Z + Z to rotate around the local Z-axis.
Handheld Effects: Makes the camera feel like a person is holding it
If you've already made a Blender camera movement animation with keyframes or along a path, you can create a handheld effect in Blender so it looks more natural. To do it, you need to add a Noise Modifier to create subtle random or shaky movement.
Part 4. Keyframes vs Path vs Noise — Comparison Table
Animating camera movement in Blender depends on the move you are after and the method you are most comfortable with. For a quick overview of the options, see the comparison below.
| Dimensions | Keyframes | Path | Noise |
| Skill Level | Beginner to Intermediate | Intermediate | Intermediate to Advanced |
| Control | High over timing and framing | High path precision | Moderate |
| Best For | Custom moves | Smooth, consistent moves | Handheld effect, micro jitter |
| Pros | Full creative control, no extra setup | Smooth camera move, editable route | Adjustable strength and scale |
| Cons | Takes time to polish, timing can drift without cleanup | Extra setup with constraints | Needs a solid base move underneath |
To sum up the methods:
- Keyframes give you the most control and flexibility.
- Paths are ideal when you need smooth and consistent moves.
- Noise works as an add-on to give your animation a handheld or jittery feel.
Part 5. Common Errors & Quick Fixes When Animating Camera Movement in Blender
While learning how to animate camera movement in Blender, it's common to run into some frustrating issues. We've compiled some of the most frequent errors that users face, along with quick fixes to make them work again.
1. Camera tilts or rotates unexpectedly when following a path
In the camera's Follow Path constraint, turn off Follow Curve. The camera will move along the path without inheriting the curve's tilt. Add a second constraint to control aim, such as Track To, Damped Track, or Locked Track.
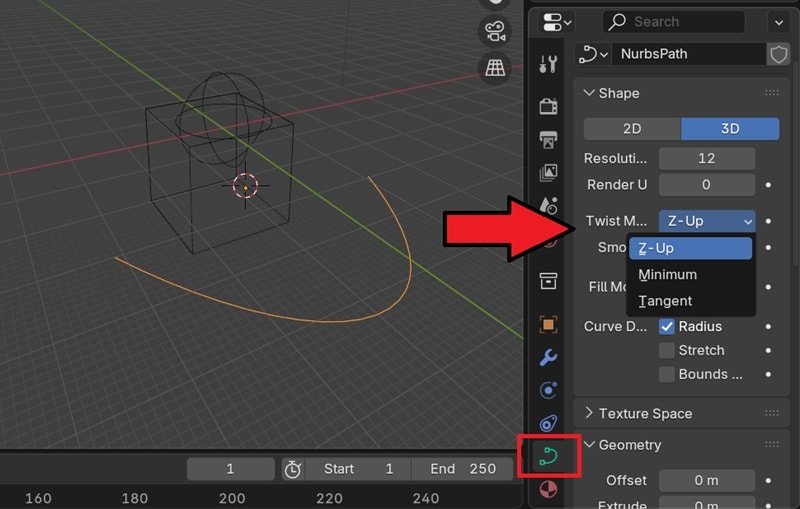
Or, you can also lock the curve's up axis. Select the path. Then, in Object Data Properties > Shape, set Twist Method to Z-Up. This forces the curve's "up" to world Z so the camera stays upright.
2. Keyframes are not showing after setting the animation
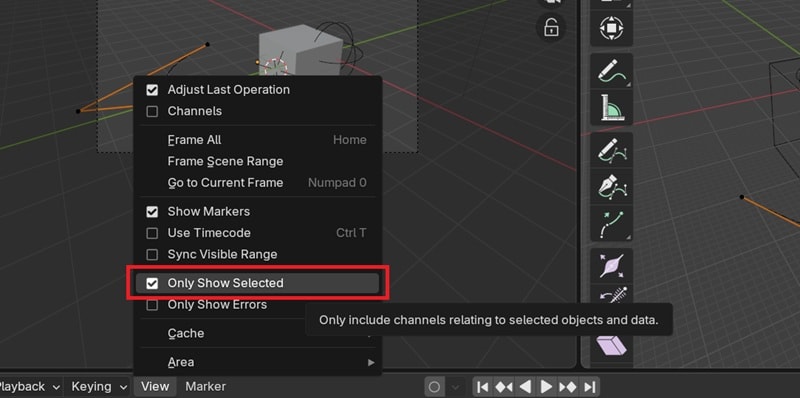
If your keyframes don't appear in the timeline, it's usually because the editor only displays them for the objects you currently have selected. To fix this, make sure the animated object is highlighted in either the 3D Viewport or the Outliner.
If you want every keyframe to remain visible no matter what's selected, open the View menu in the timeline editor and uncheck Only Show Selected. Then, click on View and select "Frame All."
3. Camera moves too fast or too slow
When you animate a camera in Blender using keyframes, it's easy to end up with motion that feels either rushed or sluggish, especially if you are controlling the timing manually. To control the speed, you can adjust a few key settings:
- Change Path Animation Frames: If you're animating along a path, update the Frames value in the curve's Path Animation panel so the travel matches your scene's length.
- Tweak Keyframe Placement: Spread keyframes further apart to slow down movement, or move them closer together to speed it up.
- Use Offset Factor: In the Follow Path constraint, enable Fixed Position and keyframe the Offset Factor. This gives you direct control over how fast the camera travels.
For an easier method, you can also render your project first and polish it in an easy editor, which we will cover next.
Bonus: Make Camera Moves Slower or Faster with Filmora
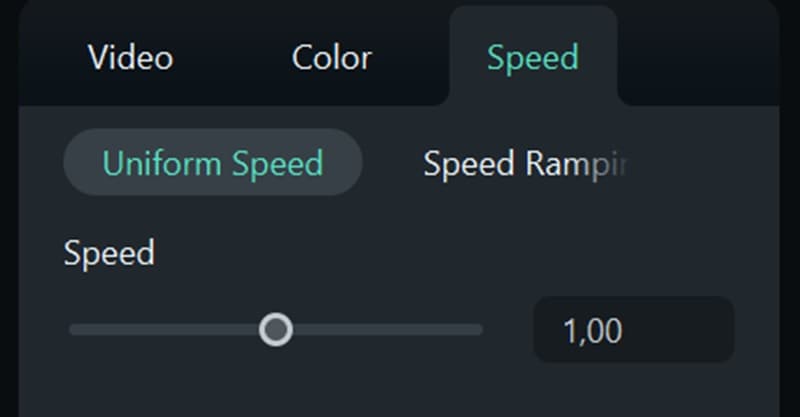
Since using Blender is pretty complex to navigate, especially for newbies in 3D software, you can edit your Blender camera movement animation in an easy video editor like Wondershare Filmora and make a final polish. Filmora offers a speed control adjustment (0.01x to 100x), with a speed ramping control for smooth slow-motion or fast-motion effects.
Besides speed adjustment, you can also find many other useful tools such as color correction, motion tracking,keyframing, and audio editing. And most importantly, they are easy to use because Filmora's interface is intuitive and designed for creators of all levels.
How to Adjust the Video Speed in Filmora

- Select the Speed option on the toolbar above the timeline.
- Select the video track on the timeline and open the Speed tab on the right panel.
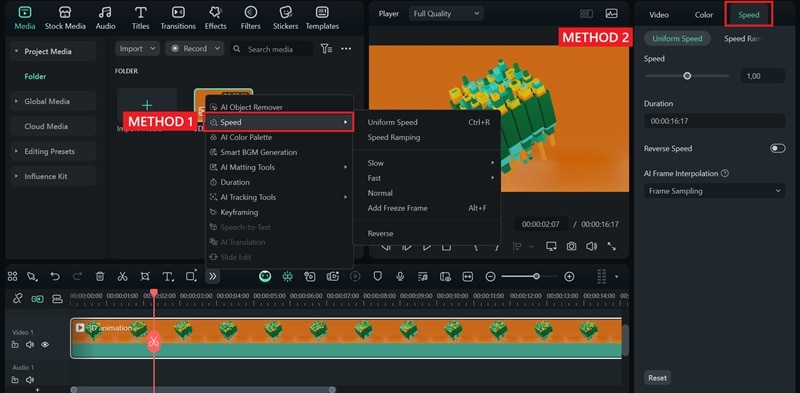
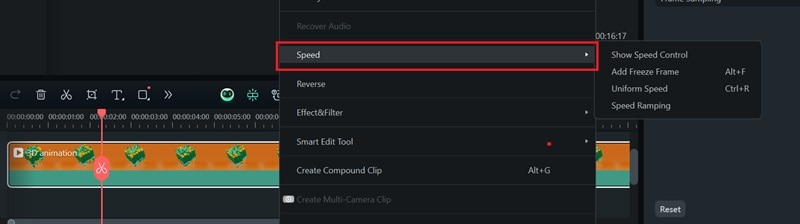
For smooth transitions, select Speed Ramping and either choose a preset or customize the curve for gradual speed changes.
Conclusion
With your understanding of how to animate the camera in Blender, you can now show off your project in a much cooler way. We've only covered the most basic methods that anyone can try. Once you get the hang of these, you can experiment with different moves and effects to make your work stand out even more.
If you've had enough of Blender's technical steps, you can always adjust the speed and polish your final video in an easier editor like Filmora. With features like speed ramping, color correction, motion tracking, and more, Filmora helps you refine your animation video with ease.
Frequently Asked Questions
-
How to make camera movement smoother in Blender?
You can smooth out camera motion by cleaning up your keyframes in the Graph Editor. Select your camera's keyframes, then change the handle type to Auto Clamped for softer curves. You can also use the Smooth Keys function or add easing to transitions so the camera accelerates and slows down naturally. -
How to add a depth of field effect to my Blender camera?
Select your camera, go to the Camera Properties panel, and enable Depth of Field. Choose an object to focus on or adjust the Focus Distance manually. You can then lower the F-stop value to blur the background more. -
What are the best rendering settings for a Blender animation?
It depends on your project, but the most common starting points are: ● Resolution: 1920 × 1080 (Full HD) at 24–30 fps for smooth and high-quality animation. ● File Format: FFmpeg with MPEG-4 for better compatibility ● Sampling: 64–128 samples for Eevee or 128–512 for Cycles (higher for photorealism) ● Output: Use PNG if you want individual frames for editing later Adjust these settings based on your hardware. Higher values improve quality but may take longer to render.
