These days, live streaming is the go-to trend for creators to get noticed, and if you're a Snapchat user, you might be curious about jumping on the trend. In fact, going live on Snapchat is an amazing way to connect with your followers in real-time and even take your personal brand to the next level.
But if you're new to it, you might be wondering, how do you go live on Snapchat? Well, if that's why you're here, you're clicking on the right article!
In this guide, we'll walk you through everything you need to know about Snapchat live video, as well as offer tips to make your Snap live video reach a broader audience. Let's begin!
In this article
Part 1. Can You Actually Go Live on Snapchat?
Alright, for those wondering how to go live on Snapchat…here's the deal—unlike other social media platforms, Snapchat hasn't rolled out a traditional live streaming feature just yet. Kind of a bummer, right? But don't worry, there's still a way to go "live" and connect with your friends in real time.
With Snapchat's Video Chat feature, you can connect with a single friend or chat with a group of up to 15 people at once. It's an engaging way to have "live" conversations, and you can even spice things up by using Snapchat's fun Face Lenses during your calls.
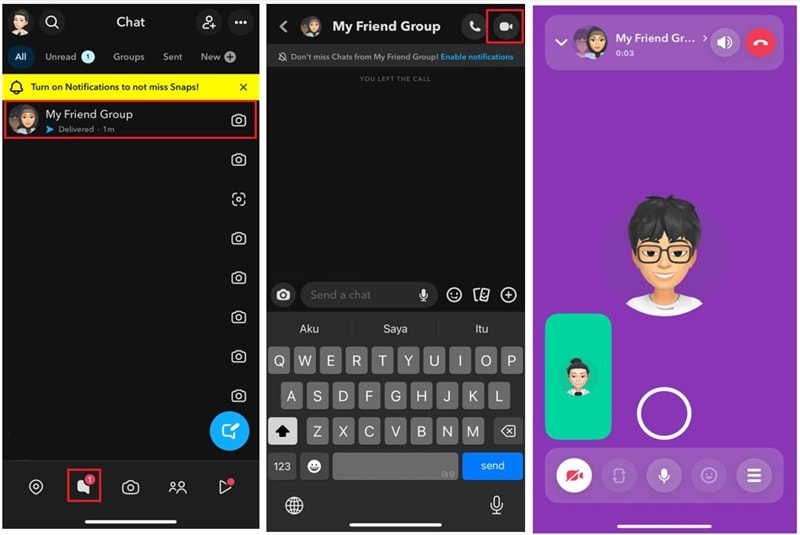
But beyond that, there's no real option yet for a Snapchat live video. So, if you were hoping to broadcast a live stream to all your followers at once, it's just not possible on Snapchat—for now, at least. Hopefully, they'll roll out something soon!
You can check the video below for a detailed explanation.
Part 2. How to Send a Fake Live Video on Snapchat
Since Snap live video isn't actually possible, you might be wondering if there's another way to get creative with your videos. Well, here's an idea—you can send a "fake live" video instead! It's a simple trick to make pre-recorded moments look fresh and real-time. You can use it to prank your friends, try out Snapchat features, or just add a fun twist to your snaps.
If that sounds like something you'd want to try, here's a simple step-by-step guide to sending fake live snaps on Snapchat. This trick makes your snaps look like they were captured straight from the Snapchat camera, adding that authentic vibe to your pre-recorded moments. Let's get started!
Step 1. Open Snapchat and tap the smiley face icon next to the camera button.
Step 2. Search for "Camera Roll" lens and select the video you want to send.
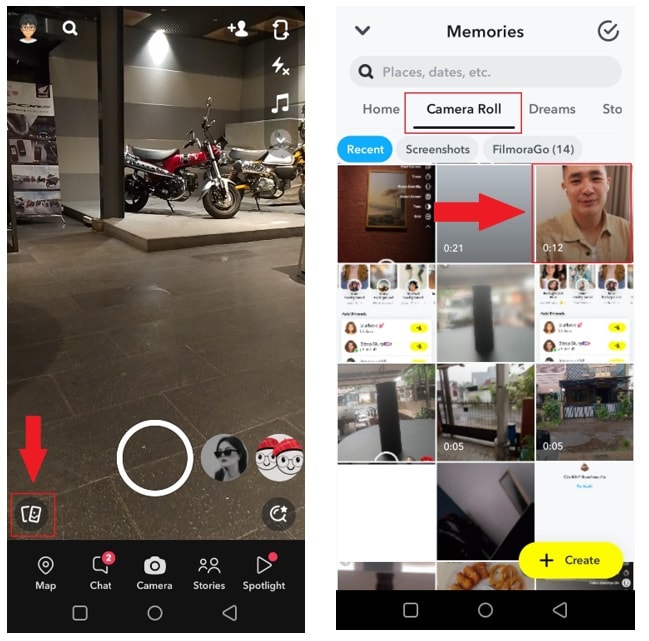
Step 3. Edit your snap video by adding live stickers to make it look like it was recorded in real time.
Step 4. Upload the edited video to your Snap Story.
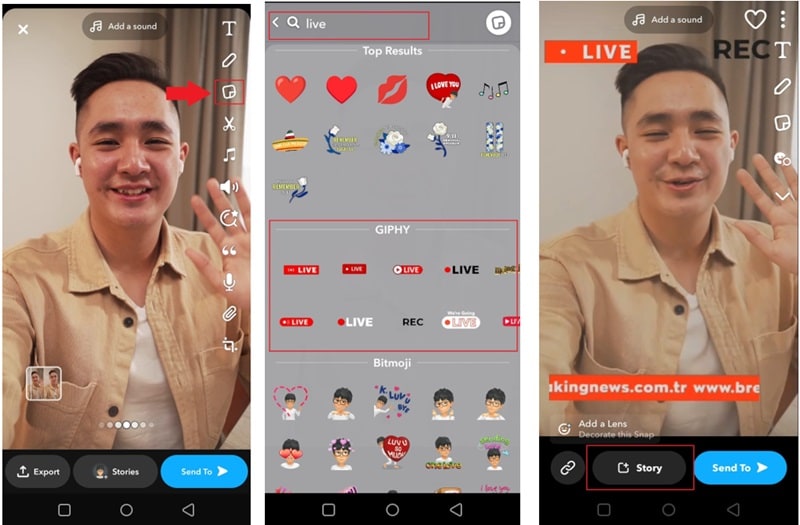
Step 5. Save your Snap Story and quickly delete it before anyone sees it.
Step 6. Tap the smiley face icon again and select "Recently Added" to upload the saved Snap Story.
Step 7. Share it with your group of friends or upload it to your story when you're ready.
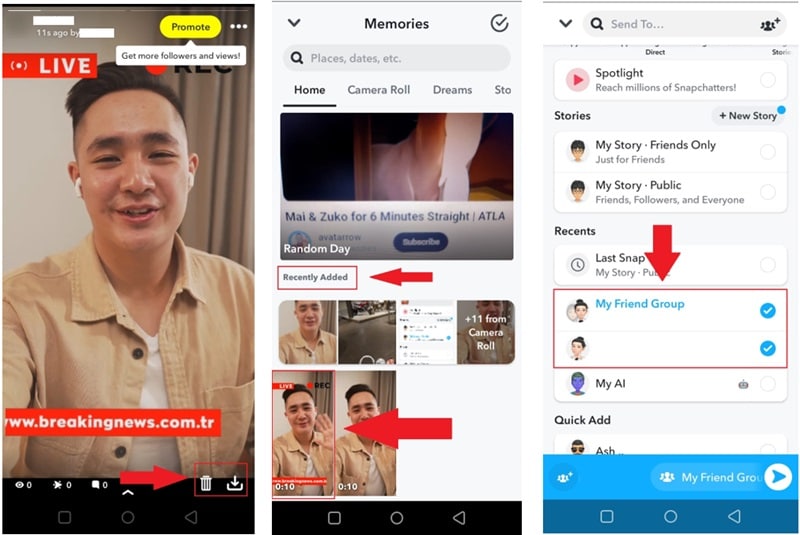
And just like that, you're all set! Now you know how to create a fake Snap Live video to share with your friends or post to your story for your followers to see. Sure, it's not technically live, but it still gets the job done and looks just as good!
Part 3. Maximize Engagement from Your Snapchat Content with Filmora
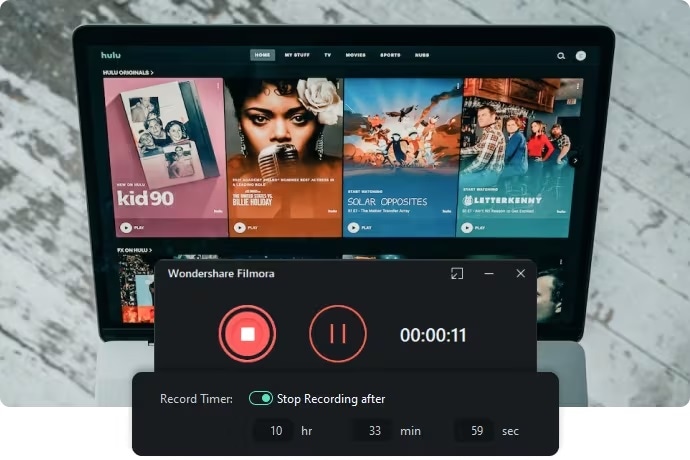
Since Snapchat live video is only a myth as they don't let you go live directly, you might need a third-party app for a more flexible solution. In that case, Wondershare Filmora has everything you need—from capturing your live-streaming content to editing it like a pro.
How Filmora Can Help Capture Live-Streaming Content and Boost Engagement:
- Screen Recorder:: Capture your screen during the live session and save it for later editing.
- Complete Editing Toolkit: Enhance your videos with effects, transitions, audio adjustments, and more.
- Speech-to-Text:Add captions or translations to make your videos more accessible and expand your reach.
- Built-In Media Library: Access a wide range of stickers, filters, and royalty-free music to make your videos more engaging.
- Export Flexibility: Export your final videos in different formats and resolutions optimized for various social media platforms like Snapchat, YouTube, or Instagram.
Plus, Filmora gives you all these awesome tools at a price that won't break the bank! Even better, they offer flexible pricing plans and a free trial, so you can try it out before deciding to buy or subscribe. Not to mention, Filmora is available on both Windows and macOS, making it super accessible no matter what device you're using.
To help you make the most of Filmora for capturing, editing, and sharing your live-streaming moments across various platforms, here's a simple guide to get started.
Step 1Open Filmora and find the Filmora screen recorder
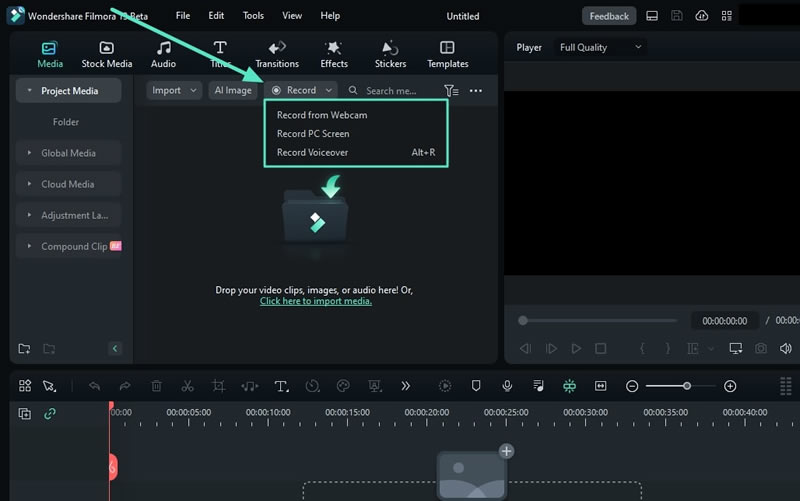
Download the latest version of Filmora and install it on your device if you haven't already. Then, open the program and select "New Project" to start editing. In the Search Media bar located below the menu bar, click on "Record", then choose "Record PC Screen" from the three available options.
Step 2Begin recording your PC Screen
In the next window, you can use the "Microphone" to capture audio during the recording. You can also turn the "System Audio" or "Camera" on or off as needed. When you're ready, hit the red record button to start. A countdown will appear, but you can skip it by clicking "Start Directly" below. During the recording, use the player controls to pause, stop, or restart the recording easily.

Step 3Visit Snapchat and make a video chat with your friend
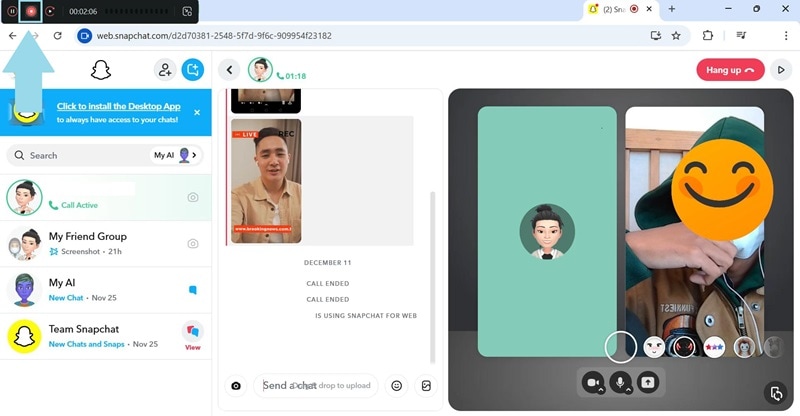
Go to Snapchat Web and log in to your account. Once logged in, start a video chat with your friends to create some "live stream" style content. For example, you and a friend could record a fun video explaining what happened to Rome after Mount Vesuvius erupted.
When you're done recording, just click the red button in the top-left corner of the screen, and the recorded video will be automatically uploaded to Filmora's main timeline for editing.
Step 4Arrange your live-stream content
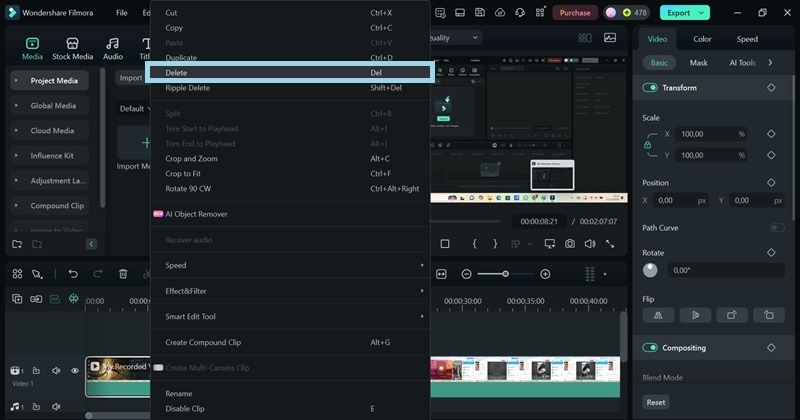
Drag your recorded video to the media timeline below. Next, trim off the beginning part before you open the Snapchat Web—it's not needed. Move the red playhead to where you want the video to start, then click the scissor icon to split the footage.
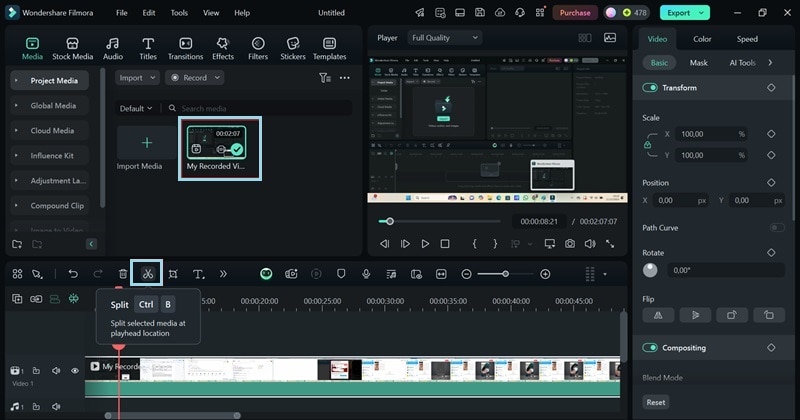
After that, right-click the part you want to remove and hit "Delete".
Step 5Enhance your content
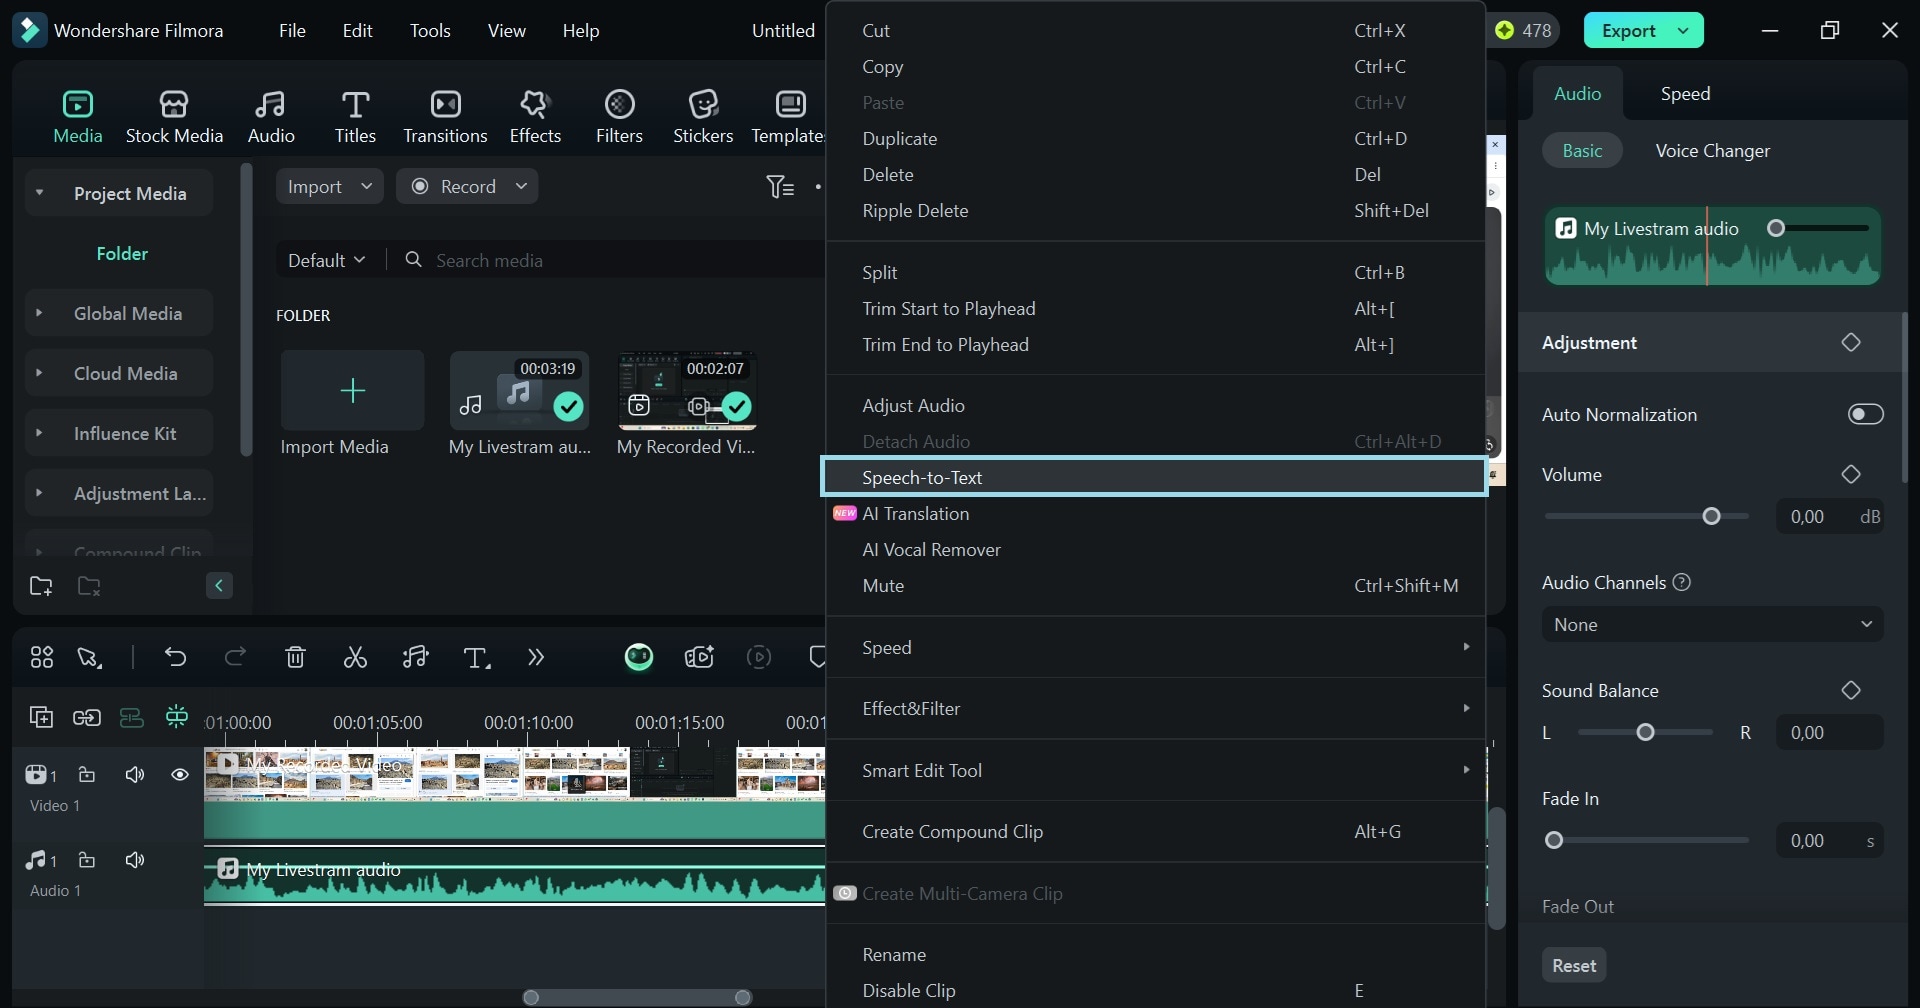
Make your content more accessible by adding captions, and Filmora makes this super easy with its Automatic Caption feature. To get started, right-click your recorded video and select "Speech-to-Text".
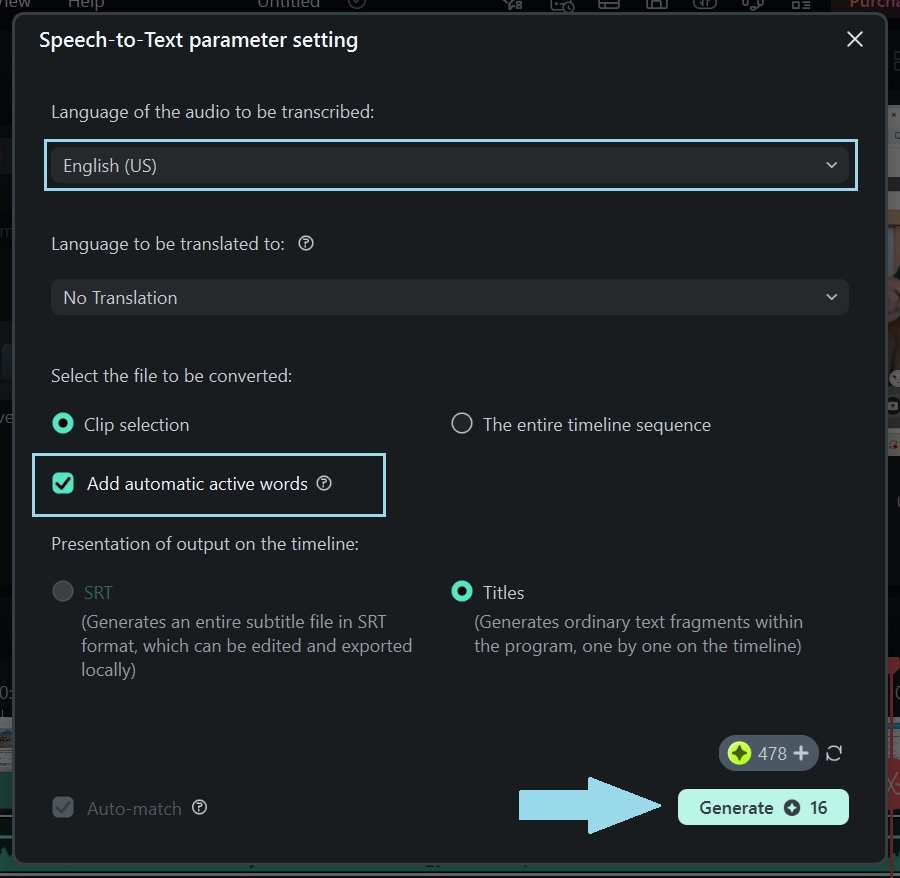
In the next window, select the original language in the video and make sure to enable the "Add Automatically Active Words" option. This activates the Auto Caption feature. Once you're ready, just click the "Generate" button at the bottom, and Filmora will create captions for you!
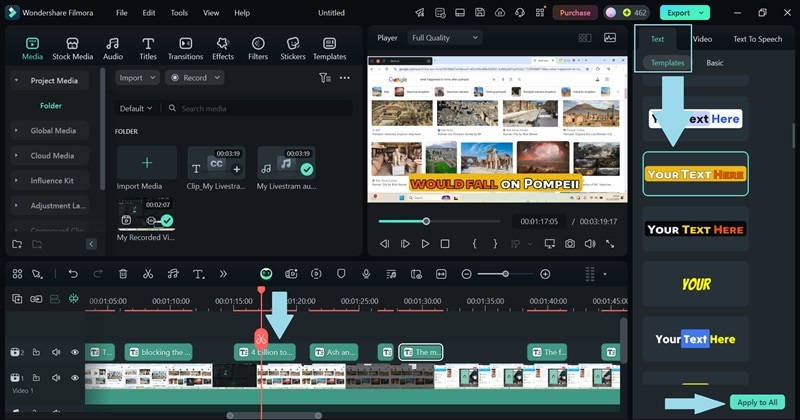
After the video is transcribed, the speech will show up as text along the timeline. If you want to change the style of your subtitles, head over to the "Titles" section. There, you'll find a bunch of options under the "Templates" sub-section. Pick the one you like and click "Apply to All" to update the style for all the captions in your video.
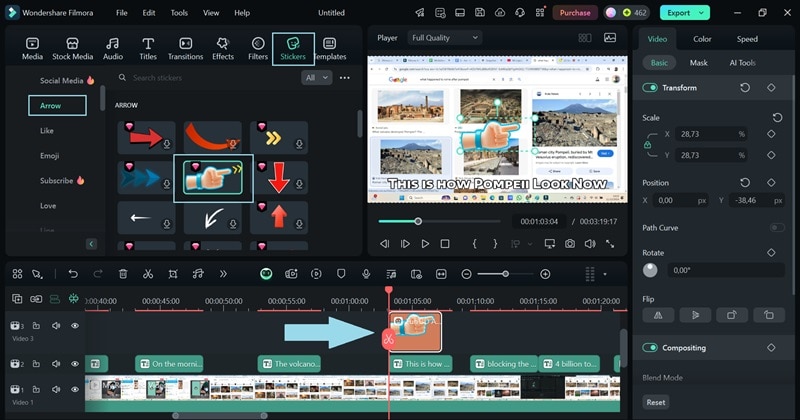
Since your live content involves an explanation, adding pointers can help viewers understand better. Just go to the "Stickers" tab, choose the "Arrow" category, and pick one you like. Drag it to the timeline where it fits, then adjust its size and position.
Step 6Save your video
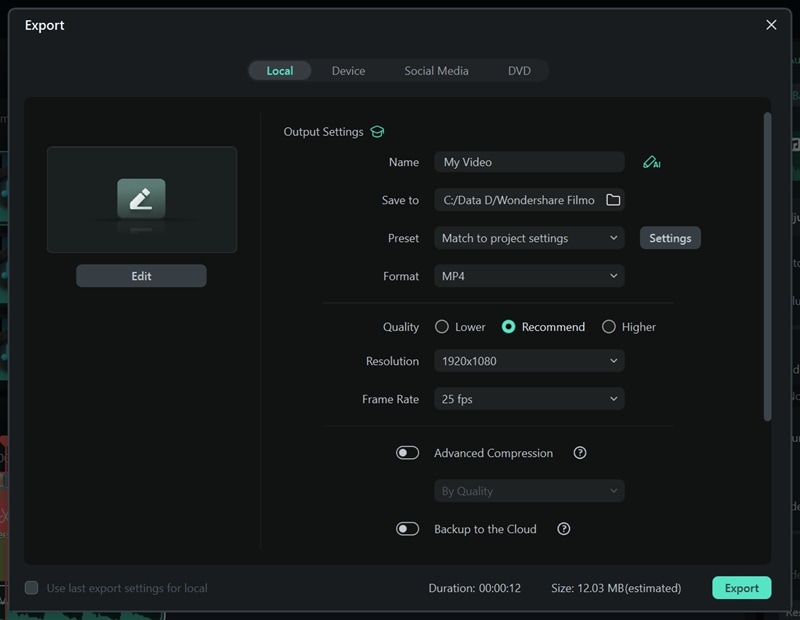
When your video is ready, click "Export" in the top-right corner. Select "Local" to save it directly to your device. You can customize the title, description, format, and resolution to suit your needs before finalizing. Once saved, share your video on platforms like Snapchat, Instagram, Twitter, or YouTube!
Conclusion
A lot of people wonder how to go live on Snapchat, especially with live streaming being so popular. But here's the thing—Snapchat live video isn't a feature yet. Snapchat doesn't let users stream live directly. That said, you can still create a fake Snap Live video to make it look like it was recorded live and even prank your friends. We've got an easy guide to help you do this.
Since live streaming on Snapchat is not possible, you can use a third-party app like Wondershare Filmora to create "live stream" content. With its Screen Recorder tool, Filmora lets you record your screen during video chats with friends while you're creating your content.
Once recorded, you can use Filmora's powerful editing tools to polish your video and share it across social media platforms like Snapchat, Instagram, or YouTube. It's an easy and creative way to get around Snapchat's live streaming limitations!


 100% Security Verified | No Subscription Required | No Malware

