
Twitch is a great platform to connect with an audience on a real personal level and build a really fun and tight-knit community. That being said, when I first started out, there were thousands of other streamers vying for people’s attention.
How do you capture the nuggets of gold from a 3-hour-long stream? How do you get across your personality and style of content to new viewers?
Well, it took me a while to figure out, but with the help of Wondershare Filmora, I was able to get my Twitch clips looking great and create compilations that I could share on TikTok and YouTube to promote my stream.
Here’s how you can do it, too.
In this article
What are Twitch Clips and Why They Are Important

As I said in the beginning, when I was starting out, the competition was tough on Twitch. The diehard fans who were there from my first month on the platform were having a blast, but I had trouble getting more eyes on the stream.
Most successful streamers were all taking some of the funniest moments and cool chunks from different streams and turning them into short clips. They would then share these Twitch clips on their TikTok and YouTube channels to get more exposure and hook new fans.
These are really important – it’s like a standup comedian showing jokes from his set or an actor providing a few of his most memorable scenes. Funny or awesome clips are the best way to give people a taste of what fun your streams can be and expand your audience.
I thought I’d try that as well – after all, how hard could it be?
Well, there was no shortage of goofy moments, jokes, and jaw-dropping moments where I literally broke the game physics or had an incredible speed run. The problem was editing these little clips to look good and adding some memes and effects to really make them shine.
Luckily, I stumbled across Filmora while looking for easy-to-use video editing software online, and it literally changed my life.
Introducing Filmora – The Best Video Editing Tool for Beginners and Pros

Most of the professional video editing software you can find is complicated and super-expensive. On the other hand, Wondershare Filmora gives you all the basic and some advanced functions you need to make a great clip in a simple package.
It’s easy to use, and more importantly, you can get it for a reasonable price or just try out the free version to see if you like it.
For my clips from Twitch streams, I used the basic video editing features to trim the clips down, cut out the parts I needed and then add some text and transitions. I then usually have some fun with stickers and filters or use some of the cool video effects like masks and overlays to give everything the final polish.
For example, you can blur out people’s faces with the face-off effect or replace them with smileys and other cool presets. You can also add countdown timers or various overlays.
Let’s look at how you can use some of these tools and effects.
How to Use Filmora to Transform Twitch Clips into Promo Videos for Different Platforms
First, we’ll go over the basics. You’ll be starting every project by cutting out a part of a clip and trimming your videos to fit the short attention span of TikTok and Instagram users. For this, you’ll need the Split and Trim features.
Here’s how to split longer clips:
Step 1: Open Filmora and start a new project.
Step 2: Import the video you want to edit or just drag and drop it.
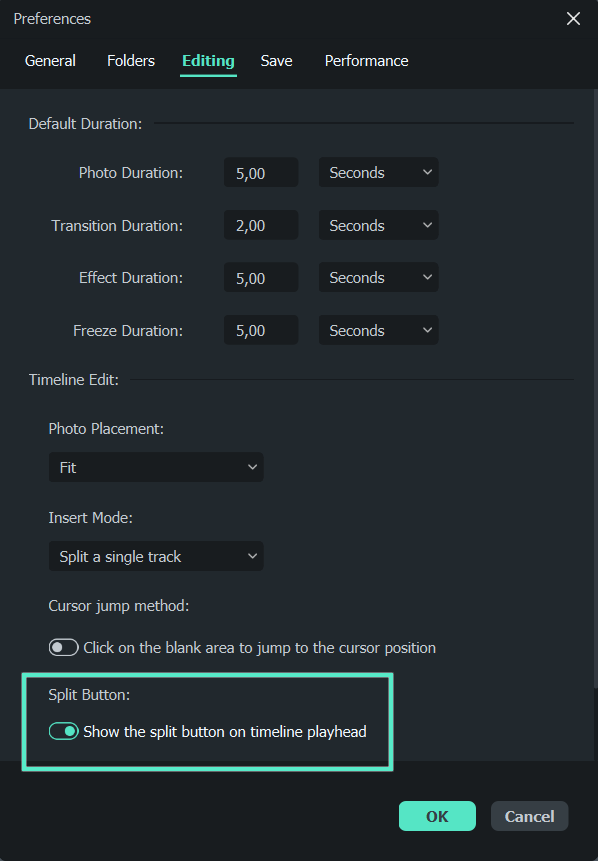
Step 3: Click on the timeline and drag the playhead to a position where you would like to make a split.

Step 4: Click the split button.
If you can’t see this button, you can go to File > Preferences > Editing and enable the option to “Show the split button on timeline playhead.”
Next, you have the Trim function, which lets you break down longer clips into segments from the Preview window. That way, you can finish part of the job already before importing it to the timeline for fine-tuning.
Here’s how you can do that:
Step 1: Import a video.
Step 2: It will show up in the Media Library, where you can double-click it to see a Preview.
Step 3: Use the Mark In and Mark Out buttons to set where the clip will begin and end.
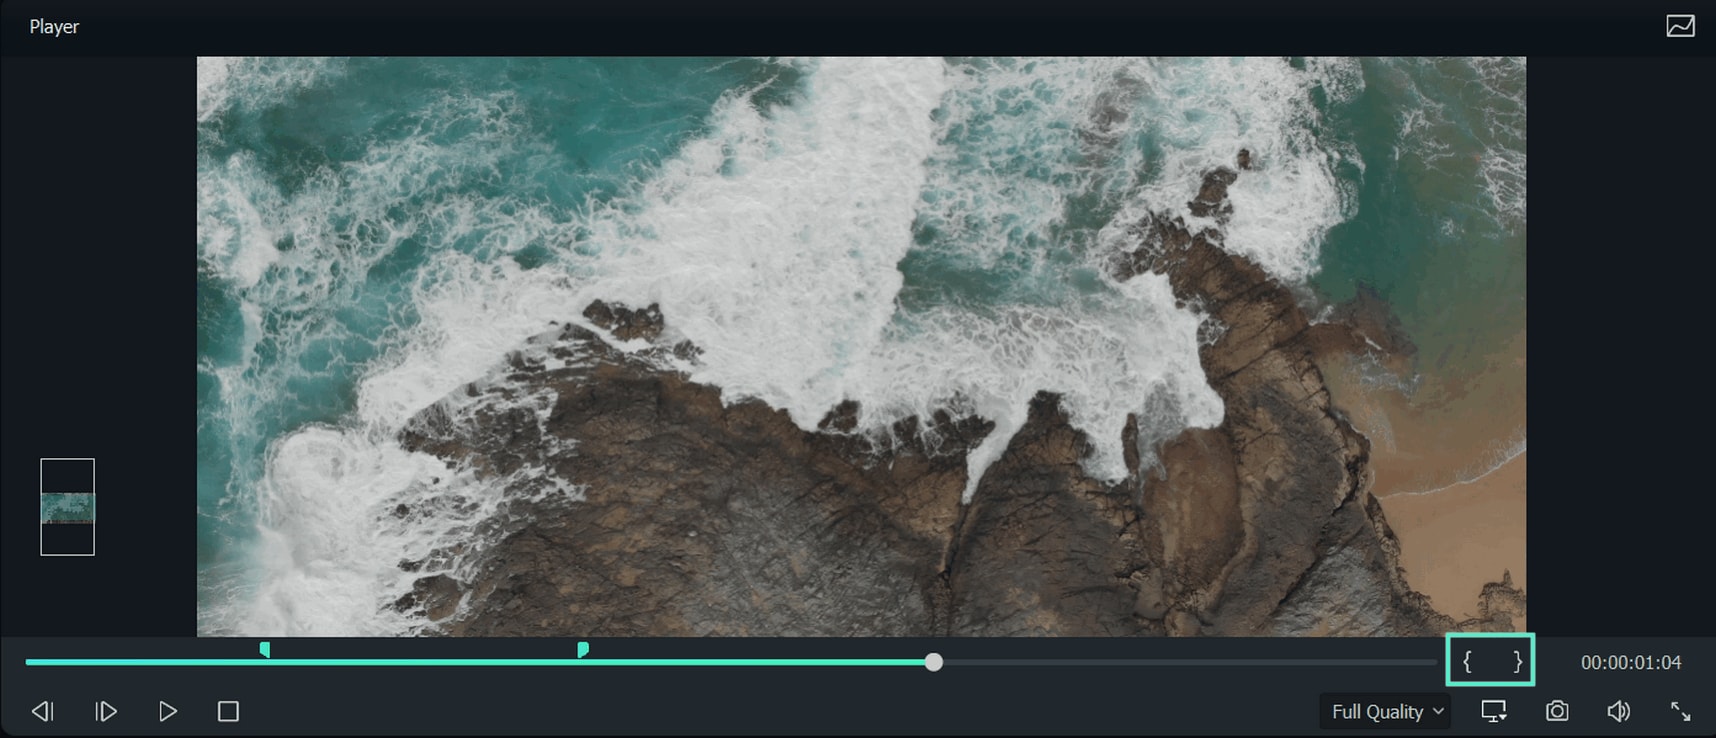
Step 4: Drag the trimmed video to the timeline.
Alright, now that you know the basics and can cut out a clip with the length you need, it’s time to transform it with some cool effects.
Let’s go over the overlay effects first. Here’s how to add an overlay:
Step 1: Open the project and click on the Effects tab.
Step 2: Choose an overlay you like and drag it to the timeline to apply it to the entire video.
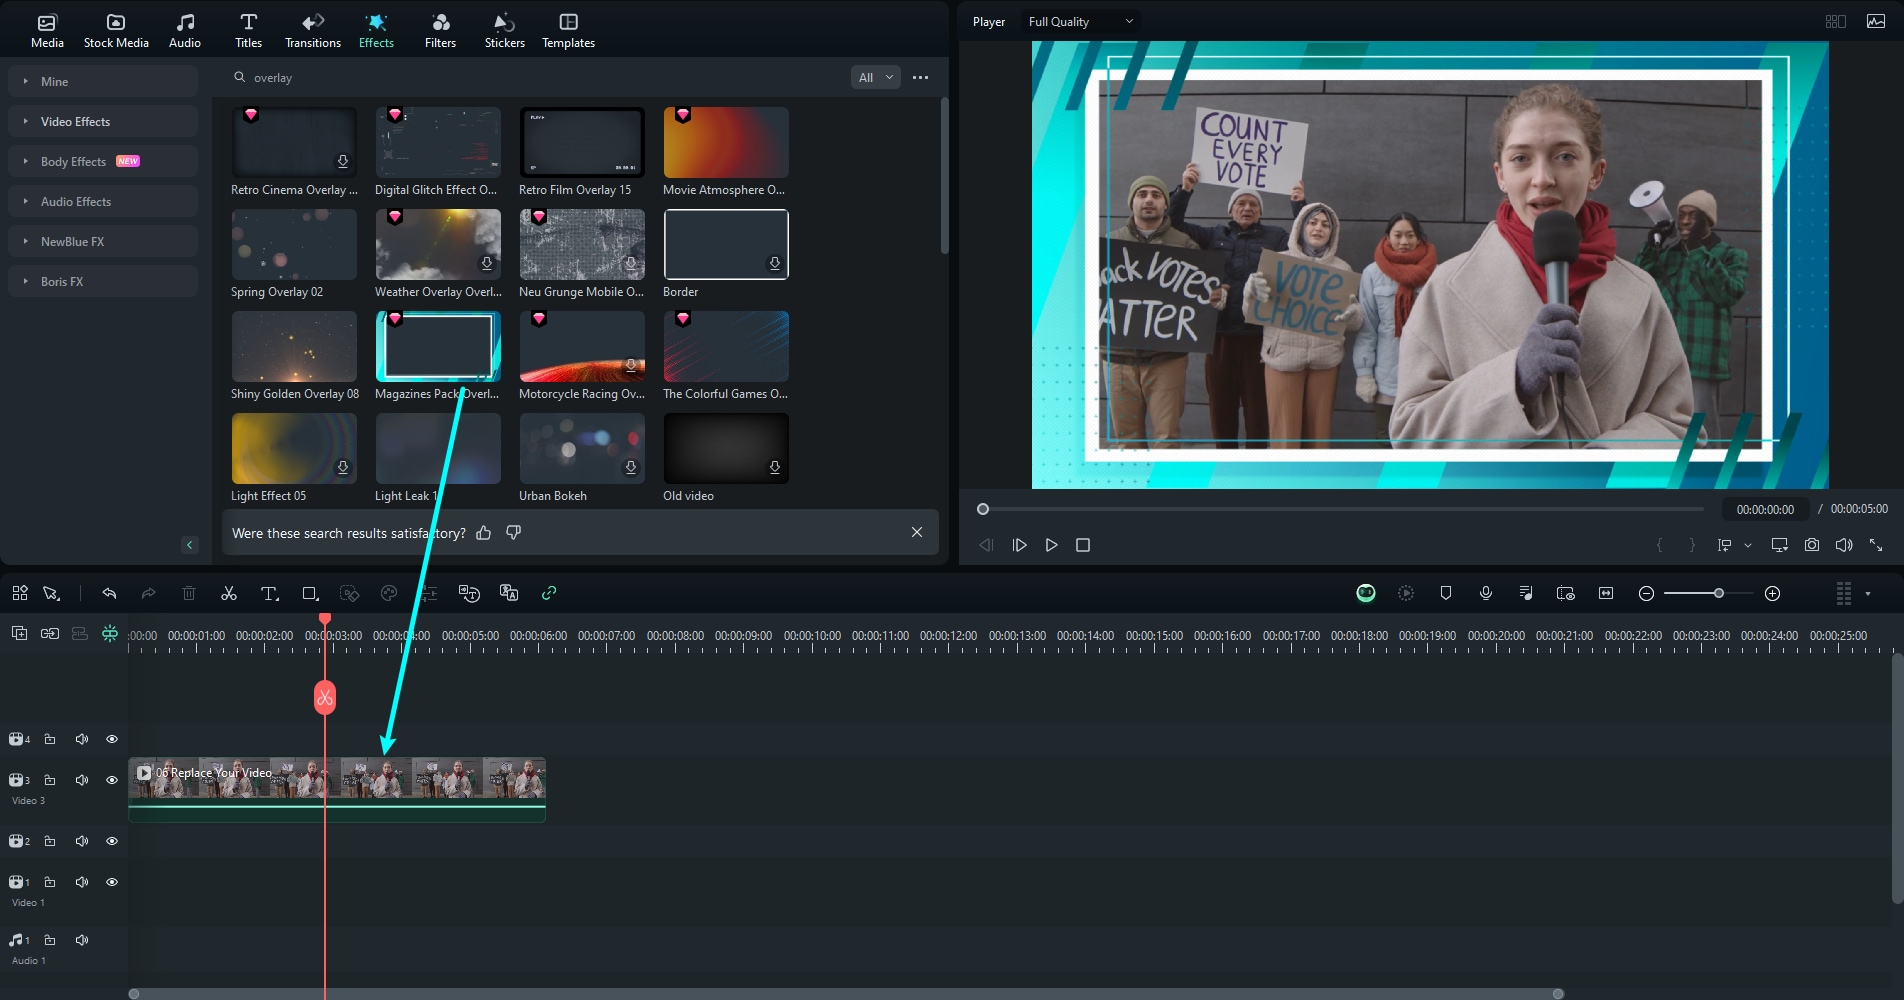
Step 3: Drag the end of the effect in the timeline to get the duration you want.

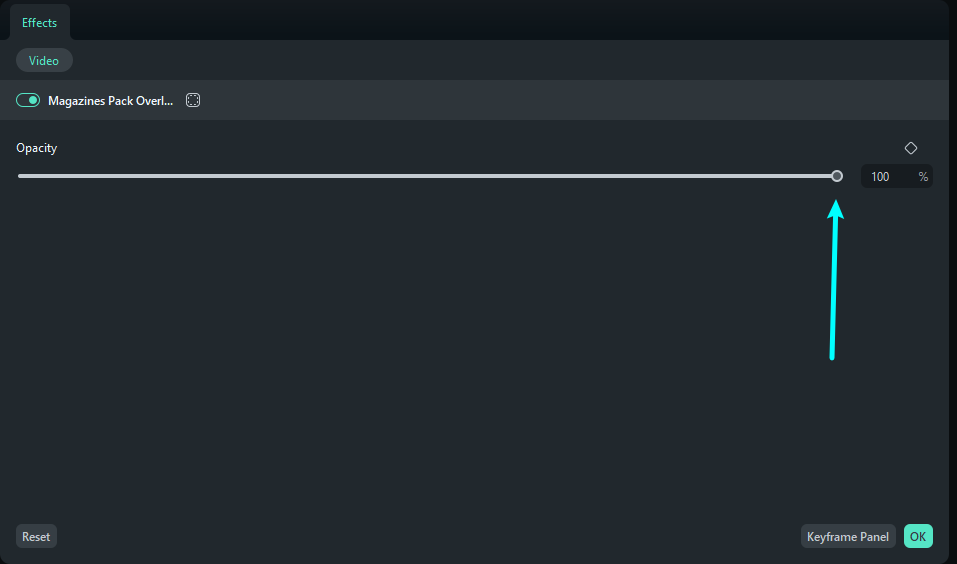
Step 4: Choose a transparency level or opacity from 1 to 100.
Step 5: To remove an overlay effect in the timeline, select it and click Delete.

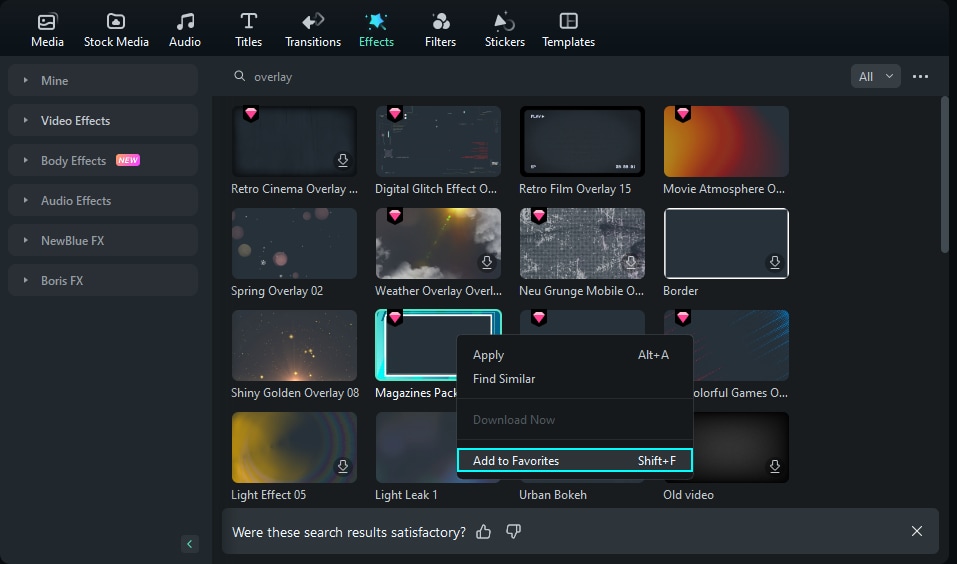
Step 6: If you like an overlay, you can go to the Effects menu, right-click it and select Add to Favorites. You can also just select it and use the Shift + F shortcut.
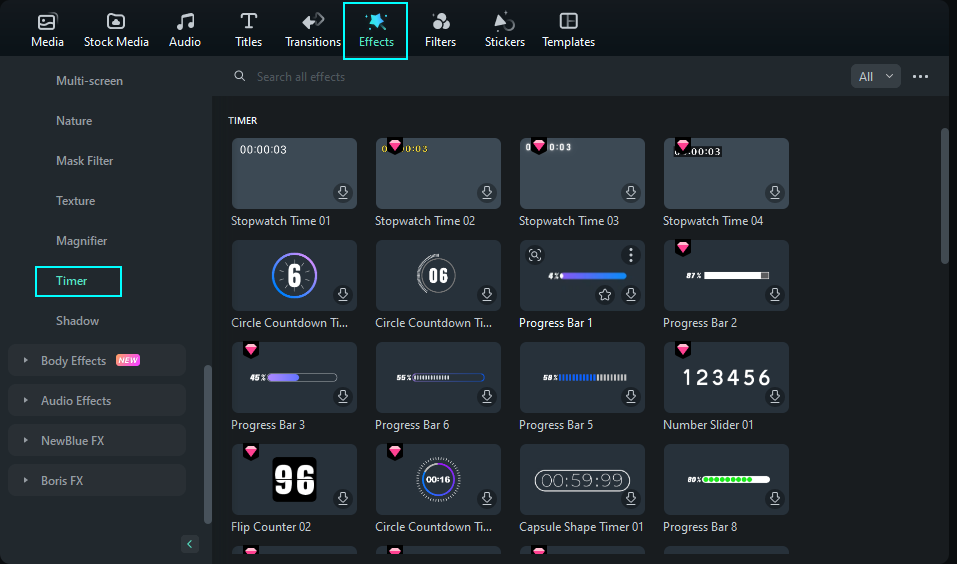
The next effect you’ll find yourself using often is the timer, either a stopwatch, countdown timer or progress bar. Here’s how to add it:
Step 1: Go to the Effects bar and choose Timer on the left side.
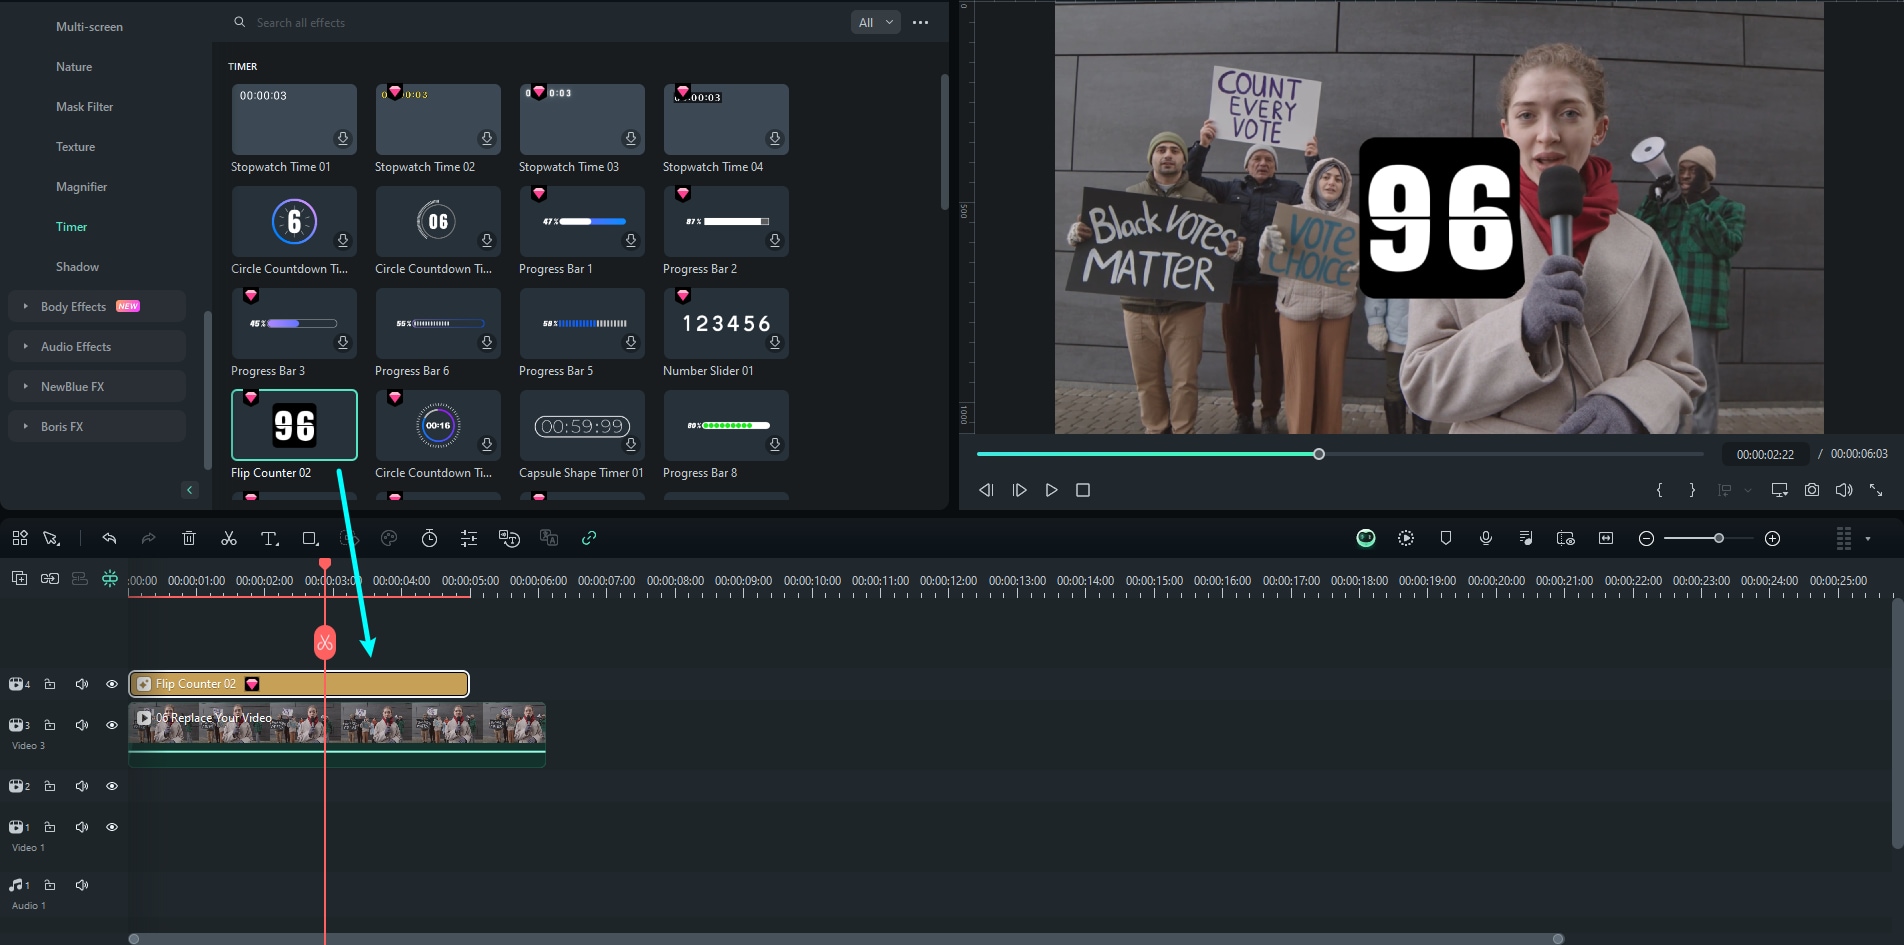
Step 2: Pick the timer you like, drag it to the timeline, and set it up in any position you want.
That was pretty fast and easy, but we should also cover how to set up the mask effects.
Step 1: Click your clip in the timeline and then go to Effects, and choose Basic in the dropdown menu on the left.
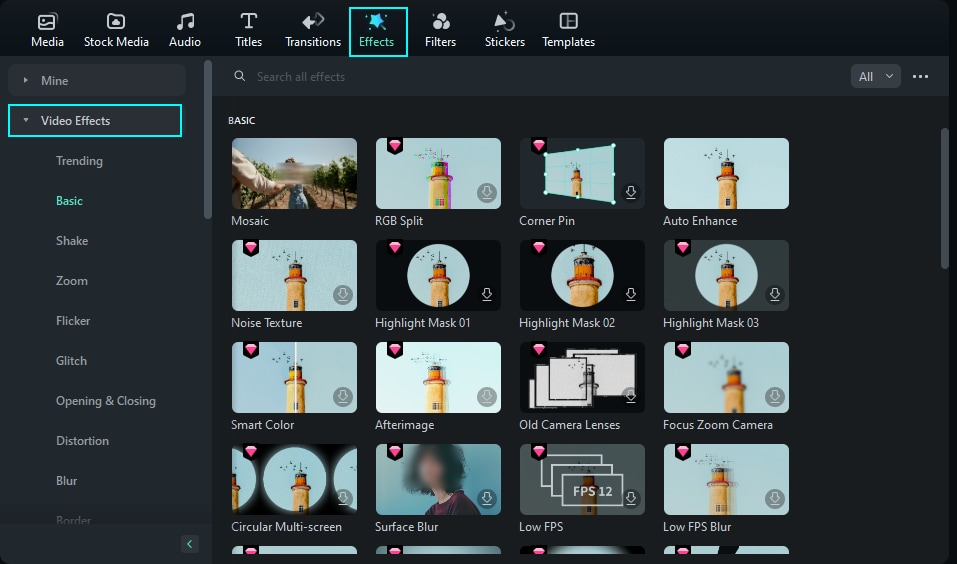
Step 2: Drag and drop the mask you like in the timeline. It will appear above the clip on the timeline.
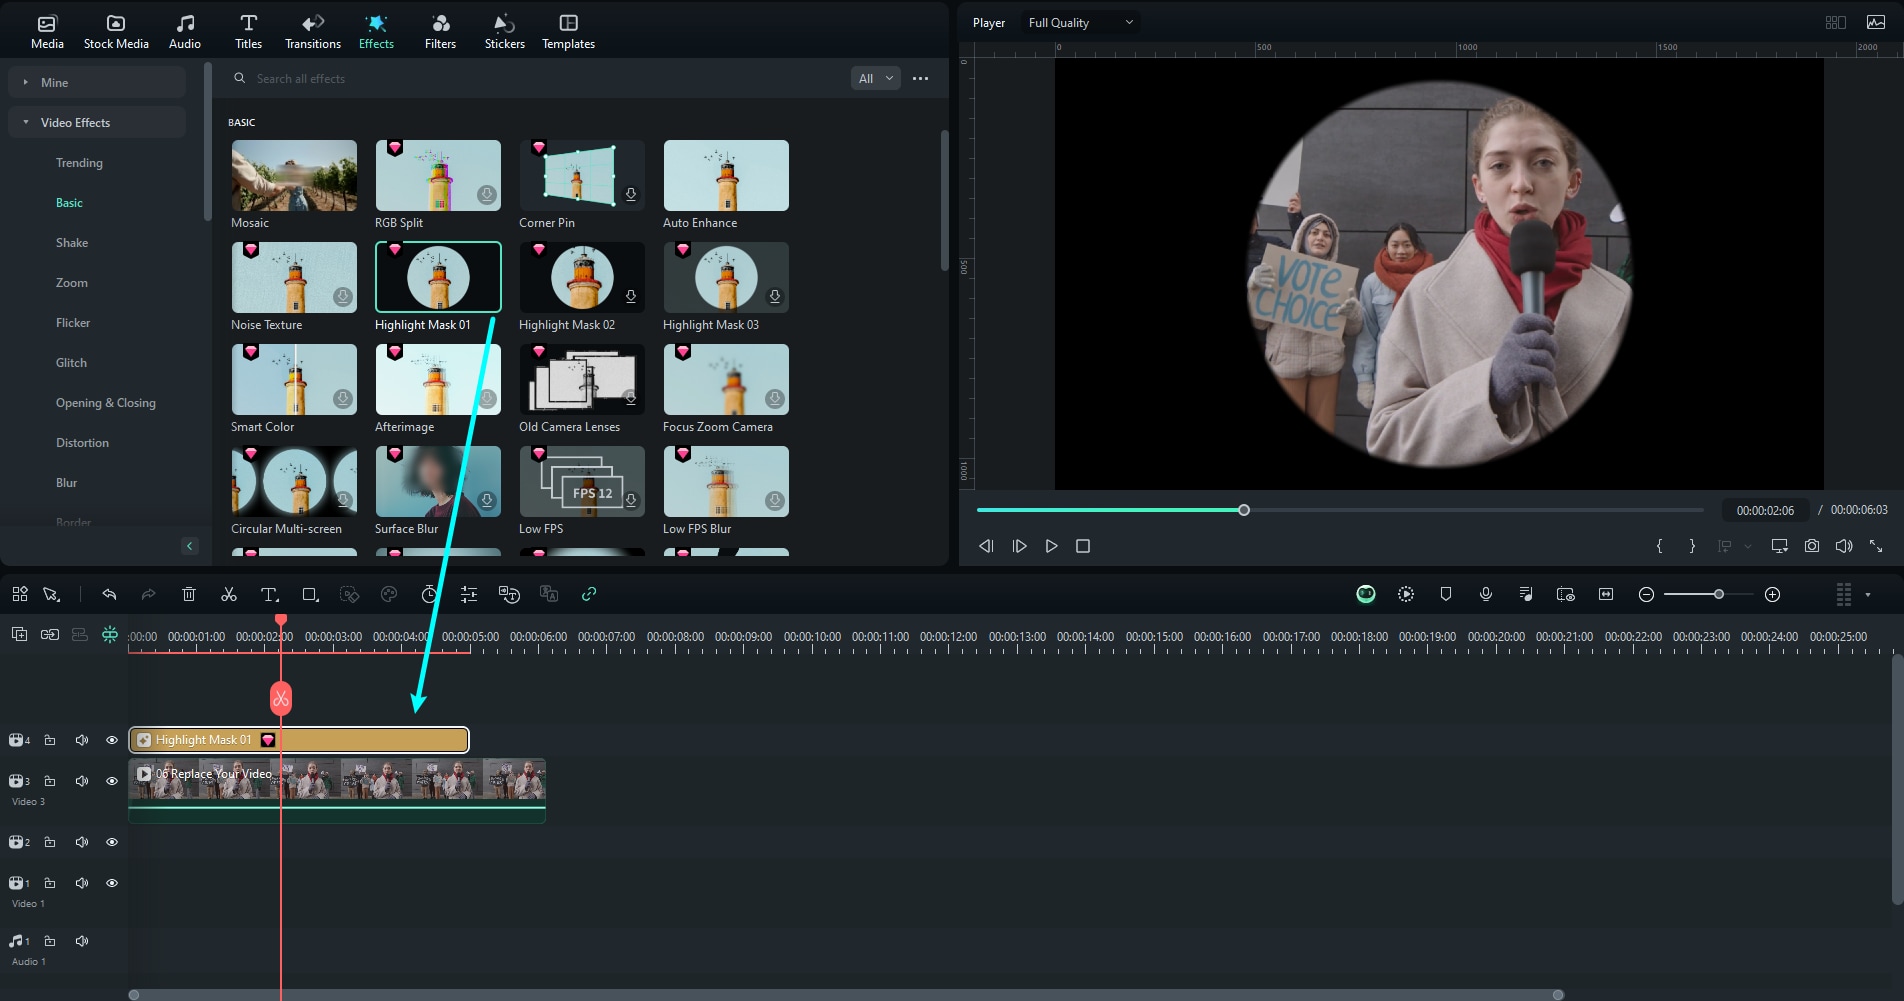
Ok, these are all excellent effects, but you can take things a step further by using AI video editing features.
Step 1: Launch the app and choose AI Text to Video in the main menu.
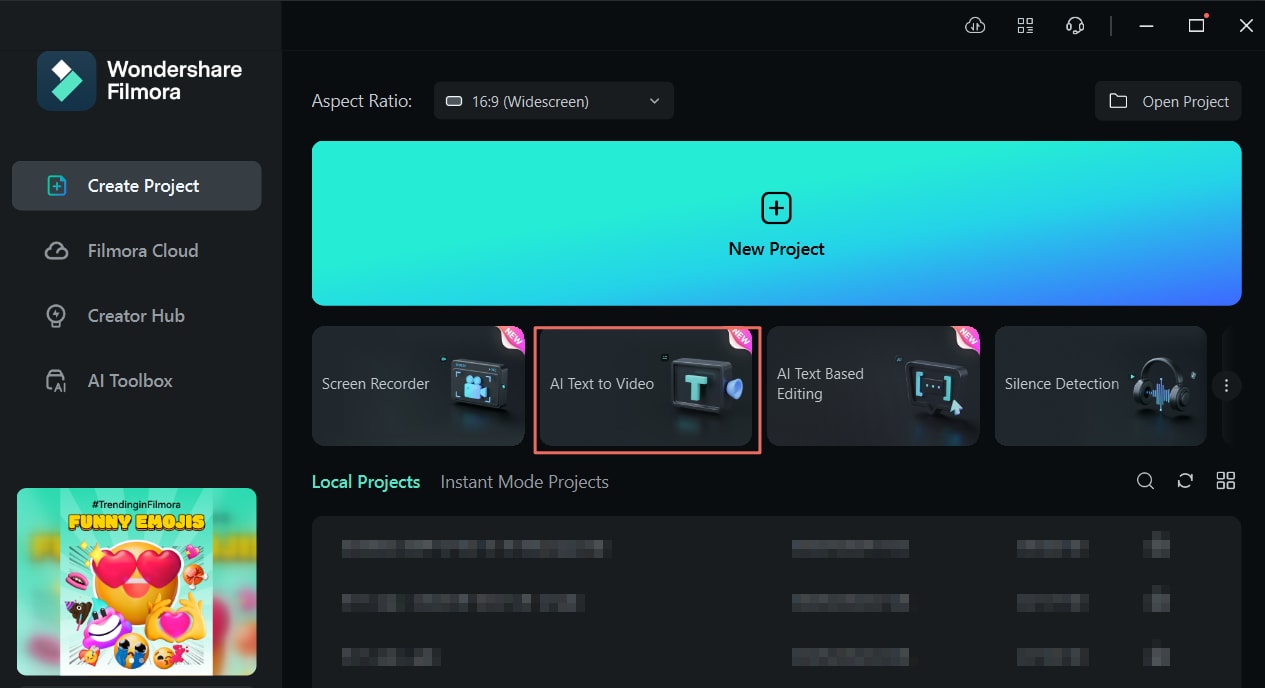
Step 2: Add a prompt of up to 1000 characters.
Step 3: Choose the settings for Voice language and video ratio, or try out Clone Voice to get a 1-to-1 clone of your voice. Click the Text to Video button to finish.

Step 4: Preview the generated video, make any edits you like, and click Export to finish the process.
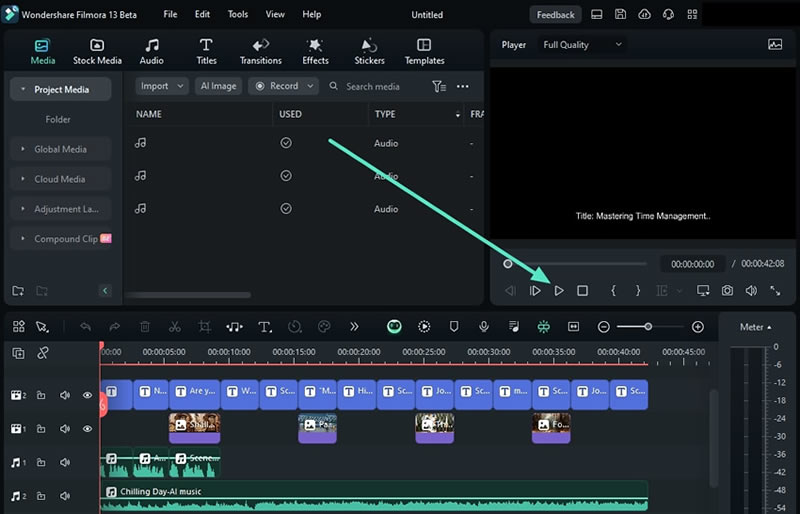
You can also use Filmora’s AI to generate your content ideas:
Step 1: Go to AI Copywriting in the main menu.

Step 2: Choose what you need written, for example YouTube Video Ideas and add your Video Topic. Click Generate to get your content ideas.

This is just a taste of all that Wondershare Filmora can offer, as it’s constantly updated with useful new features like Image-to-video, audio-to-video, and smart short clips, to name a few recent ones.
Conclusion
Standing out on a big platform like Twitch takes quite some work, and you’ll have to use smart promotional tactics, like sharing short, fun clips from the stream on social media. After I started making my Twitch clips with the help of Filmora, things really started looking up, and you can benefit from it, too.
There are tons of cool effects and things you can do with its new AI features – I’ve mentioned a few of them above, but there’s lots more to see and play around with. Give it a shot, and you’ll see how much of a difference it can make.


 100% Security Verified | No Subscription Required | No Malware

