How to Master Color Options in Filmora
Want to become a master at color correcting in Filmora? This step-by-step guide will teach you some important features of color options as well as color matching. So, let’s get started.
Transcript
Hello, everyone. Today, I'm going to teach you how to master color options in Wondershare Filmora, including color matching.
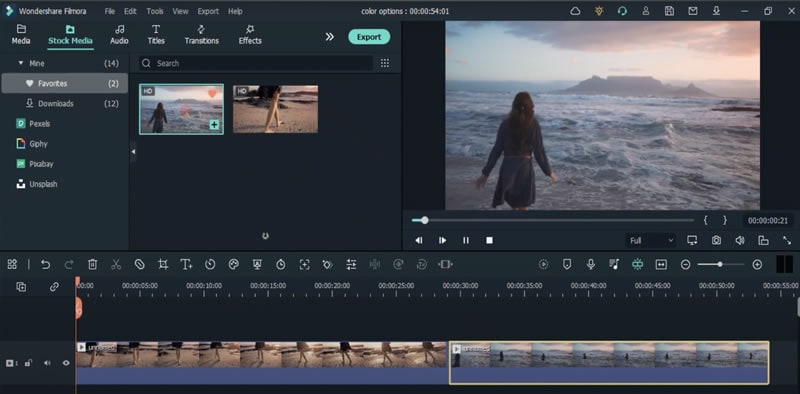
I will add two videos from my favorites to the timeline. One shows a woman walking on the beach, and the second one shows a woman running to the sea.
To access color options, just double-click on the video clip in your timeline, and in the upper left corner, you'll see four categories, "Video," "Color," "Animation," and "Speed."
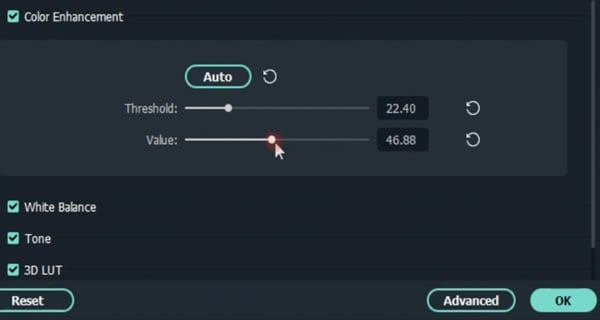
Click on the “Color” one, and the first option you have is "Color Enhancement" which is possible to just click on this button that says "Auto," and your footage will be automatically adjusted. If you’re not satisfied with the outcome, you can set everything by clicking on these circular arrows right there. And then, you can set the “Value” and “Threshold” manually.
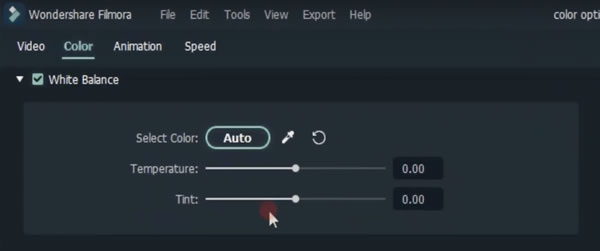
The next option is "White Balance." If you want this option to be automatically done, just click this "Auto" button right here. Or you can click on the color picker and select a white pixel from your footage, which will serve as a reference value for this option.
And now it looks like this. It is also possible to change the “Temperature.” You can make your videos look like they've been recorded on a freezing winter day or on a very hot afternoon. “Tint” can be adjusted too, but not too much if you don’t want your video to become too purple or too green.
The next thing I’m gonna show you is "Tone." You can change the contrast, saturation, and brightness by moving this circle to the left or to the right or by entering a numerical value from 0 to 100.
And then we have “3D LUT”, where you can choose one from various filters. For example, I will choose this one called the "Dark Film," and it looks like this.
And the last option is called "Color Match." It basically scans the color of one video from your timeline and applies the same colors to another video. I clicked on "Comparison View," and this showed up. You can choose any frame from videos in your timeline to be the reference one, and the video on the right is the one that you would like to change.
Once it reaches the particular frame, just click on the "Match" button, and here are the results. You can also change the level of similarity by moving the circle from left to right or entering a numerical value. These color options are really easy to use, but they can make noticeable improvements to your videos.
How to Master Color Options in Filmora
What you need to prepare:
- A computer (Windows or macOS)
- Your video materials.
- Filmora video editor
Go to the Wondershare Filmora website and download the Filmora video editor on your computer. Then install it, open the program, and click on Create New Project.
Import a video clip from the Media section or simply pick one from the Stock Media tab. Then, drag the video clip to the Timeline at the bottom portion of the program.
Next, double-click on the video clip, and a new settings menu will open up. Select the Color tab. Now, check the Color Enhancement box and click on the arrow next to it. Just play around with these sliders until you find a good color mode that you like. Don’t click on OK yet.
Next, scroll a bit down and click on the arrow next to White Balance. You can adjust these sliders to set the temperature of your video colors. This will make it either warmer or colder in color.
As you scroll down further, you will see the next effect, called Tone. With these sliders, you can adjust the Contrast, Brightness, and Saturation of the colors in your video. Adjust them as you see fit. You can instantly see your changes on the left-hand-side of the program.

Next up, you will see the 3D LUT effect. This effect simply offers a collection of already-built preset colors. You can find color presets that have been used in some very popular movies such as Star Wars, Harry Potter, and more.

Finally, you can see the Color Match section at the bottom of the row. Check this option and click on the arrow next to it. You can click on Comparison View and match a color sample from another frame to the frame of your choosing. Then, simply click on Match and you can instantly view the changes.
Now, click OK and render your video. You’re done. Congratulations on applying unique color options to your video in the Filmora video editor.
Hopefully, you were able to quickly gather the skills for color correction and color matching. Now, you can comfortably adjust the colors of all of your videos in the Filmora video editor.


Speak Your Mind