-
The Basics of Creating Typewriter Effect in Premiere Pro
-
Contextually Understanding All Techniques to Create Text Typing Animation
-
3D Text Animation Making Made Easy Finding the Best Solutions!
-
Guide On How to Blur Background of Any Video In Filmora
-
Guide On How To Add Video Watermark Animation In Filmora
-
Text Animation Bar - Bottom of the Screen - Filmora - Tutorial
-
How To Make Travel Maps Animation In Filmora | Step-By-Step Tutorial
-
Tutorial - How To Make Magnify Animation On Filmora
-
Tutorial | How to Fake Camera Movement with Filmora 12
Transcript
First thing you need to do is import media to your video editor. I've already done that here. Now click on it and drag and drop it into your timeline. I'm going to “Mute” this video for now. So this is the video I have.
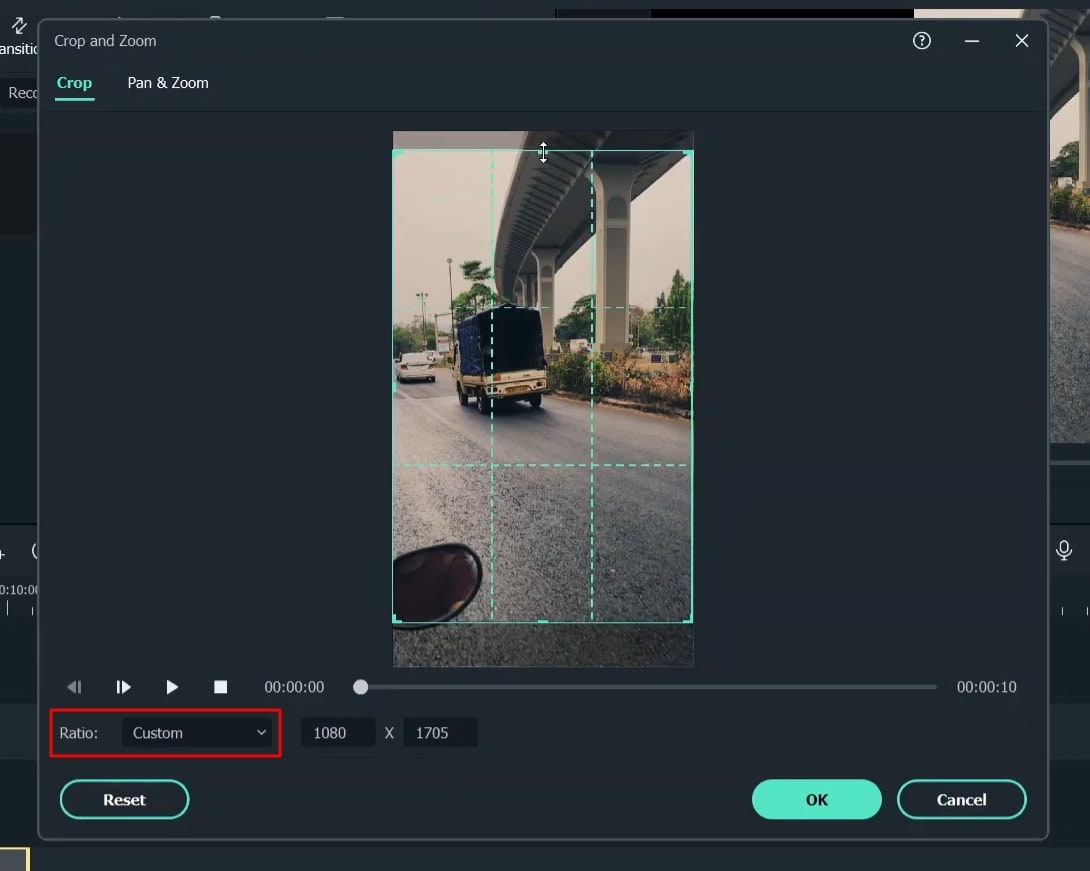
I want to increase the width of the video before I add the background blur. So I’m just going to crop the video a little bit. Click on “Custom," and now I'm going to reduce the height. As you can see, now the width of the video has increased a little bit.
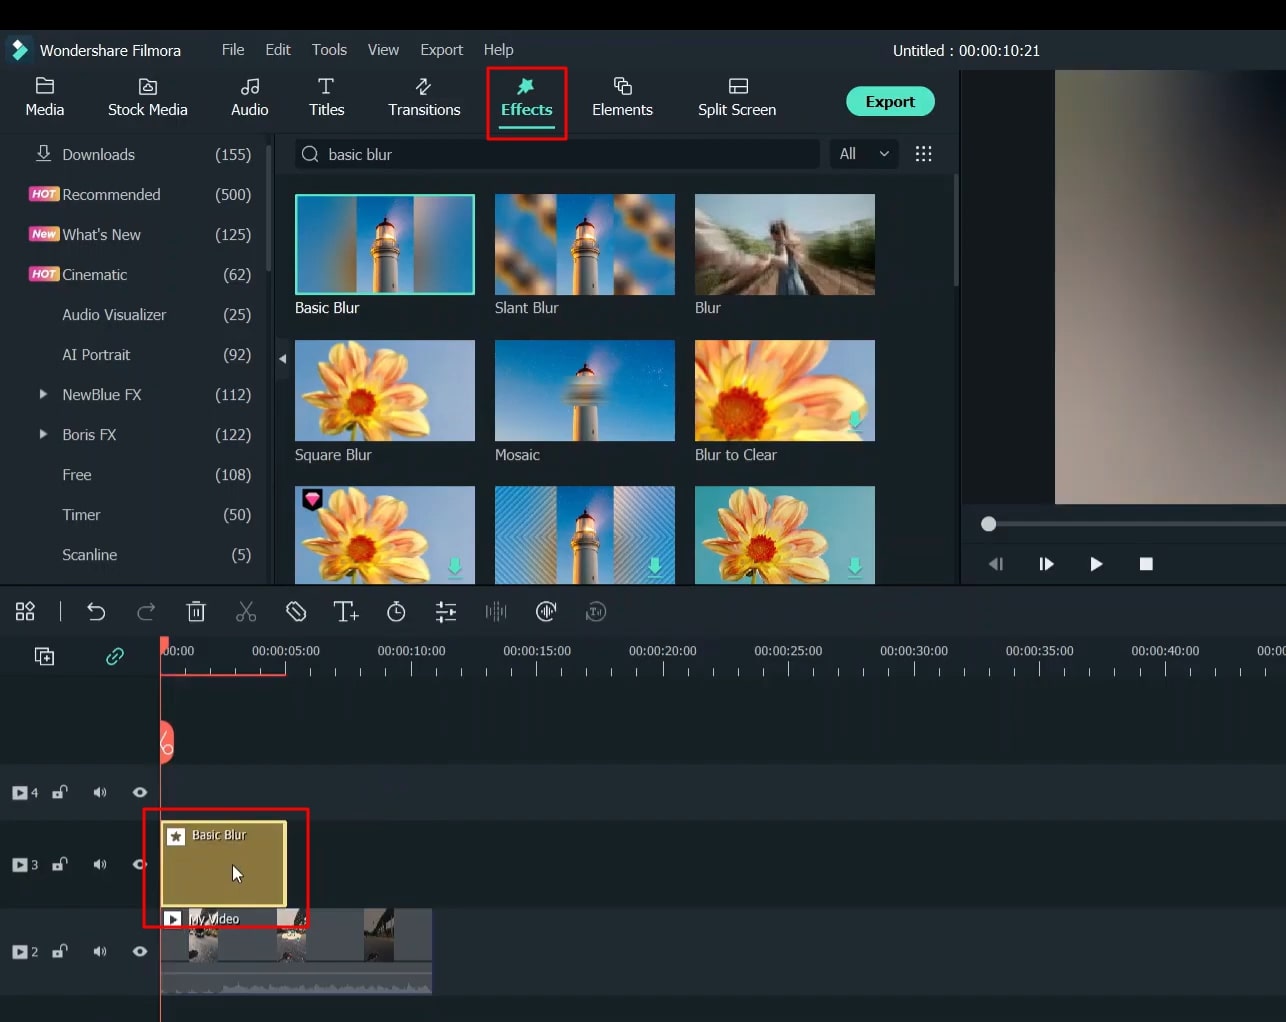
Now click on "Effects." In effect, search “Basic Blur.” This is the first option you get, drag and drop it on top of your clip. Drag it to your entire clip. So you can see the vertical video now has a blurred background.
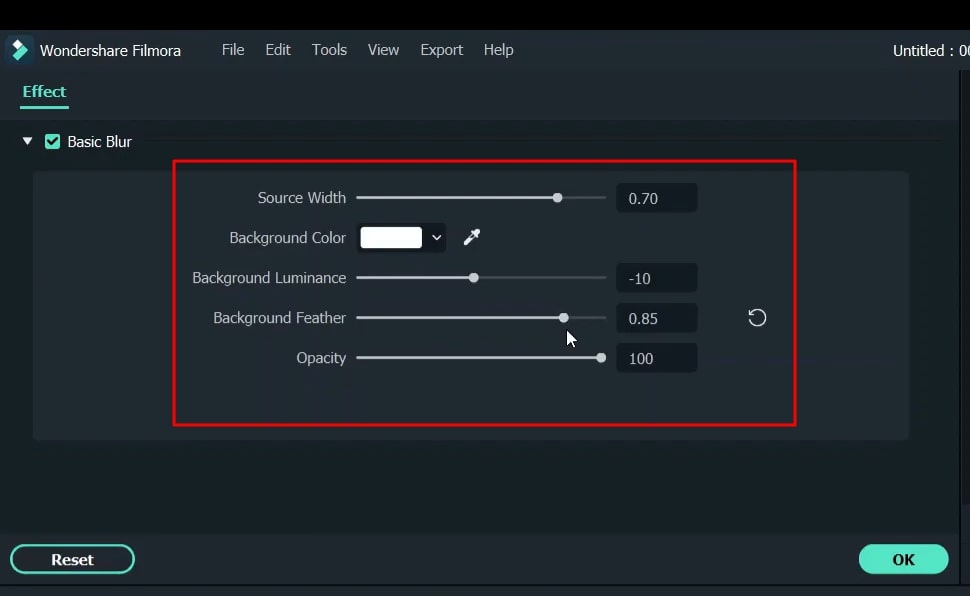
You can tweak the background. Double-click on “Basic Blur,” and here you can increase the blur intensity and everything. “Background Feather” is the option to increase or decrease the blur. As you can see, it’s increasing and decreasing. I would like to keep it at 0.85, and “Background Luminance" basically makes the background a bit darker or lighter, or you can also use a background color and use any of this gray palette to make it darker.
You can play around with all of these adjustments to make your clip how you like it. Now click “OK." As you can see, now the background is blurred, and the video looks really good.
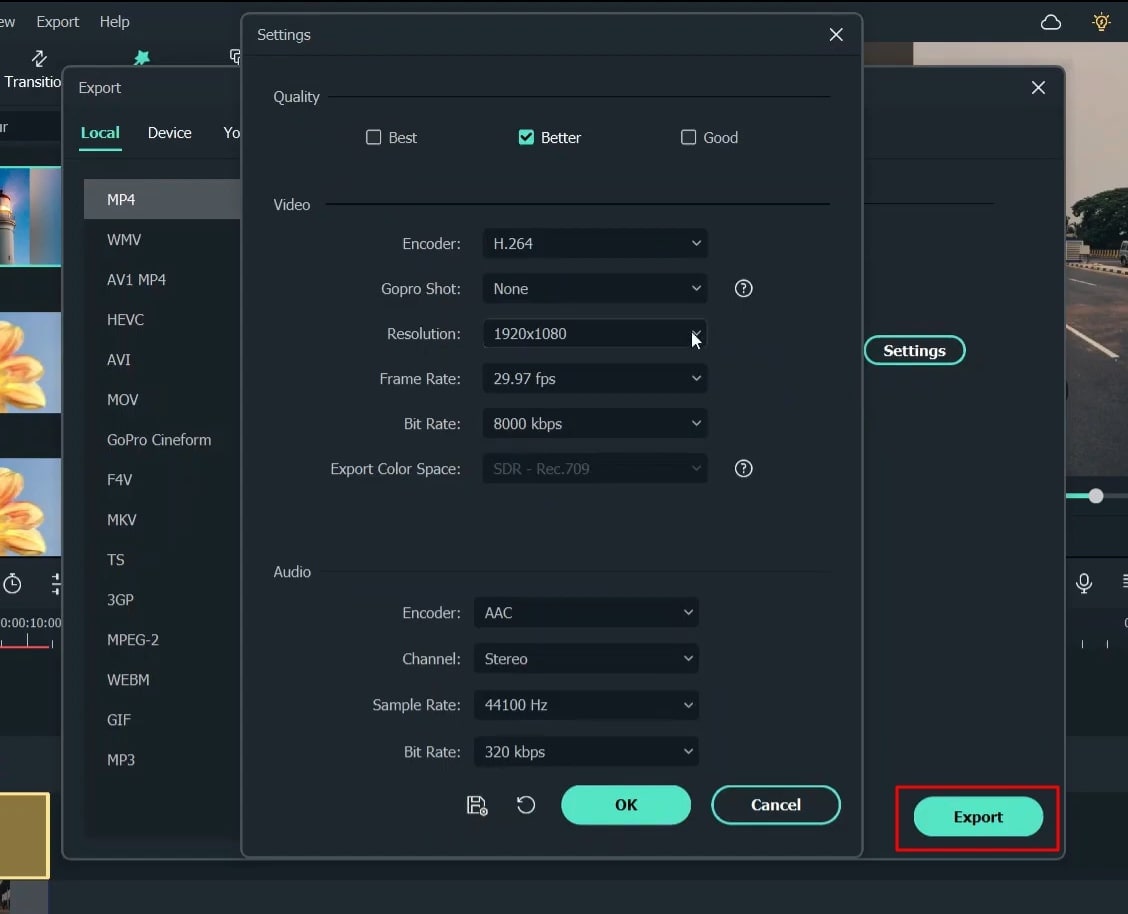
To export this clip, click on "Export" and click on "Settings." In settings, make sure you choose the resolution if you want. I usually go with 1080p videos. So I'm going to choose this and choose the frame rate as 29.97. The bit rate can either be 8,000 or 10,000. In the audio bit rate, choose 320, and click "OK." Now click on "Export." The video will now start exporting.
Guide On How To Blur Background Of Vertical Video Using Filmora
What you need to prepare:
- A computer (Windows or macOS)
- Your video materials.
- Filmora video editor
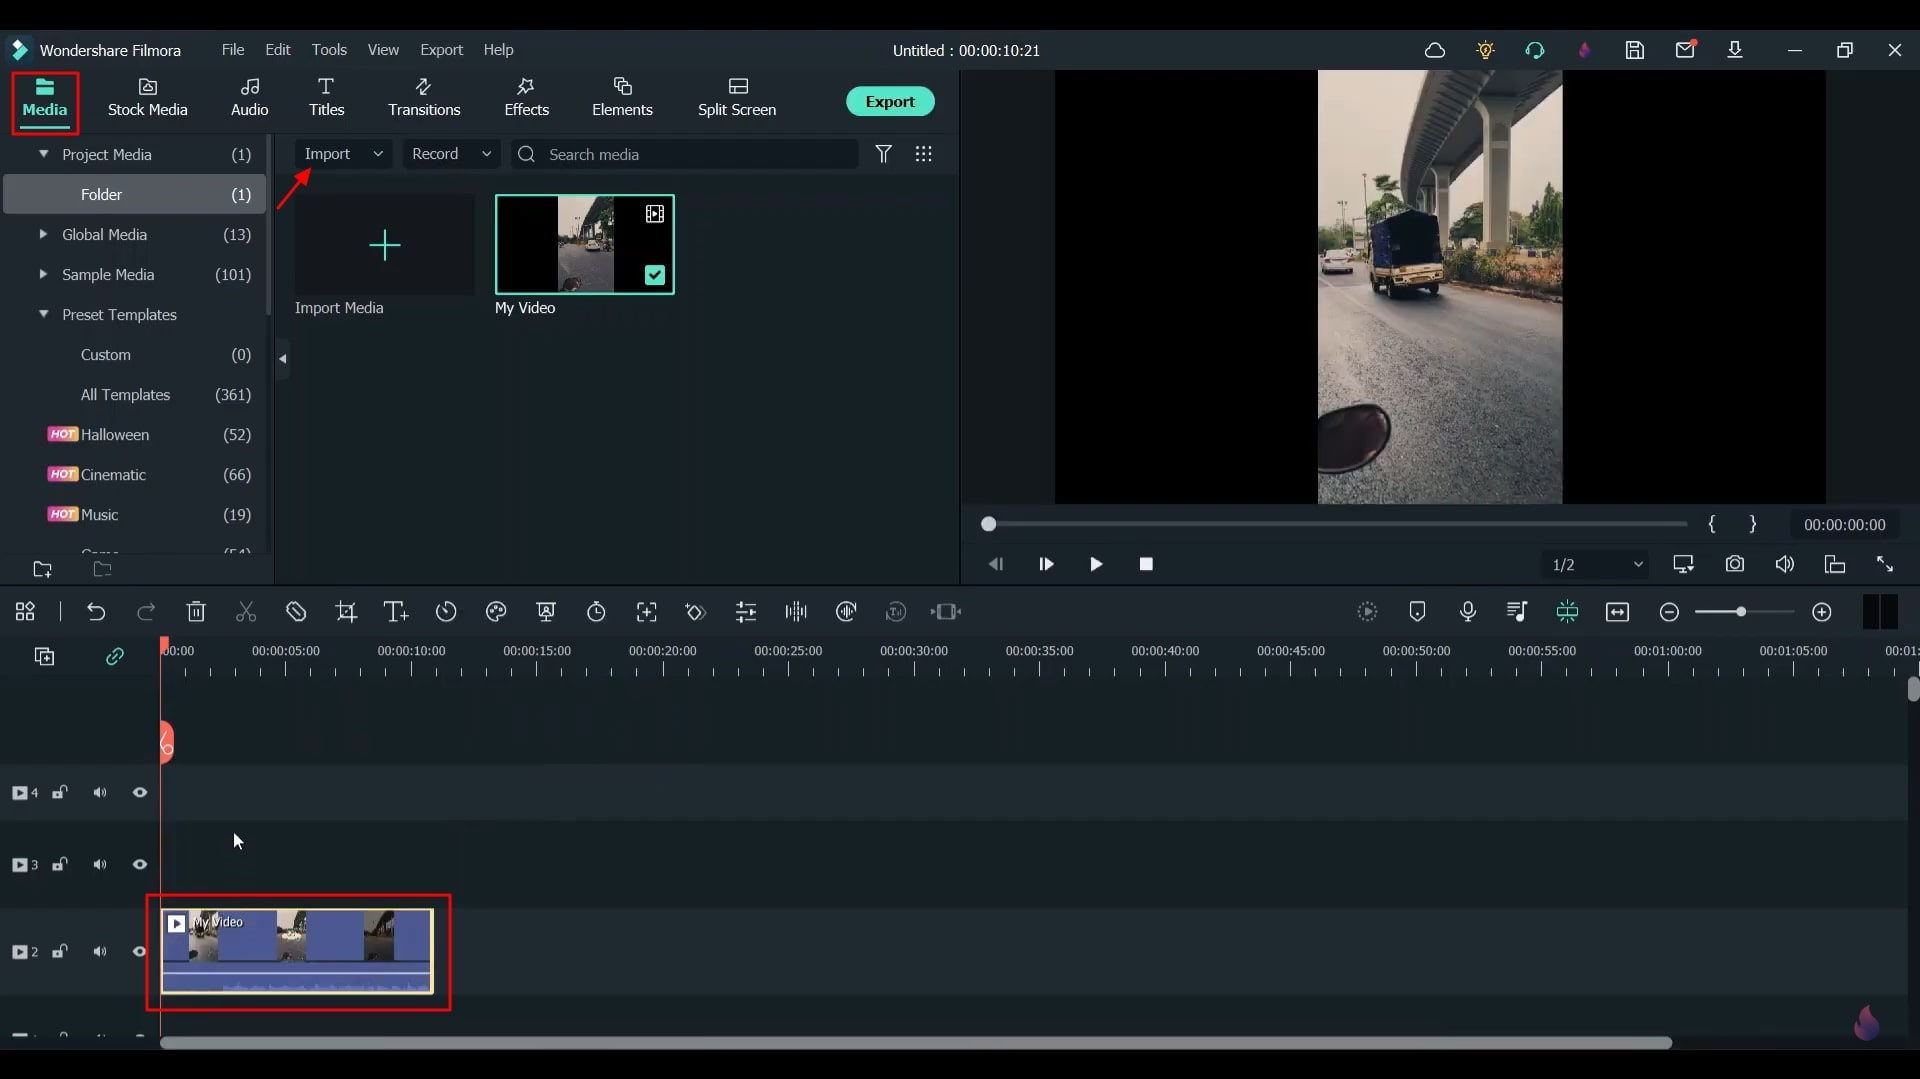
Import Your Vertical Video to Filmora
Once the Filmora application is started, click on the "Media" bar from the top-left side of the screen, and then press the "Import Media" button to begin importing your vertical video from the device. Drag and drop the imported video to the project timeline below.
Adjust the Video Dimensions to Make Editing Appropriate
To adjust the margins of your vertical video, click on the "Crop" icon available in the functions panel bar. A window will open on your screen, select "Crop" in it and navigate into the "Ratio" where you've to select "Custom." Then by using your mouse cursor, you can minimize the length or width as required.
Integrate Blur Effects to Improve Quality
Adding an effect is a better idea to make your video more interesting. To proceed further, click on the "Effects" bar from the menu above and choose your desired effect from the given options. You can also search for any effect from the search bar, e.g., “Basic Blur." After choosing your effect, drag it to the timeline over your video.
Customize Your Background Blur Effects
Double-click on the blur effect in the timeline if you want to perform custom personalization on your chosen effect. A panel will appear at the top of the screen, and here you can adjust the effect's width, luminance, feather, and opacity. You can also change the background color of the applied effect as required. Click “OK” to proceed further.
Preview and Export the Video with Customized Settings
For a smooth playback of your video, click the "Render Preview" icon. If you're satisfied with the video, press the "Export" button from the top, set the name of the video and file location, and then select the "Settings” option.
Now you can set your desired video resolution by pressing "Resolution." You can adjust the bit rate, frame rate, and other settings. Click "OK" to save changes, and now again press the "Export" button to download your video.
Vertical videos are an exciting part of visual entertainment that can grab the audience's attention at first sight. Many people make such videos daily, but only some edit them to make them even more perfect. This easy-to-follow tutorial on Filmora will help everyone edit their videos with minimal effort.


