How To Make Travel Maps Animation In Filmora | Step-By-Step Tutorial
While inspiring all traveling enthusiasts to overcome their fears and challenges, travel map animations are a great tool to share your journey’s timeline with others. You can show others which place, cities, or countries you visited and motivate others to pack their bags. This Filmora tutorial will help make an outstanding traveling animation.
-
The Basics of Creating Typewriter Effect in Premiere Pro
-
Contextually Understanding All Techniques to Create Text Typing Animation
-
3D Text Animation Making Made Easy Finding the Best Solutions!
-
Guide On How To Blur Background Of Vertical Video Using Filmora
-
Guide On How to Blur Background of Any Video In Filmora
-
Guide On How To Add Video Watermark Animation In Filmora
-
Text Animation Bar - Bottom of the Screen - Filmora - Tutorial
-
Tutorial - How To Make Magnify Animation On Filmora
-
Tutorial | How to Fake Camera Movement with Filmora 12
Transcript
Today, I will tell you how to make an animation using an animated car in Filmora 11.
We'll go into the Filmora software. As you can see, my Filmora is already open. We'll upload the files that we have prepared. Okay? So, we have added the lines and files. After that, open all of them as we have already done, and now we’ll enter the timeline.
Firstly, we'll enter the one at the bottom with the red line as a base. For the duration, it’s up to you guys to edit the video later. Okay, I will set it here and will not take it longer than 20 seconds. So, we’ll keep it at 20 seconds like this and stretch the timeline.
Okay, we'll put the plain one on top. Let's put the rest like this and ensure these two images are identical. The only difference is lines like this. Okay, we'll insert the car's PNG on the timeline track above it.
Meanwhile, we’ll hide this first, and for this map, we’ll unhide it first because there is a black bar. Now it's nice to see. Double-click and move to the "Transform" section, and I will scale this to 220. Then the same for the map above it. Okay? Like this, we are scaling to 220%.
Now, we will set the position on the bottom. First, let's hide it. Okay, we will set it like this. Let's slide it, maybe using 250 minus 70, and this has to be matched for the position. Now double-click on the two pictures, and with 250 minus 70, they can’t slip further even though it’s only a single value.
We close it again, and we turn it on the part of the map. It's fixed now, and we need to go straight into the animation. The line is easy to double-click. On the top, there is a second track, which is close to the red line. Double-click, and now go to the "Mask" section; select the rectangle, and it's already masked.
Let’s go to the keyframe section. We enter the keyframe like this. Apart from the position, it's also not big enough. So let's scale it first like this and make it big. Nice, we have already set the position, and we have already entered the keyframe.
Okay, until the end of our position, immediately slide it like this until all the lines are open. Okay, so the red line is all open like this. The red lines will be the road and the position; it depends on what you want to animate. Yes, the red line or these directions may be too slow, so speed it up a bit.
Double-click on the masking section. Now we will speed up the keyframe part here. This one looks a little slow, so yes, there's a speed in it like this. For the animation, it's totally up to you. The direction is from left to right.
If, for example, you want to change the direction, it lies in the position part as we're animating it in the position part. For example, from top to bottom, play the Y one if you want, from left to right. Okay, it means starting at the beginning; the position is in the middle and is running out. We will make this position a plus anyway.
Just adjust the position of X and Y from top and bottom. Similarly, adjust the vertical and horizontal according to your video, and I want it to be animated. Okay, here's an example from the left. Just go to the right, and when it's finished, click "OK." So, the animation of the red line has become like this.
Friends, we can see the last part, so immediately animate the car part, and we'll unhide it. Double-click, and then we’ll scale because it’s too big. Keep it at 10, just 10, and after that, we can go straight to the division. Now select "Animation," then select "Customize," bring the playhead in the beginning, and enter the keyframe.
Now we’ll adjust the position and rotation of this part again, and we'll go back and shift it first. Then we'll move it forward until the red line appears, maybe like this. After that, we'll make the rotation, and we'll move it like this, okay? After that, we'll play the red line again, and we'll move the position of the car forward.
You can animate. It’s totally up to you, and this is just an example. So, let's move the car in position again while sliding like this, and you can animate it just like the last one. Guys, this is the animation for the car. It's done, and now we'll preview it. So later, you can also make smoother animations just like this.
As you can see, the car goes on the red line; some of them are speeding while some are slow. So, you’ve to adjust the animation as per your requirements. Continue working on it until the animation is according to your needs and is also smooth.
How To Make Travel Maps Animation In Filmora | Step-By-Step Tutorial
What you need to prepare:
- A computer (Windows or macOS)
- Your video materials.
- Filmora video editor
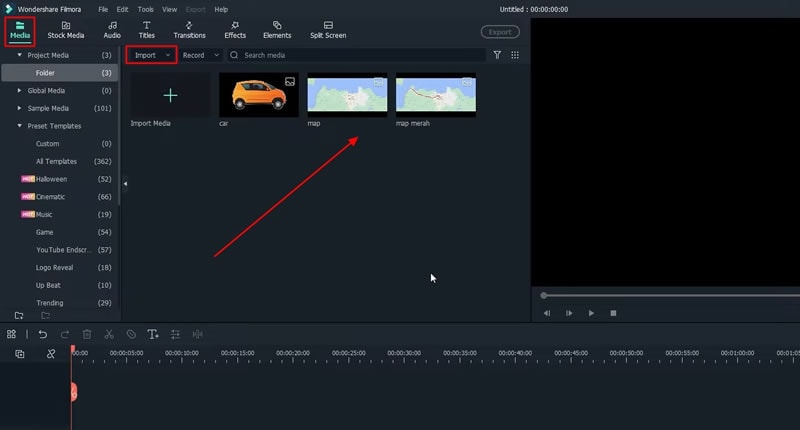
Import Car and Track Images
To begin your travel map animation, the first thing you need to do is import your respective media files to Filmora. For this, you're required to click the "Media" tab from the top left corner and press the "Import Media" button. You've to import all your required files, including map and car images.
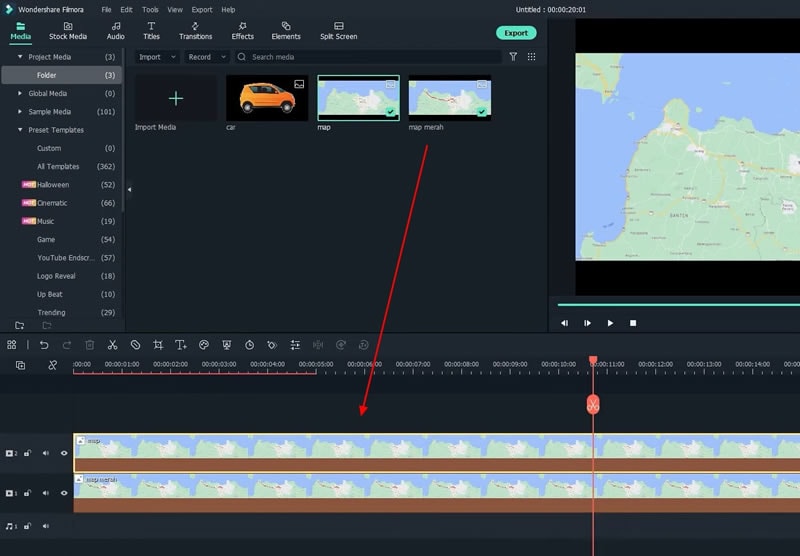
Drag Media Files to the Timeline
You need to move your media files to the project timeline below. This could be done by simply dragging and dropping the files into the timeline. After adding in the timeline, make sure to adjust the duration of each file track similarly.
Edit and Customize Images
Double-click on your image, and from the window, select "Image," press "Basic," and click "Transform." Thus, you can adjust the layout and dimensions of your image with respect to scale, rotation, and position as per your interest. If you have more images and want to edit them, continue to repeat the same process for them.

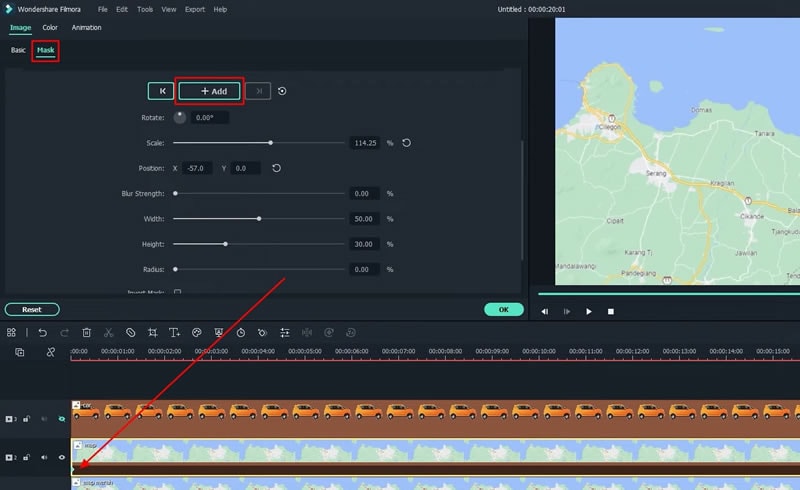
Apply Masking and Use Keyframes
If you want to change the shape of visibility in your animation, use masking for it. So you have to double-click your image track where you want to apply the mask. Therefore, now select "Image," press "Mask," and finally, choose your masking shape from the given option.
You can also edit the mask from the given parameters upon scrolling down. If you want to place a mask keyframe, adjust your playhead position in the timeline, and click the "Add" button. When the keyframe is applied to your desired image track, you can drag it further using your mouse.
Keep adjusting the mask from given mask customizations until you're satisfied with your map animation. Click “OK” if changes are completed.
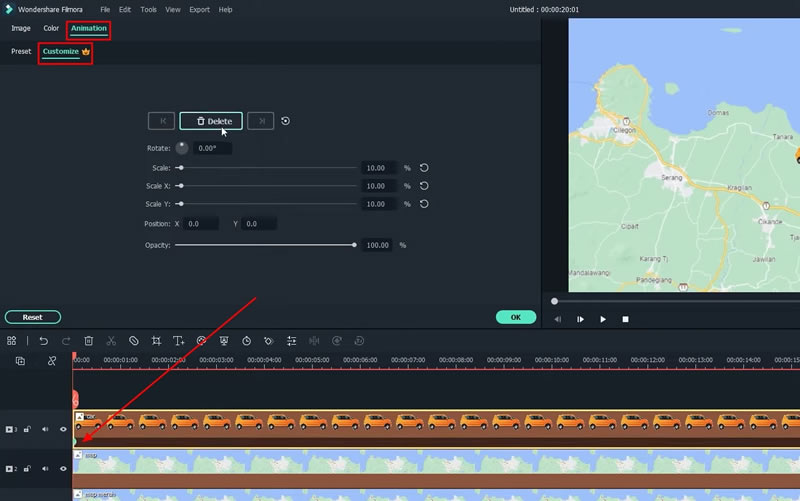
Use Animation Keyframe on Vehicle
To apply animation to your vehicle, double-click on its image track from the timeline and select the "Animation" menu from the available window. Move into "Customize," adjust the position of your playhead, and then click the "Add" button to apply the animation keyframe.
Of course, you can further adjust the vehicle movement from given customizations. If you need to apply more keyframes, repeat the process. You can also drag the length of your current keyframe if required.
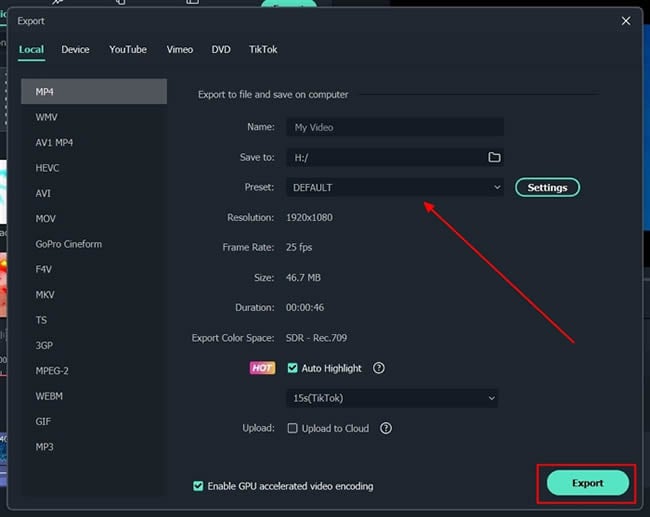
Export your Travel Map Animation
Once satisfied with your edits, tap on the "Export" button on the top. This will open a window where you can define the exporting parameters. After filling it out, click "Export" to execute.
Travel is a hobby for the majority. Therefore, when you'll create a travel map video for yourself indicating your journey's A to Z track pathway, your friends and colleagues will definitely like and appreciate your trip. Meanwhile, this tutorial on Filmora acts as a helping hand to design and develop some amazing travel animations. Follow these simple and easy steps.