-
The Basics of Creating Typewriter Effect in Premiere Pro
-
Contextually Understanding All Techniques to Create Text Typing Animation
-
3D Text Animation Making Made Easy Finding the Best Solutions!
-
Guide On How To Blur Background Of Vertical Video Using Filmora
-
Guide On How to Blur Background of Any Video In Filmora
-
Guide On How To Add Video Watermark Animation In Filmora
-
Text Animation Bar - Bottom of the Screen - Filmora - Tutorial
-
How To Make Travel Maps Animation In Filmora | Step-By-Step Tutorial
-
Tutorial - How To Make Magnify Animation On Filmora
Transcript
Let's fake a few cameras move for you guys. So let's go ahead and pick a clip that is pretty static, and I'm going to scroll across. You can see what we're going to be working on with her. So it's just two stationary laptops, and the couple there is just moving their head a little bit as they type on the keyboard. So just envision this as one of your own clips that are pretty static, and you need to add a little something to the clip because static images make terrible videos. You need it even if you really are just focused on a tree. You can make it seem like a camera is moving.
A left and right, up and down, in and out. You shake it a little bit, and I'm going to show you how to do that, and the first thing we're going to do is similar to what you just saw in my intro there. We're going to zoom in and zoom out, and we can do it with keyframing and with Filmora 12. Wow, they made it easy. Let me show you.
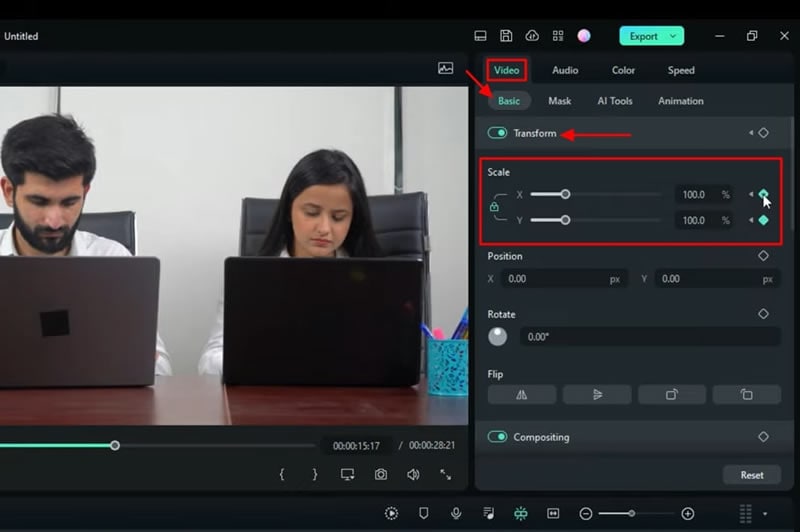
So first, let's pick a spot where we want to start to zoom in. Let's just pick that one and make sure the video clip is selected as the one you want to work with. If you've five or six clips, make sure you select the one you want to work with. Just go up to the “Video,” “Basic,” make sure "Transform" is on, and simply click the little diamond that sets your first keyframe. Where we can do all manner of things, but all we're really going to do is scale.
Let's just bring the part where we want to bring the scale in or up to zoom in, and we'll do it about there. Click again, and that's your second keyframe, go ahead and set your zoom, your scale. Let's scale pretty far in, so we can see the effects. Perfect.
Now, let's take our little playhead here and bring it all the way to the end. Set it again, keyframe number three, and let's just bring this. I'm just going to type it this time. I'm just going to bring this down to 100 and just select anywhere in this, anywhere out here in this gray area, to make that take effect. So what's going to happen is nothing happens here. We scale up, and we scale down.
Let's go ahead and watch that in action, and this is the first way, and one of the easiest ways, that you can make your audience think that someone is back there behind that camera doing a little zoom-in action. So there's zooming in on these people, the tree, the bird, the butterfly. Whatever you guys got, and you can see right here in the scale running backward as we keyframe back down to 100%. Okay, I use that technique an awful lot.
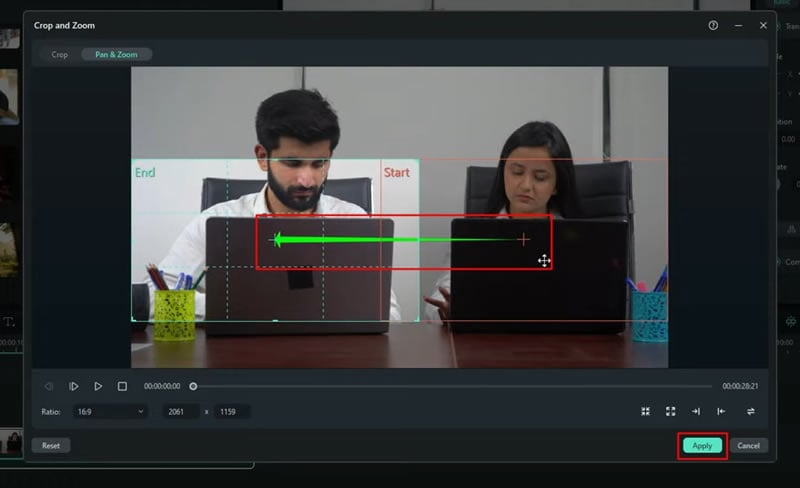
When I'm doing my travel videos, and I'm out there filming in the desert or something, and there's a cactus, and I got a nice long shot of that cactus. But that's pretty boring. So what if it's zoomed in a little bit? What if I zoomed out a little bit? What if I moved left to right or right to left? Well, let me show you how we do that, so we're going to move this left to right or right to left. So I'm going to reset all of that, which removes everything down here. Okay, and now we're going to right-click, choose "Crop and Zoom," and select “Pan & Zoom.” Pan and Zoom are very powerful features. We're going to start with the “Start.” You can see the little blue-teal color there that says Start. That's where we're going to start at.
Now you can grab the corner, and everything in this box is what's going to move this time. So I'm going to take it and give it about that much resolution. Okay, and you can see down here what I've changed it to. And we're going to now grab the end, and I'm just going to set it over top of the other box for a second, and just sort of match it up by just by feel, and we're going to go to the end. So what's going to happen here is we're going to start here, and we're going to pan slowly to the left, and we don’t even have to apply this to see it happen.
We can just click right here and watch it happen, so you see zoom in. Now, why did it zoom in? I made that square very small, and we're panning from right to left. Let's stop that and go back. Now let's take the start and fill the entire frame. Okay, and then we'll leave the end a little higher up on this gentleman, and what's going to happen is entirely different this time. Now we're zooming from right to left and zooming in at the same time. This really looks like there's a cameraman back there moving his camera from right to left and then hitting the zoom button. But in reality, that's not true. So this is how you can fake a pan and a zoom and make it look like something's really going on there.
In a lot of tutorials that I do, this is exactly how I get you guys to get up into a box somewhere to see something. I'll do a pan and zoom. Okay. Now is there another way? Let's say you want us to look like maybe you're doing a live-action like these people are on a live video or something. And you, and there's a guy standing there with a camera, and he bumps into the table, or somebody bumps into the cameraman or something like that.
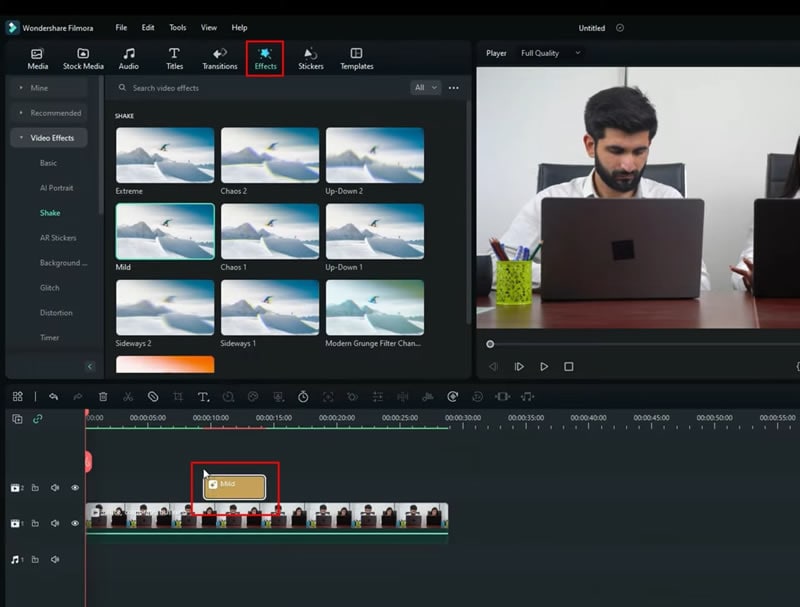
That can be done over here through effects, and there's a subcategory under video effects called “Shake.” And you can take the “Mild” one, and we'll just drop the mild one right in the middle here. And you can even add a little “Pan & Zoom” or a little scale action along with this. And so, here's the guys talking and blah blah blah. And oh. we're moving around. Now that's a good one, and you can do the sideways one for a little more drastic action so that, oh, drop the camera.
So you put the proper sound effects here; maybe shrink that down a little faster. But the proper sound effects here with the proper video, and it'll just look like some guy just got the camera on the ground, just like that. Let’s go back to that other effect called “Mild,” and by the way, these effects are free with your Filmora 12 subscription. Anything it doesn't have that little red heart on it means it comes free.
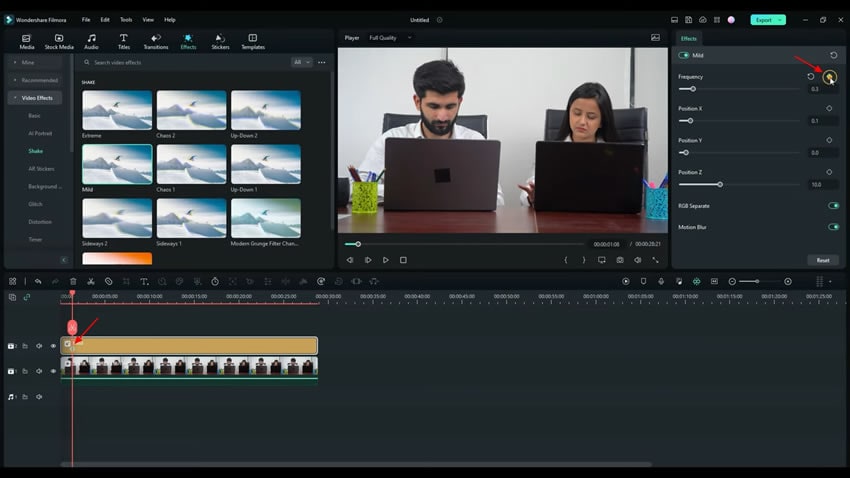
So now we're going to make the rocking motion. But we're going to go a little further with it. Left-click on the effect “Mild,” come over here, and let's lower the “Frequency” to about 0.5. We barely want this to move; now it looks more like maybe we've got a shoulder-mounted camera with the cameraman. Imagine if we were panning and zooming at all at the same time. You can see the effect there; you can even drop that down to maybe 0.3. So it barely moves, and then you can also obviously modify just about everything else, and yes, you notice these, you can keyframe this if you want.
I'll give you a quick example of how to keyframe it, so we'll just start. The frequency is at 0.3, and we'll increase the frequency. So it's going to get pretty shaky here too, I don't know, let's go to 1.5, and that's it; that's as easy as a keyframe. It is now with Filmora 12, and here we go. So we start off, and here we go. You can watch it right here. The frequency is picking up, stream, so now it's kind of like they're on a row boat or something out in the middle of a lake.
So, and it's to stop that. So if you wanted that one portion, well, then all of you would do is set the next keyframe right next to it. One frame ahead with this button right here, go one frame, add a new one, and let's take it back to well; we have it at 0.3, I think. So right there, and then that will continue 0.3 all the way out. So we'll start at 0.3; you can watch it rise and get shaky and bouncy. We're rolling, we’re getting seasick, and then we're back over.
Okay, so those are the ways that I like to make my videos look like there’s a cameraman out there doing something. And I’ll just have to tell you right now, my absolute favorite way is to keyframe the scale. It works very well. You can also use the keyframe scale, which we'll do again, and I'm going to add one more element to it. So we'll zoom it up pretty quickly there. I say the word zoom. We're really scaling up is what we're doing, and we're not only going to scale up this time, but we’re also going to change the position because we want to scale into her face.
Okay, so we got to set our position to zero until we get where we're going to get to the final clip and another way to get over there. So you know that you're right about it. It is just simply clicking on the diamond but putting your playhead directly on it.
Now, we want to move this position over here, and it’ll hold that position, and so this is very similar to a “Pan & Zoom.” It’s just another way to do it. Filmora allows all kinds of ways for things to happen. So now we're going to do a scale, and we're changing position, and then we’re going to hold that position right there.
Okay, and while we're holding that position, we can add a little and what I like to do to line up where I am. Let's get on the clip and click on the little keyframe diamond. So the playhead is where you want it and out, then drag your effect right over to it. So now, we are going to kind of do three different things at once. We're scaling, we're going to change in position, and we're not going to clean out a frame.
Definitely, that worked out. Anyway, you can have a lot of fun with these tools. I really think you guys, if you're not using it, should really delve pretty heavily into the pan and zoom features. You can get really crazy with that stuff and make all kinds of things happen.
Tutorial | How to Fake Camera Movement with Filmora 12
What you need to prepare:
- A computer (Windows or macOS)
- Your video materials.
- Filmora video editor
Select Your Clip and Import
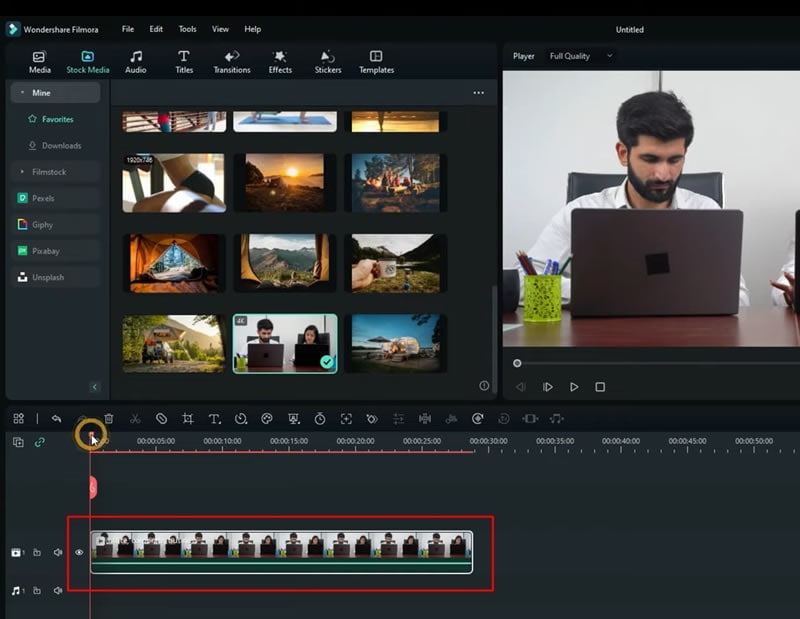
When you open the Wondershare Filmora editing interface, you first need to select a clip for yourself. If you want to edit your clip, you've to import it first, which is by clicking on the "Media" bar from the top-left and then pressing the "Import Media" button. Meanwhile, if you want to use a ready-made template, you need to select the "Stock Media" tab from the top-left and choose the desired template.

Drag Your Clip to the Timeline
After you’ve selected and imported your clip, you’re required to drag and drop it on the project timeline below.
Add and Adjust the Zooming Functionality
Implementation of zooming is an important attribute of fake camera movements. Hence, it's extremely easy if you also want to embed this functionality into your videos. To do this, you’ve to adjust the playhead on your selected clip in the timeline and set keyframes.
Once you click the clip, a window will appear at the top-right side. Press the "Video" and then click "Basic" and make sure "Transform" is on. Just ahead of the "Scale" menu, you've to click the diamond and place it on any part of the video by adjusting the playhead.
Again, click and place a diamond on the further part of the video by using playhead. By using the X and Y scale margins, you can set the zoom-in and zoom-out ratio.
Implement and Customize Pan & Zoom
Just like zooming, Pan & Zoom is a great feature for fake camera movements because of its left-right adjustment. To implement this, you need to right-click on your video in the timeline and choose "Crop and Zoom," and then select "Pan & Zoom." Grab the corner that states "Start," crop, and move the box as required. Grab the “End” and crop, and move the box as required.
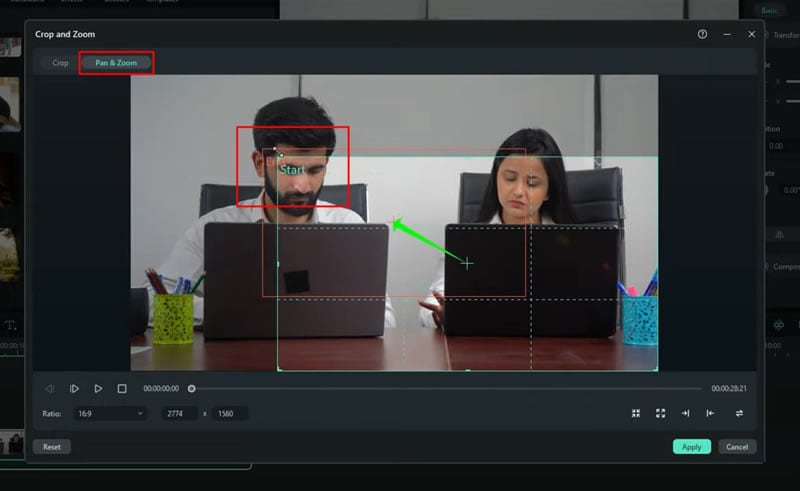
Adjust the Direction of the Pan & Zoom for Fake Camera Movement
The arrow will point towards the end from the start. So if your start box is on the right side, the video will move from the right to the left side. Likewise, if the start box is on the left side, the video will move from left to right. Not just left and right, you can adjust movement within any direction by moving both boxes. When you finish your desired changes, press “Apply” to proceed further.
Apply, Edit Effects in the Video Clip
If you want to apply effects on your video clip, simply navigate into the "Effects" bar at the top and choose your desired effect. Don't forget to drag any effect you choose to the timeline on your clip. You can put multiple effects on your clip at different intervals if required.
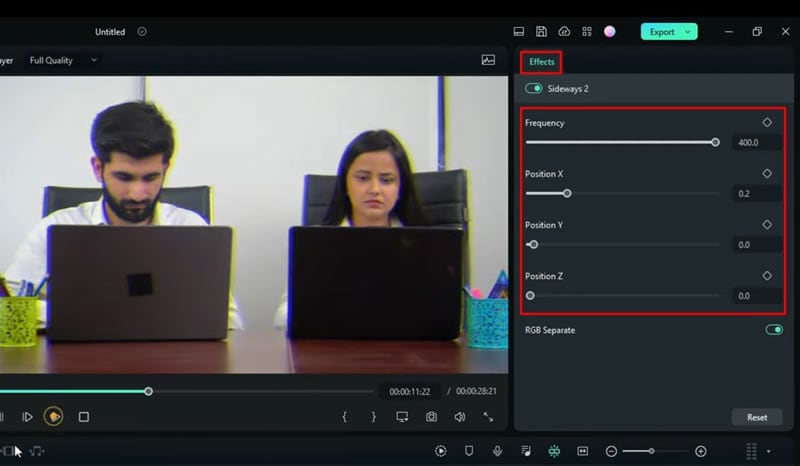
Customize Parameters of Effects for Fake Camera Movement
To edit, push a left click on your effect in the timeline, and you will witness the "Effects" editing bar at the top-right side of the screen. Set frequency parameters, adjust X, Y, and Z positioning, etc., for your effect.
Add Multiple Effects with Keyframes
In addition, if you need multiple effects in a single clip, you can apply a keyframe to your effect. For this, you need to click on the diamond from the effect adjustment parameters at the top right side and place them anywhere on your effect using the playhead.
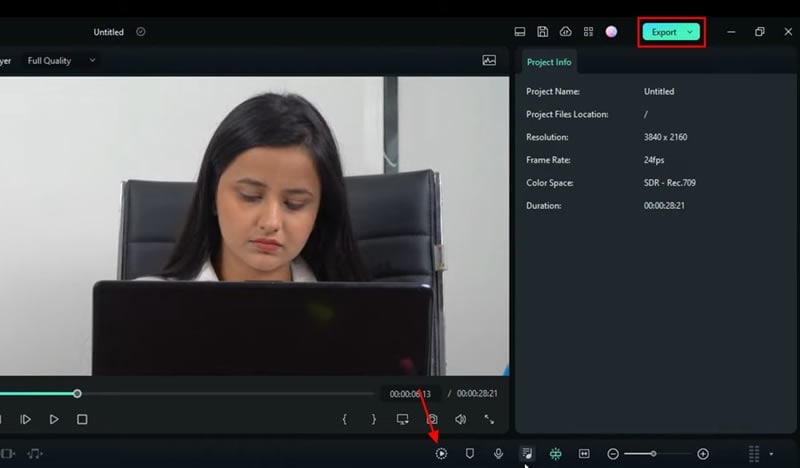
Preview and Save on the Device
Your video with fake camera movement is finally ready. It's time to preview the outcome. Press the "Render Preview" button and witness a smooth playback of your newly created project. If you're satisfied with the video, proceed further to save it on your device. You can do this by pressing the "Export" button from the top and saving your video in the required location on the device.
Having boring and dull videos is a common thing. However, instead of just deleting or ignoring them, we can definitely make them more interesting and exciting with the help of fake camera movement. This tutorial on Filmora has step-by-step solutions for everyone who needs to apply fake camera movement to make their videos extra special.