
 100% Security Verified | No Subscription Required | No Malware


 ChatGPT
 Perplexity
 Gemini
 Claude
 Grok
Grok
It’s true to say that viewers watch videos for their actual content. Either they wish to find a specific piece of information or just want to bide some free time. Hence, we cannot deny that it’s the main component that makes up this kind of material. Although its significance is evident, don’t forget that other factors also matter, especially the way the content is presented. Video color is also a key player in the content creation process. Why so? Well, let’s just say that it sets the mood, highlights important scenes, and supports a consistent narrative flow. Don’t worry. AVS video editor has built-in color correction tools that you can use in this regard. Simply configure the dedicated sliders to make your desired adjustments.
In this article, we will delve into the color correction function of AVS Video Editor. We will also suggest a great alternative that simplifies the intricate process of color correction. Continue reading below to learn more about Filmora’s AI Color Palette and how it reinvents color correction.
In this article
AVS Video Editor Color Correction: Features and Limitations
When it comes to video editing software, AVS Video Editor is always included in the list. It is basically a user-friendly and straightforward tool that allows you to create video content instantly. With regard to the features, AVS video editor is packed with fundamental video-editing functions. Among them are basic editing, visual effects, and disc authoring. While it’s indeed useful software, we cannot deny the fact that it can only handle specific video projects. You might have a hard time editing content with strict and complex requirements.
Can you use AVS video editor for color correction? The short answer is absolutely yes. AVS video editor offers a color correction panel filled with various options you can use to customize your video. If you want to correct the video color in a snap, you can make good use of its auto color correction feature. Simply select it from the options and let the app do the magic. On the one hand, you can also calibrate the provided controls if you wish to correct the video color manually. You may customize its brightness, temperature, contrast, saturation, gamma, and hues. Just move the sliders to your desired level.
For basic color correction, the tools offered by AVS video editor are already enough. You can certainly make adjustments that improve the visual and functional value of your content. However, there is no doubt that this set of color correction features may fall short if your projects have complex requirements. That’s why you should assess your needs very well and choose your tools accordingly.
Step-By-Step Guide
Let’s say you want to give AVS Video Editor a try. That’s great. To proceed, check out the tutorial below and follow the indicated steps properly.
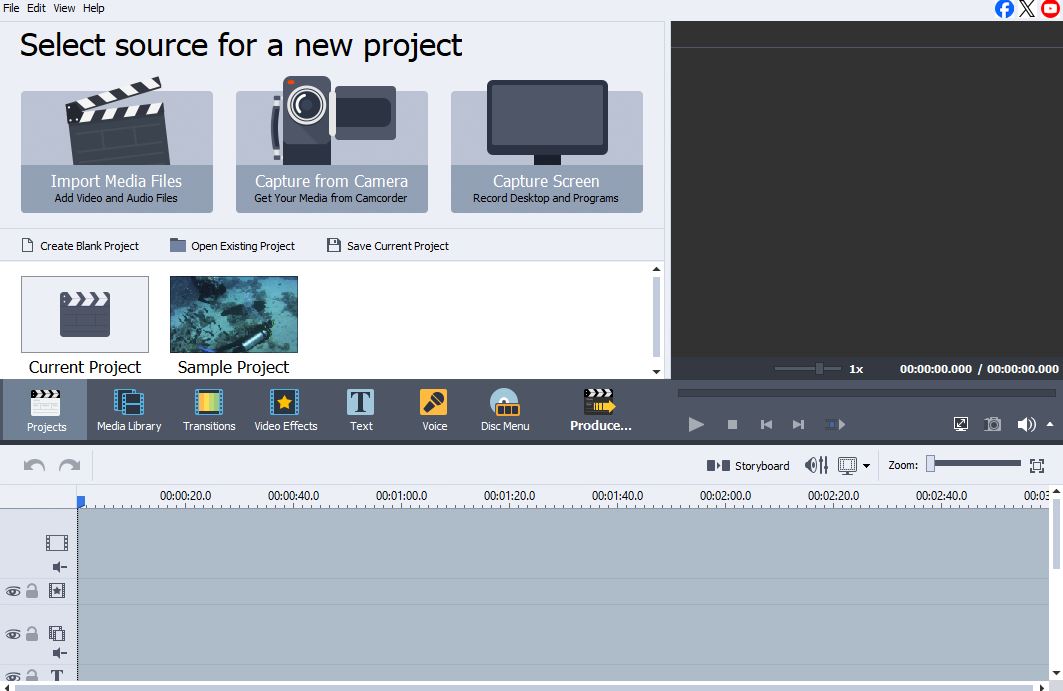
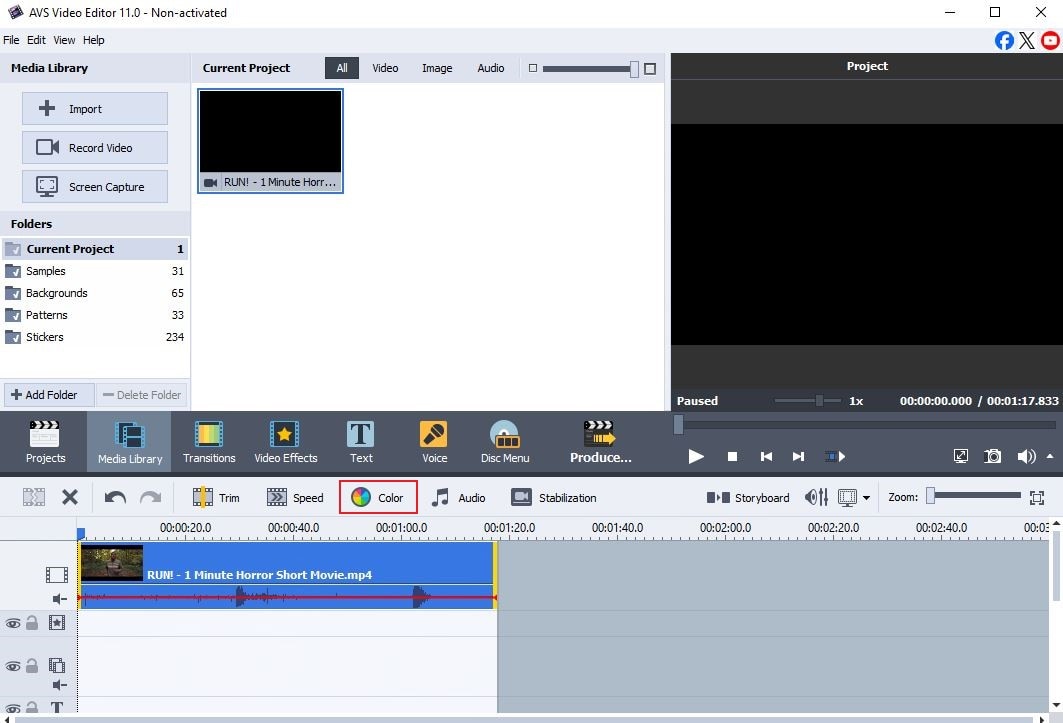
Step 1: On the main workspace of the AVS video editor, go to the timeline and select the video clip you want to edit.
Step 2: Click the Color option in the menu right above the timeline.
Step 3: The color correction panel will then open immediately. If you don’t wish to configure the settings by yourself, tick the checkbox beside Auto Color Correction. When enabled, the AVS video editor will automatically set the levels, contrast, and brightness.
Step 4: Meanwhile, you may correct the video color manually by adjusting the given parameters, namely Brightness, Temperature, Contrast, Saturation, Gamma, and Hue. Simply move the sliders or enter a specific input into the provided field.
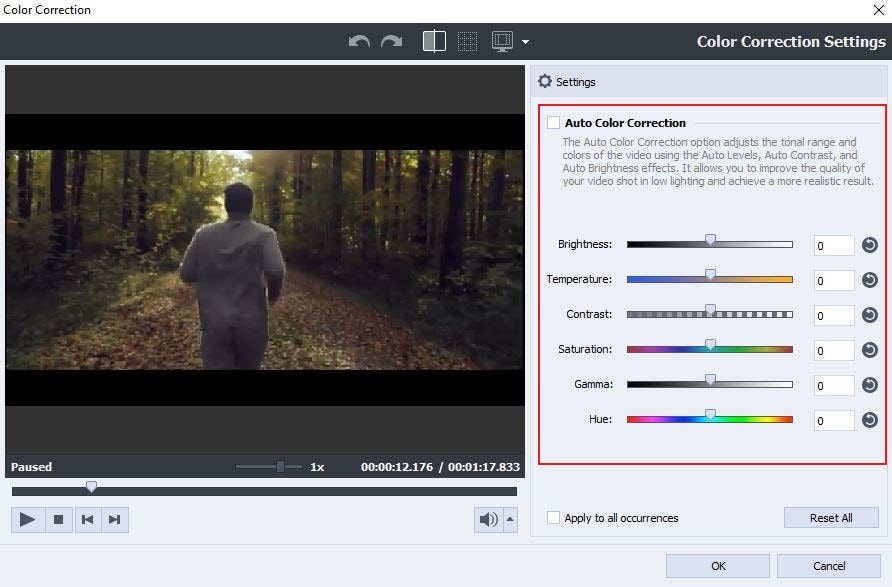
Step 5: Once done, play and review the output. If you’re satisfied with the result, click OK to apply the changes.
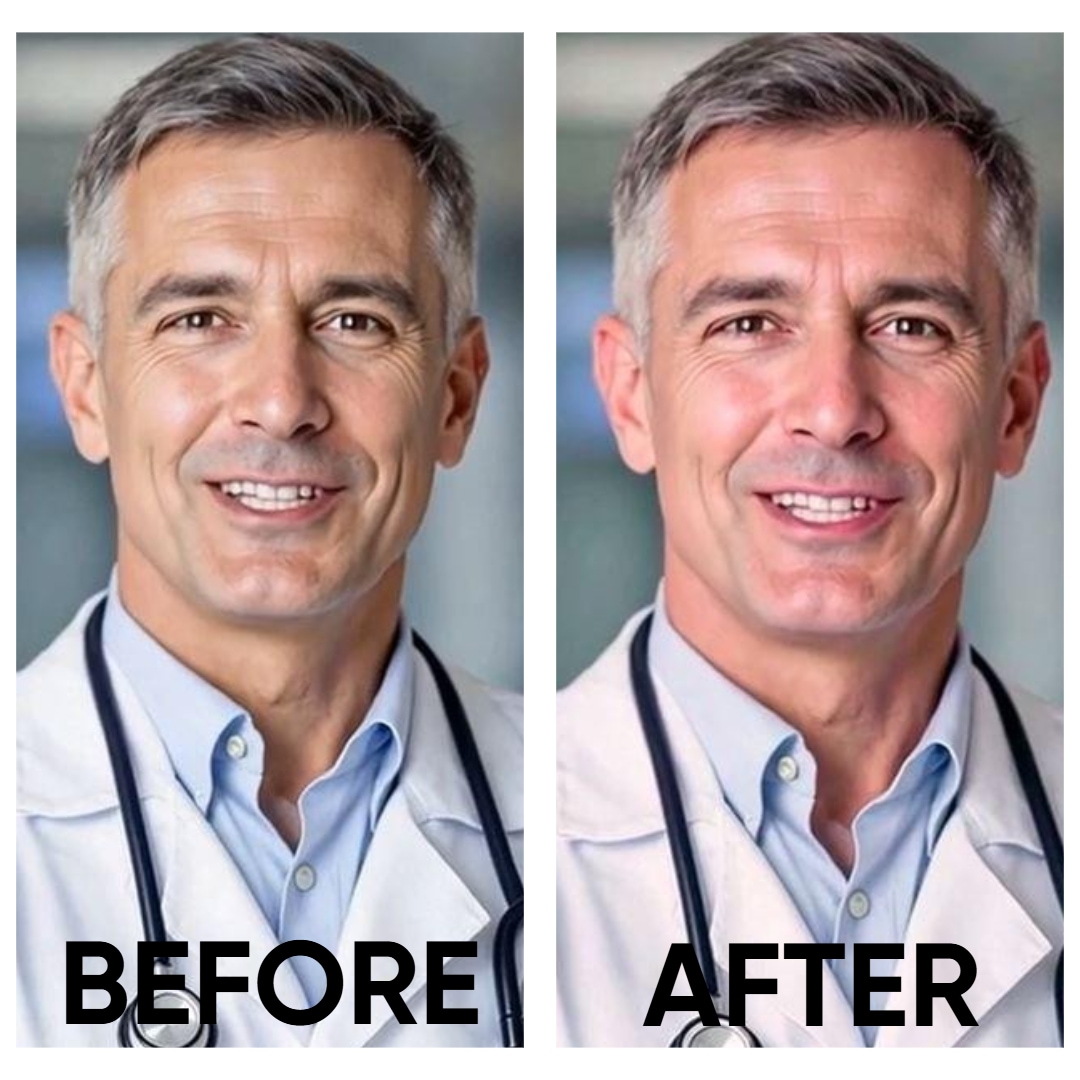
The Real-World Results of AVS Video Editor Color Correction
You might be wondering whether or not you should use the AVS video editor for color correction. Don’t worry. That’s totally fine. As previously indicated, choosing your video editing software is a very important part of the process. To help you make an informed choice, check out the sample results below.
Example 1

Example 2

Example 3

Key Strengths of Using AVS Video Editor Color Correction
For specific users, the AVS video editor can be very helpful when it comes to color correction. Check out the list provided below to learn more about its core advantages.
- Intuitive and beginner-friendly interface.
- Functional color adjustment tools.
- Real-time video preview.
- Ready-made filters and presets.
- A very lightweight video editing application.
Notable Limitations of Using AVS Video Editor Color Correction
Just like any other application, AVS Video Editor is still far from perfect. Its current set of color correction tools might not suit the preferences and needs of other users. To give an idea regarding this matter, you may check out the list provided below.
- Advanced color-grading tools, like Curves, Scopes, and LUTs, are not yet available on the platform.
- Video layering is not yet supported in case you wish to apply the effects to certain parts of the videos.
- You might find it hard to facilitate high-end color correction tasks due to its limited color-correction features.
Once again, AVS Video Editor is indeed a useful software for content creation. However, don’t forget its technical limitations that might affect your workflow later on. If you wish to opt for a convenient and powerful color correction tool, Wondershare Filmora offers a great alternative.
The Next Generation: Filmora’s AI-Powered Color Tools
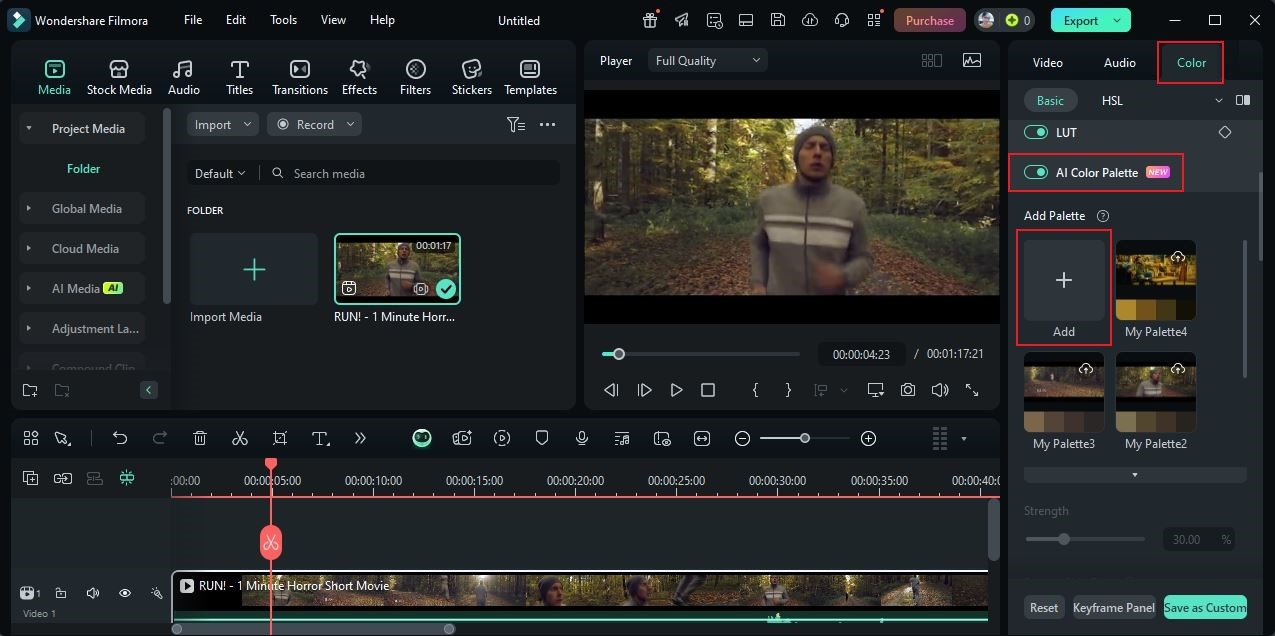
The AVS video editor carries the fundamental tools for color correction. One way or another, they can surely help you make your desired video color adjustments. However, we cannot deny that the world today has changed a lot, along with the color correction standards. You may need to opt for more advanced software if you wish to implement certain procedures. In this regard, Wondershare Filmora is there to save the day. It is a powerful video editing software filled with resources and tools you can use to facilitate various procedures. As for color correction, Filmora is equipped with a built-in color modification panel that offers different customization options. You can manually adjust basic and HSL settings to achieve your desired look. Meanwhile, you can try to integrate artificial intelligence into your workflow and make everything easier on your end. The AI Color Palette feature of Wondershare Filmora is the one you need in this regard.
Generally, the primary function of AI Color Palette is similar to the traditional video color tools. It is designed to modify the original color configuration of the videos and enhance their overall quality. However, it’s quite different when talking about the actual procedure. Why so? Simply because this feature uses artificial intelligence to automate everything. No need to adjust the color curves or wheels to apply your desired effect. The tool is capable of analyzing a reference clip and applying the same effect to the video projects. Yes. It only takes a few clicks to implement such tremendous adjustments using the AI Color Palette.
Benefits of Using AI Color Palette as an Alternative to AVS Video Editor
Is it really possible to correct video color in a click or two using AI? The short answer is absolutely yes. The AI Color Palette of Wondershare Filmora has already proven it. As discussed earlier, this tool detects the color profile of a reference clip and recreates it for your video projects. Should you give it a shot? Of course, you should. AI Color Palette offers tons of amazing benefits to video editors like you. Do you want to know what those are? If so, then check out the list below to learn more.
- It’s an instant color correction solution.
- It’s accessible to all types of users, from novice to pro.
- It saves time and allows you to focus more on other important tasks.
- It provides high-quality enhancement with accuracy and precision.
Mastering Filmora’s Color Grading Workflow
Compared to the AVS video editor, Wondershare Filmora has a much wider range of options for color grading and correction. You should explore these tools on your end and see how they can be of great help. To give you a head start, below is the tutorial on how to use the color correction features of Wondershare Filmora. Read the instructions very well and follow the indicated steps accordingly.
Step 1: On the main workspace of Wondershare Filmora, go to the Elements Panel and tap Import under the Media tab. Upload the video clips you are going to use and arrange them accordingly in the Editor Timeline.
 secure download

Step 2: From the Editor Timeline, find and select the video clip you want to edit. A new panel will then open on the right-side corner. Access it and click the Color tab to get started.
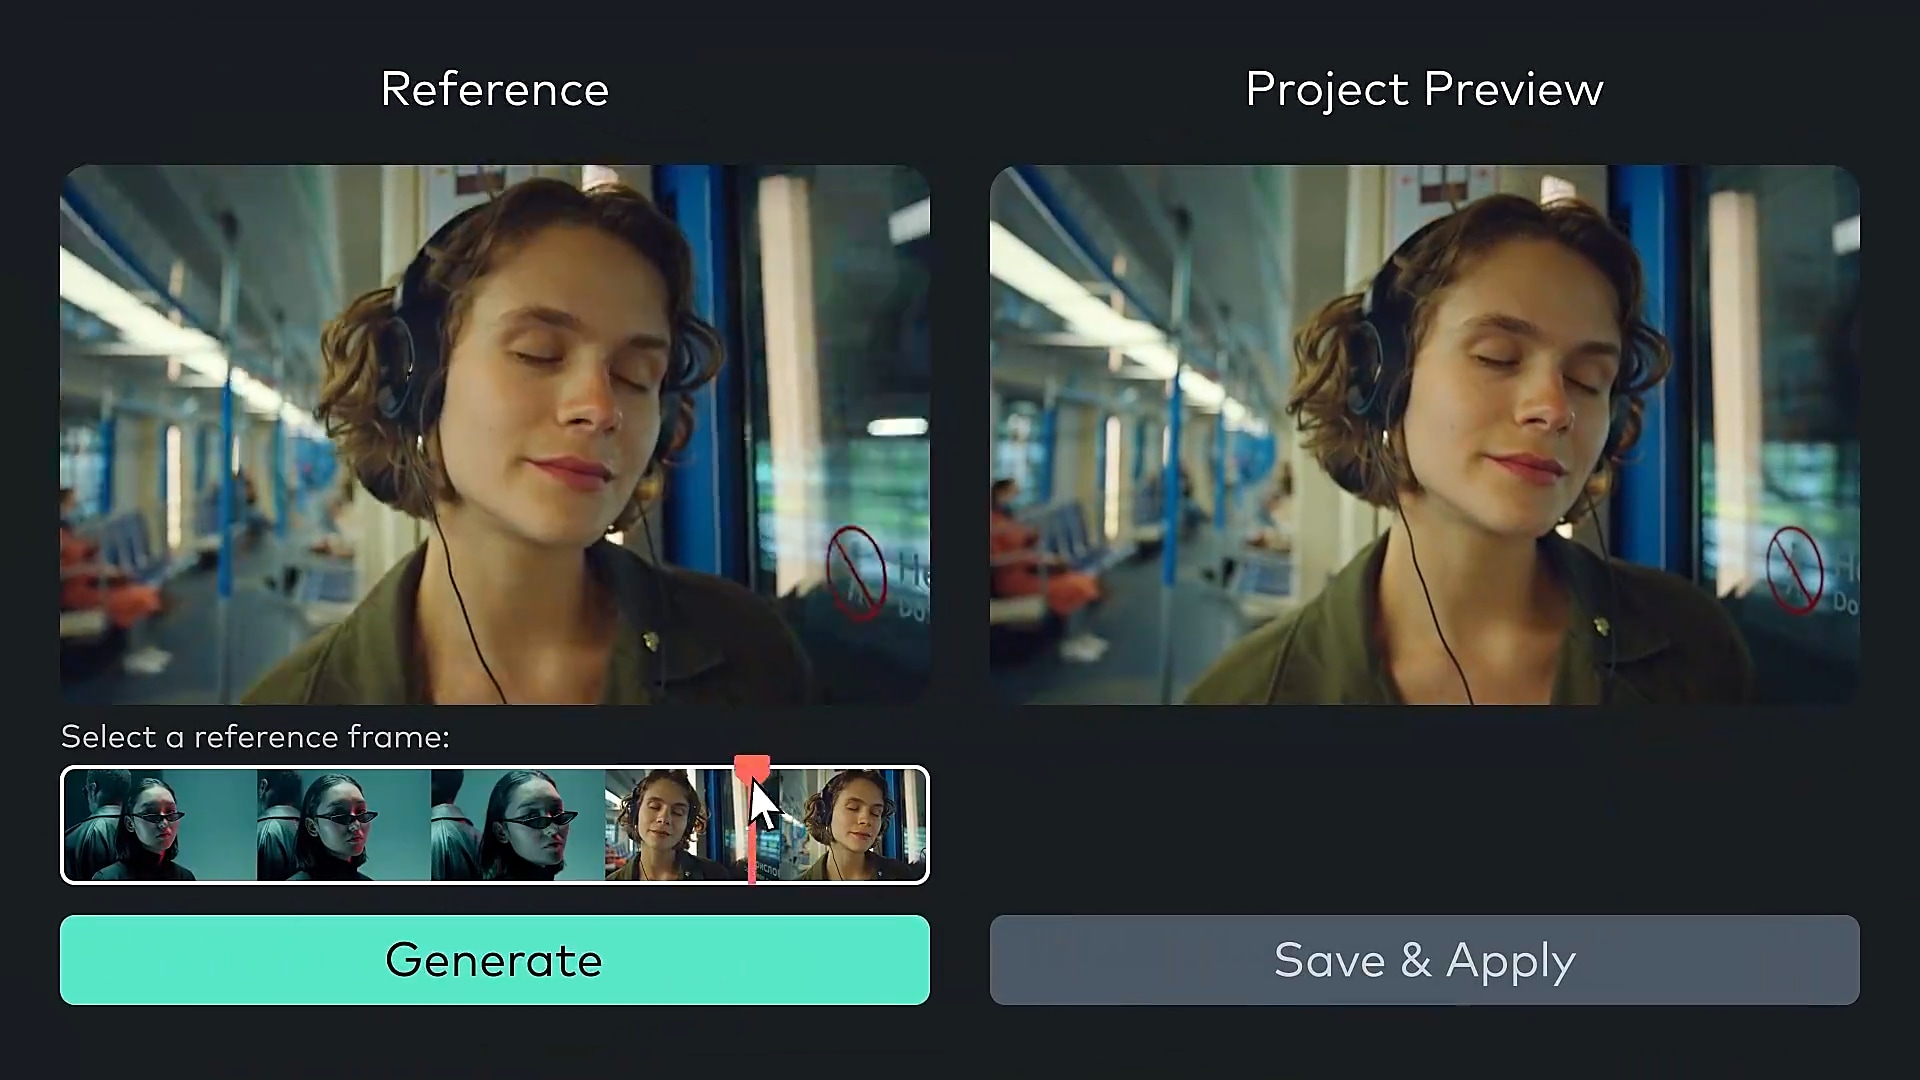
Step 3: Under Basic, locate the AI Color Palette option and switch on the toggle button beside it. Tap the Add Palette option to provide your preferred reference clip that contains the color configuration you want to recreate.
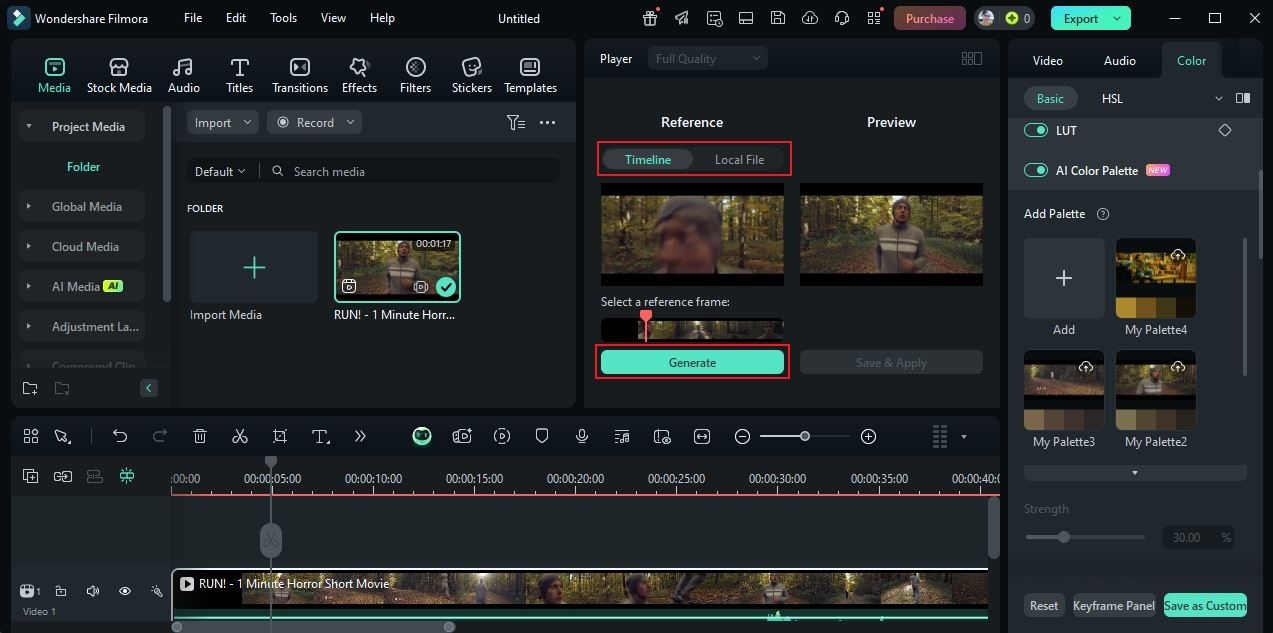
Step 4: Go to the Preview Panel, then select Timeline or Local File . For the former, move the play head to the specific timestamp you want to set. Once done, click Generate. Play and examine the preview. If you’re satisfied with the result, click Save and Apply. On the one hand, click the Local File option if you want to upload a reference clip from your device. The process remains the same, except that you need to import the actual video file on the platform.
Step 5: The color correction will be applied immediately to the selected clip.
As previously indicated, Wondershare Filmora also supports manual color correction procedures. It has a default set of color correction tools you can use to make certain adjustments by hand. However, keep in mind that these features are much more advanced compared to the AVS video editor. If you want to give it a try, refer to the tutorial written below.
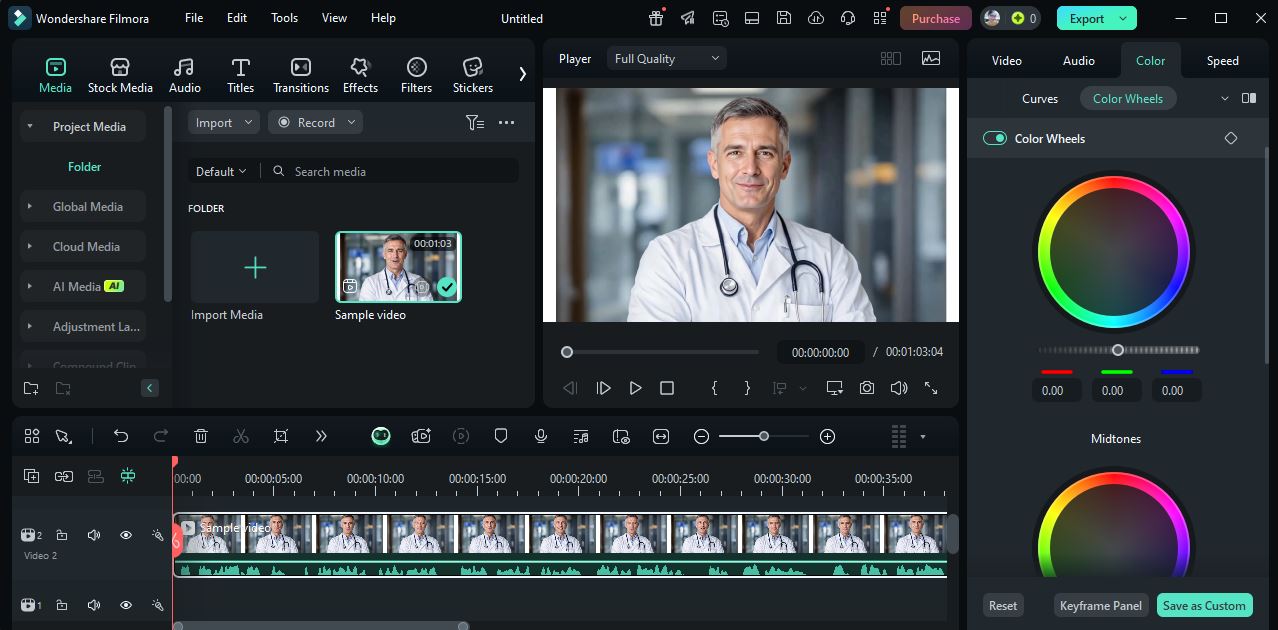
Step 1: Under the Color tab, select Basic. From there, you can access various color correction tools, such as LUT, Color, Light, Adjust, and Vignette. Each of them has different options you can individually configure according to your liking. Simply drag their respective sliders to your desired level or enter a specific input.
Step 2: On the one hand, tap HSL if you want to do basic color grading. From there, you can specify your desired shade. At the same time, you’re given a few more options to customize it further using the Hue, Saturation, and Luminance settings.
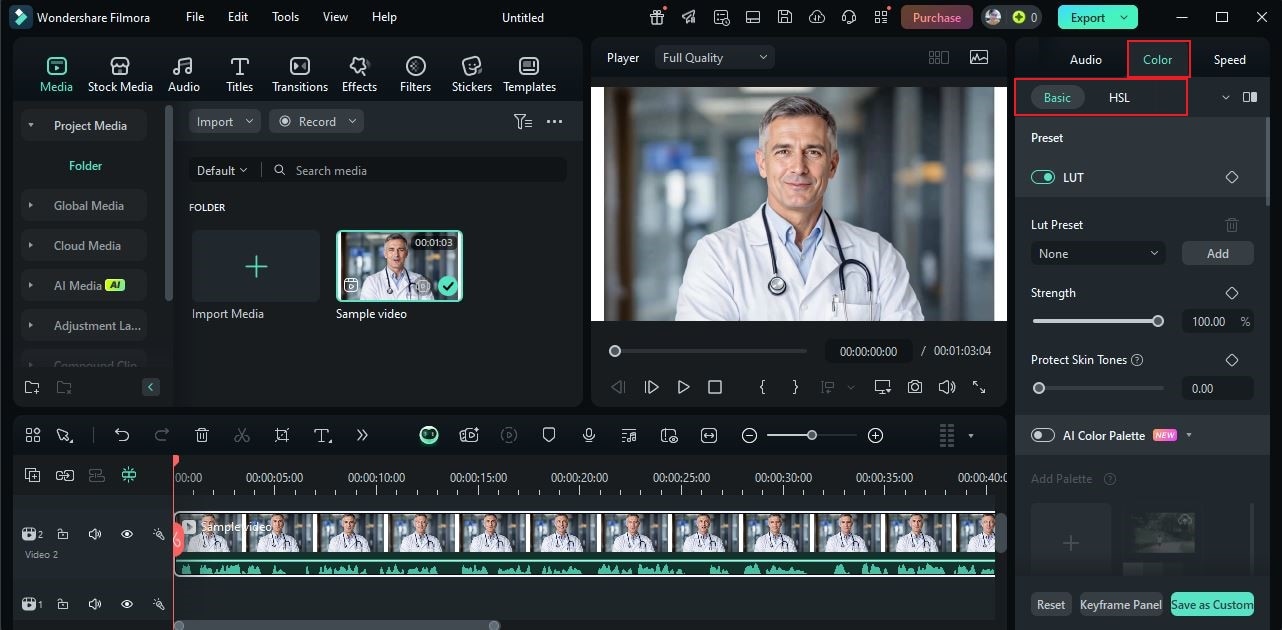
Step 3: Lastly, Wondershare Filmora provides access to other advanced color grading and correction tools. Just click the Curves or Color Wheels tab under Color to use them on your end.
Wondershare Filmora allows you to save your configurations and reuse them when editing other video projects. Yes. That is absolutely possible if you want to maintain a consistent branding and appearance. To do it, refer to the short guide below.
Step 1: Assuming that the video color configurations have already been applied to the project. Now, it’s time to save them for future use. Under the Color tab, click Save As Custom.
Step 2: Enter your preferred name for the color configuration and then click OK.
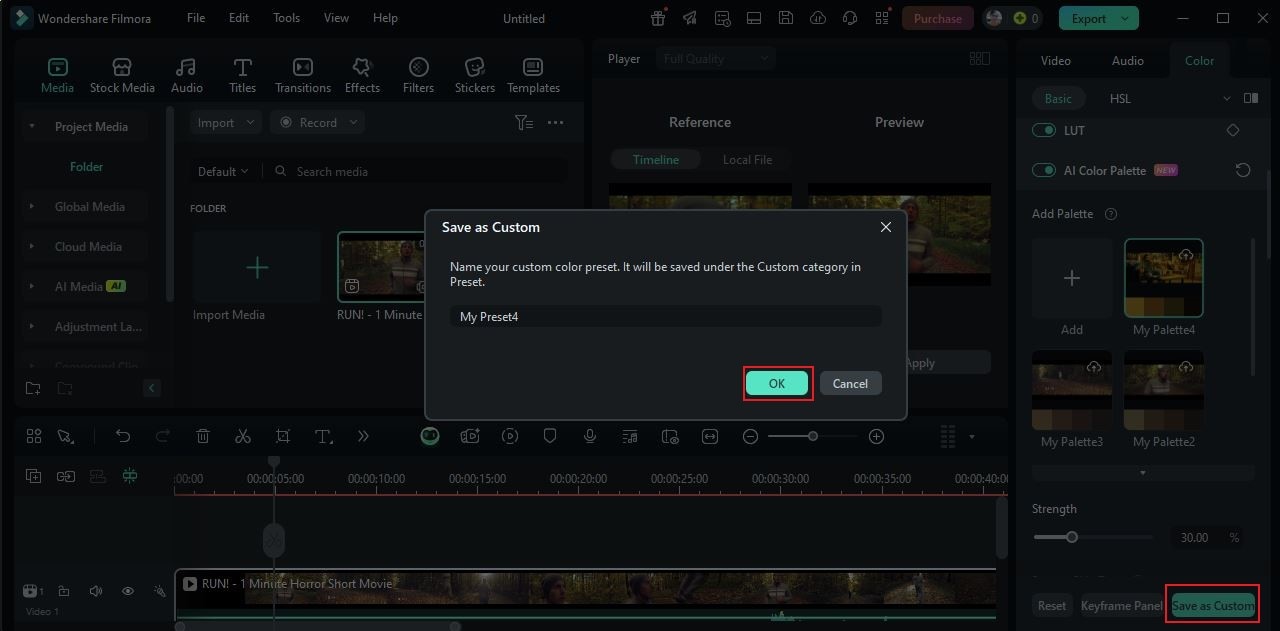
Step 3: After completing these steps, your color correction settings will be saved as a custom preset that you can apply to other video projects.
How to Make the Most of AI-Assisted Color Corrections?
There is no doubt that using AI Color Palette is indeed a game-changer. You can be sure that this kind of tool can give stunning results when it comes to color correction. While most of the job is performed by AI, don’t forget to take part in the creative process. Of course. The main input is still yours. You just have to leverage it. Do you want to know how? Check out the tips given below and keep them in mind.
- Choose the reference media very well. Make sure it resembles your preferred style and design.
- Don’t settle on one reference clip only. Try to upload a couple or more to examine each variation and make the perfect choice.
- Adjust the Strength settings until you achieve your desired results.
- In the event of lighting issues, don’t hesitate to make color modifications manually. For instance, you may increase the brightness and exposure a little to fix clips with low-lighting conditions.
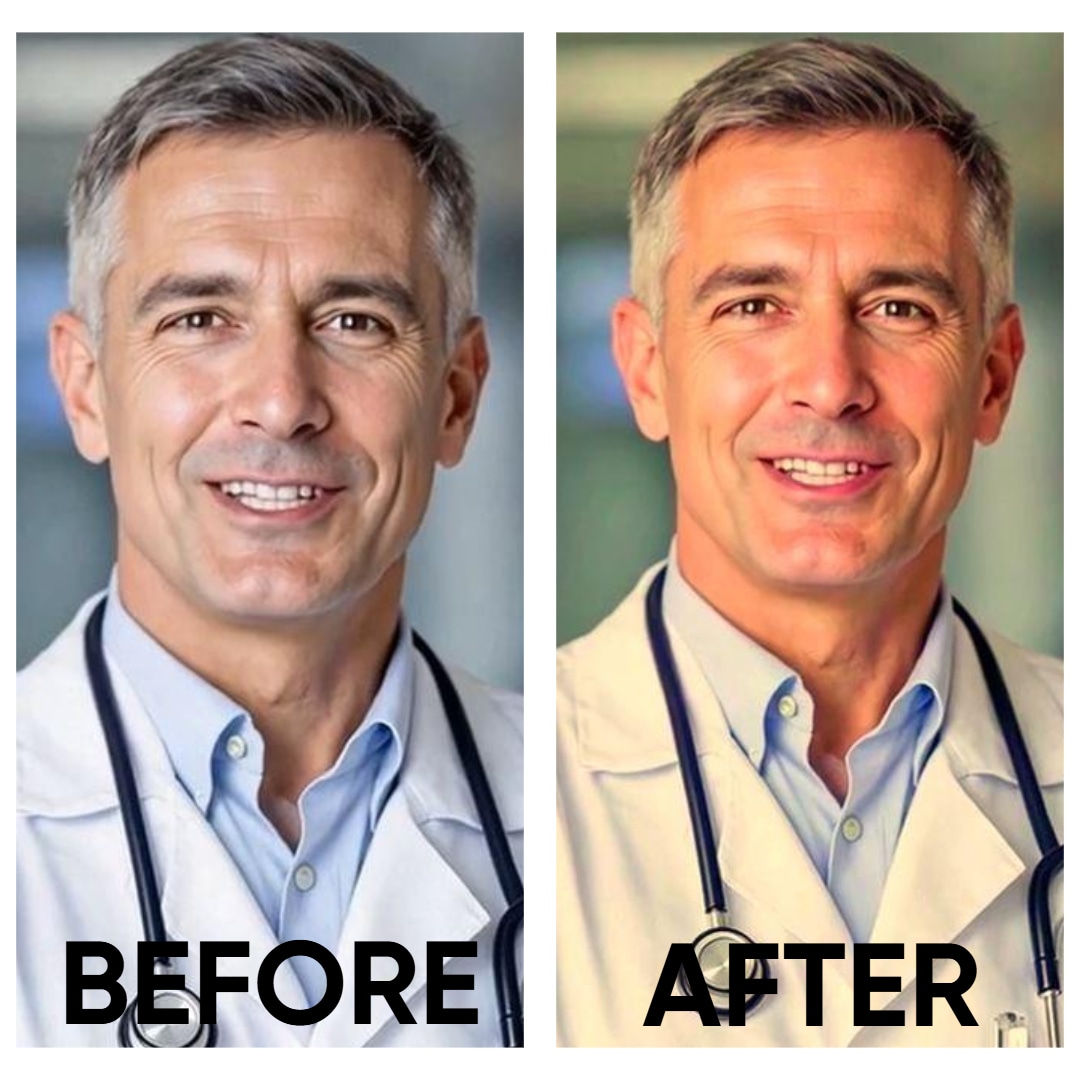
Color Correction Transformations Using Wondershare Filmora
Similar to AVS video editor color correction, the results when you use Wondershare Filmora are also evident. You can easily spot the difference in the blink of an eye. To check out some of them up close, see the examples enumerated below.
Example 1
Example 2
Example 3

Tips For Achieving Professional Color Correction Results Without Extensive Training
With the aid of modern video editing software, it’s now very easy to achieve professional color correction results. You no longer need to undergo stringent training or formal classes. You can instantly generate stunning outputs with just the snap of a finger. Are you planning to correct the video color using Filmora or AVS Video Editor? That’s great. To help you get started, check out the list below.
- Whether you’re editing with AI Color Palette or not, always use a reference clip. Make it your inspiration when it comes to the design, style, format, and more.
- Analyze the output details using the provided tools like vectorscopes, waveform monitors, and the like.
- Always start with the basic adjustments, such as exposure, white balance, contrast, and more.
- As much as possible, use adjustment layers when making color correction changes.
Filmora Vs. AVS Video Editor: Which One is Best For You?
Both Wondershare Filmora and AVS Video Editor are useful when it comes to this matter. You just basically have to choose the best option that caters to your video-editing needs. Don’t worry. It’s not that hard to find the perfect fit for you. To help you make an informed choice, check out the tips written below.
For Beginners
Wondershare Filmora and AVS Video Editor are great for beginners. These apps have intuitive interfaces that can be easily navigated. If you’re looking for a more convenient option, the former has a built-in AI Color Palette feature. You can use it to automate the intricate process of color correction.
For Content Creators on Tight Deadlines
If you’re pressed for time, then it’s best to seek assistance from artificial intelligence. In this regard, the AI Color Palette feature of Filmora can definitely be of great help.
For Technical Quality
As indicated earlier, the AVS video editor has enough tools for basic color correction. However, it’s quite a different story if your projects have more advanced requirements. In this regard, you can opt for Wondershare Filmora. It is packed with high-end features that allow you to do color correction with more freedom.
For Creative Flexibility
Wondershare Filmora offers numerous LUTs and presets that can be easily customized based on your preferences. You can take this aspect into consideration when choosing a great app for video color correction.
For Specific Content Types
You can be sure that Wondershare Filmora and AVS Video Editor can handle different types of video content. However, don’t forget that they have different sets of features for video editing. Consider this distinction to avoid disruptive inconveniences later on.
For Pricing Considerations
AVS offers a yearly subscription plan that gives access to five multimedia programs. You can take it to your advantage if you need other tools apart from the AVS video editor. On the one hand, Wondershare Filmora has different premium plans that might suit your needs. Just choose the perfect option that includes the color correction features you wish to use.
For System Requirements
AVS video editor has lighter system requirements compared to Wondershare Filmora. Among its technical specifications are a minimum of 2 GB RAM, a dual-core processor, and Windows 7 or higher OS. Meanwhile, Wondershare Filmora has much heavier system requirements. Well, it’s understandable, given the roster of advanced features it offers to users. For instance, it requires a minimum of 8 GB RAM, a multicore processor, and Windows 7 or higher OS.
Conclusion
Indeed, the AVS video editor is a useful tool for color correction and similar procedures. It has a functional array of features that you can easily configure according to your liking. On the other hand, Wondershare Filmora is there if your project requires more complex and more advanced features. It can handle both manual and automated color correction. Explore the color correction panel of Wondershare Filmora and put the AI Color Palette to good use. For sure, these tools can greatly help you in this regard. Download Wondershare Filmora today and make your color correction workflow more convenient.
secure download 