-
Guide On How To Create Dr. Strange Effect In Video Through Filmora
-
Guide On How To Create Audio Visualizer in Filmora
-
Guide On How to Add Smoke Effect in Filmora
-
Tutorial On Smooth Blur Transition in Filmora
-
A Simple Photoslide Tutorial With Slideshow Effects In Filmora
-
Isolate Color Effect Or Selective Color Effect In Wondershare Filmora
-
Guide On How To Add Dr. Strange Effect In Video
-
How To Make Snap Video – Filmora Tutorial
-
Tutorial – How to Make Fast Speed Effect Like The Flash With Filmora
-
Guide On How To Edit Coin Magic Tricks With Filmora
-
How To Get Explosion Effect On Your Video Using Filmora
-
Creating Seamless Typography Animation with Filmora 1202:11
-
A Guide to Creating Looping Text Animation With Wondershare Filmora02:11
-
Tutorial - Create 3D Photo Zoom Effect in Filmora02:11
-
5 Essential Video Editing Tips You Must Know On Wondershare Filmora02:11
-
Performing Next-Level Editing With Ready-Made Templates on Filmora 1202:24
Transcript
Hey everybody, are you ready to see the latest from Filmora? Dynamic countdown effects. You can now add and configure countdown timers with a single click. Let's check it out.
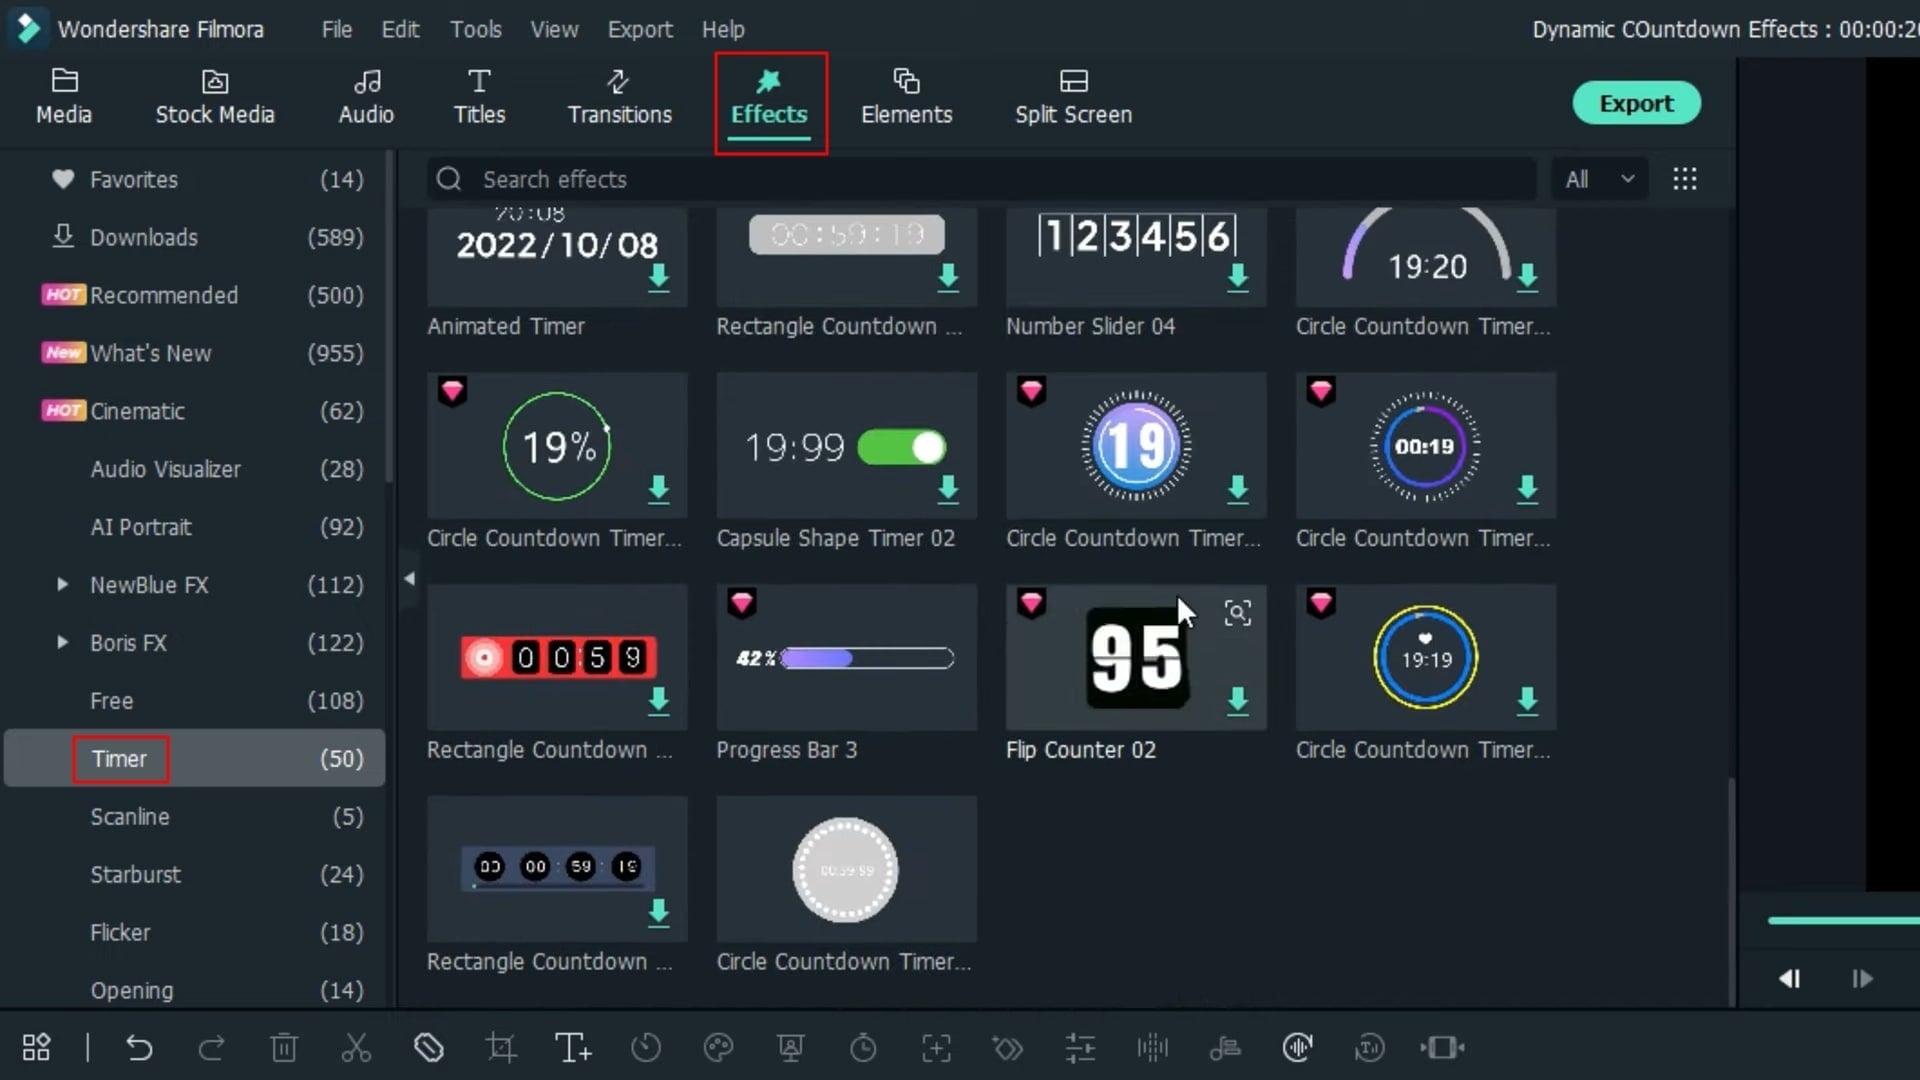
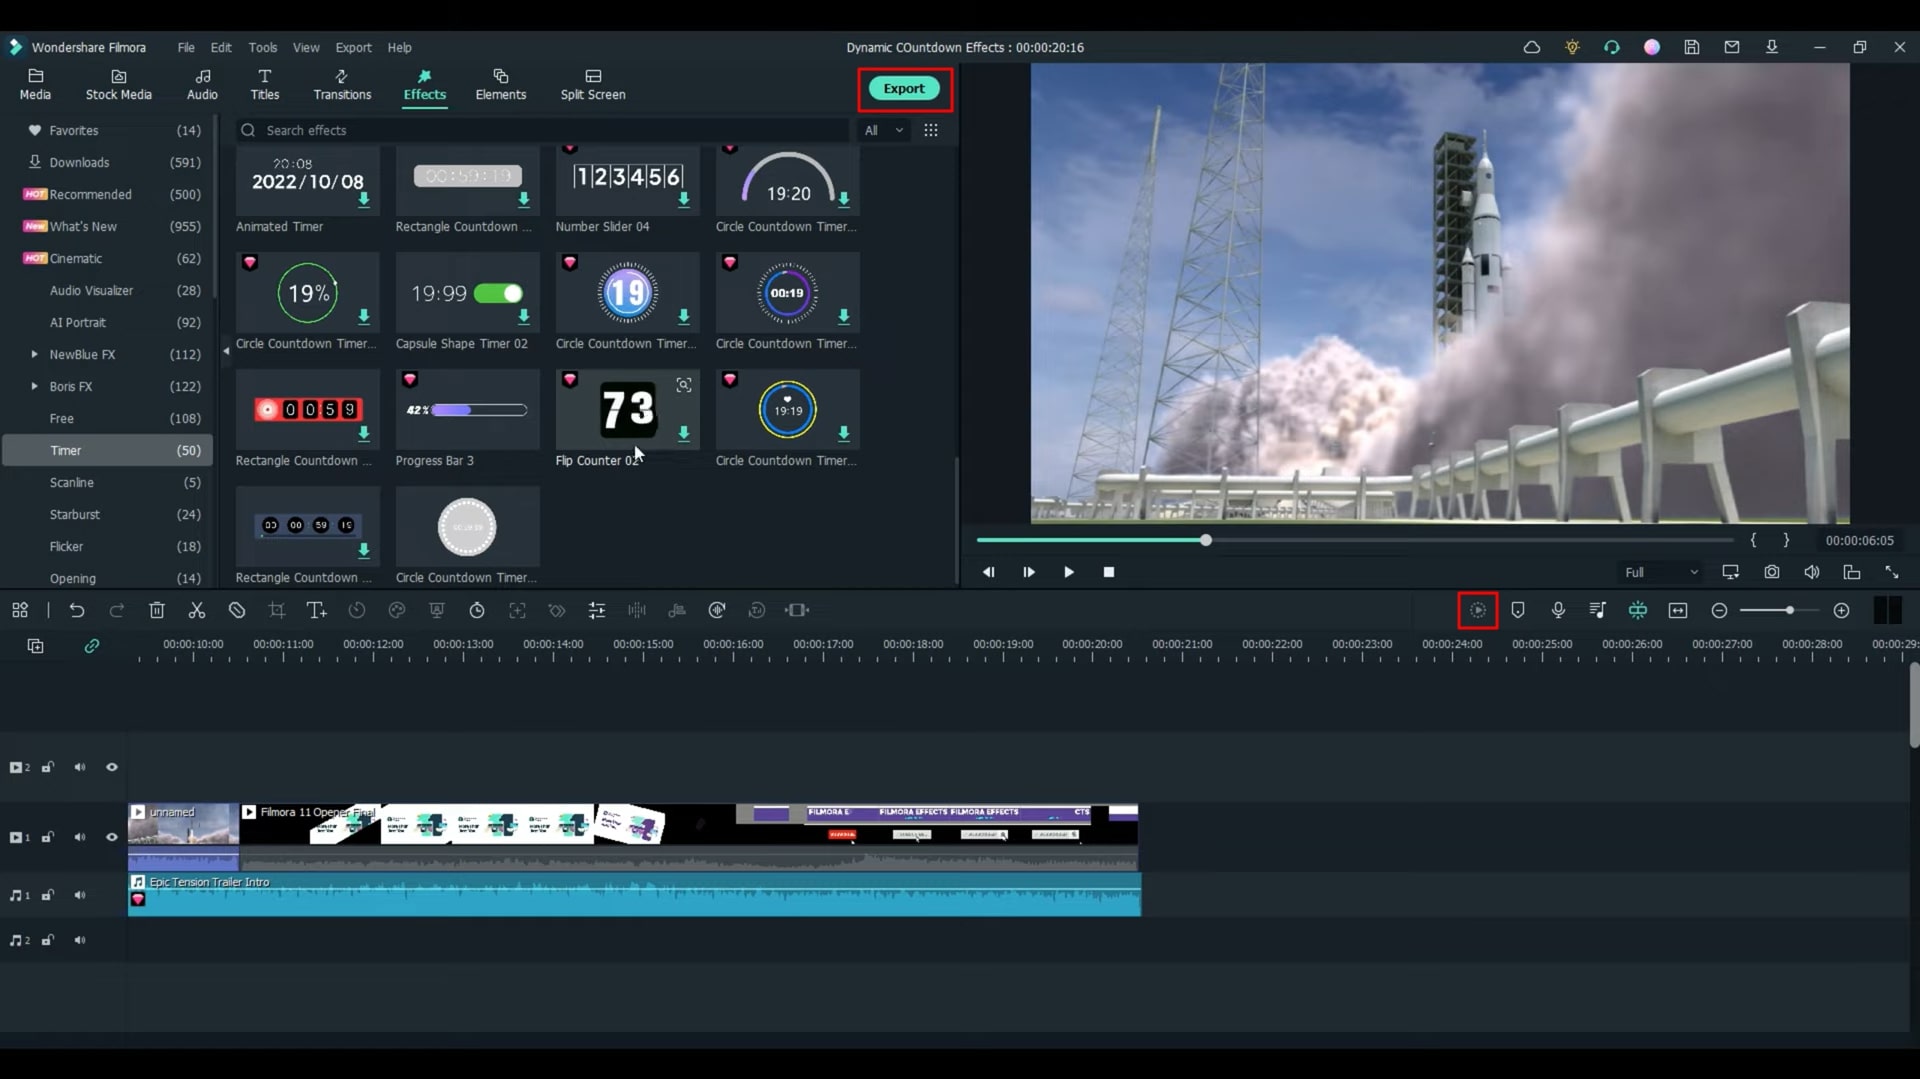
To get to your countdown effects, all you need to do is go to your “Effects” category. On the left side of the screen here, we scroll down to “Timers." There are currently 50 timers here. Filmora constantly adds things. So next time you look, there might be 60. Who knows? Each of these timers is configurable in some way, shape, or form. All of them are a little different, and the one I used in my sample was this one. The circle countdown timer, let's take a quick look at that one. Let's put it on the screen on the timeline, scroll over the top of it and simply double-click.
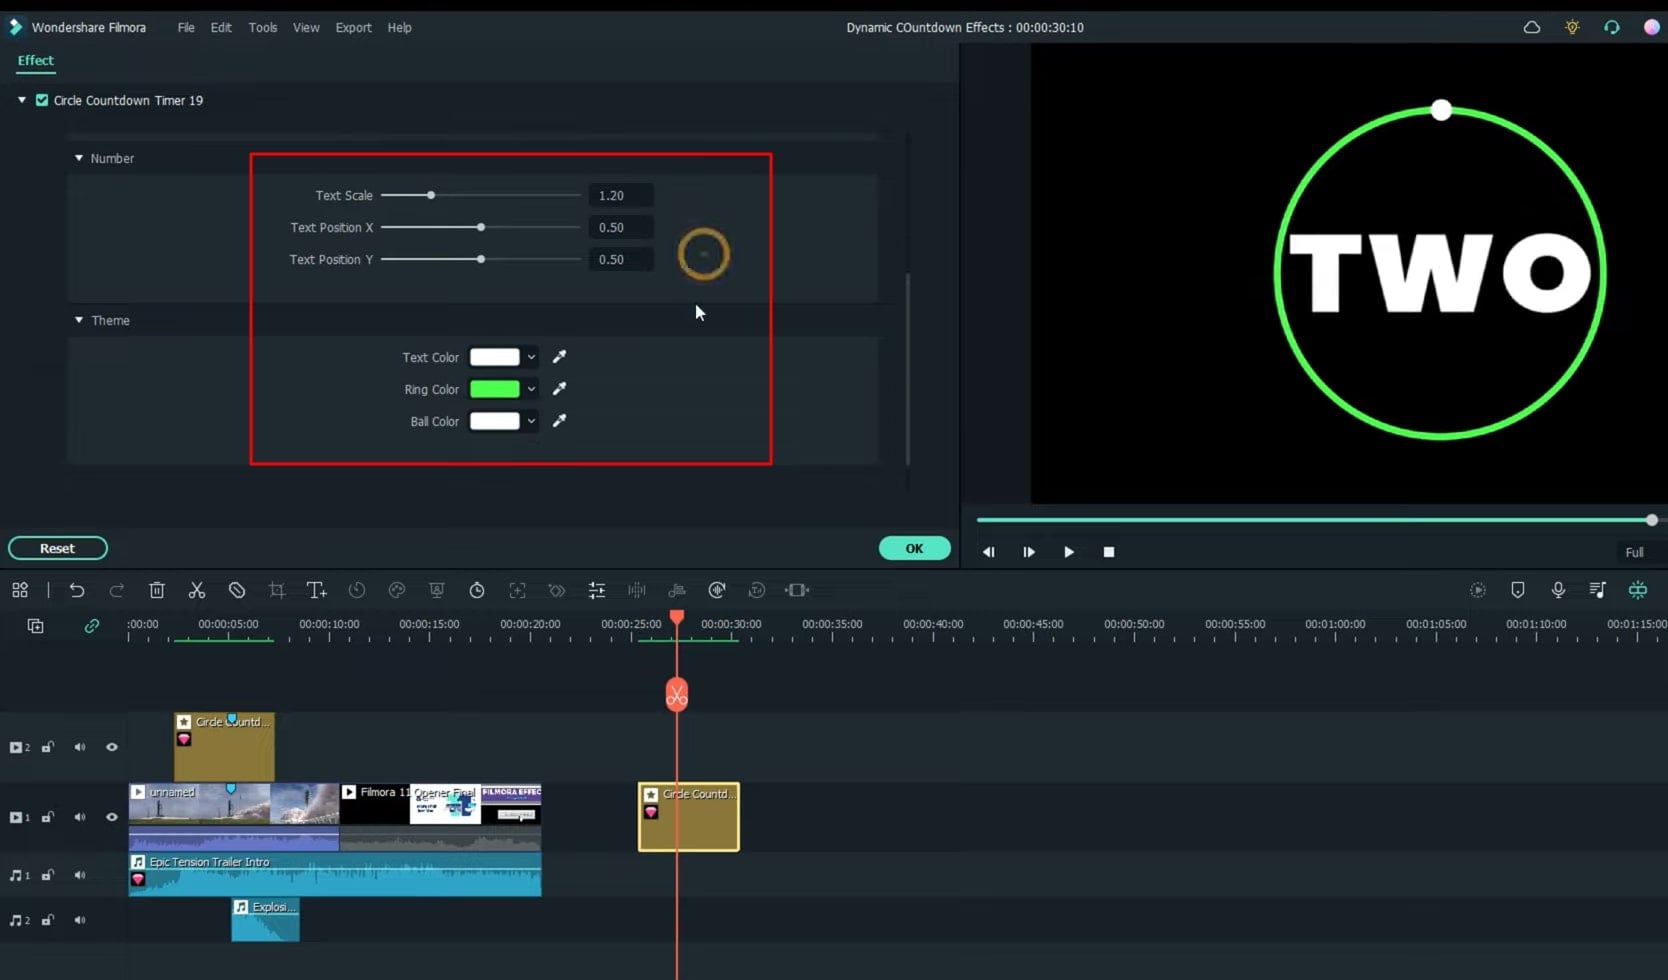
You can change the opacity. You can change its position X and Y here. You can scale it up and down wherever you need. You can speed it up. There is text on the screen, so you can scale the text to pretty much gone if you don't even want it to do really big. If you need it big, you can also position that text. You can change that text. You can change the text color to whatever you want.
Let's pick a nice light blue here, the ball color. That would be this ball here that goes around. I'll play that for you again real quick. You see it moving, so you can change that ball color and the ring color. Now that is for this one.
Let’s bring in a different one, and we’ll hover over that one. Well, let's watch it go first. That is a pretty cool counter. Let's double-click that and see what we get. So it's currently set for 20 seconds; you can change that. So let's say you need a 3-second timer; you can change the scale, etc., etc., the coloring.
Let's say you really don't want that process ring to be white. We need that to be red and the background color to be white, something like that. See. So now, it’s a 3 second counter. Progress bars are pretty cool. This is how this one looks. I've used this one, a particular one, a couple of times already in my videos. Again speed it, scale it, “Opacity," which I do like to use opacity quite often sometimes. They're just a little too bright for me. I need to just fade them in, and then, of course, you can change all the other stuff too.
I can change the text position in this case; it's the number. So, we can even put the number in the bar, if we want like so. Wild, of course. You probably want that number, that text color number, to be a brighter color and change it to red. Red didn't show up too well. We'll put it blue or whatever. You can change it to whatever you want, and each of these is configurable in its own special way.
This one is a percentage, and you cannot kind of already see what's going to happen here. Start at 0, and end at 100. Maybe you're doing something that only needs to be 50%. You can 0 to 50, and change the text, the “Motion Duration.” So the duration there is pretty fast, I would say. You can slow it down by telling it how long to be there. You can, again, with the “Opacity” on pretty much all of them. So that is the new feature with Filmora 11, Timers.
And let me quickly show you how I did the intro. I know a lot of people; if I don't show you, that's the first question I'm gonna get. And you might see something already you don't recognize, and these are markers, and I'll show you why I use the marker here in a second. And, so, I got a lot going on here.
But first off, I just went to "Stock Media." I went to “Pexels,” and I did a search for a rocket, and it brought up a whole bunch of them, and I chose this one. So we'll hide these tracks for a second and mute all the sound for a second, and you can just see that this was a rocket, and I edited the clip. So you just get right to the launch part of it, and so by itself, it's pretty boring.
So then I brought in the timer. So what I did was find the position behind that one again for you. I found the position where the rocket had just left the ground. Okay, so I needed to go backward from there for my timer to 3,2,1. Make it work. So I put a marker there, so I highlighted the clip, I went over here, and I added a marker. Then I went to my countdown timer and found the place where it said 1, and I held highlighted that clip and added another marker. Now originally, when you dropped this in, it was here somewhere. So then I just simply took and lined the two markers up, and that’s how I timed it.
So when it goes, it's the time right there, and I added some music behind it, and I added an “Explosion” sound effect right at the one. If we mute that music, you can hear the sound effect go off pretty clearly, and that's how I did the intro.
Timers are fun. They’re not for every video. Obviously, but I’m sure you can find a million and one uses for them. If you’re doing exercise videos and you need to be timing something on the screen. If there’s a race going on, you got one car in front of the other car; you got one runner in front of the other runner. You can time them. They're just a multitude of things you can do with them, and I think the funniest thing you can do here is configuring them.
So you know, this time, we're pretty elaborate here. We have lots of moving parts, and you can really get in there and tailor this to your video. So this one is currently in seconds, but you can put this one all the way up into minutes if you want. Let's make it 1 minute and no seconds. So basically, it's 60 seconds, and you can change all the other stuff as well.
Well, let's tone it down a little bit, and then away we go. Now you add some music to that. You scale this down. Put it over in the corner like a little picture-in-the-picture kind of thing for whatever you’re trying to time. Or show the length of time of something that happens, and you can make one heck of an impact in your videos.
Filmora Tutorial – Setting Up The New Dynamic Countdown Timers
What you need to prepare:
- A computer (Windows or macOS)
- Your video materials.
- Filmora video editor
Import Your Video to Add Timer
Once your Filmora tool launches, you're required to upload your video that needs the integration of timers. To move ahead, click on the "Media" category from the top-left and press the "Import Media" button to upload all your required videos from the device.
Moving forward, your required video is already imported. Now, you've to drag it to the project timeline below. Even if you’ve multiple videos in the import section, drag all of them to the timeline.

Select Timers and Add to Timeline
The video in the timeline is ready to be added with timer effects. To do this, click on the "Effects" menu at the top and navigate into the "Timers" section by scrolling on the left side of the screen. You'll see the different type of timers there, select your desired option and drag it to the timeline below. You can choose as many timers as you want since there isn't any restriction.
Customize Your Timer Effects to Adjust
After you've added your selected timer to the timeline below, you can customize its effects as per requirements. To execute this, you need to double-click the timer, which will take you to the timer's editing window at the screen's top-left side. Thus, you can change the timer’s size, speed, opacity, position, color, style, text, and duration.
Preview, Render the Final Video, and Export
To witness a smooth playback of your video, click the "Render Preview" button under the screen panel. If you're absolutely satisfied with your efforts, download this video. Simply click on the "Export" button at the top, and by selecting the desired location on the device, you can save your new video with a dynamic timer.
Dull videos are bound to be unattractive in viewers’ interest. Thus, these videos end up being ignored or not watched at all. Adding dynamic countdown timers to all these videos would increase the scent of audience engagement and curiosity in content. This tutorial on Filmora will help everyone looking to make their videos more engaging.


