-
Guide On How To Create Dr. Strange Effect In Video Through Filmora
-
Guide On How To Create Audio Visualizer in Filmora
-
Guide On How to Add Smoke Effect in Filmora
-
Tutorial On Smooth Blur Transition in Filmora
-
A Simple Photoslide Tutorial With Slideshow Effects In Filmora
-
Isolate Color Effect Or Selective Color Effect In Wondershare Filmora
-
Guide On How To Add Dr. Strange Effect In Video
-
How To Make Snap Video – Filmora Tutorial
-
Tutorial – How to Make Fast Speed Effect Like The Flash With Filmora
-
Guide On How To Edit Coin Magic Tricks With Filmora
-
How To Get Explosion Effect On Your Video Using Filmora
-
Creating Seamless Typography Animation with Filmora 1202:11
-
A Guide to Creating Looping Text Animation With Wondershare Filmora02:11
-
Tutorial - Create 3D Photo Zoom Effect in Filmora02:11
-
Filmora Tutorial – Setting Up The New Dynamic Countdown Timers02:11
-
Performing Next-Level Editing With Ready-Made Templates on Filmora 1202:24
Transcript
Let’s start with number 1, text “Titles.” Titles are very important. It's something you need to know, and it is essential to any good video. A lot of people watch YouTube videos and TikTok videos with the sound off. Having titles is critical to get their attention and to get your message across, and we'll just do a quick little sample here. We'll just pick a random clip from “Pexels” which is built into Filmora 11 and the new version of Filmora 11 actually allows very quick titles, “Quick Text” right here on the bar.
If you don't see it, click here on the “Custom Toolbar” and make sure it's enabled. It could be turned off, so we can just kind of scroll across. Click it real fast, and boom, you've got a subtitle, a title. You can go in and double-click it; you can change it around, and you can do whatever you want to do. This is a beach. Okay, got it. You can change that color. You can add some preset styling to it like so you can simply scroll it up. I'm rolling the wheel on my mouse right now, over I hover over it. So you can change it right there. You can make it bold. If you got a couple of things, you could center them up. You can switch it over to “Word Art," which is one of my favorite things to do. I love word art, like so, and that is very critical and essential to your videos. Filmora does make it quick and easy with this new button right here.
If you don’t want to use that button and you want something really fancy, you can just go to “Titles” and in my favorites. I said probably the very first thing I ever favored was a "Default Title." So we just pop that in. That's pretty much exactly the same as clicking there, except they started in the center instead of as a lower third, and then you can just go in here, double-click it, and do everything. I just did all over again, and you can just grab that stuff and move it here and change it, etc.
If you want to get super fancy, well Filmora allows you to do that as well. I want to just quickly look over here and see what's going on. There are just thousands, literally thousands of title openers. Things you can use to enhance your video. There's a new category called “Cinematic” just popped up the other day. That's one thing I love about Filmora. They're constantly adding things.
Here’s one that I’ve already downloaded, so I'll just grab it, and you can change this. Now you notice there's stuff underneath. So what I like to do is slide that up out of the way, double-click it, and let's say I don't particularly want that. I just deleted it, and I really don't want that. Just delete it, and then we can just take the main one. You can notice it centers up for you. It just sorts of snaps into place. The beach. Anyway, guys, you get the idea. You can also go ahead and get really fancy. First, let's look at it and see how it looks. So it just sort of fades in.
Okay, but If you want to do something crazy with your text titles, you can double-click. You can go to let's go ahead and put a Word Art on it. There it is, and we can go to "Animation" you can pick all of these custom animations. So we want to zoom that out. So we just double click it, and now it zooms, and now we've got something even more exciting, and you can shorten that length and that whatever you want to do. That was your essential tip for number 1, “Text Titles.” Titles are incredibly important to your video. Don’t miss out on them.
Essential item number 2 is color grading. This is something a lot of people miss out on. But Filmora makes it crazy easy. I'm going to shrink this timeline up, just for a second. I'm going to get another piece of footage for you. Let's go with something in my "Downloads" folder that I already have; that's a nice one. Let's just go ahead and apply that one over here and let me show you what I got going on. So with a lot of purple and dark reddish colors there, this sand is not. This, so, is quite the contrast in colors.
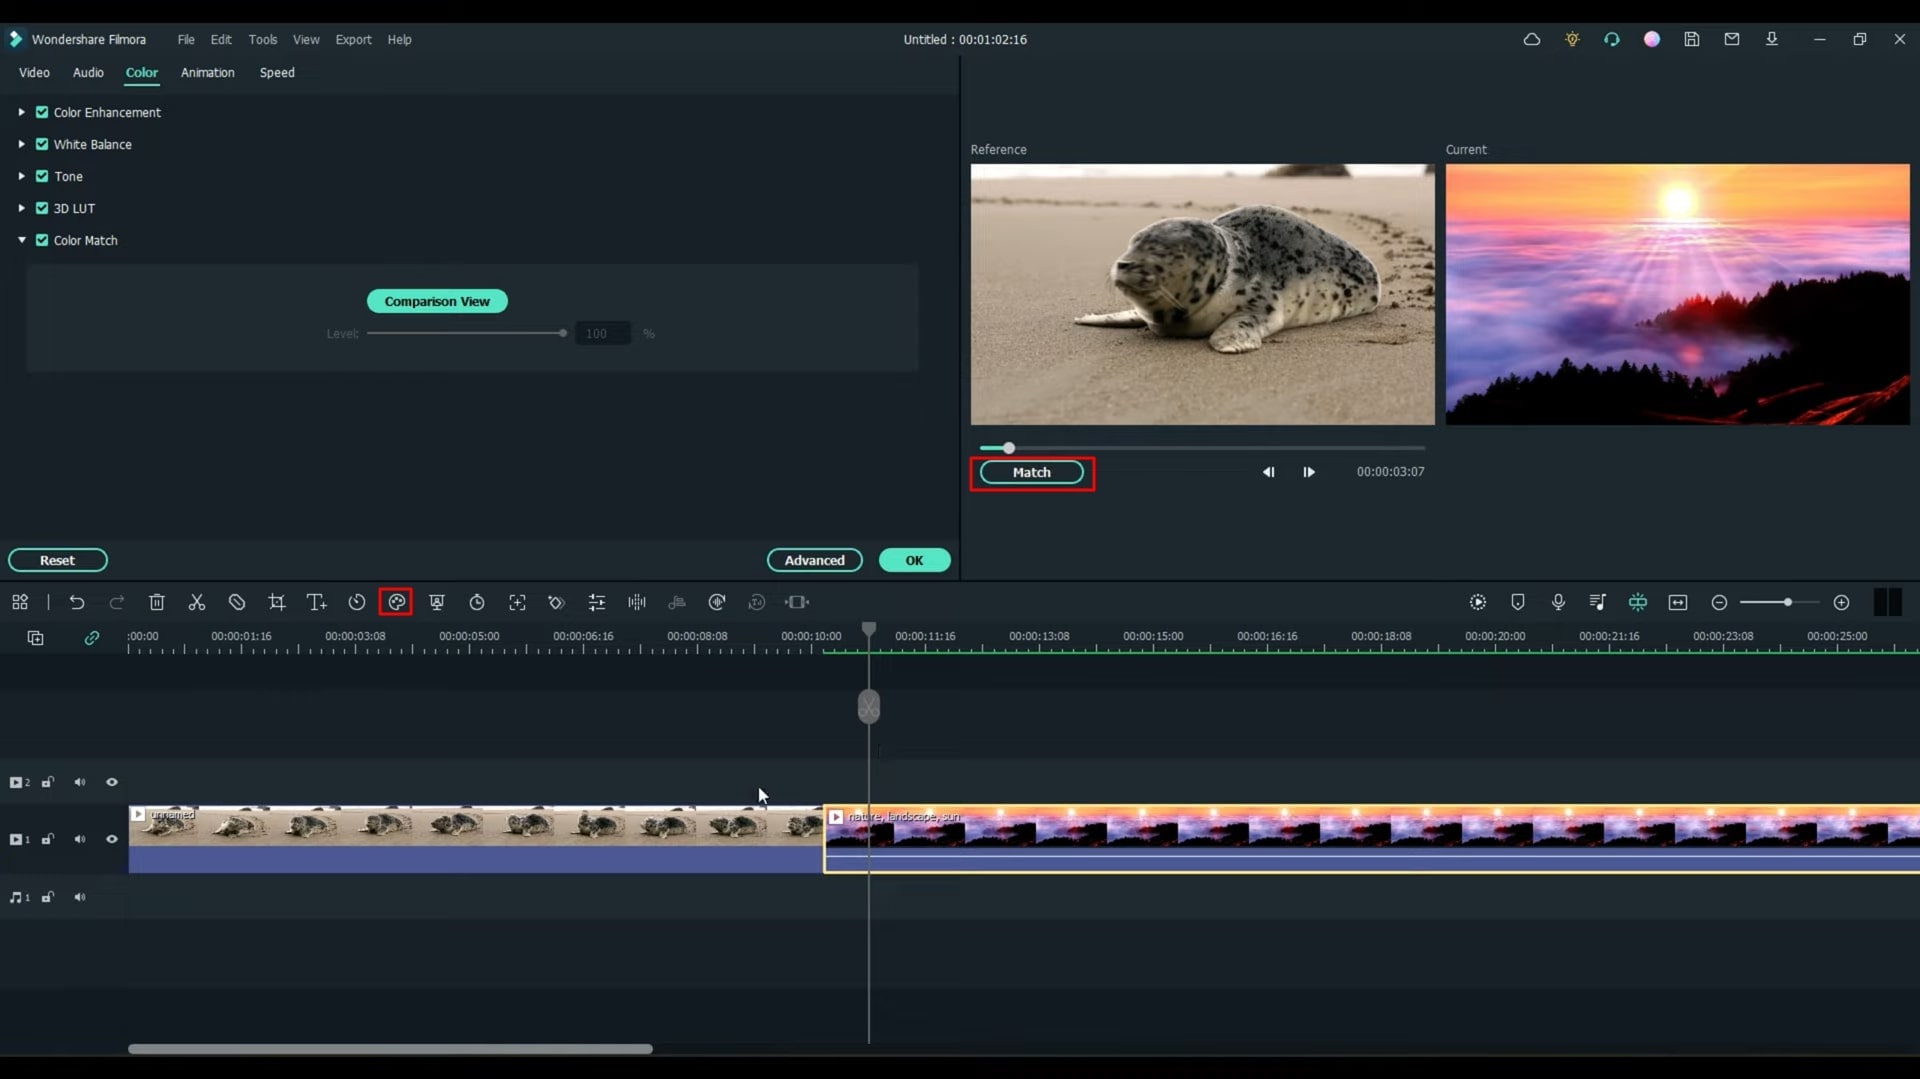
Advanced Color Tools,” and let's go with “Color Match,” and I'll show you a "Color Correction" in a second. Let's go with "Color Match." Select the frame to match. So what we're doing here is matching this. This color to this color. So I want to match right there. So what it did is it sort of brought these two images closer together, and we’ll do the opposite in a second. So now you can see, isn't that beautiful? So you can see that the color scheme of everything has been modified to kind of fit that one, and that looks really cool.
So you can take. Let's just take a clip and cut it. Let's take it over here. Drop it in the center. Delete that really fast now. Now your video makes a little more sense, right? So now we got this, then you got something happening over here, and then we're back on the beach because something's going on over here. That's "Color Correction"; it's pretty cool. Alright, let's just grab that and put it back over here. If you haven't seen my other video about Timeline Management, make sure you go back and click on that video and watch it, and you'll see why these things are snapping and rippling, and all kinds of fun stuff are happening.
That's in a completely different video guys, so we're gonna do here is, I'm gonna hit “Ctrl+Z” and just kind of bring this back to where it was. There we go. One more, and you can also do the opposite, guys. So if you want to get the beach picture, a little more like this color. Well, all you got to do is just switch positions because it's going to take the first one, first, as a reference. So we just switch the positions; we can always switch them back when we're done. Okay, select the clip that you want the color to come over to them. This is going to be your reference. This is the one we want to get a little more purply. Just simply go back over to “Color Match;” that's our current, that's our reference. We already got the frame that we want. Go ahead and match it. There you go. Say okay, and now things are a little more matched up. So you can see that the beach picture now kind of reflects the same dark image as the first one, and you can do something similar to what I did before. If you want it, if you're trying to make a video where you're showing the fog and the sun, and then you want to switch over to the beach. See how it's purply up in this area. That was color matching.
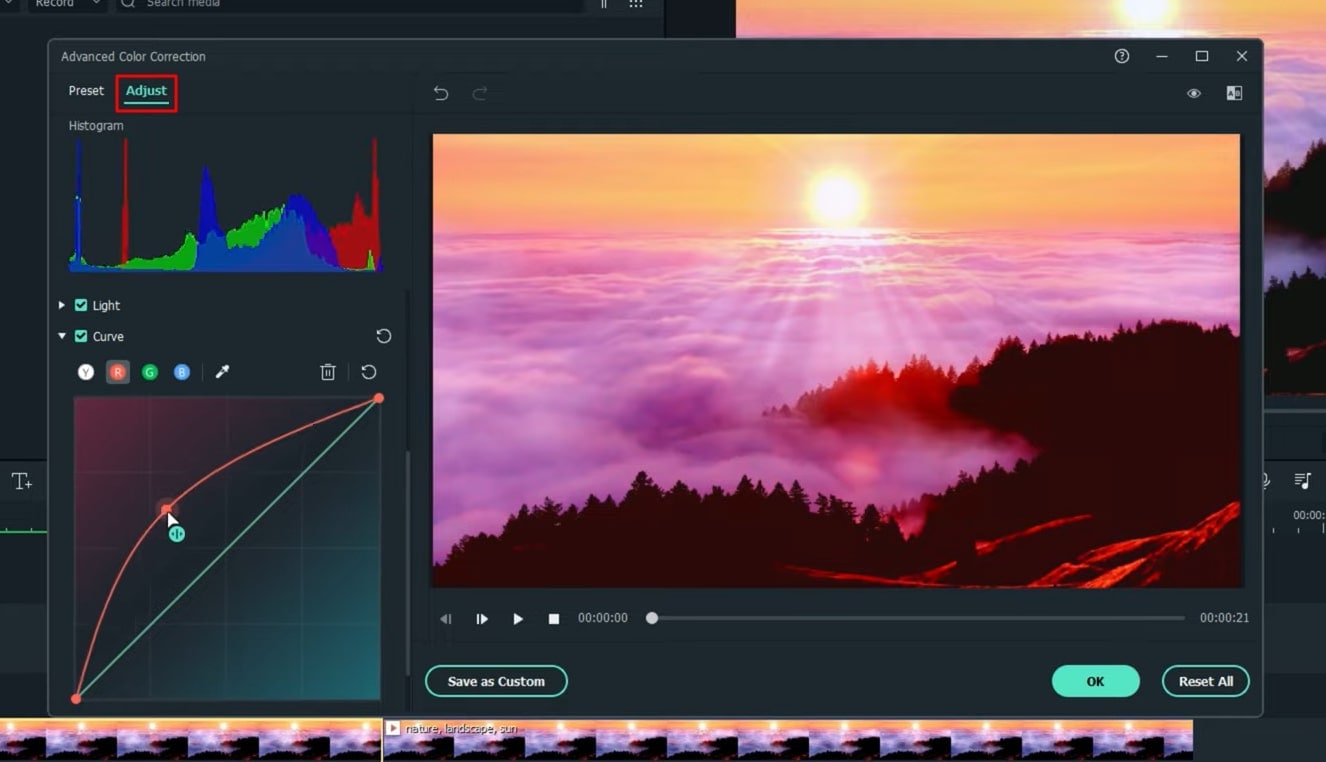
Also, an essential tool for you to learn is color correction. These kinds go hand-in-hand. Let's take the beginning of this video, and this all depends, obviously, on what you guys are doing with your videos and how you're trying to make them look. But we can see right here we've got a lot of yellow, orange, purple, red, and dark black. Well, maybe we don't like that. Select your clip, go to your “Advanced Color Tools” and “Color Correction” tool, and you can see that we've got a bunch of presets. We'll go with Harry Potter, so now we can turn that kind of blue, and maybe you're trying to match this up to an ocean scene, for example, where there are some blue waves. Maybe you're trying to do something to make it a little darker.
If you don't like any of that stuff, you can reset it all, jump over to “Adjust” and use your “Histogram,” using “Auto Mode,” using any of these, including the brand-new feature of RGB curve. Make sure you go back and watch my video on RGB curves. You can select the position on the line. This is blue. Let's go with red. You can see the red here, a little lighter there. Let's pick the top end of the red. You can already see; look at the red. I'm gonna circle this. See that red right there? Watch that red, bright red. Now we can actually hold the mouse button and pull it down, you can bring it away, you can bring it up, you can go full red, and so that is just absolutely beautiful.
But let’s say we need a little more yellow to come up in these clouds. Let’s pick a new spot on the line. There we go, let’s brighten that yellow up just like, so let’s bring it down, let’s bring it higher. Nope, let's bring it down. Oh, that is awesome, and that's how you can do color correction and color matching, and let's go on to essential number 3.
Essential item number 3 for your Filmora video editing tips is “Speed.” And once again, Filmora has made this so incredibly easy for us. We used to have to go in and manually do “Speed Ramping” with transitions and etc. Well, now it's built-in. What? Yeah, I just said that speed ramping is now built-in. Let's go to our “Stock Media” downloads, and let's find something that's moving. Something's moving fast. Well, we can take it; this girl is running right here. So, let's take the running girl, spread that out, and quickly show you what's happening. So, she's running rather fast. Let's slow her down right as she throws her purse up in the air. You see the purse go. Alright, right about there. Let’s go ahead and split that.
Let’s find where the purse and right about there is where we want to fix that. Okay, so we can speed it up, we can slow it down. Now, sometimes you might want to split it, so you know where there you're working. But with the new speed ramping, you don't actually need to split the clip. But let's go ahead and add that slow-mo. So I'm going to go frame by frame here, so I get over where I want to be. That looks good, and slow-mo is this little picture of the, like a speedometer here. This is speed. We can go “Speed Ramping.” We can just go “Slow.” We can do a “Uniform Speed.”
So, for this instance, we'll slow it down to 0.1. You can see that really extended that out. That's a big slowdown. Now that is not speed ramping. Guys, this is just a uniform slow. To see how to abruptly stops there. Okay, that frame rate was a little slow for that. I'm going to hit “Ctrl+Z” and back it out, and we're going to come back again, and now I'm going to show you how to ramp it.
Let’s go to “Speed Ramping.” Now speed ramping is super fun. They've got a couple of presets for you. I normally go to “Customize,” but let's go ahead and do one of those. Let's do a “Hero Moment” right there on that clip. So what's going to happen is, and this is the fun part, you can actually watch this as it goes across. So you can drag the line and see what's happening. So here we speed up slightly, and then here we drop real slow, and then we come back up, and then we fade out. Let's see how that looks.
Okay, now, not bad. Did you see it? Slow down, speed up. Now speed ramping takes a little bit of work, you need to really play with it for a while, but it is an essential tool for Filmora Video Editing. I use it frequently, and I'm going to back this up one more time. Remove all the splits in the timeline, and we're going to go ahead and just ramp it without it, which is super cool. You just pick the spot where you want speed ramping to start.
Let's do a “Customize,” and I'm going to show you really fast how this works. So we're basically starting our ramp right when the purse starts to come out. So let's add a line, so we're adding a spot right there. That's kind of my beginning spot. Now I'm just going to click and drag the next spot, so she's slow, she's fast. So let's go fast, real fast. I'm gonna make her just rip around, just spin around.
Like that with the person, we come back to normal. Okay, I love to speed ramping. Guys, it's so fun. So let's. Did you see that? There you go; that is essential that you have to use this. Guys, you can do some amazing, incredible effects with speed ramping. It really grabs the attention of the viewer. It makes them think. Please keep in mind if you're gonna be doing slow-mo, you're gonna need to film at a high frame rate. Let's move on to the next essential thing you need to know as a Film Editor, and that is “Transitions."
Transitions are incredibly important, incredibly important. I'm going to hit Ctrl+Z, guys, and just kind of undo everything and get right back to a couple of transitions. I'm just going to drop some stuff on the timeline. I don't really care what it is right now. So we got a guy walking, we got a waterfall, and we got that same girl running around. Okay, just to make life easy, let's split and delete. So we have a shorter video for this demonstration. Let's split some of the waterfalls out as well, and there we go. So we've got, if you just were to watch this at normal speed with no transitions, it's kind of weird. You got a guy walking into the distance, and then it just switches abruptly switches into this little stream and then abruptly switches into this girl. Well, that doesn't make any sense. Transitions, Filmora, unbelievable.
Look to my left; these are “Transitions.” There are, again, thousands and thousands of transitions. Literally thousands, they're broken down into all kinds of categories. Just look under “Film Stock.” Look at all this stuff that I’ve downloaded from their site. So let's just take one, and it's as simple as drag and drop. That is it, guys; that's your transition. But if you don't like it, you can grab the end and make it shorter. You can make it longer. You can do whatever you want. You can double-click that, and you can even do a few things to it. You can adjust the time, including the edges, the frames, prefixes, and the post-fix. There's a thing you can do to all of these transitions.
Now let's go from this guy walking. Now that could have made sense. If we were doing some sort of video about some ancient Rome or something, and there were some pillars involved somewhere. But again, click it and delete it. Now up here in my “Favorites.” It's called "Dissolve." I use it pretty frequently, so it just sort of dissolves into the next scene; that is one of my favorites. But there are millions; I've been using "Wind" quite a bit lately. Depends on the type of video I am making. I like when this sort of, and that's not bad for that scene, and then we got the girl. We're going to go from this to that one, depending on the type of video and the music, and all that we can do is a “Shattered Screen” effect and move on anyway. Thousands of transitions, and finally, let's go to the last essential thing, you need to know as an editor, and that is Music and Audio.
Now, once again, I am using Filmora. Filmora has just again looked right here, Sound Effects. 1129 sound effects. If you need it, they probably got it. I'm gonna go to exclusive music, and I'm just gonna grab one and drop it down. So now, I'll mute that for a second. So now, a boring video of a guy walking into the distance. All of a sudden becomes a whole new video.
Now that just became a whole new video, you know. I mean, it just went from some boring scenes to the music. I guess the music is one of the most important things in the video. But again, don't overdo it if you're speaking. If you're telling a story about this pond or this stream, and you're trying to give great detail on the green mossy and the flowing water. Well, no one's gonna hear you if the music is blasting in the background. Well, Filmora helps you with that, too, if you want to use it. Let's pick this clip of this flowing water. I'll just leave the transition there; let's go ahead and double-click it.
Let's go to audio, and they have a built-in Ducking. Have you never heard of Ducking? Watch the volume level right here in this clip. Just watch that while I click this button. See what happened. So this clip automatically reduces the volume of this clip. So the music can be heard in the background, and in this case, I left it dead center. But I can make it very weak or very strong, or I can adjust it to wherever I want it.
Now you can hear it in the background. But now you can be talking about the flowing water and the ripples in the water, and someone can hear you. Sometimes you just flat-out want that audio gone. So right about here. Let's say we start talking. So what we do is, we highlight that, we split the clip, we delete the music over here on this side, we grab this little white bar, and we fade. I do a lot. Guys, see how it just faded off into nothing there.
5 Essential Video Editing Tips You Must Know On Wondershare Filmora
What you need to prepare:
- A computer (Windows or macOS)
- Your video materials.
- Filmora video editor
Import or Select Video in Wondershare Filmora
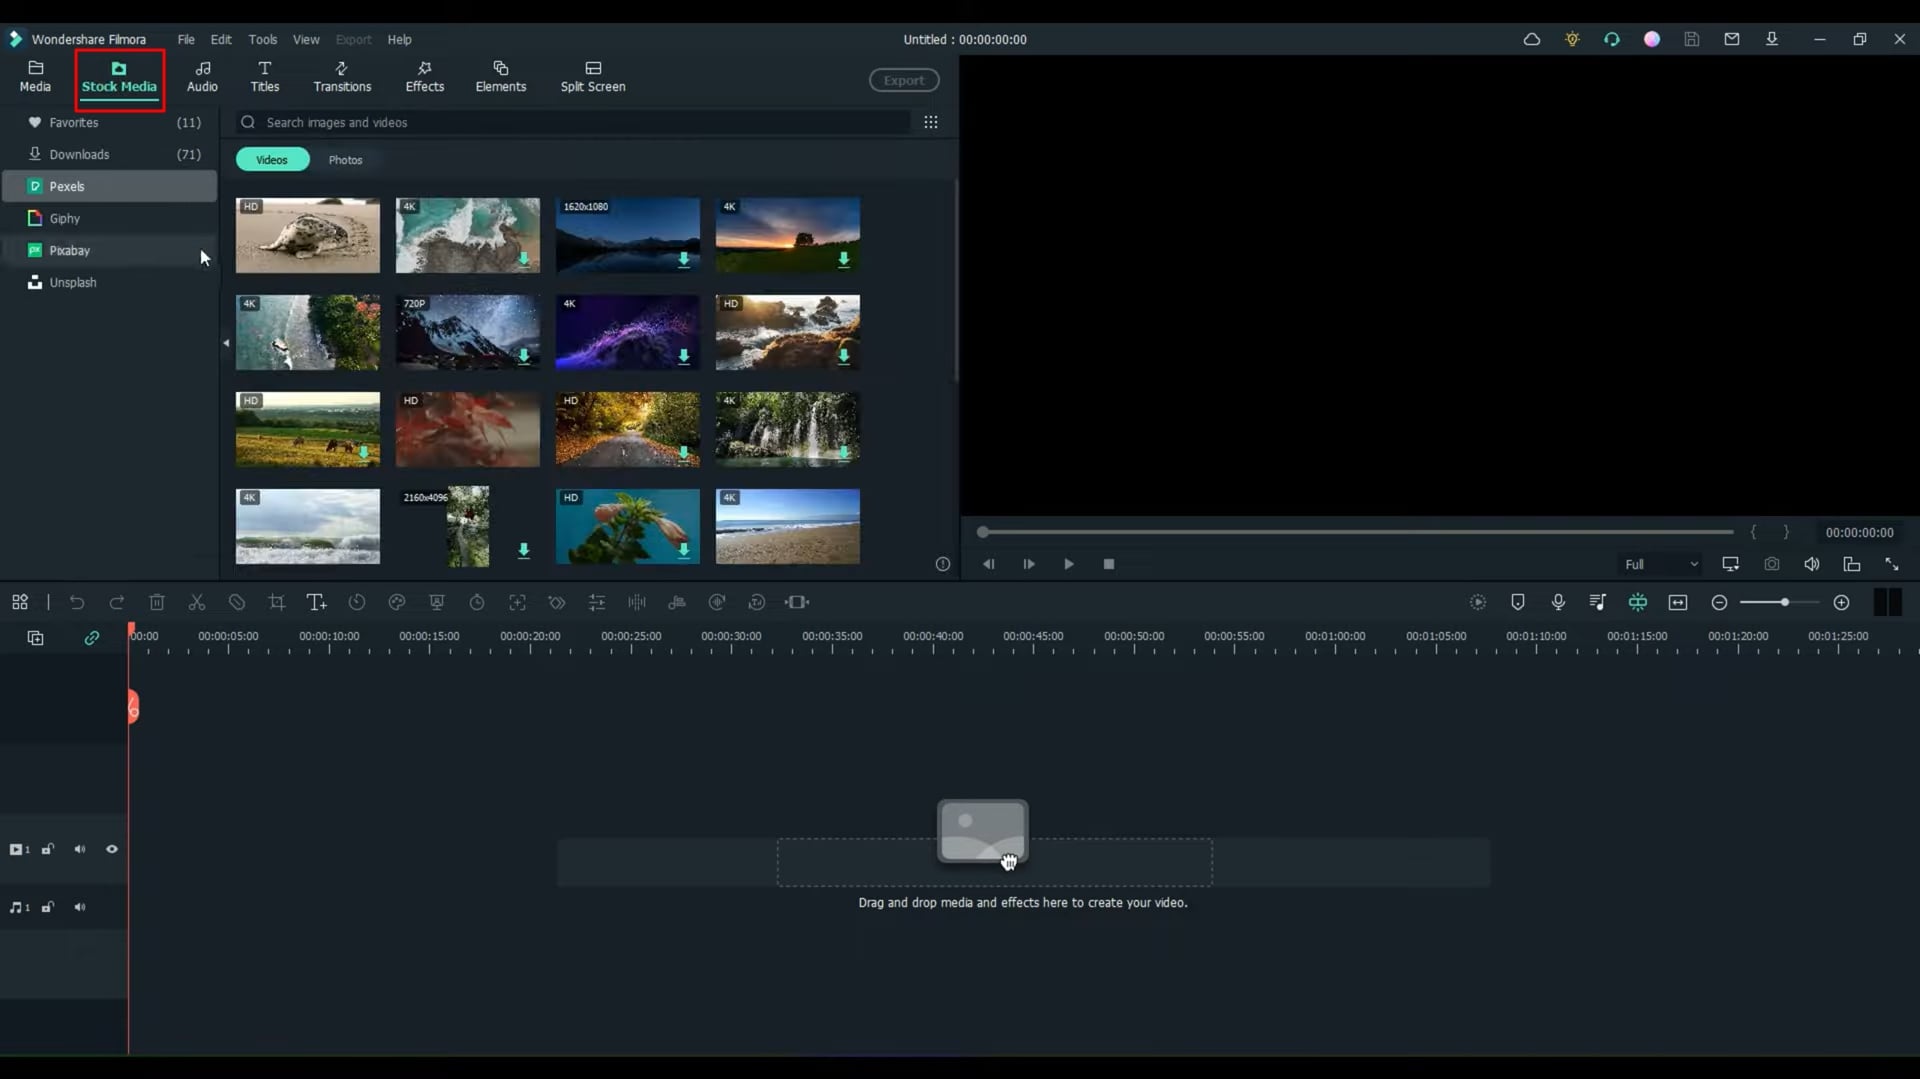
After starting Wondershare Filmora, you need a clip you want to edit. If you want to edit your clip, you must import it. It is possible by clicking the "Media" bar from the top-left side of the screen and then pressing the "Import Media" button. However, if you need a ready-made clip, you can get it from the "Stock Media" bar from the top-left.
Drag and Drop the Clip to Timeline for Editing
If you've already imported or selected your clip, drag it to the project timeline below to begin editing.

Implement Titles in your Video for Defining Motive
Adding a “Title” to your clip is the first essential to cover in video editing. To proceed, press the "Quick Text" icon, and a default title will be added to your timeline. Double-click on it, and an editing window will appear at the top left side of the screen. You can edit the title by writing anything in the available text box. In addition, you can also change the title’s size, style, color, alignment, position, margins, and much more.
You can also perform specialized title editing after navigating into “Titles” from the left side of the above editing window, where you’ve to select "Preset," "Animation," or "WordArt." After navigating in, choose your desired element.
If you need to apply a fancy title, delete your current title from the timeline. To do this, right-click and press the "Delete" option.

Apply Color Grading to Match Color Schemes
To apply color grading to your video, click the "Advanced Color Tools" icon and select "Color Match," which is also possible by pressing the "Alt+M" shortcut key on the keyboard. Initially, you’ve to select the frame of your video as a reference, whose color you would like to match with other frames.
To do this, keep the reference frame on the left side of the timeline and rest on the right side. On the available screen, press the button "Match," and your reference frame's color will be applied to all the frames of your clip.
Apply Color Corrections to Adjust the Colors
To apply color correction to your video, click the "Advanced Color Tools" icon and select "Color Correction," which is also possible by pressing "Ctrl+Shift+C" on the keyboard. A window with many "AI Presets" options will appear on your screen.
Select your desired preset and click "OK" to apply the preset to your video. If you still need to customize the preset, click "Adjust" and edit preset colors using the adjustable histogram and other options.
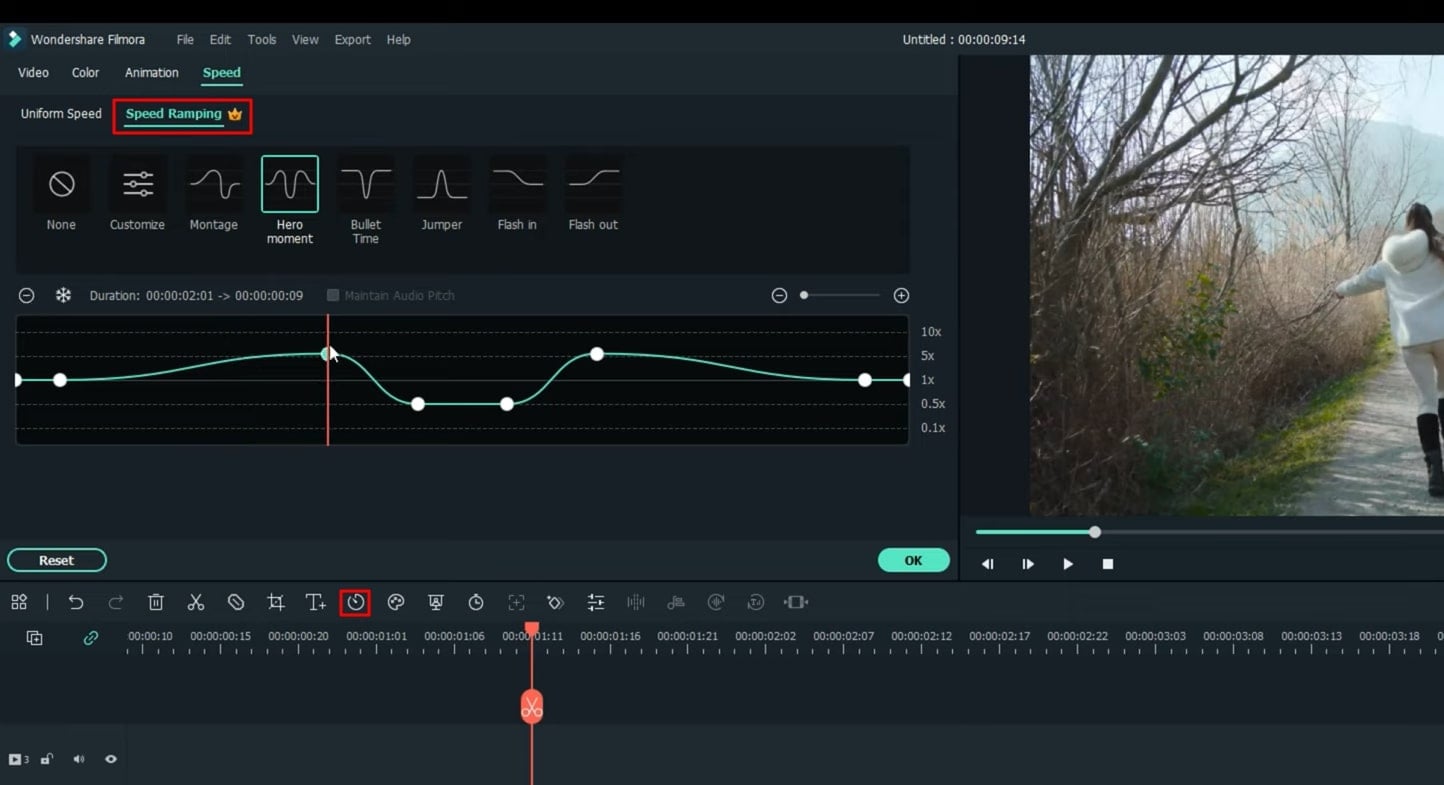
Adjust Video Speed with Ramping for Smooth Results
Moving further, you need to click on the “Speed” icon and select “Speed Ramping” if you want to adjust your video's speed. A window will open on the top-left side of the screen with multiple speed ramping presets.
Click on your video in the timeline and select any preset from the given options, and the speed effect will be applied to your video. You can also adjust speed by adjusting speed playback from options like 1x, 0.5x, etc.
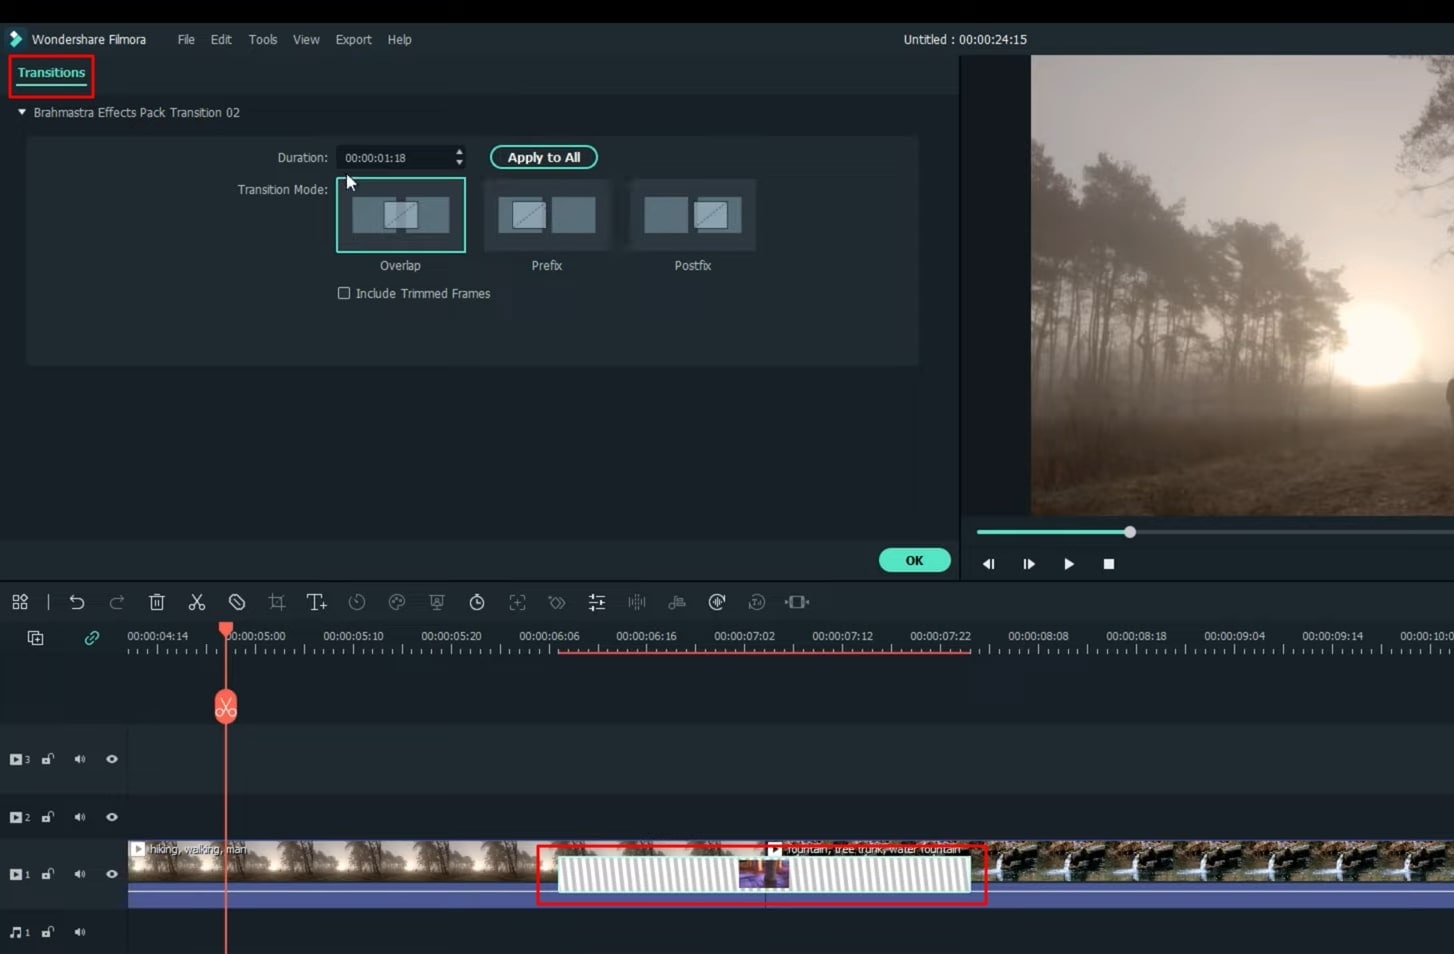
Enhance Multiple Clips within the Video Using Transitions
To apply transitions within your video, navigate into the "Transitions" bar from the top, select your desired transition, and simply drag it to your video in the timeline. If you want to customize the transition, double-click on it on the timeline to adjust its “Duration,” “Frames,” and “Modes.”
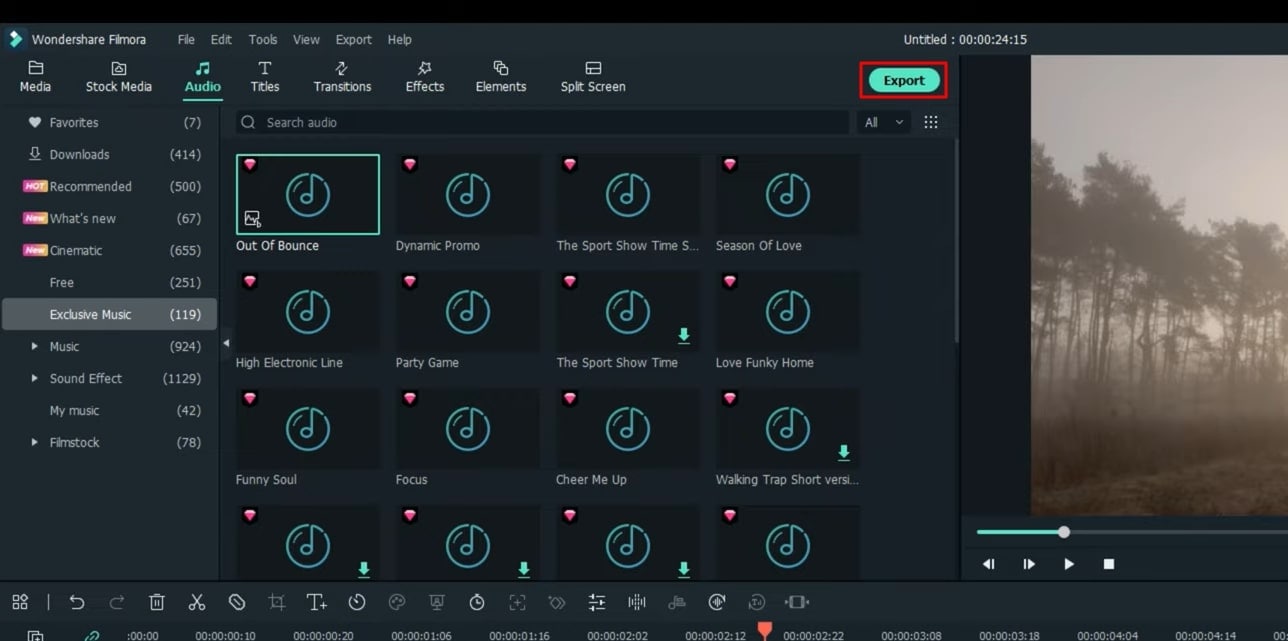
Blend Audio into your Video for Aesthetics
To apply audio to your video, click the "Audio" bar from the top and choose your required audio clip from the given categories. Whatever option you choose, drag it to the project timeline below, and the sound effect is successfully applied to your video.

Preview, Download, and Save the Edited Video
With your video edited successfully, click the "Render Preview" option and enjoy smooth playback. Finally, move ahead to download the video, and therefore press the "Export" button from the top and choose your desired location to save the file on your device.
Videos are a very important part of our lives because they possess many exciting and useful memories. Thus, editing videos is a way to improve their aesthetics and interesting factor and show love towards these fantastic media files. However, not many people understand video editing techniques. This tutorial on Filmora is a blessing for every aspirant.