-
Guide On How To Create Dr. Strange Effect In Video Through Filmora
-
Guide On How To Create Audio Visualizer in Filmora
-
Guide On How to Add Smoke Effect in Filmora
-
A Simple Photoslide Tutorial With Slideshow Effects In Filmora
-
Isolate Color Effect Or Selective Color Effect In Wondershare Filmora
-
Guide On How To Add Dr. Strange Effect In Video
-
How To Make Snap Video – Filmora Tutorial
-
Tutorial – How to Make Fast Speed Effect Like The Flash With Filmora
-
Guide On How To Edit Coin Magic Tricks With Filmora
-
How To Get Explosion Effect On Your Video Using Filmora
-
Creating Seamless Typography Animation with Filmora 1202:11
-
A Guide to Creating Looping Text Animation With Wondershare Filmora02:11
-
Tutorial - Create 3D Photo Zoom Effect in Filmora02:11
-
Filmora Tutorial – Setting Up The New Dynamic Countdown Timers02:11
-
5 Essential Video Editing Tips You Must Know On Wondershare Filmora02:11
-
Performing Next-Level Editing With Ready-Made Templates on Filmora 1202:24
Transcript
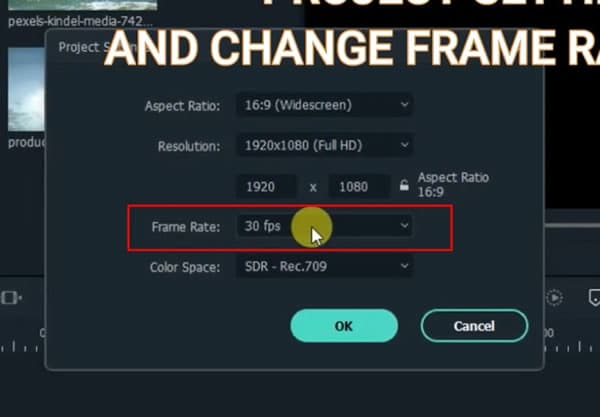
I am using 4 videos. So go to “File,” “Project Settings,” and change “Frame Rate” to 30 for easy editing on the timeline. Drag each video to the timeline and reduce their duration to 3 seconds or more.
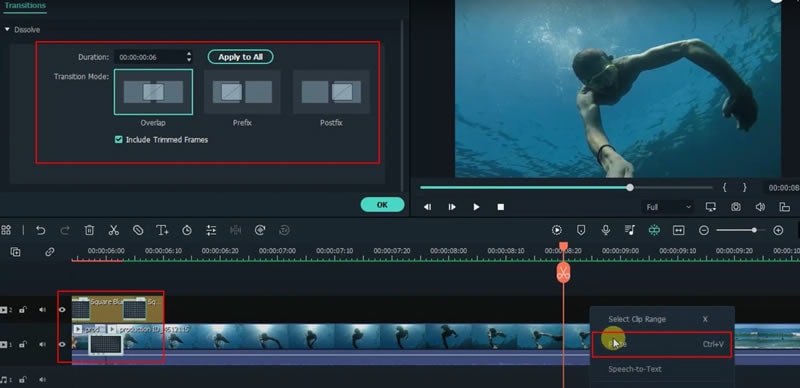
Move the playhead 10 frames backward from the middle intersection in between the videos and bring down the "Square Blur” effect below. Move the playhead 10 frames forward from the middle intersection in between the videos and split and delete the rest. Now split the effect 5 frames from the beginning and also split 5 frames backward from the end of the effect.
Further apply the "Dissolve” transition in between the effects splits and on the videos.
The duration for the transition on the effect is 4 seconds, while the duration for the video is 6 seconds.
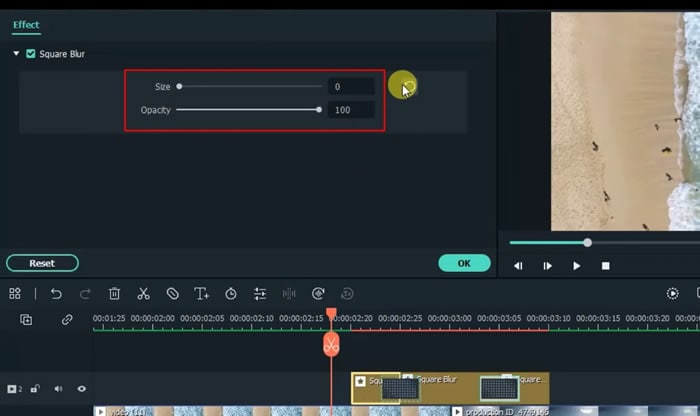
For the square blur effect, the size of the first split is 0, the middle split is 8, and the last split is 0.
Move the playhead 10 frames backward from the middle intersection, and copy and paste the effect transition. Afterward, drag down the "Dissolve” effect in between and reduce the duration to 6 seconds. Continue with the same process.
Preview.
Tutorial On Smooth Blur Transition in Filmora
What you need to prepare:
- A computer (Windows or macOS)
- Your video materials.
- Filmora video editor
Import Video to Filmora
Initially, you've to import your videos to Filmora editing software. For this, you've to click "Media" from the top-left side of your screen and then press the "Import Media" button. If you need ready-made videos, click "Stock Media," and select your desired video from the available options.
Adjust Video Frame Rate from Settings
Click on the "File" menu from the top toolbar, navigate into "Project Settings," and a window will open. Select the "Frame Rate" option and choose "30 fps" from the drop-down menu. Click “OK” to move further.
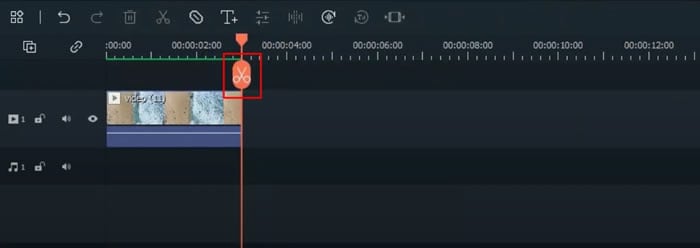
Drag the Video to Timeline and Trim
Now you’ve to import your video to the project timeline to continue editing it as required. Make sure to set its duration as per your requirements. If you’ve multiple videos, you can also delete the unrequired part of the videos by adjusting the playhead and using the "Scissor" icon on it.
Blend Video with Blur Effects
Navigate into the "Effects" bar from the top of your screen, search blur, and see many options. For instance, you chose "Square Blur," and now you have to drag this effect to the timeline below. By adjusting the duration of your effect or splitting the frames of your effect, you can decide when and where your effect should come into play during the video.
In addition, by double-clicking the effect, you can edit its "Size" and "Opacity" through a window on the left side of the screen.
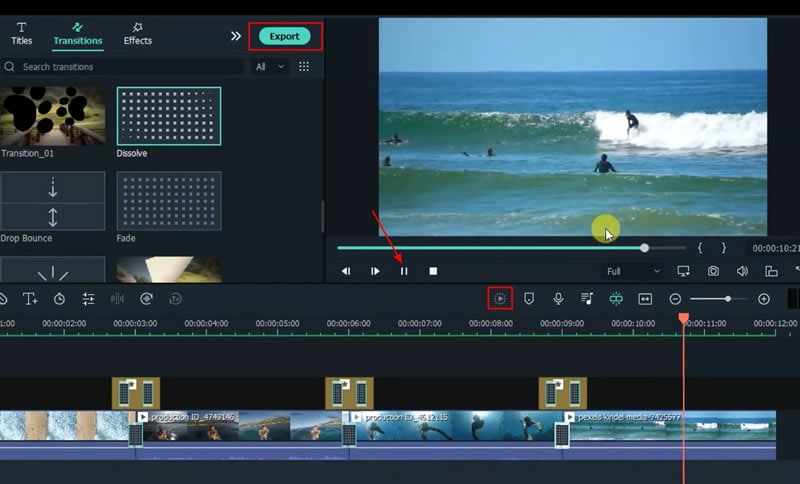
Apply Transitions to Video and Adjust
Improve the flow of your video through transitions. To apply, click "Transitions" from the top of the screen and choose your desired transition. Whatever option you choose, drag it to the timeline below. Double-click on the applied transition to edit it, and an editing window will open. You can adjust its duration from here and set the required transition mode.
If you need to apply transition in splits, you can simply right-click on it and select "Copy." Then, by moving the playhead further or backward, you can paste it anywhere on the video by right-clicking and pressing the "Paste" option.
Preview, Render, and Export Smooth Blur Transition Video
Since your final video is ready, preview it by pressing the “Render Preview” icon. You can also press the “Play” icon for video playback. If you're satisfied with your progress, click "Export," choose file location, and your smooth blur transition video will be saved to your device.
Videos are a very popular form of digital media files that store important memories, life achievements, and many other exciting moments. Thus, we have emotional attachments with them. However, the videos are usually affected by troublesome backgrounds that can make them less interesting. This tutorial on Filmora is the solution to this problem in an easy and defining way.


