Filmora Tutorial | How to Edit Beat Sync Instagram Reels Video
Instagram is a globally used social media application that comprises billions of users. Apparently, Instagram reels with exciting beat syncs are a new cool because they allow people to create compelling and entertaining short videos that earn followers within the community. Do you need to edit an Instagram reel video for yourself? This Filmora tutorial has solutions for you.
Transcript
Today, in this video, we will get to know how you can create beat sync real videos. By using Filmora software, you can edit it in an effortless way.
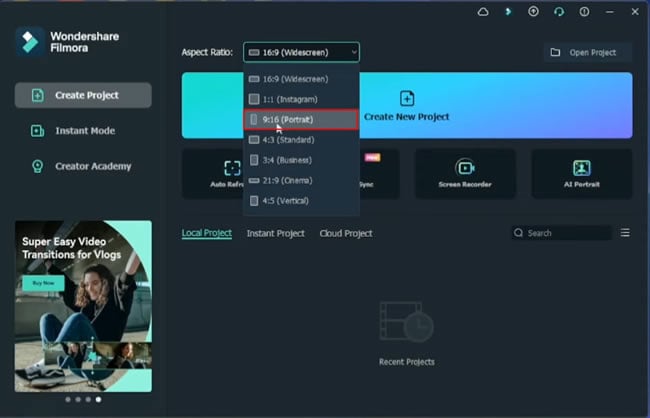
First, you've to download the Filmora software and then open it. After that, on the top, you'll see a ratio, and you've to set it at 9:16, which is a portrait one. After this, you've to create a new project, and you'll see this type of interface.
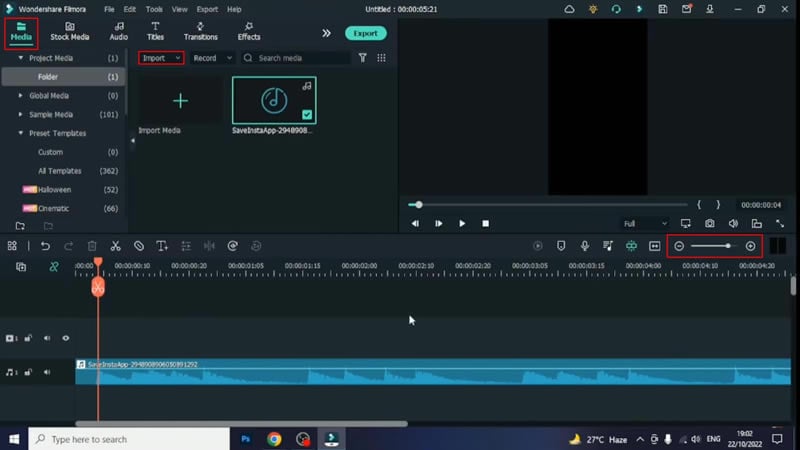
Now you've to add a song. For this, you need to click this option and then import it. After import, slide it to the layer where you'll see a song like this. After that, you've to zoom the layer. For zoom, this is the option to increase, after which the music will be zoomed in. Now you can see the wave music; basically, high beat marks are visible, and it is possible by zoom.
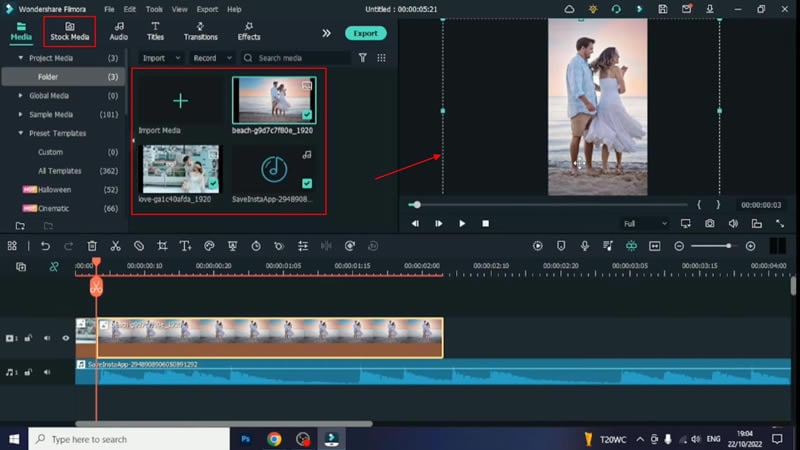
Now you've to place the image based on the high-beat waves. For this, you've to go into "Import Media," and after that, if you want to add any image or video that you want to add, simply add it. After adding, you've to zoom the image, which can be done by sliding and zooming the main portion in the center.
After setting, click on the image layer and shorten it. Like where the beat is, so you've to keep it 1 second before the beat to perfectly match it. After this, you've to come here to add a second image. After adding, you will go here and right-click and select the "Crop to Fit" option, which you've to click and then can set the image. Otherwise, you can do it manually by clicking the image, then sliding the corners and setting the image in the center perfectly like this. So this way, you can set the image.
After setting, you’ve to add your second image as well according to the beat mark. Then add the third image, and again you've to import it. Then click the image and slide it to save perfectly according to the screen. After saving, you need to reduce the image size and match it according to the beat. So this way, you adjust the images according to the high wave beats. So I have added an image according to beats which shows a perfect display.
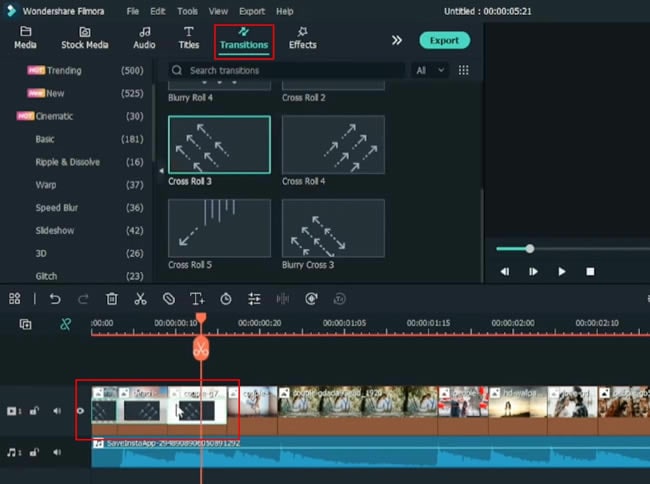
Now you've to add transitions. For this, you've to click on "Transitions," and from here, you'll find many transitions. So you can add as per your requirements. What I have added, I will let you know as I have favorited and saved them after downloading. So as in the display, it shows "Cross Roll 3"; add it to the first image. After this, add the "Cross Roll 4" transition to the second image. Then add the "Cross Roll 3" effect on image 3. Then add "Cross Roll 4" on the fourth image. The fifth image is a bit long, so for this, I will add an effect, "Warp Zoom 6", from transitions.
After adding, right-click, navigate into "Duration," and set the duration according to your requirements. Like I have set 8 seconds, so you set it as per your needs. So you can see I have added, and I am watching it play and how perfectly it is matched. I will show you again by playing, and the width is matched.
Again, you must click the sixth image and add "Cross Roll 4" to it. Then I add "Cross Roll 3" on the next image. Again next image will be "Cross Roll 4". After this, on the next image, I will use the wave bar, "Warp 6", so I will visit the duration and set it to 8 seconds. So according to your requirements, you can reduce as much duration based on beat, so your speed and transition will come right. These are your other images, and you can add other effects, like “Wave Bar,” or you can download them to use.
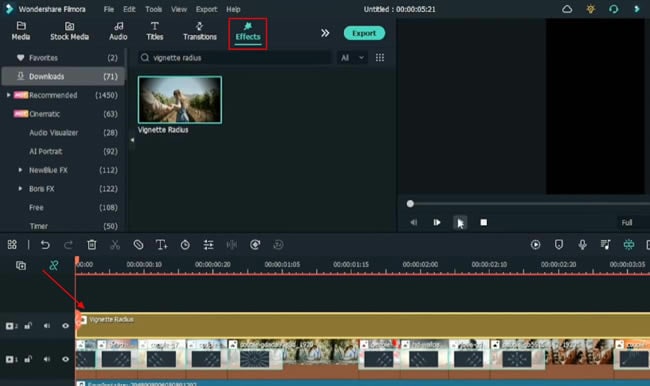
You've to now add a vignette effect, "Vignette Radius," which you have to search in "Effects." So it will appear like it, and you've to download and add it to starting point. You can see on the side your "Vignette Radius" looks perfect. Just slide it till the end of the video, and you can make further adjustments. Thus, it's how you can get edit your video.
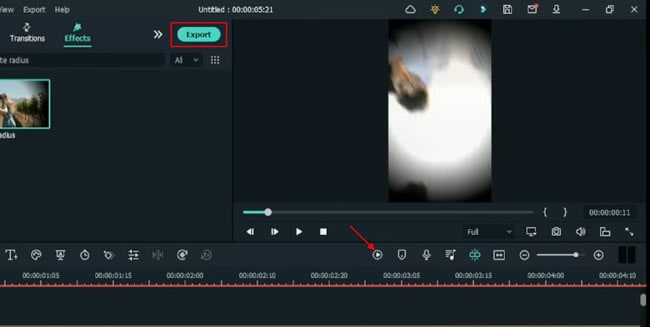
Now, to export the video, click on "Export," and here you can give the name to the video. After this, you can adjust the ratio and frame rate from the settings as needed. So finally, click on “Export” to export the video. On clicking, set the name of the video and proceed to "Settings" to manage more advanced video settings. You can also manage the frame rate and other settings, after which you must click "Export" to conclude.
Filmora Tutorial | How to Edit Beat Sync Instagram Reels Video
What you need to prepare:
- A computer (Windows or macOS)
- Your video materials.
- Filmora video editor
Set Screen Ratio from Interface
Once you open Filmora, at the beginning of the interface, click "Aspect Ratio" from the top and choose "9:16 (Portrait)” from the options. Then press “Create New Project” to proceed further.
Import Song and Add to Timeline
Now click the "Media" tab from the top, and select the "Import Media" button to import the audio or music file from your device. Afterward, drag your file to the timeline and zoom it by pressing the "Zoom In" button.
Select Images for Video
If you need your images, you've to click the "Media" tab from the top-left and press the "Import Media" button. Meanwhile, if you need ready-made images, press the "Stock Media" tab and select images from the given options. After this, drag your selected images to the project timeline below.
To edit the image, double-click on it, and you can adjust its margins and layout using the screen on the right by adjusting corners. Make sure to reduce the size of the image track and set it as per the beats of the music tracks. If you've more images, repeat the same process for them.
Implement Transition Effects
Navigate into the "Transitions" tab from the top, and you'll see many categories of transitions available. Simply select the one that looks interesting to you, drag it to the timeline, and apply it to any image. Thus, for example, if you've more than one image in the timeline, you can apply multiple transition effects to them.
Visualize the Video with the Effect
Now click on the “Effects” tab from the top and select your required effect from the given options. Whatever effect you choose, drag it to the timeline below and adjust the duration as required.
Render and Export Finalized Video
Your final video for the Instagram reel is ready. Thus, press the "Render Preview" icon and witness a smooth playback with a cinematic experience. If you're satisfied with your creative effort, further export the video, which is done by clicking the "Export" button from the top.
Instagram is a perfect platform to get entertained in an art-like creative environment. Thus, from an entertainment perspective, people like to watch, create and share their Instagram reels with beat sync functionalities, which everyone loves. With this tutorial on Filmora, you can design such edits for your reels smartly and efficiently.