Transcript
Guys, making money on YouTube is easy, and actually, it's not very difficult. The key is to create content that benefits viewers, and we’re going to create content that benefits the viewers.
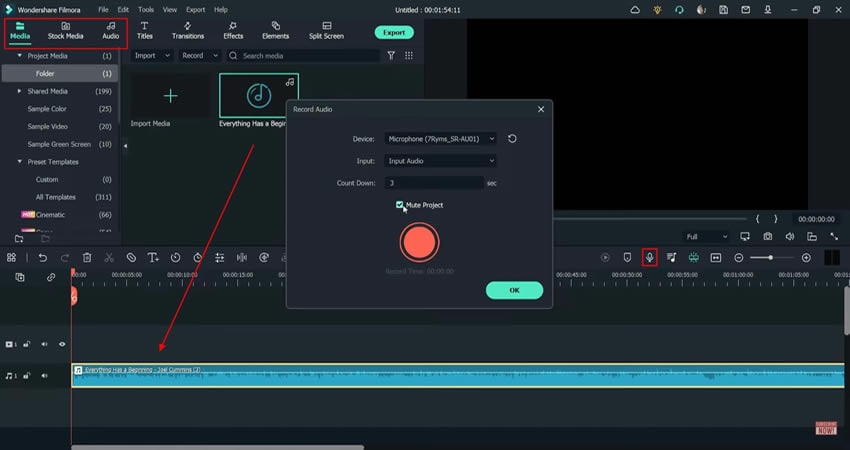
So, in Filmora, you already have a microphone like this. Just click on the one that goes up here, select the microphone device and turn it off. After all, if it sees the project, you would not be able to hear the background music later when you record.
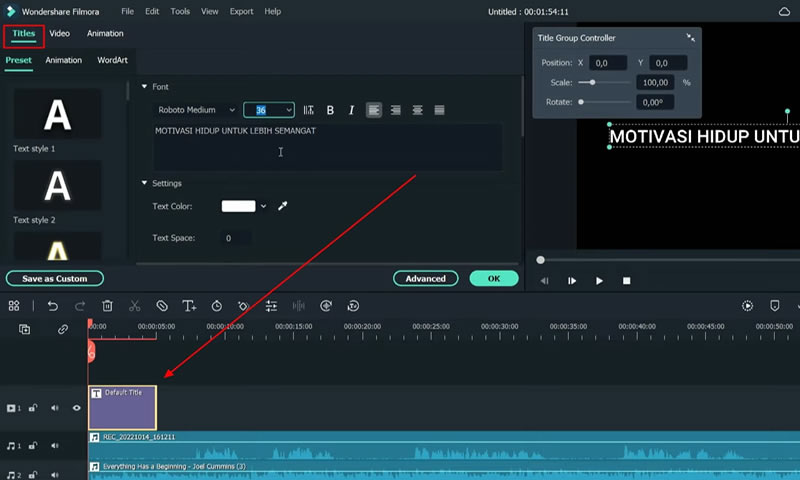
Ok, now let's make the video. The first step is to enter the intro of the video, in other words, the title of the video. You have to enter the text here, and it’s really easy. Choose the standard one. So let's reduce the font to 36, and this is just an example.
For the animation, if you want to apply animation directly, it’s like this. If you want to edit again, go to the “Advanced” tab here, and there are a lot of animations that you could choose from. So you can also choose the duration of effect.
How long does it take; I’m going to try like this. Okay, guys, you can also choose a custom font. Also, include appropriate scenes, which is important for a motivational video. There's a "Stock Media" tab where you can download free stock videos, as well as free stock images directly from Filmora.
So you can combine videos and images like this. I'll turn down the music first. Let me hear it, and I usually set it at -16. Moreover, you can also add a stock video here. Let's go straight to the next scene. For example, I'll insert the video here. Let’s make it short.
Here, I’m going to give you a transition, and the transition is very smooth. Right away, you can slide the transition to the part where you want to give transitions. So, the result is like this. Okay, now I will enter the text according to the motivational words that we’ve made.
Enter the "Titles." I'll try this one and will add it. We’ll change the size. Then we’ll navigate into the “Advanced” tab, and you can change the font per your interest. Then I'll add a shadow, which you've to activate from the shadow tab, and you can change the shadow distance as required.
Usually, I have two blurs and opacity, and I can reduce them as needed. Then I will change the color to yellow. Okay? For animation, I usually use fate. We will then move straight into the second text and copy and paste it into the selected layers. So, it already possesses the same effect and animation.
You can also play or modify text. That means we have to separate it, which is why we have to delete it again. Okay, delete it, and we’ll add it again. I'll change the font to this and make it bigger.
Drag it right away, according to your needs. So your video quotes and motivational videos are finally level. After it's finished, you can also add "Effects." I'll try adding cinematic effects. You can also add cinematic colors; so your video looks more like cinema.
Change the title and choose a title format that you could use. I’ll try to use this one. You can also give the transition again, and now it’s done, and you’ve added your stock video, titles, and effects, as well as sound.
Click "Export," and you can save it on your computer and upload it on YouTube.
How To Make Money On YouTube With Useful Copy Paste Content – Filmora Tutorial
What you need to prepare:
- A computer (Windows or macOS)
- Your video materials.
- Filmora video editor
Import your Media Files
Click on the “Media” tab from the top-left side of the screen and select the "Import Media" button to import your required audio, video, or image files to Filmora. If you don't have your media files, you can get read-made videos and images from "Stock Media." Meanwhile, you can also get ready-made audio from the "Audio" section.
If you have got an audio file and you want to record a voiceover, click on the “Record a Voiceover” icon and adjust its settings accordingly. Select your media files from the “Media” section, and drag them to the project timeline below. You can also add them to the timeline by clicking the "+" icon on every media item.
Implement Titles into your Project
Navigate into the “Titles” option from the top and select your desired title from the given options. Make sure to drag it to the project timeline below.
Now double-click on the title track and start the text editing process. On the available screen, write whatever you want, though, and also adjust the text’s font, size, layout, color, and margin. If you want to apply animations to your text, click the "Animation" tab from the top of the window and select the desired option.
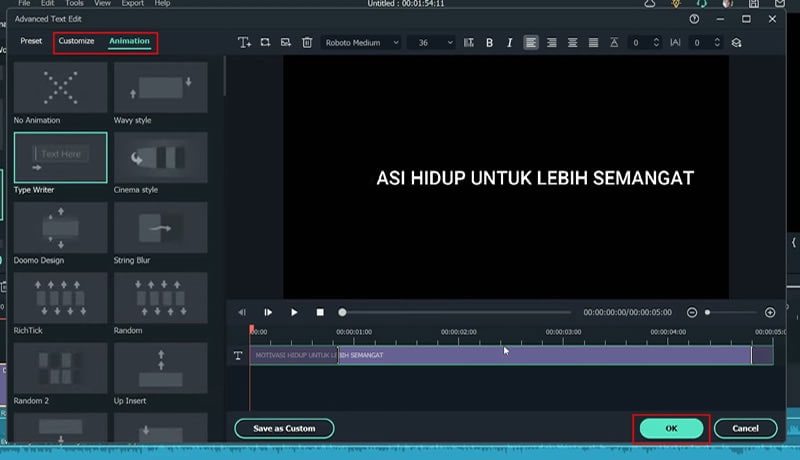
Make Advanced Edits to Titles
Meanwhile, if you want to apply an advanced animation, so click on the “Advanced" tab, then move into "Animation," and click on your desired animation. You can also perform many other advanced text customizations from this window after clicking on the "Customize" menu. Press “OK” if changes are completed.
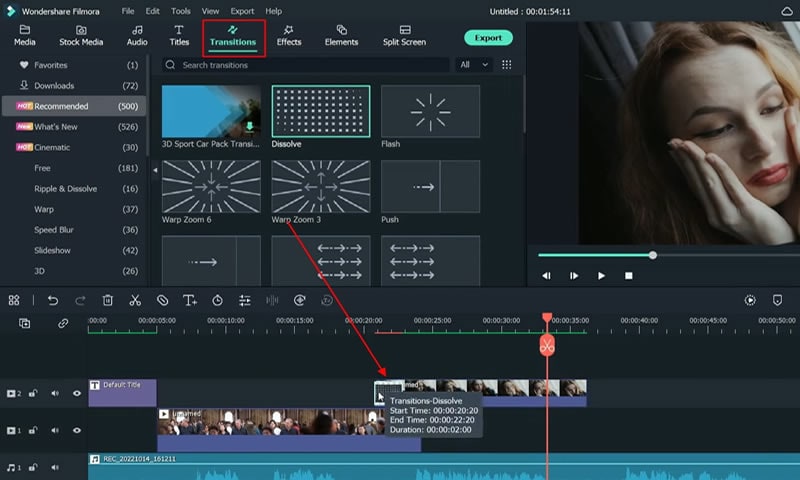
Integrate Transitions into Video
Select the "Transitions" tab from the top of the screen, and from the available options, choose your most suited transition. Afterward, add a transition to your video in the timeline by dragging and dropping. This will make your video look more appealing. You can apply as many transitions as required.
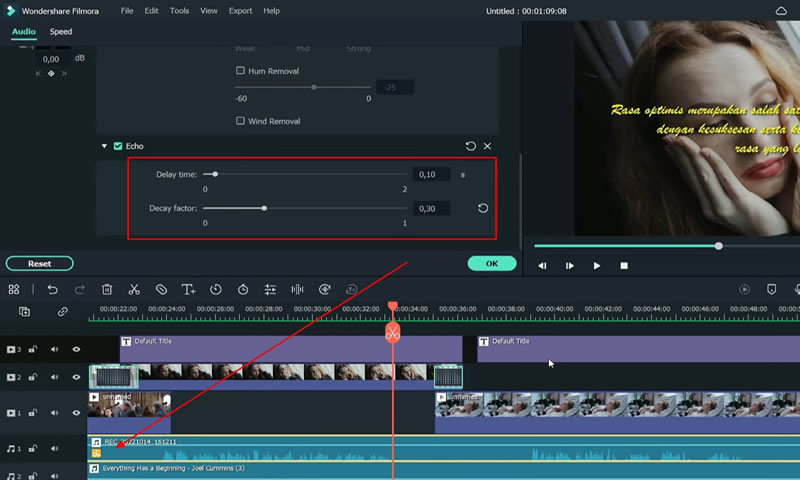
Add Effects to the Audio
Navigate into the "Effects" section from the top, select the "Audio Effects" category, choose "Echo" or any other effect, and add it to your audio track in the timeline. If you need to edit this audio effect, double-click on the audio track and scroll down from the window to edit your audio effect with respect to "Delay Time" and "Decay Factor."
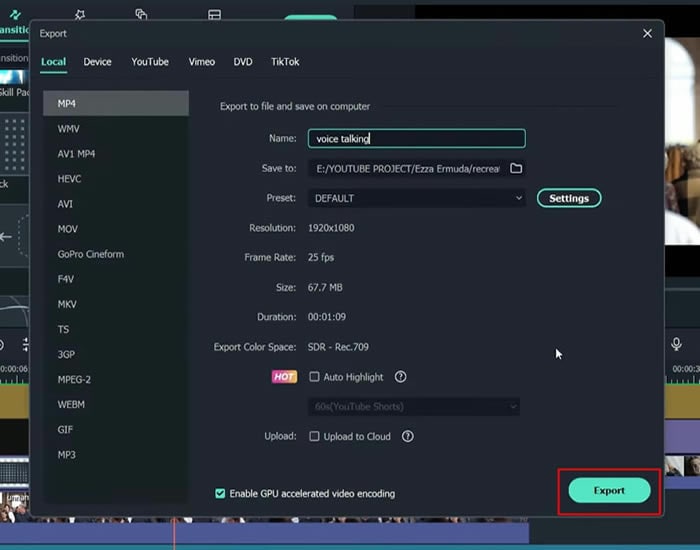
Preview Video and Save it to the Device
Now preview your final video by clicking the "Render Preview" icon. Moving further, click on the "Export" button, set the file name, choose the file location on the device, and again press the "Export" button to save your video.
In this digital world, earning money through YouTube content creation is significantly rising as more people indulge in this profession. If you want to avail this opportunity, this tutorial will act as a helping hand for you. After all, it will help you to design beautiful videos right from the copy-pasted content that will take no time and is very easy and straightforward to process.