How To Make Snap Video – Filmora Tutorial
Snap videos are always interesting, considering they act as an intro to various exciting clips ahead. Do you want to make a snap video for yourself with personalized editing? This tutorial on Filmora will teach you steps to transform the quality of your video and improve its engagement with the help of snapping effects.
-
Guide On How To Create Dr. Strange Effect In Video Through Filmora
-
Guide On How To Create Audio Visualizer in Filmora
-
Guide On How to Add Smoke Effect in Filmora
-
Tutorial On Smooth Blur Transition in Filmora
-
A Simple Photoslide Tutorial With Slideshow Effects In Filmora
-
Isolate Color Effect Or Selective Color Effect In Wondershare Filmora
-
Guide On How To Add Dr. Strange Effect In Video
-
Tutorial – How to Make Fast Speed Effect Like The Flash With Filmora
-
Guide On How To Edit Coin Magic Tricks With Filmora
-
How To Get Explosion Effect On Your Video Using Filmora
-
Creating Seamless Typography Animation with Filmora 1202:11
-
A Guide to Creating Looping Text Animation With Wondershare Filmora02:11
-
Tutorial - Create 3D Photo Zoom Effect in Filmora02:11
-
Filmora Tutorial – Setting Up The New Dynamic Countdown Timers02:11
-
5 Essential Video Editing Tips You Must Know On Wondershare Filmora02:11
-
Performing Next-Level Editing With Ready-Made Templates on Filmora 1202:24
Transcript
Today, in this video, I am going to tell you how we can make our snap. So let's find out how we can make our snap.
After installing, this interface will appear before you. Now you've to import that video which you want to make a snap. I have some of my videos. You can also record your videos and take them from the internet.
So first, you've to take a video you want to snap, like taking from the internet or recording your own. After the right click, you've to separate its sound.
Now you’ve to add a second video to the timeline and the video you require, so you'll keep it while trimming the rest.
So, first of all, how can you remove the green screen? Double-click on the green screen. After that, click on the "Chroma Key," and your green screen will automatically be removed. So here, you've to play and see the video first, and where there is a snap, you would have to trim that part of the video.
Now, you've to add that photo or video here, where you are looking to change it with a snap. Behind the snap, you can add your video, as well as a photo. You would have to import that photo or video. After that, you need to play the video for once to find out where your video is getting snapped, so, at that point, the video is getting changed or moving. This means you can adjust as required.
Now, at this point, you'll keep that video which is required, while deleting the rest part. Now what you've to do is copy the sound of the snap video from here and add it to your second timeline. After this, you’ve to add your photo or video to the timeline and keep the length of the video as required while deleting the rest.
Now again, you've to copy these two parts and paste them into your third timeline. The number of videos that you want to add, based on that, you've to continue to copy while adding to the timeline. After that, you've to adjust it according to the length of the video and delete the rest. Here you can also make a snap video of your photo. Here I have added three videos, so let's see by adding a photo here.
Thus, same you’ve to copy the snap from here and there. So let’s play the video to see how the snap we made looks. Friends, so this way, you can make a snap for yourself.
After this, I will tell you guys another thing about a new update in this software. So as you know, friends, if we trim any of our photos or video, you must have seen that we are required to click on the split button again and again, after which our photo or video gets split. But you can also find the option of the “Quick Split.” So if you turn on this option, then whenever you’ll click on your photo or video, it will start getting split automatically. You guys don't need to split the video every time again and again; like with one click, you can apply a quick split to your video.
Afterward, let me tell you another thing, if you want to add any snap within your animation, you can also do this. You've to double-click on your snap video. After this, you need to navigate to "Animation." After this, you'll get to see many animations. But for the animation that you want to add to your video, you've to pick and paste it onto your video.
So, let's play the video once to see how the animation we added now looks. So in my view, our first video was better without animations. You can see many animations here, as I have shown, and you can adjust any animation in your video per your requirements. This added animation is to show you how you can add animation to your videos.
So, let's see the video by clicking on the "Export" button. So before exporting, let me tell you one thing. If you export your video without buying this software, so you'll get a watermark on your video.
Now, write the name of your video and set the location where you want to export your video. Here you need to set the video's resolution and frame rate. After this, there is another good thing in this software which is the presence of the "Auto Highlight" feature. So if you turn on this option, whenever you export your video, so two videos will get exported.
One, which was edited, would be exported, and the second video would be for social media, like shorts. After that, you'll do an export. But before that, you also see an option of uploading to the cloud. If you tick it, you can directly export and upload your video from the cloud ID.
How To Make Snap Video – Filmora Tutorial
What you need to prepare:
- A computer (Windows or macOS)
- Your video materials.
- Filmora video editor
Import Video for Snap
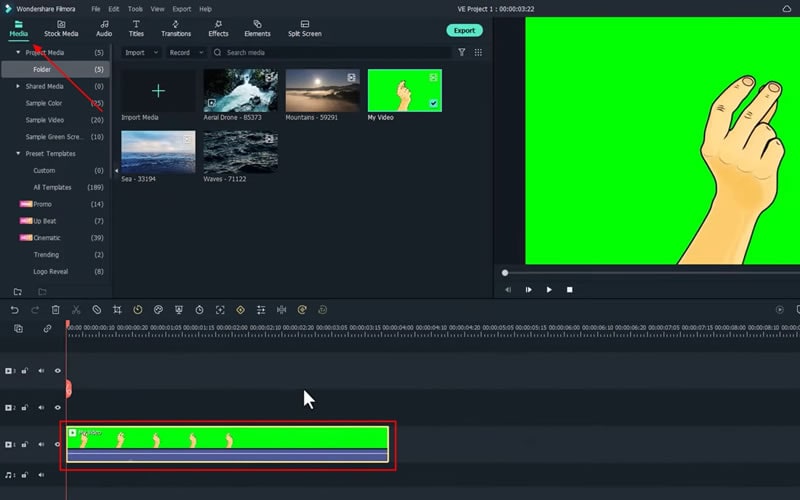
Click the "Media" tab from the top-left and then select the "Import Media" button to import the video required for the snap. Now select the video from the media section and drag it to the project timeline below.
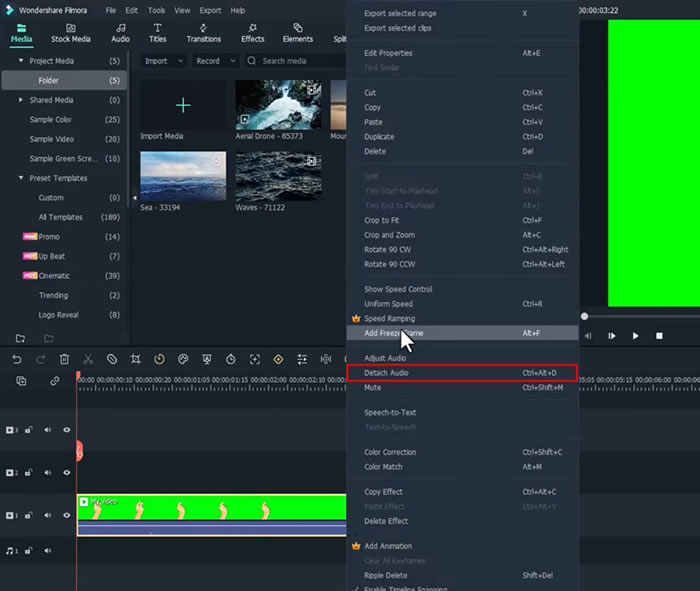
Separate Sound in the Video
Right-click on the video in your timeline, and select the "Detach Audio" option to separate the sound of the video.
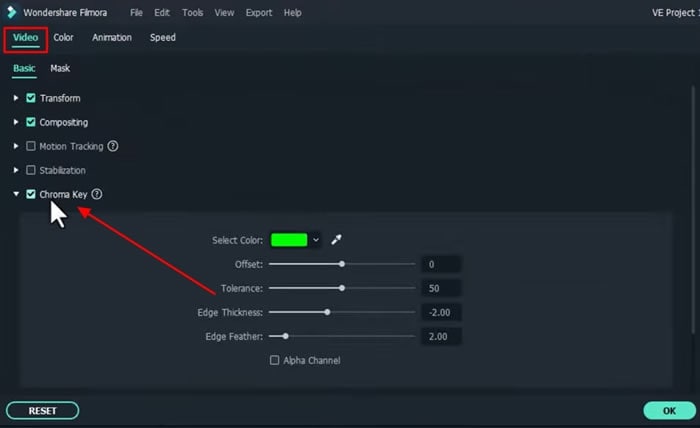
Adjust Snap Video Background
To adjust the background color, double-click on the video, and a window will appear. Now select "Video," then press "Basic," and finally enable the option of "Chroma Key," from where you can remove the green screen appearing behind the video.
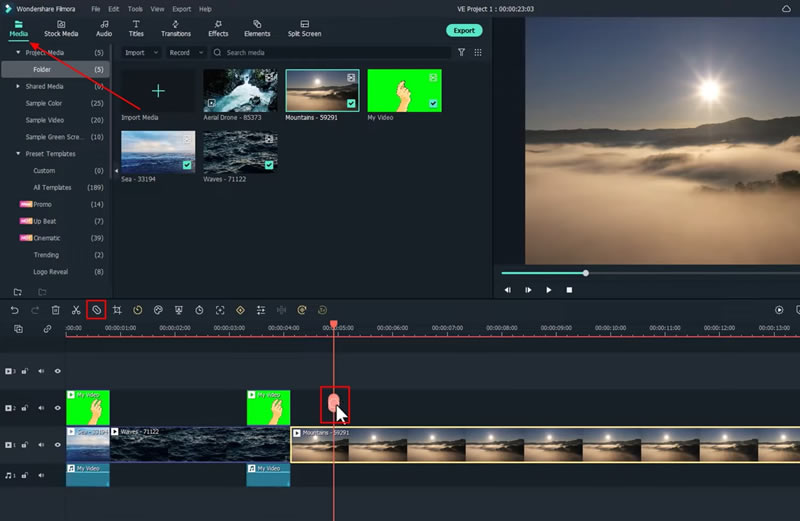
Trim and Delete Unrequired Portions
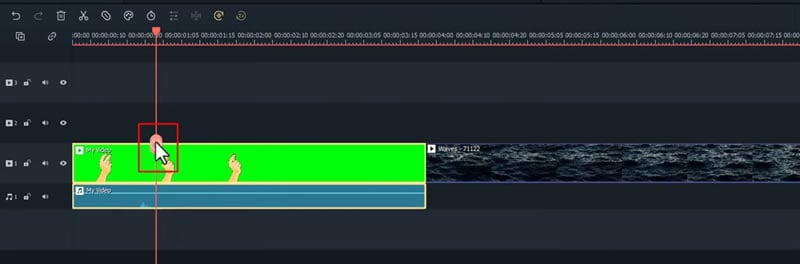
Copy, Trim, and Manage Video Tracks
Perform a right-click on your snap video, select "Copy," move into the second timeline, press right-click, and select "Paste." If you want to add another photo or video in your single snap video, drag them from the "Media" section to the timeline, and delete the unrequired part using the "Scissor" icon on playhead. Continue to repeat this process for more images and videos.
To process trimming fast, you need to click on "Quick Split Mode," and with a single click, you can split your videos or photos into parts.
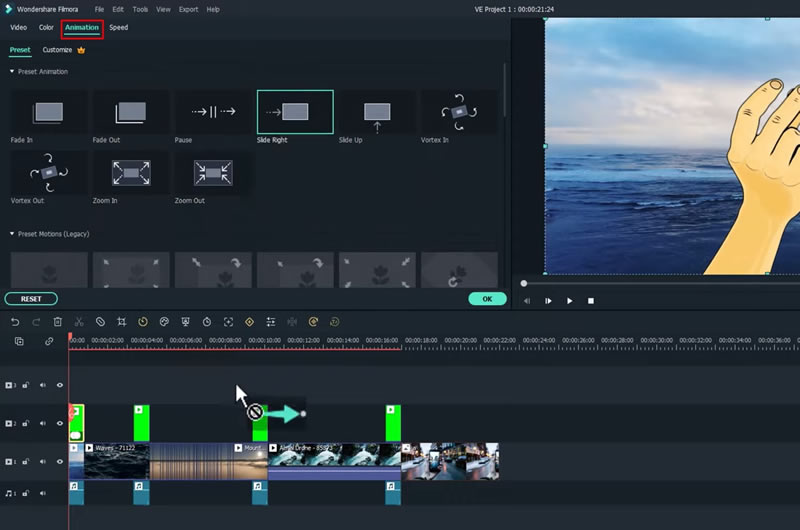
Apply Animations to Snap Video
If you want to apply animation to your snap video, double-click on it, and from the window, move into "Animation" and select your desired animation from the given options. Whatever option you select, drag it to the timeline below.
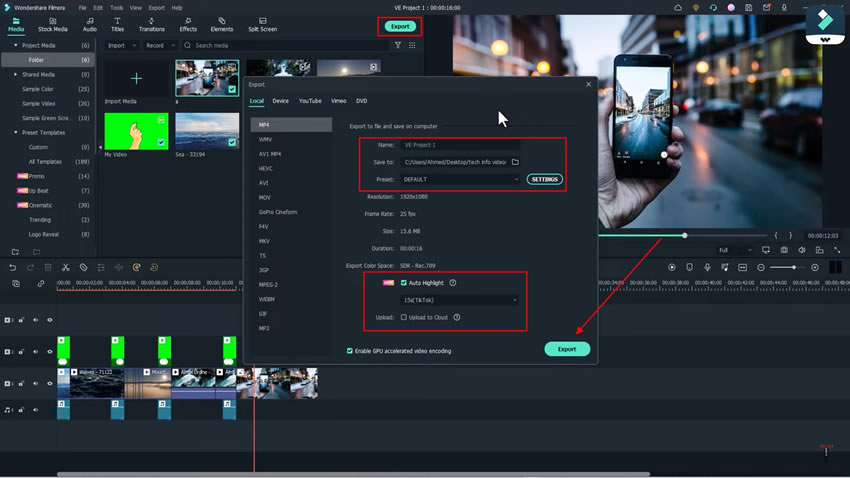
Preview and Export Edited Snap Video
Now play your final video by clicking the “Render Preview” icon. If you’re satisfied with your work, click the "Export" button from the top. Here you need to select the file name and set the file location as desired. By clicking on the "Settings" button, you can also set video resolutions as required.
In addition, by pressing the "Auto Highlight" button, you'll get two videos exported to your device, one edited and the other a social media short. Moreover, if you click the "Upload to Cloud" button, you can directly export and upload your video from the cloud ID.
Having a snap video is like owning a unique piece of creative art within the visual media. After all, snap videos are always exciting, fun, and, more importantly, something that develops interest from the viewer's perspective. This tutorial on Filmora will help every individual to perform snap video editing in a convenient way with easy steps.


