Tutorial on How to Crop or Zoom in a Video with Filmora
Most of our videos are victims of either unnecessary backgrounds or wrong-focusing problems. This can happen to anyone, and it's undoubtedly a very disturbing issue to experience. This tutorial on Filmora will discuss important steps to implement crop and zoom adjustments within your video. Ultimately, you could transform your video in desired margins and layouts.
Transcript
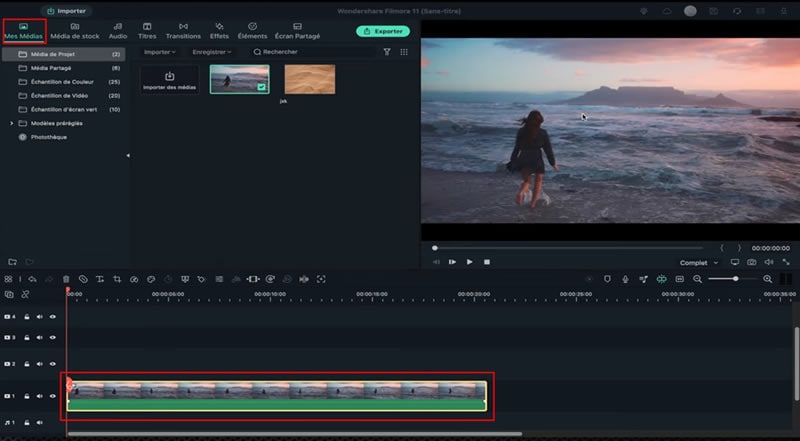
Here we are on Filmora, and I have moved into the timeline. Now, I'll show a few seconds of that clip. In this tutorial, we will see how to use the "Crop" tool to crop your videos and simply zoom in and out. Let’s start by cropping this video.
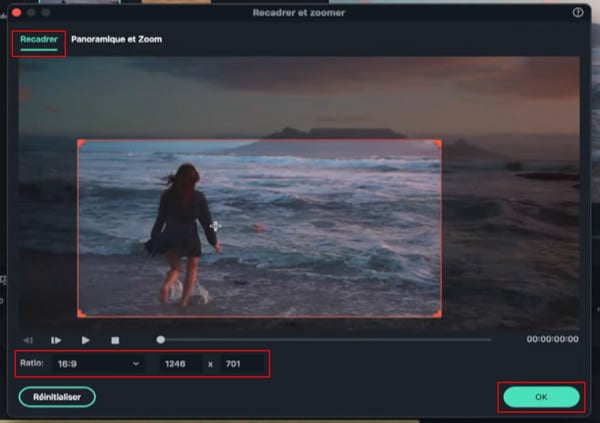
First, I will select the video in the timeline. For this, I'm going to click that "Crop" icon. Don't panic if you don't see this icon. Right-click on the clip and choose "Crop and Zoom," and this pop-up window will open. To crop, select the first tab and modify the framing by moving angles, and we move with drag and drop.
We can modify the ratio, but we will see that later. I want to stay on the 16:9 ratio because I prefer this framing. I will click “OK” after this, and we will see that it's cropped now. Obviously, we are not obliged to crop in the 16:9 format, as you can also choose any other ratio.
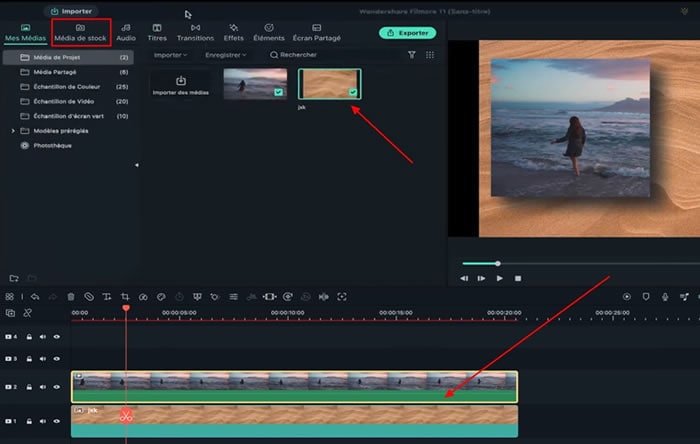
I’ll get back to the tool, click the video, and then use the “Crop” tool and change the ratio as required. For instance, I choose 1:1, the square ratio. Now select the area that you want, and click on “OK ."Since our project is in 16:9 format; thus, black bars appear on the right and left.
We could be creative, which is why we can fill it with background and titles. I’ll quickly show it to you. Here it is; I edited my video by adding a background and titles. Let’s see the results together. We saw together how to crop a video using the “Crop” tool. Now, we’ll see how to Zoom in and Zoom out with this tool.
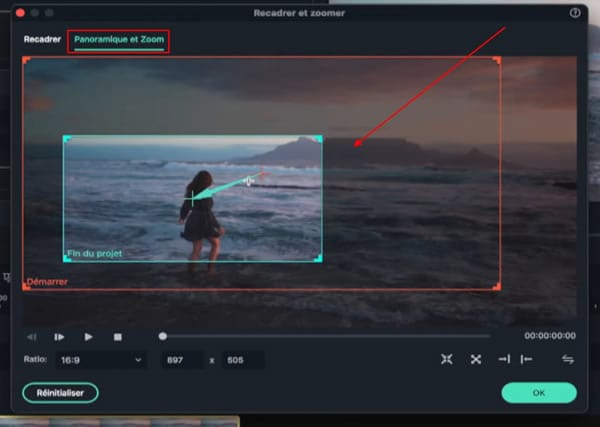
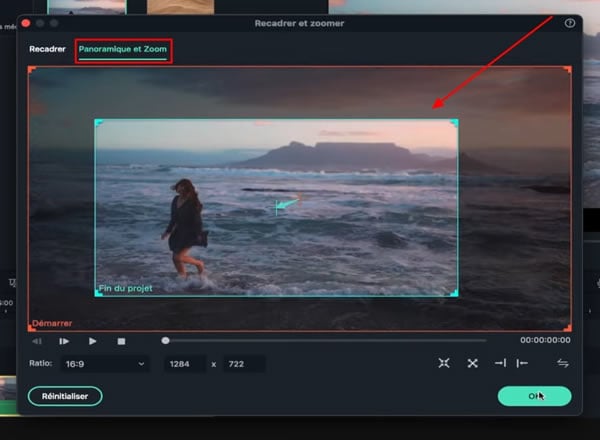
Now, I’ll delete everything from the timeline, and I will drag the video to track 1 again. First, I want to create a “Zoom In” effect, and we'll start with this frame and gradually approach the woman. Now, I will double-click, go to the "Crop" tool, and select "Pan and Zoom."
We can see two boxes appearing, which include a "Start" box, and this will be the beginning of the movement. The green frame will be the end of our zoom move. I can adapt the size of this start and end by using the corners and moving them around. You may notice the green arrow that indicates the camera movement you created.
We’re happy with the result, and therefore we will click “OK."Now let's take a look at our Zoom in altogether. Must note that it's better to work on high-resolution videos. By zooming in, of course, we will degrade the resolution of the video. Ok, now, we're zoomed in and will see how to zoom out.
We will click on the video again, select the “Crop” tool, and invert the start and end zones. We're going to go from the red frame to the green frame. It's a zoom-out, and let's see the results together. Now, I'm going to cancel all this because I'm going to perform one last exercise where we zoom in; meanwhile, the camera pauses for a few minutes and then zooms out.
We delete everything, and now we again move the video to the timeline. I would like to create a zoom-in at the start of the clip. Then I would like the camera to stay still, and finally, I would like to zoom out to finish. First, I will recreate the Zoom in by selecting the clip, then I'm going to "Crop," and then I will select "Pan and Zoom."I will also define my end zone, and when I'm satisfied, I will click "OK."
Now we see that we have created a simple Zoom-in, as seen previously. The trick is to cut this into 3 seconds. So I adjusted the playhead into the right place and clicked on "Scissor" or performed "Ctrl + B."I will move forward and click the "Scissor" again. We see that at the beginning of this clip, we always have Zoom in, and this Zoom in is present in every extract.
We do not want that because we want this particular extract to remaining still. So, I will select it, click the “Crop” tool, and click invert/reverse. After this, I click on the crop, and then I click "OK."Let's see the results. So, there is Zoom in at first, and then the camera stops moving forward.
There, we have the zoom forward, and we're going to zoom out. So I select the clip, click “Crop," and perform the simple inversion. We will manage to Zoom in and Zoom out. Now, I will show you the video by playing it. I hope you enjoyed the video.
Tutorial on How to Crop or Zoom in a Video with Filmora
What you need to prepare:
- A computer (Windows or macOS)
- Your video materials.
- Filmora video editor
Import your Video and Drag to Timeline
Click on the "Media" section from the top-left after opening the Filmora software. After this, press the “Import Media” button to import your video to Filmora from your device. Once your video is imported, drag and drop it into the project timeline below. You can move your video into the timeline by clicking the "+" icon.
Begin the Video Cropping Process
Now press the "Crop" icon from the panel bar to enter the video cropping menu. If you're unable to find this icon, click the "Alt + C” buttons from your keyboard. You'll see two categories, "Crop" and "Pan & Zoom."
By pressing the “Crop” button, you can crop your video as required by reducing its size from the corners. In addition, you can also adjust the cropping ratio format from the “Ratio” category. Click “OK" if you're done with the changes.
Apply Background to Cover Sides
After cropping your video, you may witness that the edges on the screen are black; if you need to add a background image or titles to these black parts, it’s very easy. You can import a background image from the “Media” section or get a ready-made from the “Stock Media” section. After selecting the image, add it to the timeline below.
Include Title Texts to Video
For titles, move into the "Titles" tab from the top, select the desired title, and add it to the timeline. Hence your background image and titles are applied. For further customization on it, double-click on your title track separately, and adjust them from the respective editing window.

Implement Zoom Effect Into the Project
If you need to apply the zoom effect and not a cropping effect, delete everything from the timeline first. For this purpose, select your entire timeline, right-click, and choose the "Delete" option. Now again, click the "Crop" icon and choose “Pan & Zoom” this time. You’ll see two boxes: “Start” and “End.” The start is from where your movement begins, and the End is where the movement finishes.
If you need a “Zoom In” effect, keep your start box out and the end box within it. Adjust the size of both boxes as per your interest. Set the ratio format for the boxes from the “Ratio” menu underneath. Click “OK” if changes are done.
Meanwhile, if you need a “Zoom Out” effect, click the "Swap the start and end points" icon, and your zoom effects will be inverted. Thus, Zoom in would change to Zoom out.
Similarly, if you need different Zooming effects in different intervals of the video. First, you've to divide your video into parts, which can be done using the "Scissor" icon on the playhead. Once your video is in parts, move into the "Crop" icon, select "Pan & Zoom," adjust box sizes, and click "OK."
Repeat the same process in other parts but use the invert option by clicking “Swap the start and end points” to differentiate between Zoom In and Zoom Out.
Export and Save the Video
Preview your final video by clicking the “Play” icon. After this, click the "Export" button from the top to save your video to the device.

Adjusting the video as per your interest is a good way to maintain its engagement levels. The crop or zoom feature will ideally help you to transform your video within the desired layout and, most importantly, provide suitable background with a better focus on target objects. This tutorial on Filmora provides step-by-step proceedings to initiate your video editing concerning crop and zoom.