

When you think "free video editor," OpenShot probably shows up near the top, and for good reason. OpenShot is an open-source video editing software designed for accessibility, providing a cost-free solution for cross-platform video production without licensing fees. But with so many new tools on the scene in 2026, does this classic still hold its ground?
In our OpenShot review, we'll break down what it actually feels like to use it, what the software can and can't do, and where it shines (or crashes). Not to mention, if you're wondering if there's something better out there, we'll provide an alternative for you, too!
What is OpenShot?
OpenShot is an award-winning free, open-source non-linear video editor for Linux, Mac, and Windows. It is designed to be easy to use, quick to learn, and surprisingly powerful for creators looking to trim, slice, and animate videos without any watermarks or costs.
Part 1. What is OpenShot Video Editor? (2026 Overview)
The OpenShot video editor has been in the game since 2008, starting as a passion project by one developer who just wanted a better free editing option for Linux. At its core, OpenShot is built for people who want a no-fuss way to cut, trim, and tweak their videos without getting lost in technical menus.
Fast forward to today, OpenShot editor is a full-blown open-source editor that runs on Windows, macOS, and Linux without charging a single cent.
Standout Capabilities
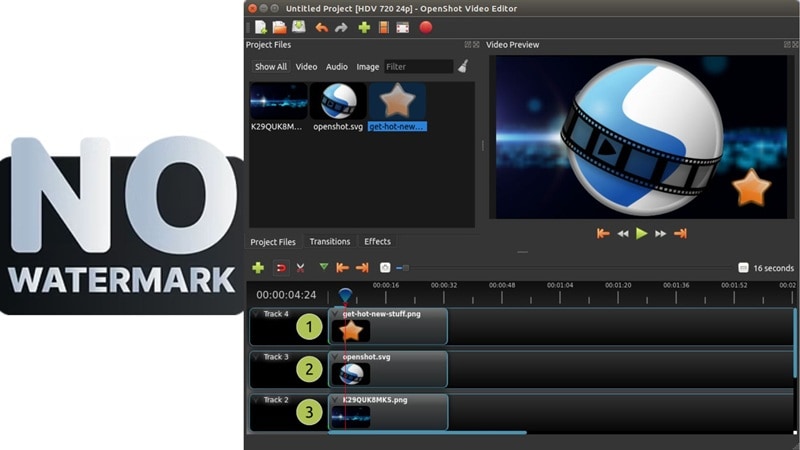
- Totally Free and No Watermarks: You can use OpenShot video editor without paying a cent, and it won't slap a watermark on your project. That alone puts it ahead of a lot of other free editors out there.
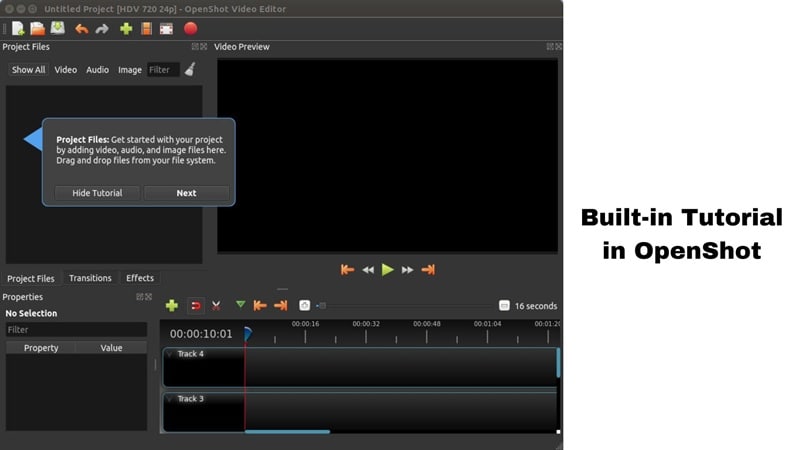
- Built-in Help When You Need It: OpenShot comes with a built-in tutorial that walks you through the basics. It's perfect for first-timers who just want to get started without reading a thick manual.
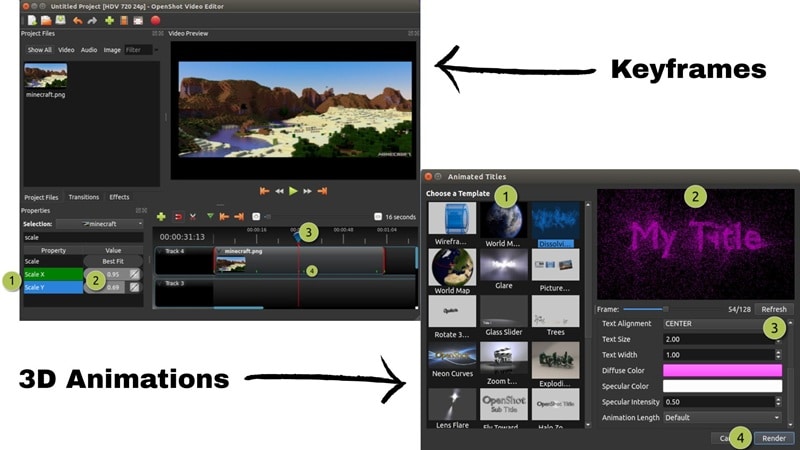
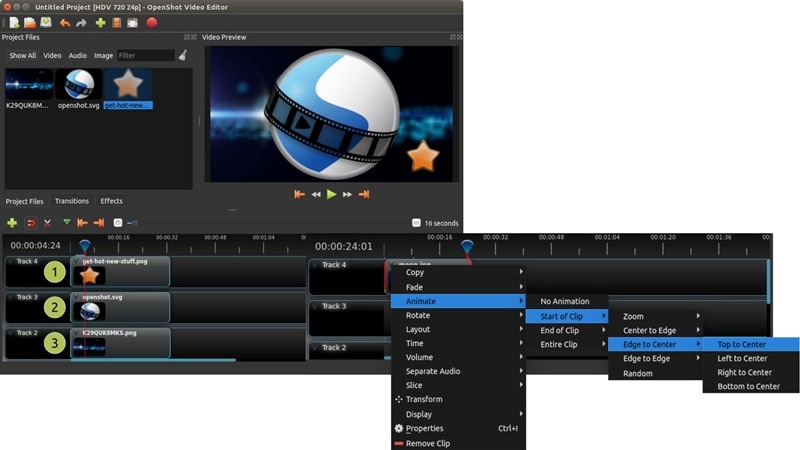
- Smooth Keyframes and Cool 3D Titles: OpenShot editor gives you basic keyframe animations that let you move stuff around over time. You can even create 3D animated titles that spin, bounce, or fly into your scene.
- Supports 70+ Languages: No matter where you're editing from, there's a good chance OpenShot speaks your language. That global support makes it even more accessible.
What's New in 2026
The latest version of OpenShot, now updated to 3.5, brings major performance improvements, making editing noticeably faster and smoother—especially when working with effects or larger projects. The redesigned timeline is cleaner and more responsive, and a new keyframe panel makes animations easier to control.
OpenShot 2026 also introduces improved GPU acceleration for faster exports, along with enhanced effects like masking and better chroma key. In addition, experimental AI features such as text-to-video, upscaling, and subtitle generation have been added, making the editor more modern and future-ready.
Price
OpenShot video editor is completely free to download and use with zero strings attached. You won't be asked to upgrade or unlock features later. If you love it and want to support the team, you can toss in a donation, but that part's totally your call.
Part 2. Features and Usability: What Can OpenShot Do?
So far, the OpenShot editor sounds pretty solid for a free tool. That said, those highlights only scratch the surface. Now it's time to explore the actual features and how they perform once you start editing for real.
Here's a closer look at how OpenShot holds up in action:
Core Features Breakdown
Basic Editing Tools
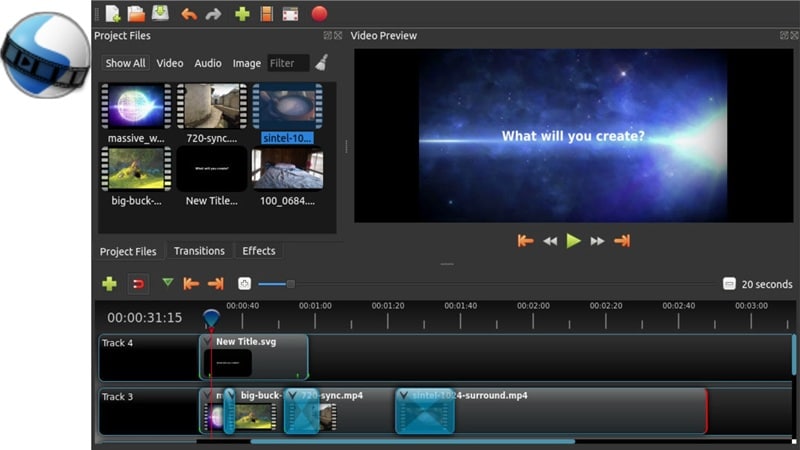
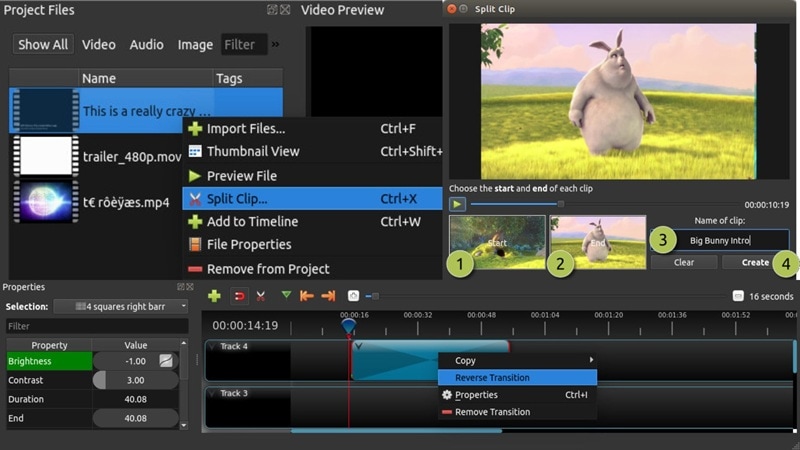
You can split clips, adjust speed, and drop in transitions without getting confused. With over 400 built-in transitions, fading between scenes looks clean and takes just a few clicks. The whole setup in OpenShot is easy to follow, even for beginners, though it does feel a bit limited if you're used to tools that offer more detailed control.
Media Library
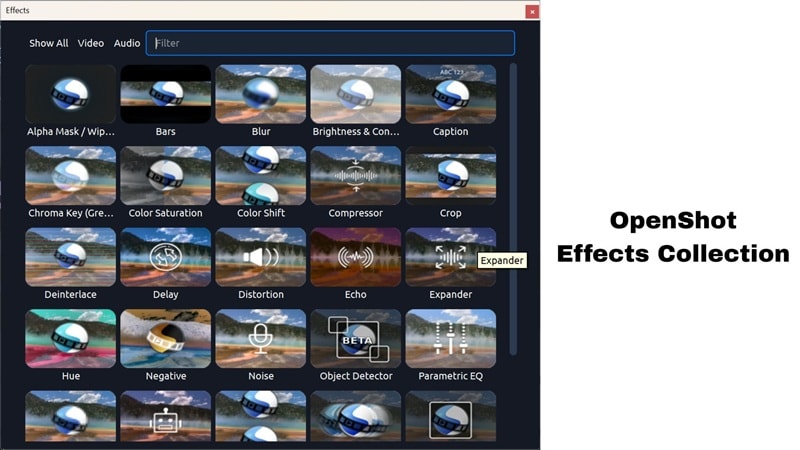
The OpenShot video editor gives you more than just transitions. You'll find a handful of video effects, audio tweaks, filters, and even some fun sticker emojis to drop into your project. Everything works with drag-and-drop, so it feels quick and easy. Still, once you start playing around, you might wish the library had a bit more variety, especially when it comes to effects and those playful extras.
Audio Editing
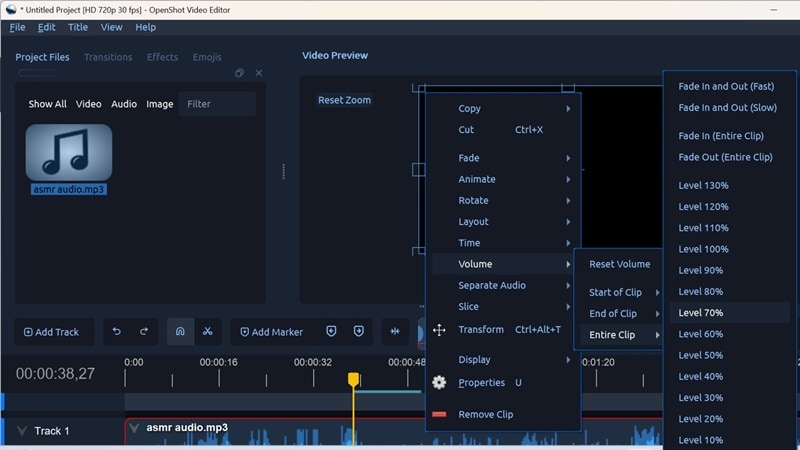
For a free editor, OpenShot editor surprises with how much you can do with audio. You can separate sound from your video, fade it in or out, and tweak the volume up to 130 percent.
What's nice is the control you get, letting you adjust audio from the start, the end, or the whole clip, depending on what you need. The slice effect also adds something cool for those using headphones. However, while it handles the basics really well, you might still find yourself wanting more advanced tools to clean up and polish the sound.
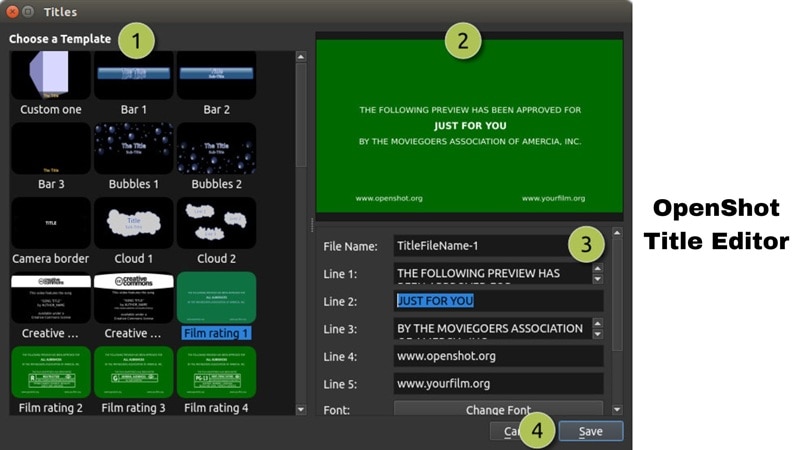
Title Editor
OpenShot video editor does a pretty good job when it comes to adding titles. You get over 40 ready-made vector templates that make it easy to throw together an intro or caption in seconds. The built-in editor lets you tweak fonts, colors, and text without any fuss, so it all feels quick and effortless. If you're feeling creative, you can even design your own SVG titles and reuse them anytime.
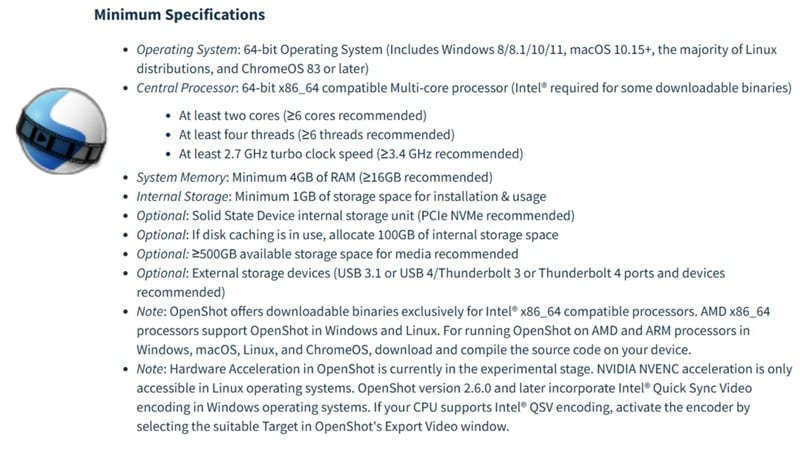
System Requirements
OpenShot video editor runs smoothly on most laptops, even some older ones, but it still needs decent specs to perform well. According to their official site, it's best to use the most capable computer your budget allows for smoother editing. Below are the minimum system requirements for each platform.
Part 3. What's It Like to Use OpenShot?
What we covered so far sounds nice on paper, but what really matters is how it feels to actually use the editor. After all, smooth editing can make or break your whole creative flow. So, in this part of our OpenShot video editor review, we'll walk through a simple project and see how it feels to edit a video using OpenShot from start to finish.
Hands-On Experience:
Using the OpenShot video editor feels natural from the moment you open it. Importing files is quick and painless, thanks to the simple import button that lets you load up videos, audio, or images without confusion. Once your media's in, it's all drag-and-drop from there. Just slide your clips into the timeline, line them up, and use the playhead to scrub through and preview everything in real time.
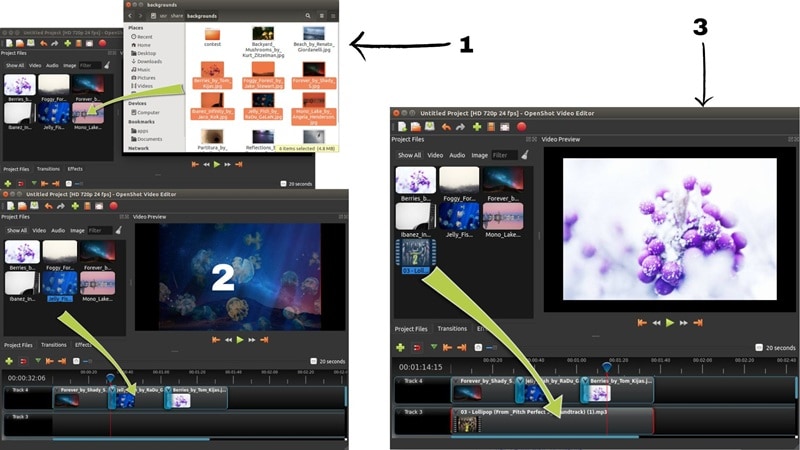
Whatever you place on a higher track on the OpenShot timeline shows up in front, while the lower layers stay in the background. You can easily move clips around, trim them down, rotate, resize, adjust transparency, and reposition them just by dragging. If you want to tweak things further, a simple right-click on any clip in the timeline opens up a bunch of options like adding effects, animations, and more.
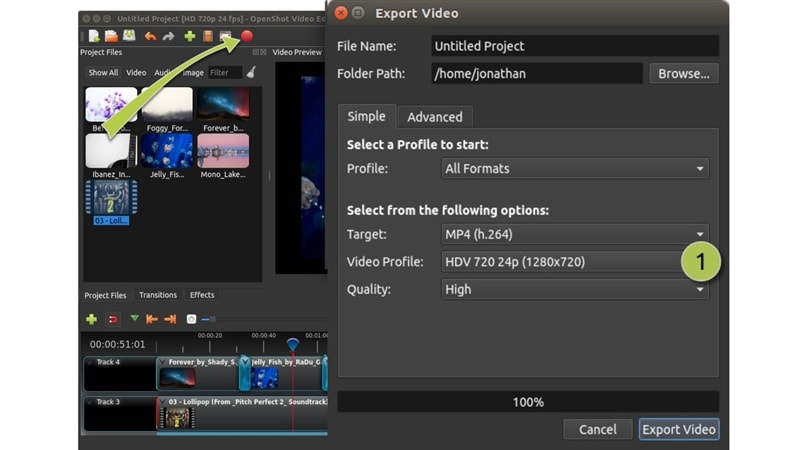
When you're done editing, you just need to click the big red button up top, and you'll land on the export page where you can choose where to save your file. You also get control over the video quality, with options going all the way up to 16K if your machine can handle it.
One thing to note though, OpenShot editor doesn't offer direct uploads to platforms, so you'll need to save your video locally before sharing it anywhere. That extra step might feel a little clunky if you post often on social media.
Performance Test
Editing with OpenShot video editor feels smooth enough for basic projects, but once you hit export, things start to slow down. Rendering can take a while, especially if your video is long or high quality. Some tools, like effects, also take extra steps to figure out, since you need to manually adjust how strong the effect is before you can see it in action. It works, but it takes a little patience to get used to.
Part 4. OpenShot Pros and Cons
After testing the OpenShot video editor on a real project, we noticed a mix of smooth moments and small bumps along the way. So, for this next part of our OpenShot review, let's break down what works well and what could be better.
- Completely Free and Open-Source: No subscriptions, no trials, and no hidden fees. You get full access to everything right out of the box.
- No Watermark, Even on 4K Videos: OpenShot lets you export your videos without any logos ruining the view, even at higher resolutions like 4K.
- Runs on Windows, Mac, and Linux: No matter what system you're using, OpenShot editor is ready to go. Great for creators who switch between platforms.
- Simple Drag-and-Drop Workflow: Everything from clips to effects can be added by just dragging them into place.
- The Interface Feels a Bit Old-School: It works, but the design could use a modern refresh to feel more inviting and updated.
- Missing Advanced Features: No motion tracking, AI tools, or smart automation. Professional editors might find it lacking.
- Rendering Takes a While: Exporting longer or high-quality videos can be slow, especially without a strong computer.
- Limited Templates and Effects: While you get the basics, the library of transitions, filters, and animations isn't very deep.
Part 5. Who Should Use OpenShot?
Judging from everything we've seen so far, including the features, real-life editing test, and the pros and cons, OpenShot video editor clearly has its own place. It's not built for everyone, but it does suit certain users really well. Let's take a closer look at who might get the most out of it.

Recommended For:
- Students and First-Time Editors: OpenShot is simple enough for anyone learning the ropes. It's a safe space to practice without getting overwhelmed.
- Creators on a Budget: If you're making videos with zero budget, OpenShot gives you the basics without charging a thing.
Not Ideal For:
- Professional Editors: If you're looking for color grading, pro-level plugins, or slick automation, OpenShot won't hit that mark. There's no smart cutouts, no tracking, and no real-time team features, so it's not the best pick for serious post-production work.
- Content Creators: If you post daily and need things like auto-resizing, direct uploads, or quick vertical templates, OpenShot editor might feel too basic.
Part 6. Looking for a Smoother Ride? Try Filmora Instead
Looking at our OpenShot video editor review so far, it's clear that OpenShot makes a strong first impression for beginners. It covers the basics well and gives you room to explore without spending a dime. But in 2025, when editing tools are getting faster, smarter, and more creative, OpenShot starts to feel a little behind.
If you're ready to level up with more features, smoother editing, and fewer headaches, Wondershare Filmora is worth a look. This all-in-one editor gives you full creative freedom while still keeping things easy and fun to use.
Here's what makes Filmora feel like a big step up after OpenShot editor:
- Clean and Modern Interface: Filmora looks fresh and feels smooth to use, while still keeping things simple for beginners.
- Loaded with Ready-to-Use Templates and Effects: You get tons of built-in transitions, filters, and templates to make your video look polished fast.
- Smart AI Tools That Do the Heavy Lifting: With features like smart cutout, audio denoise,motion tracking, and even text-to-video, Filmora saves you serious time.
- Works Across All Devices: Whether you're on Windows, Mac, iPhone, or Android, Filmora keeps your editing flow going wherever you are.
- Renders Faster, Even in 4K: Exporting is quick and smooth, so you spend less time waiting and more time creating.
- Regular Updates and New Features: Filmora keeps things fresh with frequent updates, giving you new tools and effects throughout the year.
Conclusion
OpenShot is a name that always comes up when talking about free open-source video editors, so we took a closer look to see if the OpenShot video editor still holds up in 2025. We explored everything from its features and editing flow to speed and overall performance. Based on our OpenShot video editor review, it works fine for basic edits, but that's really where it stops. The limitations start to show, and rendering can slow you down fast.
For a smoother ride, Wondershare Filmora gives you way more tools, smarter AI features, and a faster editing experience that grows with you. It's the kind of upgrade that makes video editing feel exciting again.
Frequently Asked Questions
-
Is OpenShot Video Editor completely free and safe to use?
Yes, OpenShot is a 100% open-source video editor, meaning it is free for both personal and commercial use without any watermarks. It is safe to download from the official website, as the community constantly monitors the code for security. -
Why does OpenShot lag or crash during video playback?
OpenShot can be resource-intensive during real-time previewing. To reduce lagging, try decreasing the "Preview Profile" resolution in the settings or resizing the preview window. If you continue to experience instability on complex projects, a more professionally optimized editor like Wondershare Filmora may offer a smoother experience. -
How do I add text and titles in OpenShot?
OpenShot offers a "Title" menu at the top where you can choose from various templates. For advanced 3D animated titles, OpenShot requires you to have Blender installed and linked in its preferences. Once linked, you can customize 3D effects directly within the OpenShot interface. -
Which is better for beginners: OpenShot or Shotcut?
OpenShot is generally considered easier for absolute beginners due to its simpler, drag-and-drop interface. Shotcut is more powerful and offers more advanced features like 4K support and hardware acceleration, but it has a steeper learning curve compared to OpenShot's straightforward design. -
Can OpenShot export videos in 4K resolution?
Yes, OpenShot supports 4K video export. You can select the 4K profile in the "Export Video" window. However, keep in mind that rendering 4K content in an open-source tool may take longer and requires a computer with a capable CPU and sufficient RAM to avoid crashes during the process.
Review Methodology: Our video editing experts spent 15+ hours testing OpenShot 3.3 across Windows and Mac environments, focusing on export stability, UI responsiveness, and feature depth for 2026 content standards.
