VivaVideo stands out as a widely-used mobile app for creating dynamic, engaging video content, thanks to its diverse editing tools and popular effects. Known for its accessibility, VivaVideo appeals to those who enjoy quick, creative editing directly on their phones. However, for creators who need advanced capabilities—such as higher resolution, extensive layering, or sophisticated desktop tools—VivaVideo’s limitations can be noticeable.
This review will talk about the pros and cons of VivaVideo and introduce you to another video editing app in case you need more professional and in-depth editing. This article will help you pick the right editing tool for your creative goals, whether you're just starting out or want to improve your video projects.

In this article
Part 1: Understanding VivaVideo: Features and Overview
The VivaVideo application can be downloaded for both Android and iOS mobile devices. It is designed to bring professional-level video editing to your phone and makes it easy to make videos of excellent quality. From creating short social media clips to tackling more detailed video projects, VivaVideo video editor & maker offers a comprehensive suite of tools to accommodate every level of experience.

Key Features of VivaVideo
- Text Overlays and Stickers
Customization is smooth with VivaVideo's broad selection of fonts and stickers. Users can add animated stickers and text overlays to match various themes and moods, providing a unique, engaging style for each video.
VivaVideo’s library includes extensive background music and sound effects. Users can also add personal flair by importing their own music or recording voiceovers directly in-app, offering full creative control over the soundtrack.
- Visual Filters and Effects
To enhance visual appeal, editing video with Vivavideo includes a rich set of filters and effects such as glitch effects, animated transitions, and color grading. These tools let users transform videos with cinematic quality and personalized visual styles.
- Curve Speed
Create dynamic speed adjustments within a single clip. You can customize the video speed at multiple points and create smooth slow-motion or fast-motion effects that flow naturally.

VivaVideo allows full-resolution export and up to 720p, 1080p, and 4K so you can share your last results on social media platforms, like Instagram and Facebook, YouTube, and TikTok, directly from the application.
Part 2: Best Use Cases, How to Use VivaVideo and Its Limitations
VivaVideo’s mobile-only design makes it a convenient choice for quick, on-the-go video editing. It’s especially popular among content creators who want a simple tool for producing social media videos without the complexity of desktop software. In short, it’s best for:
- Social Media Edits: The app’s quick tools make it perfect for TikTok, Instagram, and Facebook.
- Lightweight Editing: For creators who need simple editing and don’t require multiple video layers.
- Personal Videos: Fun effects, filters, and music choices are great for making personal, informal videos.
✅How to Use VivaVideo Video Editor App
Step 1: Download and Start a New Project
First, install VivaVideo by using the VivaVideo free download link. Open the app, then tap on New Project. Select the video you want to edit from your album.

Step 2: Select a Theme and Add Music
Next, tap on Theme to pick a style that best fits your video’s mood. On selection, tap Done and go to the Music tab to put music in the background, effects of sounds, or even record a voiceover to customize your project.

Step 3: Add Effects, Filters, and Adjustments
In this step, tap on Effect to incorporate special effects or remove the background if needed. Then, apply a Filter for color adjustments. Use Stickers, create overlays, add Text, and adjust the canvas to customize the appearance and format of your video.

Step 4: Export Your Video
When you’re finished editing, tap Export. Set your video’s Resolution and Frame Rate to your preference, then save it to your device.

Step 5: Share Your Creation
To share your video, select the platform you want within the app and tap Share it Now to post it directly.

✅Limitations of VivaVideo
While the VivaVideo application is excellent for casual edits, it lacks many features that more advanced editors need. For instance:
- Resolution Constraints: Video quality is limited, which can be an issue for professional-grade videos.
- Performance Issues: While VivaVideo works well for short edits, it often lags when handling longer videos or complex effects.
- Feature Limitations: The free version has limited features, including a maximum video length of just five minutes.
- No GIF Support: Editing GIF files is not supported.
- Mobile-Only App: VivaVideo is only available on mobile devices, which limits its functionality compared to desktop editors.
✅Solution: Find a Video Editor Alternative
If VivaVideo’s limitations are holding you back, it might be time to explore a more advanced video editor with better features and performance. There aren’t that many powerful yet easy-to-use editing apps on mobile, so switching to desktop software could be the solution. Desktop editors provide several key advantages that make them a superior choice for more complex projects.
Here’s why they often outperform their mobile counterparts:
- Additional Features: Desktop video editors typically come packed with advanced tools, allowing users to incorporate unique effects, dynamic transitions, and customizable titles. This feature set goes beyond what most mobile editors do.
- Enhanced Precision: Editing on a desktop allows you to manage every element in detail, from adjusting the frame rate to balancing audio levels. This precise control ensures you can achieve a professional look, which can be more challenging to accomplish on smaller screens.
- Improved Usability: Desktop software generally offers a more intuitive and creative experience, thanks to larger screen space and robust interfaces. This setup makes navigating complex edits, such as adding slow-mo or fast-mo effects, simpler and more enjoyable than on mobile.
Part 3: Best VivaVideo App Alternative on Desktop
If you're looking for VivaVideo for PC, you might be disappointed to learn it's not available. However, there’s still a powerful and intuitive desktop alternative to VivaVideo Video Editor & Maker: Wondershare Filmora. If you think using a desktop video editor is difficult, you probably haven’t tried Filmora yet.
Filmora is equipped with AI-powered tools that simplify most of your video editing tasks. Whether you're working on long-form content like YouTube videos or short-form clips for TikTok and Instagram, creating videos is easy and efficient. This software includes a comprehensive library of royalty-free music, video effects, and animated titles to elevate your projects.
Filmora is also available as a mobile app for both Android and iOS. However, the desktop version provides a more powerful editing experience, with advanced features like multi-track editing, motion tracking, and AI-powered tools that aren’t available on the mobile app.
Features of Wondershare Filmora
- Smart Short Clips: AI extracts highlights and transforms them into short, vertical clips, adding subtitles, sound effects, and transitions, ready for social media sharing.
- AI Video Enhancer: Restores detail and clarity in blurry or low-resolution videos, improving overall quality, especially for footage shot on basic cameras.
- AI Color Palette: One-click color grading that mimics professional reference footage. It also preserves skin tones for cinematic visuals, accessible to all users.
- Multi-Camera Editing: Edit multiple camera angles in sync on a single timeline. It is perfect for creating dynamic videos for interviews, tutorials, and performances.
- Planar Tracking: Effortlessly attach text, images, or videos to flat surfaces, ensuring smooth integration with camera movement, ideal for overlays.
- AI-Enhanced Video Editing: Use AI-powered tools such as AI text-to-video, AI translation, and AI text-based editing to automate your workflow and save time.
- Auto Reframe: Transform video dimensions from horizontal to vertical (or vice versa) without sacrificing quality. Filmora’s AI tracking keeps key subjects in focus, adjusting the composition to maintain important elements in every frame.
A step-by-step guide using Filmora
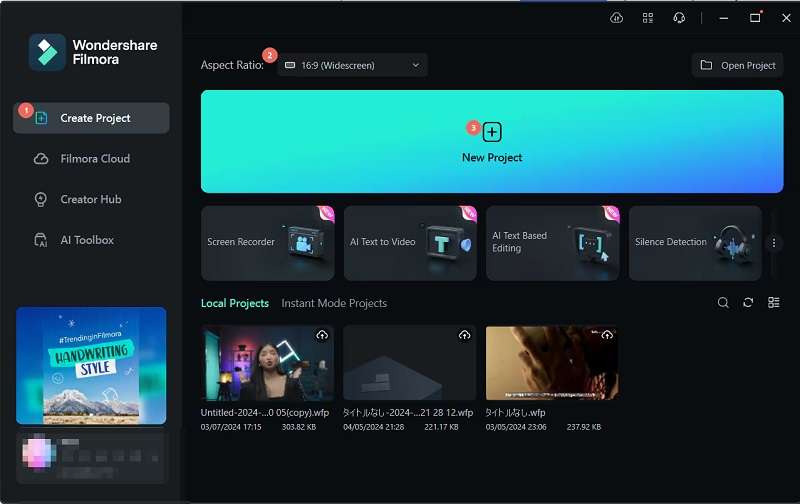
Step 1. Create a New Project & Import Footage
Launch Filmora and click on New Project to start.

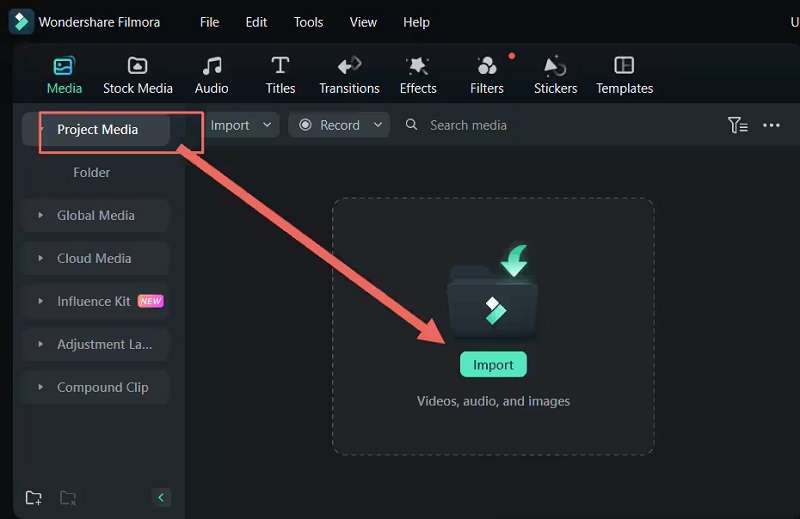
For importing your footage, click the Import button under the Media menu.

Step 2. Organize Your Media
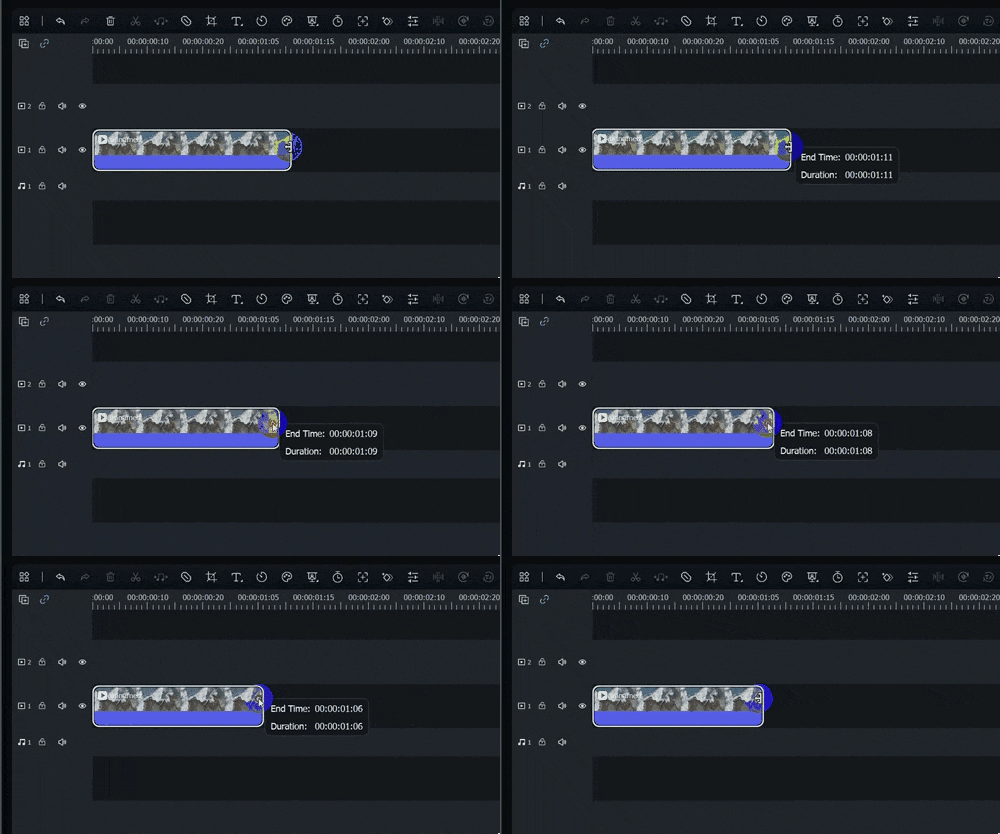
Drag your imported clips from the Media tab onto the timeline. Use the Playhead to preview and position your clips where needed. To trim, simply drag the ends of a clip to the left or right. You can cut and rearrange clips as desired.

Step 3. Import Audio Assets
Besides video, you can also add and import your audio. Once imported, drag and drop the audio files you want to use onto the timeline.

Step 4. Add Video Transitions
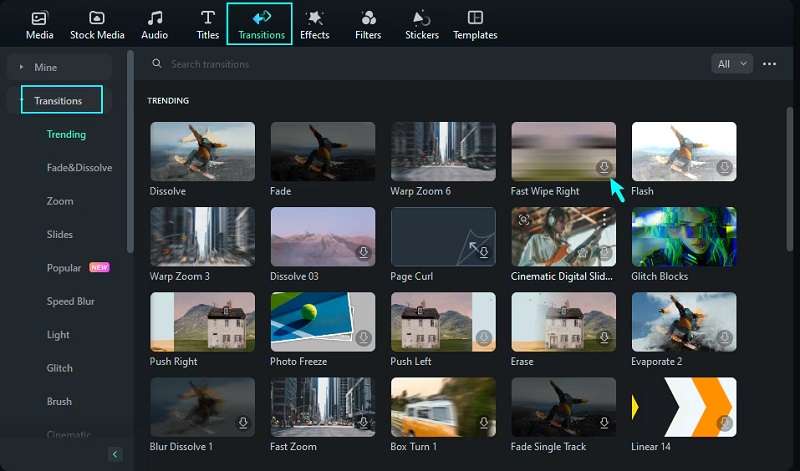
After that, you can add transitions for smoother flow, especially if there are two or more video clips in your project. For transitions, click the Transitions icon to choose from a variety of styles. Drag and drop them into the timeline between clips.

Step 5. Export Your Video
Once you have finished editing your video, click the export button. From the drop-down menu, you can choose a desired resolution and output format, such as MP4, MOV, etc. It is also possible to export a clip straight to Vimeo or YouTube for quick uploading. Save a file location and title, and you're set to click the Export button to save your project.

Conclusion
VivaVideo offers a great solution for mobile-based and quick video edits. It falls short for those seeking advanced features and precision. Its simplicity is ideal for casual social media creators. But when it comes to professional-grade editing, Wondershare Filmora proves to be the superior choice.
Filmora provides a seamless desktop experience. It includes an array of AI-enhanced tools like multi-camera editing and auto reframe. Such tools make it perfect for both newbies and expert creators. If you're ready to elevate your video projects and need more control, Filmora is a strong contender. It gives you the tools to take your editing to the next level.


 100% Security Verified | No Subscription Required | No Malware

