

You may notice when working on a video project that frame size is essential for the final appearance of your video on different platforms.
As you go from editing 16:9 cinematic videos to square clips for Instagram to vertical formats for Reels and TikTok, your video might appear cropped, stretched, or poorly framed if you don’t adjust it properly.
If you're using Adobe Premiere Pro, we have prepared a tutorial on how to change the frame size in Premiere Pro, including adjusting sequence settings and resizing existing clips. Here, will also share tips for maintaining video quality and introduce simpler alternatives for those who want a faster and easier workflow.
If you're using Adobe Premiere Pro, we have prepared a comprehensive tutorial on how to change the frame size of video in Premiere Pro, covering key methods like adjusting sequence settings and resizing video clips. This guide shows you how to set frame size in Premiere Pro for any platform
Part 1. Understanding Frame Size, Resolution & Aspect Ratio
Before you start adjusting frame sizes in Premiere Pro, it's important to understand the basics of frame size, resolution, and aspect ratio. By understanding these elements, you'll know how your video will appear on various screens and platforms.
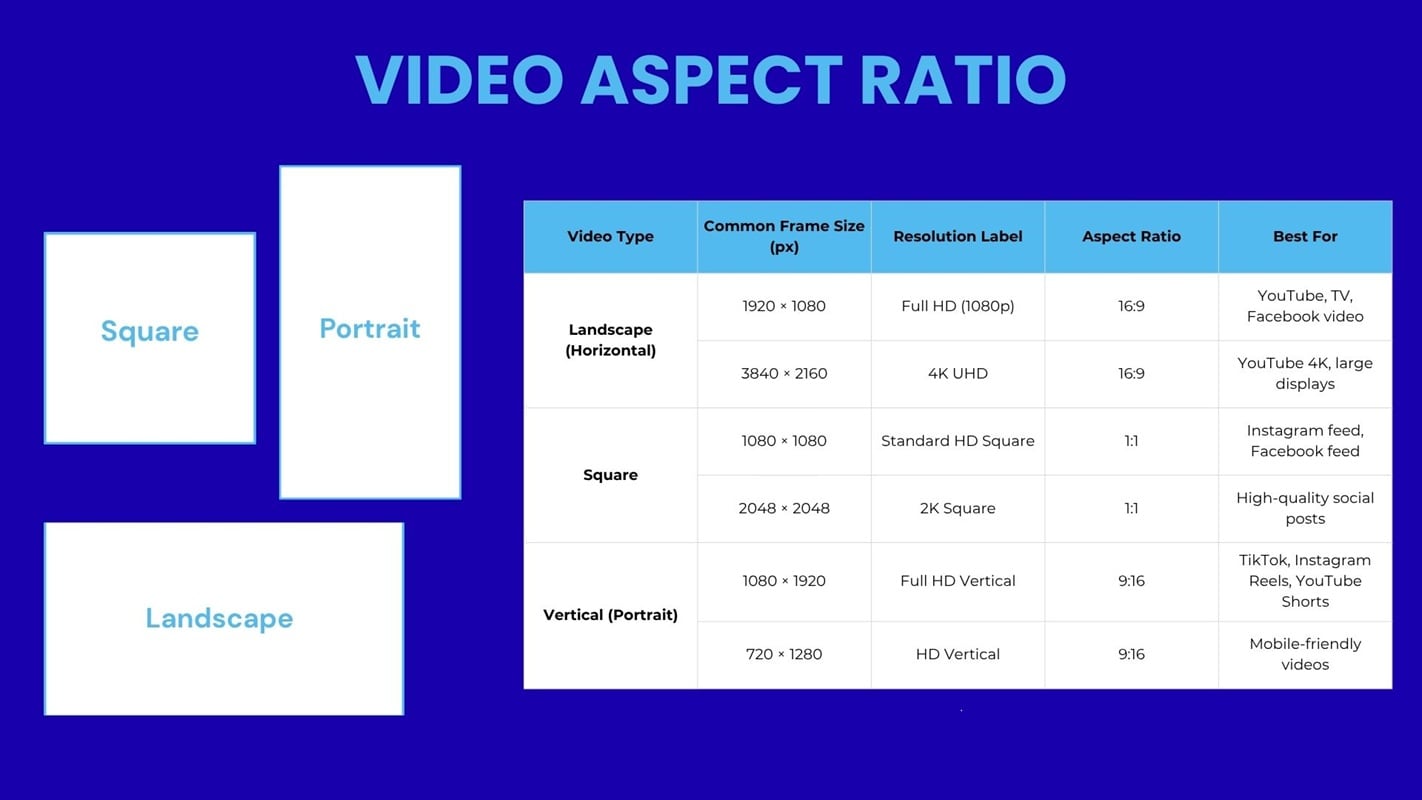
- Frame size refers to the dimensions of your video, measured in pixels, such as 1920x1080 or 1080x1080. Frame size affects the clarity of your video and how it adapts to different devices.
- Resolution is defined as the total number of pixels displayed in your video. Videos with higher resolutions, such as 4K (3840 x 2160), offer sharper images but require more processing power and storage.
- Aspect Ratio is the proportional ratio between the width and height of your video. Common aspect ratios include 16:9 for YouTube and widescreen formats, 1:1 for Instagram posts, and 9:16 for vertical social media videos.
Part 2. 3 Effective Methods to Change/Resize Frame Size in Premiere Pro for Any Format
Well, now that you understand the basics, next we'll discuss how to change the frame size in Premiere Pro. There are multiple ways to do this, and it depends on what you want to adjust for the whole project or just specific clips. Below are three of the most effective methods you can use.
Method 1 – How to Change Sequence Frame Size in Premiere Pro (Project-Wide)
This method is ideal if you’ve already started editing but want to change the overall frame dimensions of your project. Here are the steps:
- Open your project in Premiere Pro
- Go to the Sequence menu at the top and select Sequence Settings
- In the Video section, look for Frame Size
- Enter your desired width and height (for example, 640x360 for vertical video)
- Click OK to apply the changes

Premiere Pro will automatically adjust the timeline to your new frame size. This method may require repositioning or scaling clips to fit the new dimensions.
Method 2 – Set Frame Size in Premiere Pro by Creating a New Sequence for Custom Dimensions
If you prefer to scratch or need to maintain multiple versions (like landscape and vertical), creating a new sequence is the cleaner option. Below are the steps to create a new sequence:
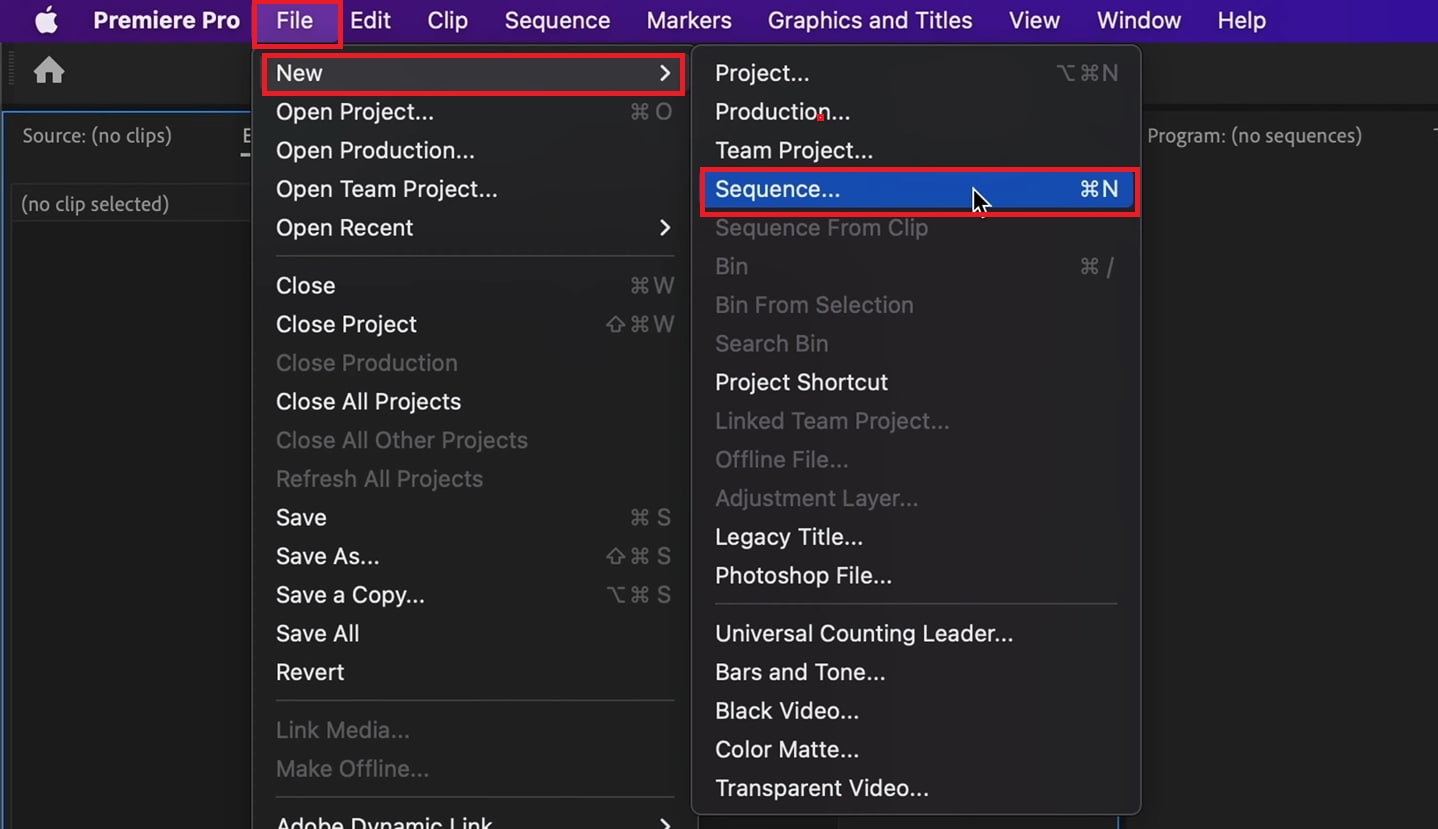
Go to File > New > Sequence.
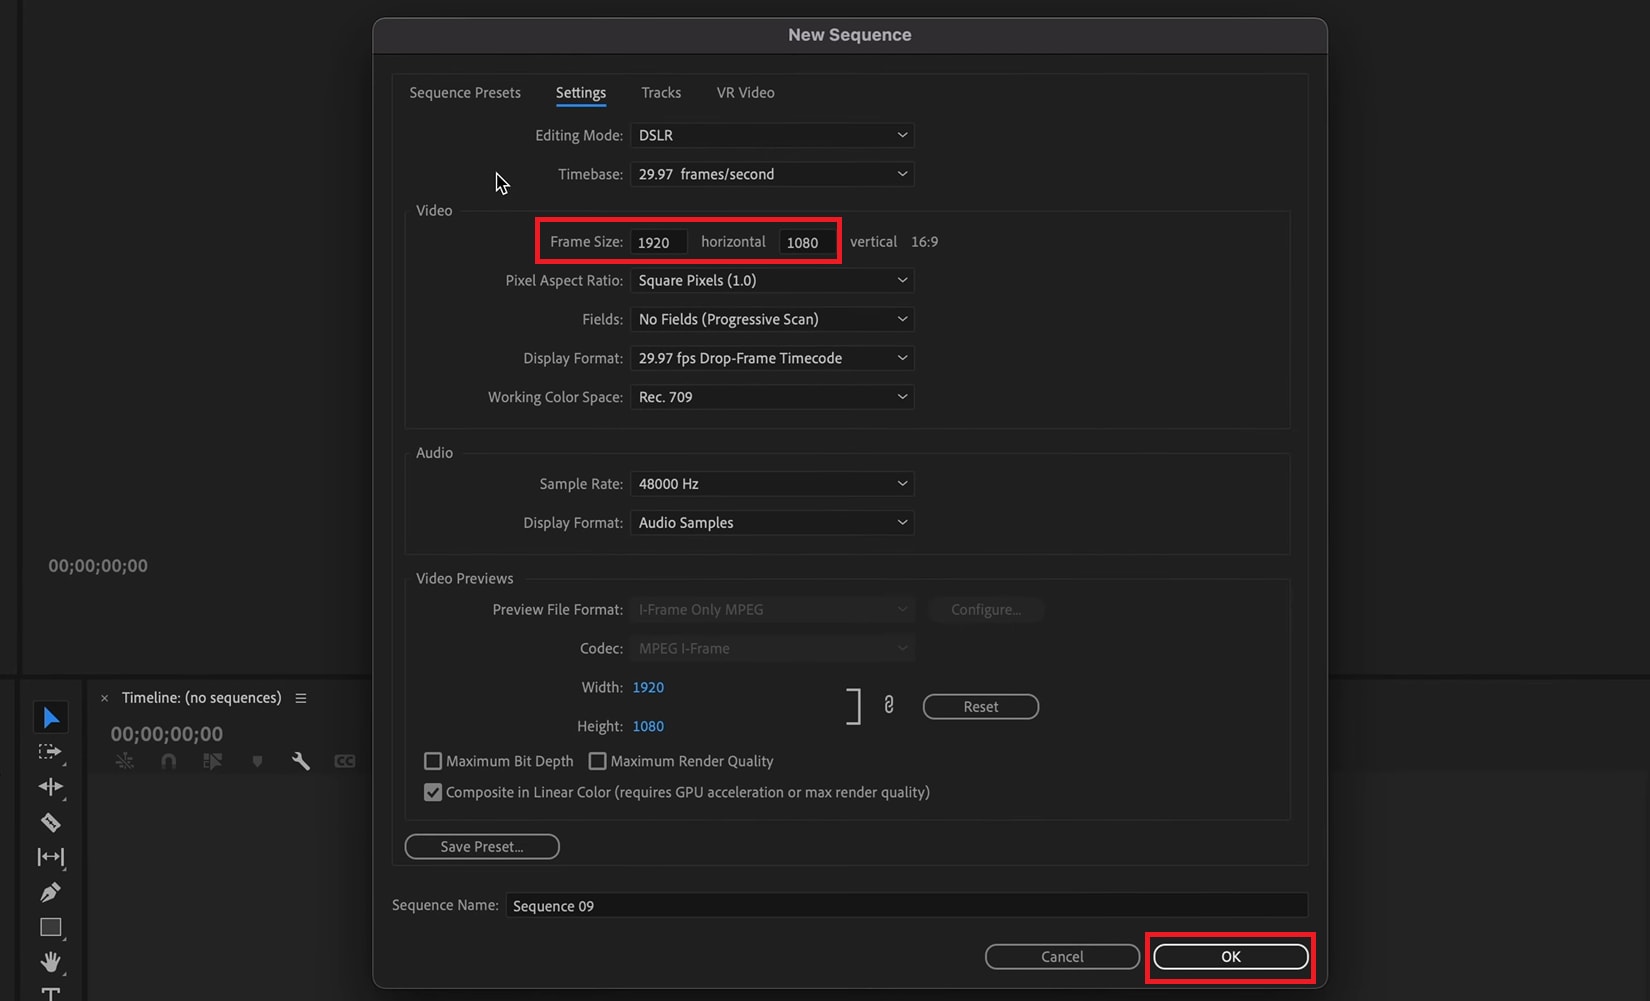
Under the Settings tab, manually enter your target Frame Size, then click OK to create the new sequence.
Return to your original sequence, select all clips (Ctrl+A or Cmd+A), and copy them. Then paste the clips into your new sequence.

This ensures that your new sequence has the correct resolution without changing the original project. You can also open Sequence Settings to make any necessary adjustments.
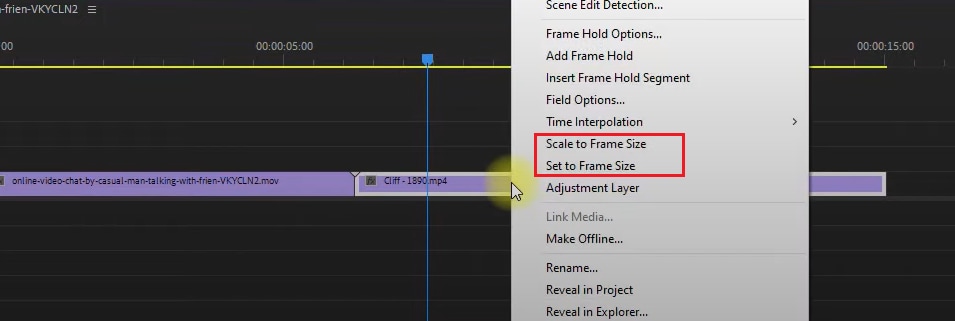
Method 3 – How to Change Frame Size of Clips (Scale / Position / Set to Frame Size)
When only a few clips need to be resized, you can adjust them individually in the timeline.
Select the clip you want to resize in the Timeline.
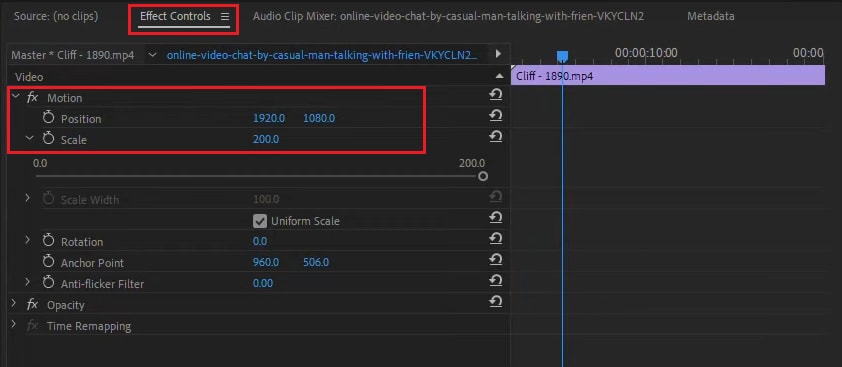
Go to the Effect Controls panel.
Under Motion, adjust the Scale and Position settings to fit the frame.
Alternatively, right-click the clip and choose Set to Frame Size (to auto-fit) or Scale to Frame Size (to force fit without maintaining full resolution).
Part 3. Default Media Scaling / Preferences
Premiere Pro also allows you to set the default media scaling for all new clips you import into your project. Doing this can be a real time-saver, especially when you're working with videos that have different resolutions or aspect ratios.
By adjusting these preferences, you can control how clips automatically adjust to fit your sequence frame, so you’ll be able to change the frame size in Premiere Pro more efficiently.
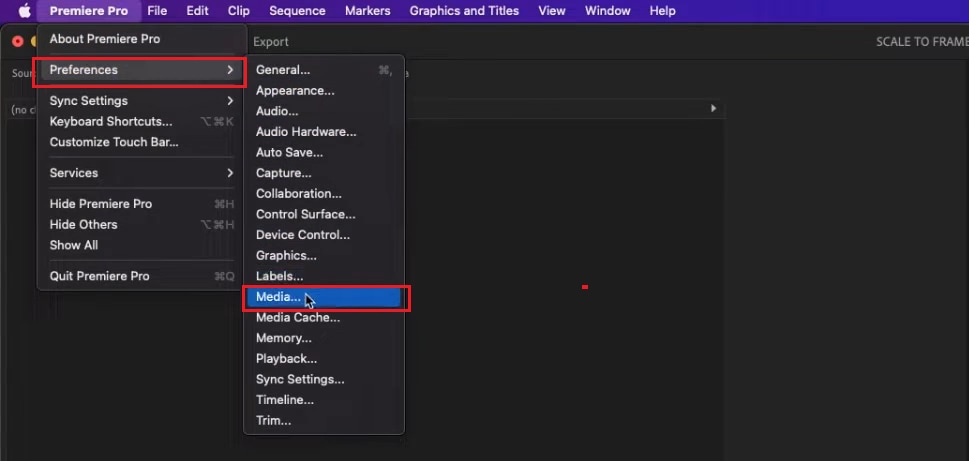
To set your default media scaling:
Go to the top menu and click Edit (Windows) or Premiere Pro (Mac).
Then choose Preferences > Media.
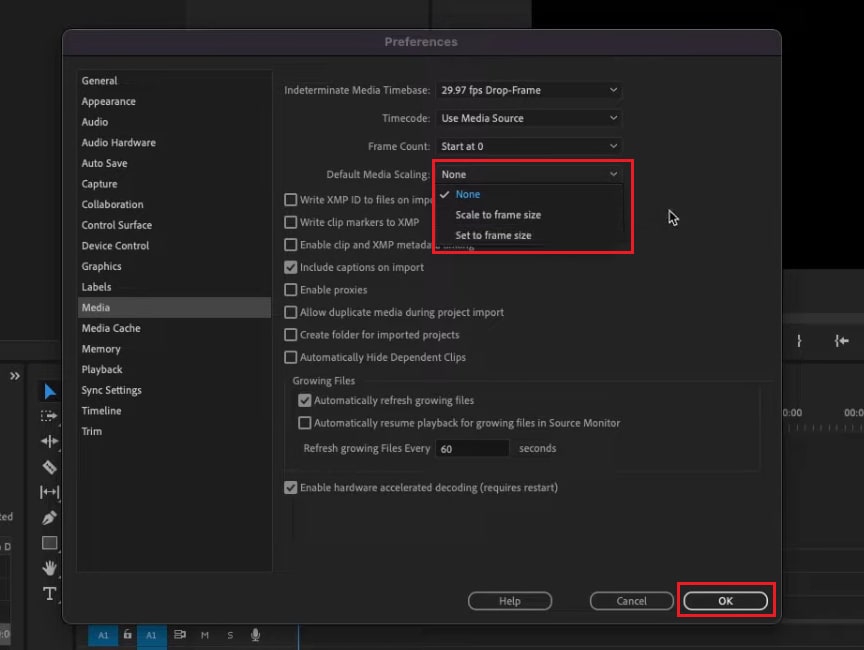
In the Default Media Scaling section, select one of the following options:
- None – Keeps the clip’s original size, which may require manual adjustment.
- Set to Frame Size – Automatically scales the clip to fit the frame while maintaining quality.
- Scale to Frame Size – Forces the clip to fit the frame, but may slightly reduce image sharpness.
Click OK to apply the setting.
Once configured, every clip you import will automatically follow the scaling rules you selected. This is highly useful for editors working with mixed footage or multi-platform content where consistent framing is crucial.
Part 4. Practical Tips, Best Practices & Troubleshooting

Now that you understand how to change frame size in Premiere Pro, the process is straightforward. However, maintaining visual quality and compositional consistency requires some smart techniques. Here are practical tips on how to set frame size in Premiere Pro correctly. Below are some practical tips and common troubleshooting steps to help you get the best results.
- Always start with the correct sequence settings: Before importing your clips, set the sequence frame size based on your target platform. Doing this helps prevent unnecessary scaling or cropping later on.
- Maintain the aspect ratio when resizing: When adjusting the scale value, ensure the link icon remains active in the Effects Controls panel to preserve your clip's proportions and avoid stretched or compressed images.
- Use "Set to Frame Size" instead of "Scale to Frame Size": "Set to Frame Size" preserves your clip's original resolution, which ensures sharper visuals compared to "Scale to Frame Size," which permanently resamples the footage.
- Double-check framing after resizing sequences: If you resize project frames halfway through editing, check each clip for unwanted cropping, black bars, or misalignment. Use Position controls to fix framing issues.
- Preview before exporting: Use the Program Monitor and play back in full resolution to ensure your video fills the frame correctly without losing detail.
Common problems and solutions
- Black borders appear around the clip: Adjust the scale or use "Set to Frame Size."
- The clip appears blurry: Avoid scaling more than 100% larger; use footage with a higher resolution if possible.
- Text or graphics appear cropped: Manually reposition the elements after changing the frame dimensions.
Part 5. Filmora Alternative: How It Simplifies Frame Size Adjustment
If you find changing frame sizes in the Premiere Pro workflow too complicated or time-consuming, you may need a simpler and faster alternative. Wondershare Filmora is the answer.
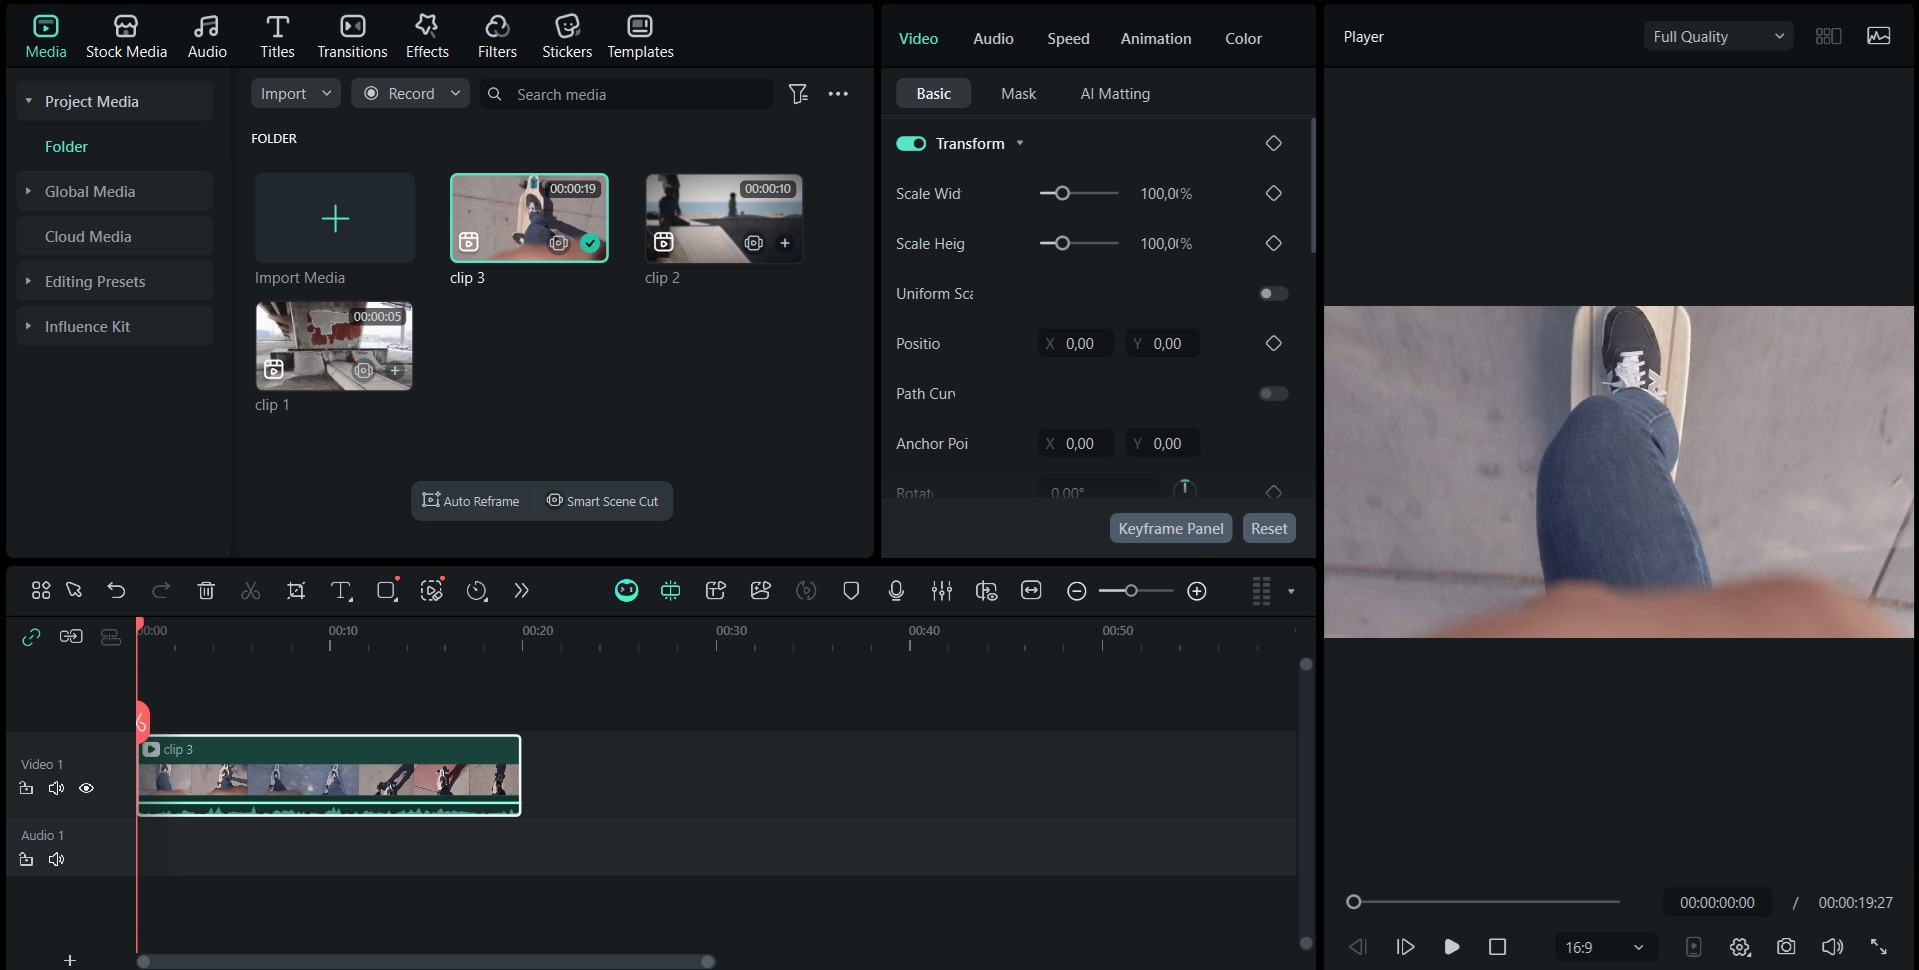
Filmora is ideal for creators who want to produce professional-quality videos seamlessly, as it is designed with straightforward settings. Its clean interface and built-in aspect ratio options in mind make it easy to resize videos for different platforms like YouTube, Instagram, or TikTok with just a few clicks.
Moreover, Filmora includes an Auto Reframe feature that automatically adjusts your video’s aspect ratio for different platforms. It detects the main subject and keeps it centered as the frame changes, so you don’t have to manually crop or reposition clips for the correct formats.
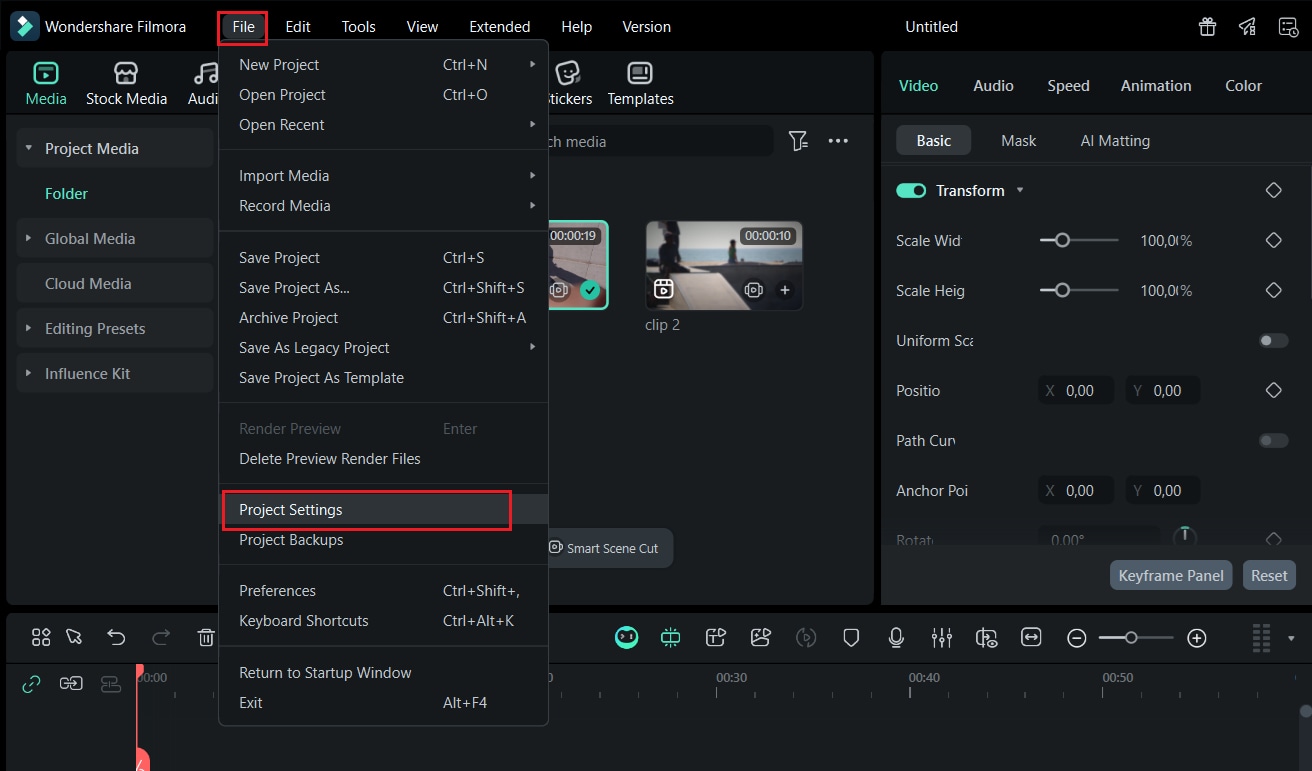
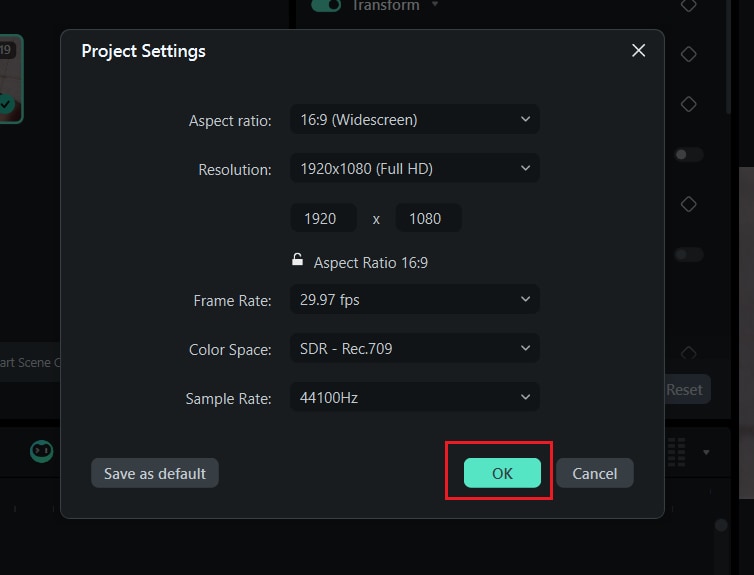
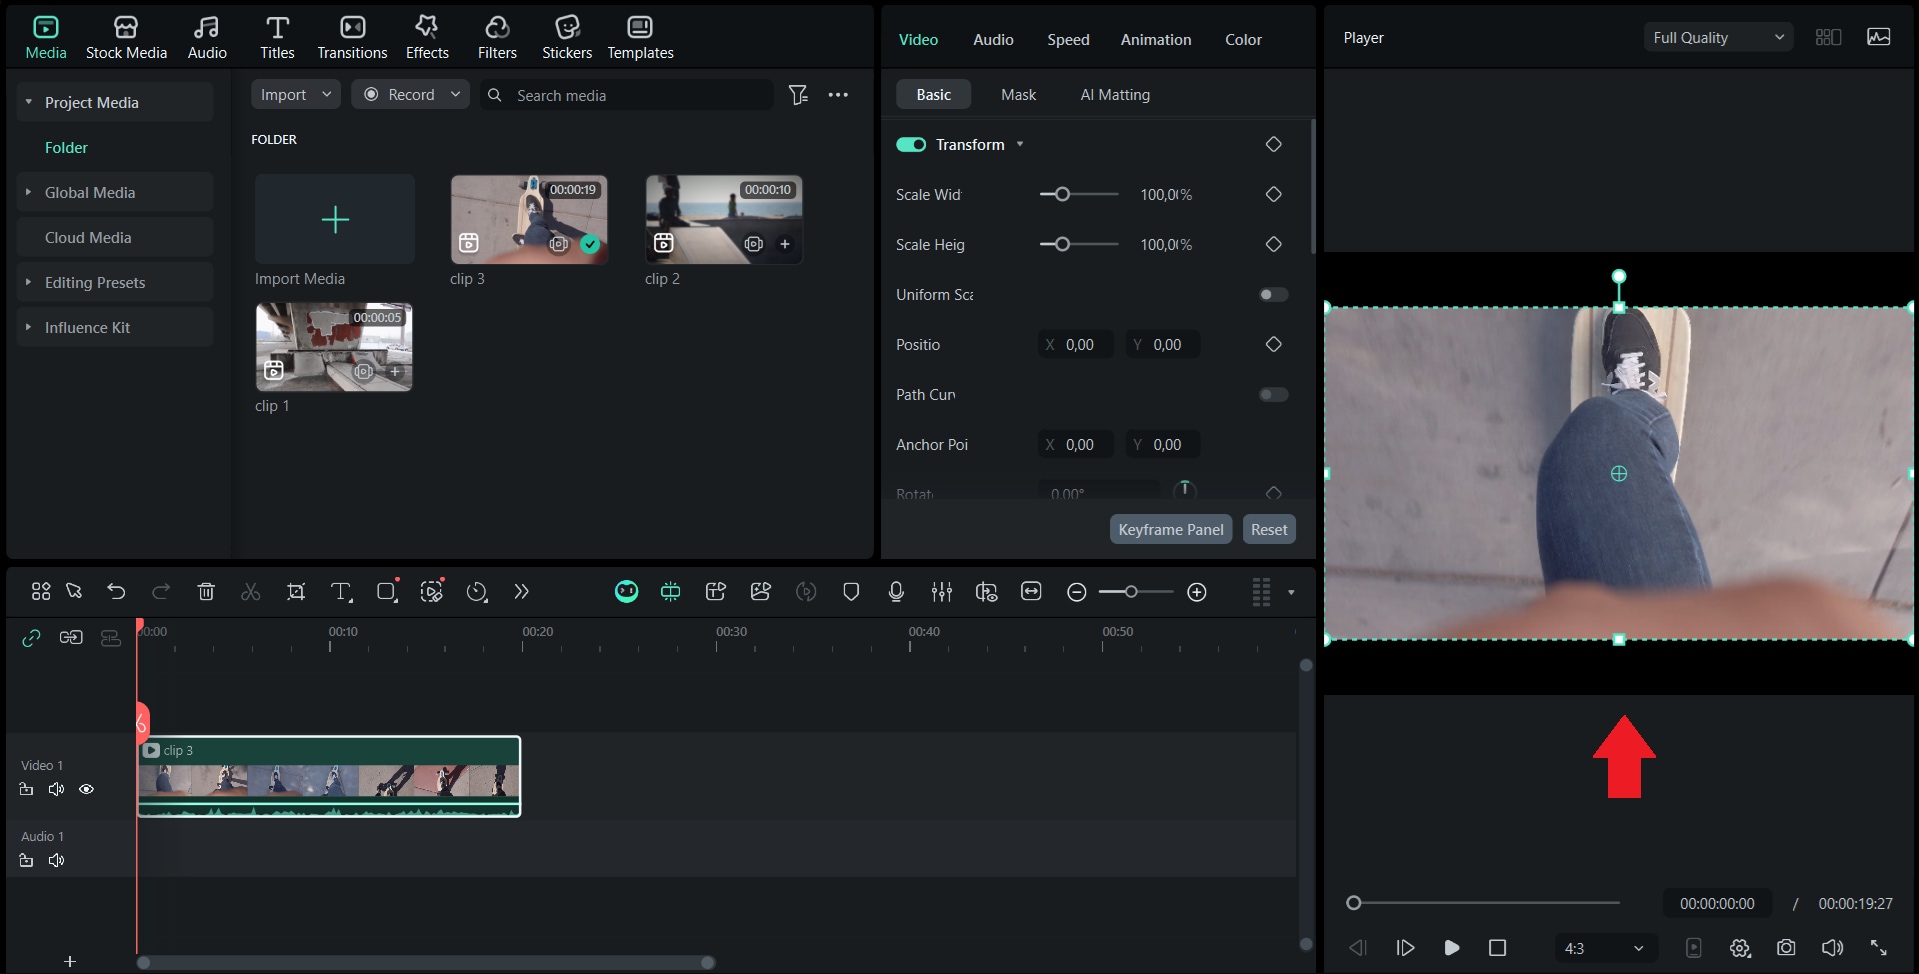
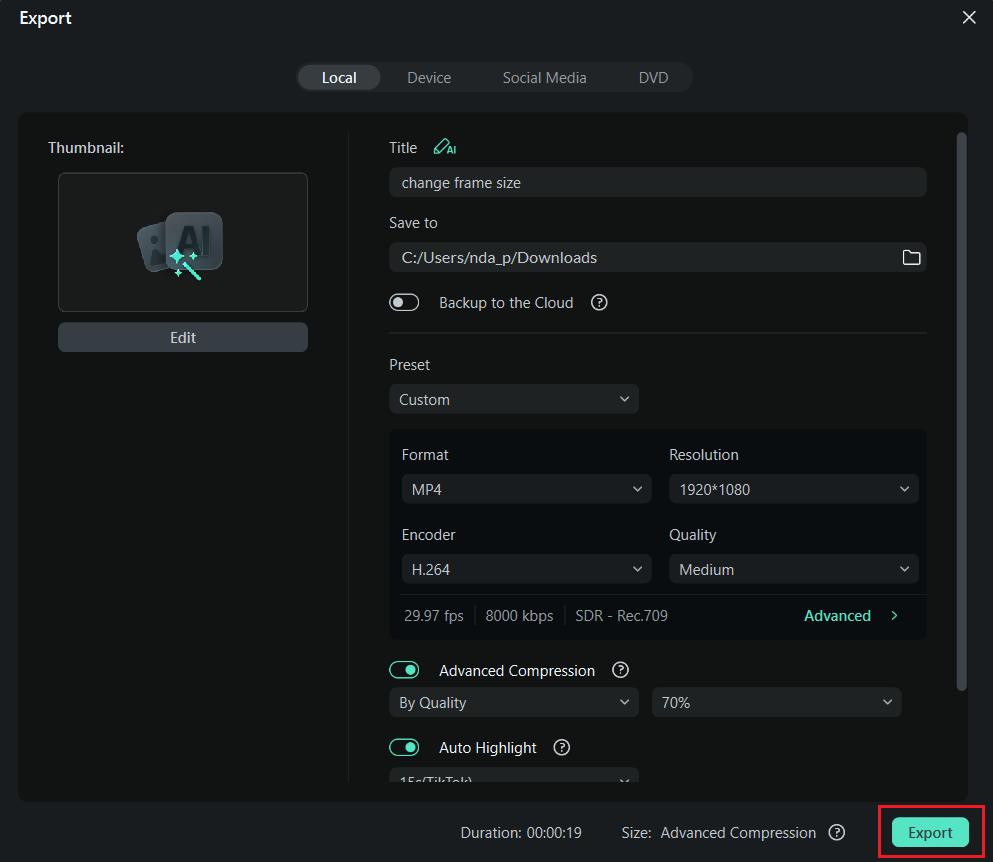
How to Resize and Change Frame Size in Filmora with a Single Click (Step-by-Step)
Conclusion
Adjusting the frame size of your video can completely change the look and performance of your video across various platforms. Changing the frame size in Premiere Pro is a powerful and professional tool for adjusting every detail, but it takes time to get used to.
When you prefer a faster and more intuitive approach, Wondershare Filmora offers an easier way to achieve the same results with just a few clicks. When you prepare horizontal videos for YouTube or vertical clips for social media, choosing the right frame size ensures your content looks polished, well-structured, and ready to wow your audience wherever it's shared.
